

Our son is transitioning from his teenage room to a more grown-up college aged room. We’re getting rid of the loft bed and building this easy, L-shaped, corner desk.
Read MoreA Quick and Easy Headphone Repair Hack
Our daughter's beloved, plush headphones went silent. Here's how I did a quick and easy repair to get them back in action.
Read MoreCloset Remodel and Emergency Escape
Kid Closet Remodel: Episode 1 Our daughter’s room doesn’t have a second means of egress (escape). I’m tearing out all the shelving and making plans to cut in a big, new window.
Read MoreRewiring Reindeer and Decorating in the Desert
How to rewire a burned-out Christmas deer yard decoration with efficient LED lights.
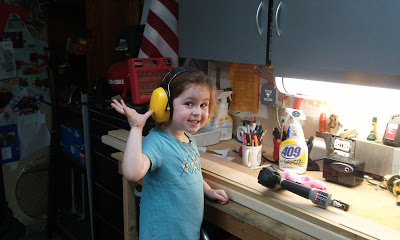
Read MoreThe Father's Day "About" Update
A six year old "helper's" view of her DIY Daddy.
Read MoreDisneyland with the DIY Guy's Eye

No, I didn't finish remodeling the house to look like a pink castle.
We took a long weekend and headed for Disneyland. As always, it was a great time. Nobody does it better when it comes to detail, service, and providing an enjoyable experience, for 10 bazillion people.
If you haven't been, I'm going to let you in on a little secret, to prepare you,... you are going to wait in line. Seriously. You are going to wait in some serious, godawful lines. Sure, it's worth it in the end; the attractions are pure joy for young and old. In fact, the lines are not so bad at first. They're generally theme decorated and everyone is anticipating a day of awesomeness. Early on, the lines are pretty fun...

Cars Land is like stepping into a cartoon! ...but later, as energy wanes and the heat of the day starts wearing you down, the lines are not quite as fun.

"Staaaaar Waaaarssss....better be worth it" (It is!)
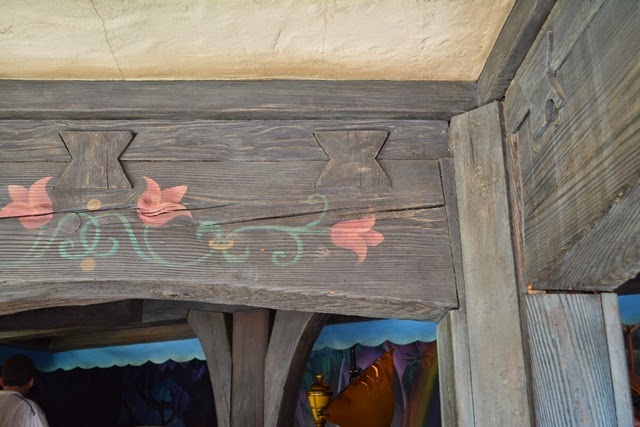
When your's truly wasn't in kid consoling mode or fetching drinks, I was peaking at the details, figuring out how stuff was put together. Check out at this bow-tie / dovetail joinery holding the timbers together at the
Peter Pan line. I imagine, it was probably built in the 1950's.
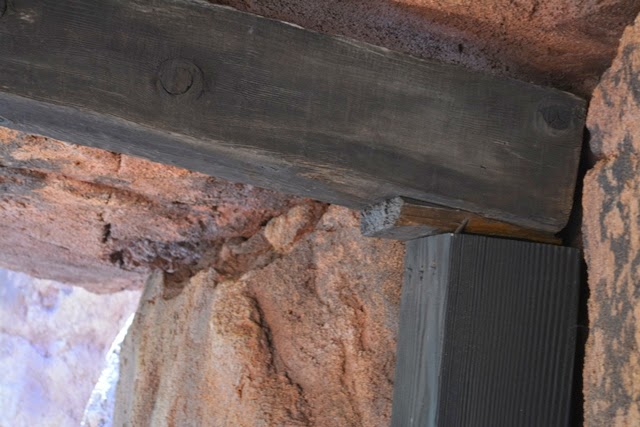
A " bow-tie / dovetail" (?) Over at the newly-renovated, Thunder Mountain Railroad, the fence was made from some sort of weird resin or acrylic, but it was nicely done.

Dino-mite!!!! There was some seriously rustic timber fit in place with meaty shims.
In the Toy Story - Midway Mania line I was mesmerized by their plank ceiling. I never even thought about setting ours at an angle. Look at all that molding!

We clamored around in Tarzan's house for a while. It truly feels like a massive, vine filled tree...

... especially with this weather tight, flexible electrical conduit, growing from the jungle floor.

Finally, my keen eye spotted this incredibly realistic horse. I couldn't believe the attention to detail the designers had put into this fine piece of animatronic wizardry. I marveled at the heap of steaming Disney magic it deposited on the street, just like a real horse.

Obviously hand crafted realism!
Cleaning and drying out after a plumbing leak isn't as fun as it sounds
After an in-wall plumbing leak, I start the clean-up / dry-out. I have to cut an access hole and treat for mold and mildew. Fun fun fun!
Read MoreThere and Back Again
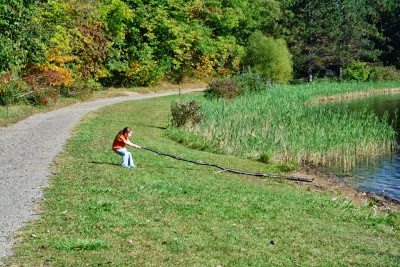
I've gone dark for over a week, enjoying some time back in Michigan with family and friends. No projects, no tools. Just crisp fall air and overwhelming amounts of water and the color green. Living in the desert southwest is a land of beige and earth tones. There's nothing like this blast of fall color.


 |
| Ok. Gracie did have a little wood work project to do. |
We timed our trip perfectly. Michigan was beautiful, crisp temperatures in the mornings and evenings with warm sunny days (mostly). Sweetie and I felt a homesick, missing living there.
The kids had a blast. It was fall break in Arizona, but school was in session in Michigan. We had parks to ourselves, only sharing them with the seagulls, Canadian Geese, and Swan.
We enjoyed a day of apple picking, cider and donuts at the cider mill / orchard, where Gracie befriended several wooley caterpillars...
...and the other of our young offspring, quickly devised a rousing game of apple stomping.
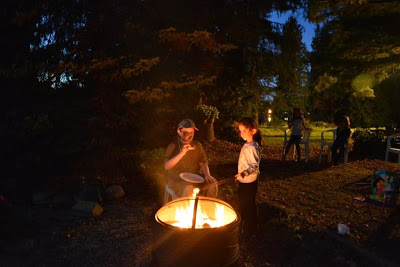
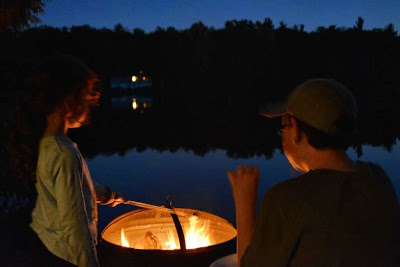
We spent a nice evening at my folks place on the lake, ending with making s'mores.
Alas, work and school beckoned us home. The beauty of Michigan will soon give way to the horrors of winter driving, shoveling snow, and freezing one's butt off pumping gas. Arizona has passed through its time of summer inferno and is offering months of sunny, beautiful paradise. We'll miss everyone, but we'll miss them while we enjoy wearing shorts and sandals, picnicking in December.
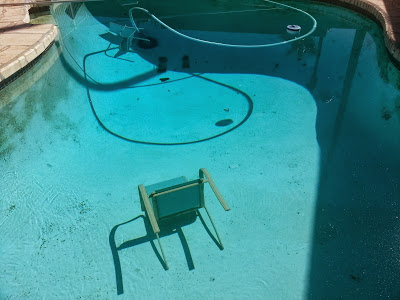
We returned home, tired and jet lagged from the three hour time difference. There'd obviously been a wind storm, judging the amount of newspaper in the yard and pool, not to mention the submerged patio chairs. The pool was filthy with the vacuum tangled in a chair.
 |
| Allow me to show you to your seat sir. |
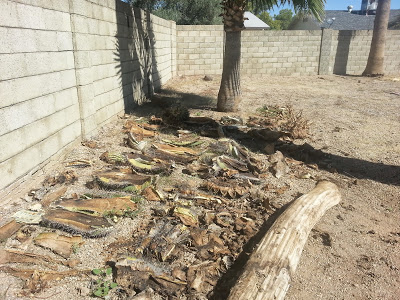
What a difference a couple weeks makes. The cactus I'd cut up and laid out is dramatically dried up. Most of it is crispy, like weathered cardboard, ready to be scooped up and thrown away.
 |
| Pita chips anyone? |
You know me; of course, with a post title of There and Back Again, there has to be a hobbit reference, right? A Lord of the Rings movie quote perhaps?
Nope. But it all comes together in the end...
This is a grand item of mystery we found laying smack-dab in the middle of our front yard, when we got home, right beside the walkway.
 |
| Take this back to Hobbiton please. |
Seriously, what the hell is this? Who leaves a collectible plate in someones yard when they leave town? More importantly, who owns a "collectible" plate featuring a freakish, barefoot circus-child that looks like one of Samwise Gamgee's hobbit children? "Little Strong Man" .... I just don't have a clue.
Installing an Oscillating Ceiling Fan / Fishing Wires (It's hot up here)
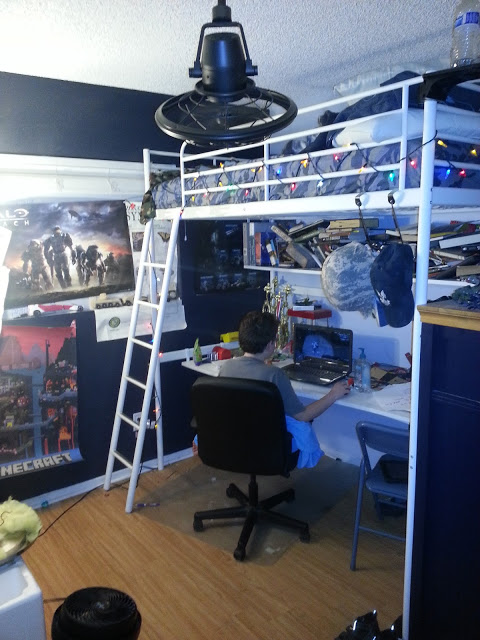
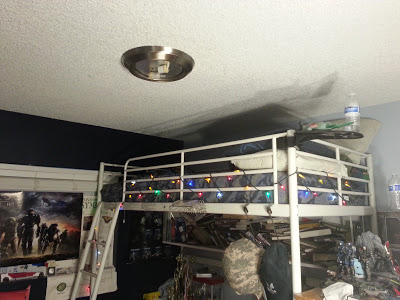
Jack's room is a den of tween, man-cave awesomeness. It's his fortress against the world, or at least against the constant onslaught of a pestering little sister. He spends a lot of time in there. To maximize space we'd gotten him a loft bed from IKEA, with a built in desk.
Problem: the blades of his ceiling fan spun right through the sleeping area. I told him to scoot over against the wall and not roll around much, but Sweetie convinced me Child Protective Services would have an issue with my solution. So, I removed the fan and installed a simple light fixture. Unfortunately, during the hottest summer nights, it's been warm for him, up by the ceiling. A floor fan just doesn't cut it.
We saw an oscillating ceiling fan on display at Home Depot and decided it would be perfect for him. We'd direct it at his bed and get him some much needed air flow. What a cool idea! I've installed plenty of ceiling fans over the years, this was an odd one, but it shouldn't take more than a few minutes,...right? (Remember Murphy's Law?)
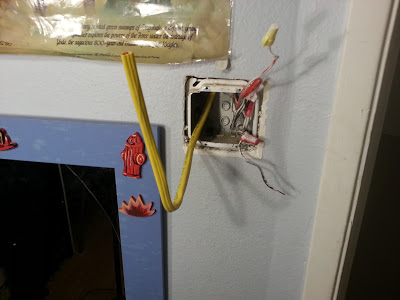
I say "prepared", because that's as far as I got. Why? because I was an over confident putz. In my steely-eyed, experienced-fan-installer confidence, I hadn't even glanced at the instructions. I hadn't paid any attention whatsoever to the fact that this fan had two wires, one to control the fan, the other to control the oscillating. The existing house wiring only had one wire. Moooooron.
Problem: the blades of his ceiling fan spun right through the sleeping area. I told him to scoot over against the wall and not roll around much, but Sweetie convinced me Child Protective Services would have an issue with my solution. So, I removed the fan and installed a simple light fixture. Unfortunately, during the hottest summer nights, it's been warm for him, up by the ceiling. A floor fan just doesn't cut it.
 |
| The lens is missing as a result of an unfortunate incident with a N-Force Vendetta Sword |
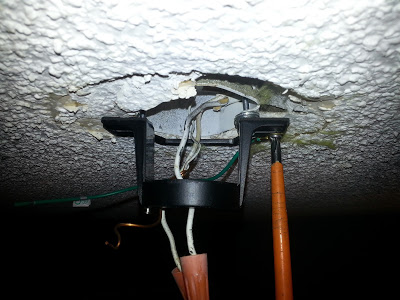
With the power off, I took down the old fixture. I capped off the wires and installed the mounting bracket that came with the fan. I'd forgotten about the ceiling damage from the old fan that was hidden behind the larger fixture.
Again, please excuse the shabby cell phone pictures folks. I'm still working on a replacement for the camera.
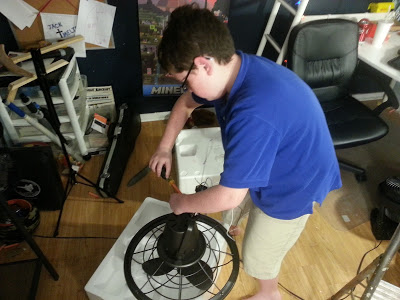
Jack got some tool time in with the assembly of the fan.
I popped the fan onto the bracket and prepared to make the electrical connections.
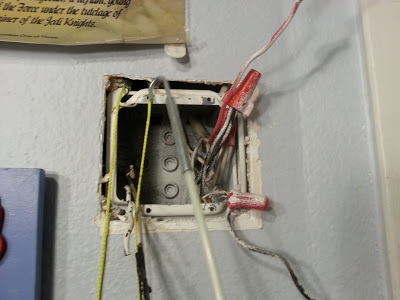
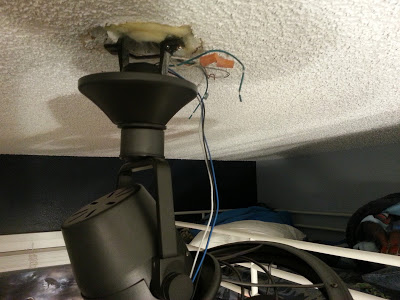 |
| See the black AND blue wires? |
I say "prepared", because that's as far as I got. Why? because I was an over confident putz. In my steely-eyed, experienced-fan-installer confidence, I hadn't even glanced at the instructions. I hadn't paid any attention whatsoever to the fact that this fan had two wires, one to control the fan, the other to control the oscillating. The existing house wiring only had one wire. Moooooron.
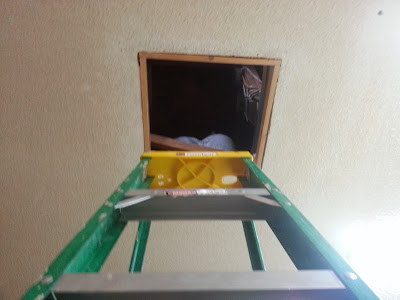
I've used awesome add-on electronic solutions in the past to solve this single-switched wire problem when using a fan / light combo, but this unit comes with its own control switch. It requires two wires. I need to install another wire from the switch box to the fan. You know what that means,... in Phoenix,... in the summertime,... in the afternoon...
 |
| Attic work. I hate attic work. |
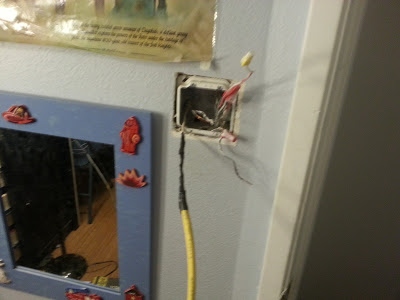
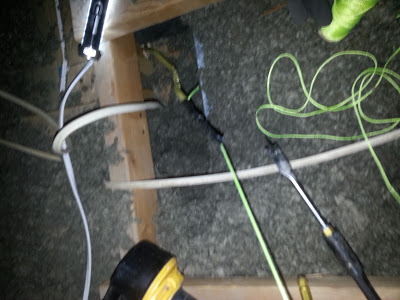
It was easy to find the ceiling box quickly (It's hot up here.), and trace the cable to where it dropped down the wall, towards the switch (It's hot up here). I needed to replace that section of 2 conductor cable with 3 conductor cable (It's hot up here). I gave it a gentle tug (It's hot up here) and figured that it felt loose enough to pull out, no staples (It's hot up here). I scurried back down into the sweet cooling embrace of air-conditioned space.
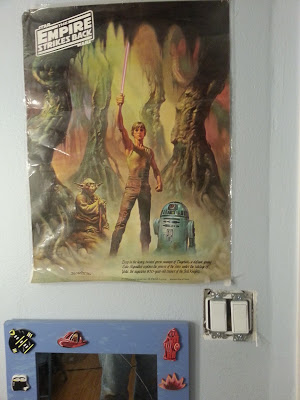
I popped into the switch box, below the Empire poster. Anyone know where I got this poster,... a loooooong time ago?
Fishing attempt #1: (By using the word "attempt", and numbering it, savvy readers will recognize that I'm about to introduce a failure). I tied attached the new cable to the old one and wrapped it with electrical tape in a long tapered head. I had Jack gently feed it into the wall, while I pulled from above (It's hot up here).
Nothing. We made it an inch. I stopped pulling when I felt initial, heavy resistance (It's hot up here). There's no point in skinning the wire up due to a staple. Fail.
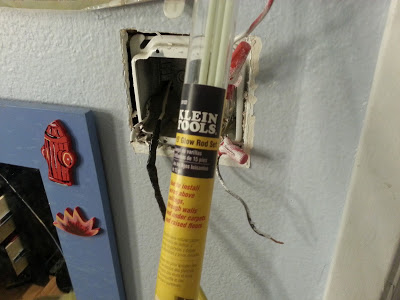
Fishing attempt #2: I broke out the ol' fish sticks. No, not this variety, but a set of Klein Glow Rods . These are great for getting through hard to reach areas. I've had tremendous luck in the past.
I poked around for a bit but could not access the proper spot from above (It's hot up here) or below. There was a duct immediately above the switch, blocking the wall cavity. The existing cable entered through a hole at an odd angle. FAIL
Fishing attempt #3: A fish tape? . Nahhhh... The last thing I want to mess with in the attic (It's hot up here) is a coiled mess of fish tape in all that god-awful insulation. Didn't even try. FAIL
Fishing attempt #4: In walls without insulation, I've had good luck with weight on a string. I Mac Gyver'd this feat of modern engineering with a string line and some 1/4" nuts.
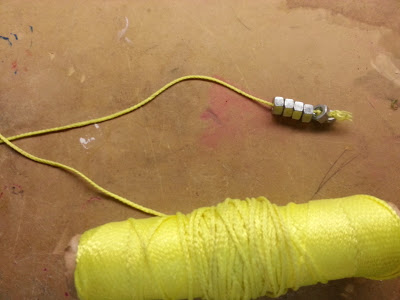 |
| W.W.M.G.D. = What would Mac Gyver do? |
Then it was a matter of drilling through the top plate. I used a large extension and a 3/4" spade bit
 , at an angle to penetrate below the duct work (It's hot up here).
 |
| Here's my rig. |
 |
| Hmmm... AZ DIY Guy, It doesn't look to miserable in the picture. |
This is one of those times where a good cordless drill is a must. Stringing an extension cord through the itchy attic mess (It's hot up here) would be another exercise in misery. I like a bigger 1/2" chuck drill too.
I dropped the weighted string down the hole (It's hot up here) and landed it directly on the top of the switch box, first try!!!. Success!!! I clambered back down (into air conditioned sweetness) and fished the string out with the hook on the fish stick.
Back up top (It's hot up here), with Jack feeding from below, I slowly pulled the string with the new cable attached. I managed to get it plenty clear of the hole, when it got hung up on something. There was no way I was going to tug on it and strip the wire in the wall. I cut my losses and stopped. I'll splice it in the attic (It's hot up here).
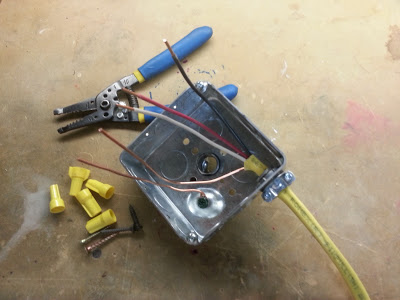
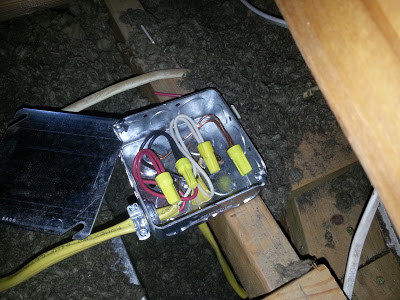
I did not want to spend one more second than necessary in a 140 degree attic (It's hot up here), so I prefabricated my splice box down in the workshop.
Back in the foul darkness (It's hot up here). I screwed the box down, clamped the cable, made the splices, installed a few staples and stuffed the cable into the fan box.
It's hot up here: In case I hadn't mentioned it. It was a bit toasty, especially in my long sleeve shirt and jeans. I forgot my dust mask on that last ascent into hell.
 |
| Crazy from the heat. |
Seriously folks, attics are no place for dilly-dallying in the summer, not to mention in Phoenix on a 106 degree day. I took good breaks in the cool, stayed hydrated, and kept my visits to less than 10 minutes. It still sucked, but I got it done and managed to avoid a heat stroke and fall through the ceiling. I don't recommend it.
Back on earth, I had a nice fresh piece of 12/3 w/ ground NMC ("Romex") to work with.
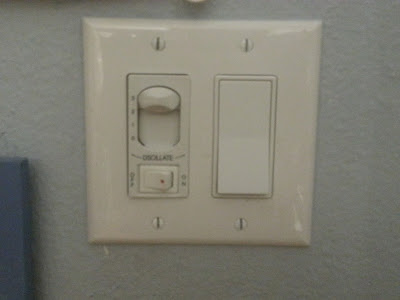
The included switch went in easy. It has a speed selector and an oscillate switch. The other toggle switch now controls a switched receptacle to control a floor lamp, for lighting. We now had no ceiling light fixture. My exciting post on installing a switched split receptacle can be enjoyed here.
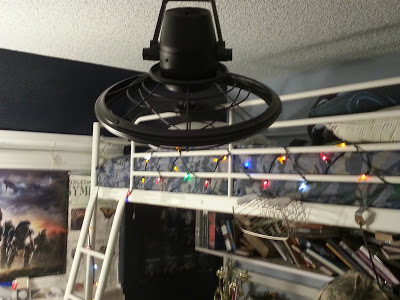
Installing the fan the rest of the way was pretty standard stuff. No problem at all.
It looks great and works well. It cools nicely at the desk below. BUT, dang-it, it won't oscillate high enough to blow into the bed. It's a total miss. I couldn't rotate it until I powered it up to learn that it wouldn't go 90 degrees to the ceiling; it goes about 45 degrees.
The other issue is that there's some wobble in the entire fixture as it oscillates. I'm going to have to brace it up tighter. I'm not comfortable with all the movement on just two 8/32 screws holding it up. I also don't like the direction to periodically tighten the screws. It seems they'd solve that in the design.
I may see if I can safely disassemble it and slip a couple gear teeth to get the thing to shoot sideways. Either way, Jack's enjoying it while he Minecrafts his summer vacation away.
Enjoy the cool breeze my friends.
AZ DIY Girl, Episode II
Following up on the last episode of AZ DIY Girl, I've found more evidence of covert, munchkin DIY crafting actions. This time Gracie took it outdoors, and to a whole new level.
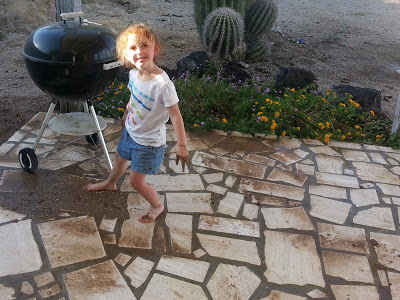
At our house, "Daddy, can I water the flowers?" means something that has absolutely nothing to do with flowers, but a lot to do with water. We do need to water our flowers off the back porch, because I have yet to run irrigation over to them. However, when our little princess returns from "watering the flowers", the flowers are still somewhat dry, she is a filthy-soaked mess, there is mud all over the patio, and our backyard is a Martian landscape of empty water canals.
Our pristine desert backyard goes from this...
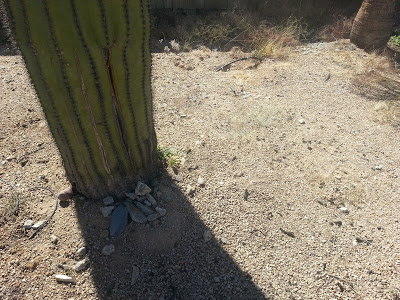
...to this:
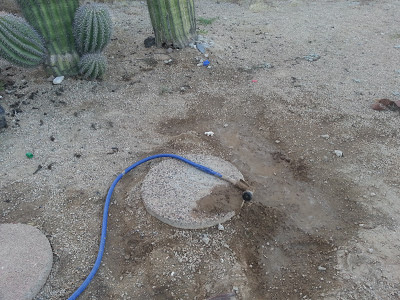


At our house, "Daddy, can I water the flowers?" means something that has absolutely nothing to do with flowers, but a lot to do with water. We do need to water our flowers off the back porch, because I have yet to run irrigation over to them. However, when our little princess returns from "watering the flowers", the flowers are still somewhat dry, she is a filthy-soaked mess, there is mud all over the patio, and our backyard is a Martian landscape of empty water canals.
Our pristine desert backyard goes from this...
...to this:
So what? Left alone to her own devices, a kid just blasted holes in the dirt with the hose. How cute, right?
Wrong!,... She was mining.
That's right, the 5 year old DIY'er engaged in hydraulic, high-pressure excavation techniques to acquire the necessary material for her project. I really don't know how she refined it or even how she did the actual crafting, but I did find the results sitting on a plate later.
Arizona snowmen. Mud? Clay? It's dried hard as a rock, dry fired in the 100 degree sun. This must be the stuff the Native Americans used to make adobe homes in the past. This whole thing happened with no more adult awareness than turning the hose on.
The ladies of the craft blogging world really have some competition coming and it's this little delicate flower:
PS - Pay no attention to the god-awful patio stone. The replacement of it's hideousness is on the long term plan.
Flagging it for the weekend
This morning, with Sweetie feeling under the weather, I took the kids to join a group going to place flags at at the National Memorial Cemetery of Arizona.


It was humbling to read the names and dates of the heroes interned there. Our section was from those who had passed around 2003, but had served in World War II, Korea, Vietnam, and the Gulf War. Sometimes, they had served in three conflicts.
With the volume of volunteers on site, we finished in an hour or so. Considering the solemn nature of the location, I don't consider the experience "fun", but it was certainly rewarding. I enjoyed hanging out with the 30 for 30 team again. It was a good experience for the kids as well.


We figured that approximately 100 volunteers would complete the 40,000+ grave markers in 3-4 hours. then, everyone showed up: Cub Scouts, Boy Scouts, Girl Scouts, Junior-Marines, biker gangs, families, veterans, active duty soldiers,... everyone. Five hundred people?,... A thousand?!!! A sea of humanity had descended on the cemetery this morning. At one point it was shoulder-to-shoulder, like Disneyland.
Our group loaded up bundles of flags, headed out to a fairly uncrowded section, and set to work.
The desert floor proved to be very tough to stick flags into. Of course, the Boy Scouts were well prepared with custom-made, welded-steel, hole-punching contraptions of precise efficiency. They positively started ripping along, peppering their trail with fluttering flags. Never without at least one of my tools, I employed my beloved Victorinox Swiss Army SwissTool's saw blade to poke holes in the tough soil for some of our group.
 |
| Don't leave home without it. |
Gracie liked to stab the flags into the ground with the unbridled gusto of an explorer of old, claiming new found shores for King and country.
With the volume of volunteers on site, we finished in an hour or so. Considering the solemn nature of the location, I don't consider the experience "fun", but it was certainly rewarding. I enjoyed hanging out with the 30 for 30 team again. It was a good experience for the kids as well.
Have a great Memorial Weekend all! Do some projects, put some flame to meat, and enjoy the time off.
Oh yeah, can we get some more stars and stripes back in our neighborhoods too? I don't get it, why am I the only one flying a flag on my street each patriotic holiday?
Remember our heroes, past and present.
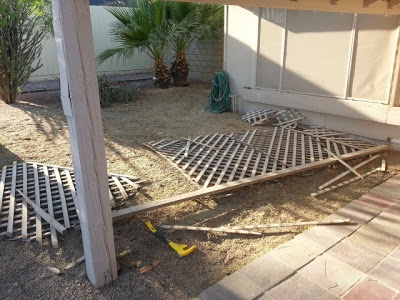
And so it begins - demolition day
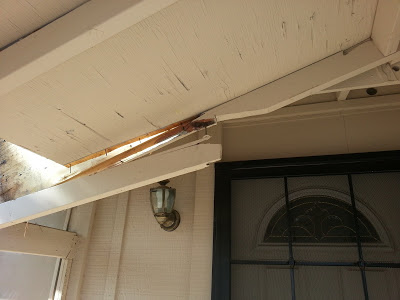
Since we hate our front door overhang / porch / hobbit tunnel, and the HOA conveniently demanded that we remove it, I decided to jump right into the demolition this weekend. As a certified dimwit, I thought the hottest weekend of the year (to date) would be a great time to climb up on the roof. With other commitments, I was only able to find bits of time here and there, to tackle the project.
Two minutes wielding the mighty Stanley FUBAR (Functional Utility Bar) resulted in lattice and splinters blasted across the front yard like a cruise-missile strike. This beast of a tool is like having the very essence of destruction itself, leashed in your hand.

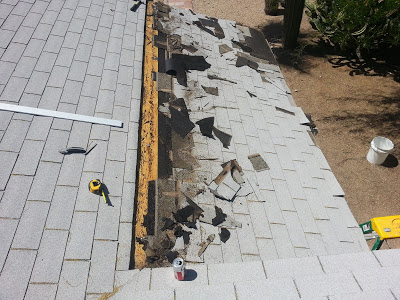
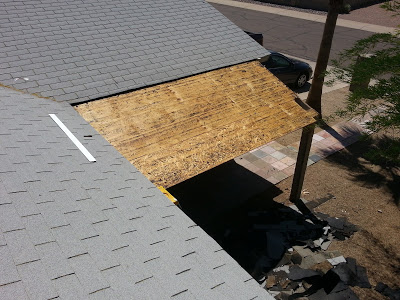
It took about a 45 minutes to finish the cut line. It turned out pretty good, but it's thick as heck with 4 ply of shingles at that point.


Two minutes wielding the mighty Stanley FUBAR (Functional Utility Bar)
 |
| Don't you just want to skip barefoot across our lush front yard? |
Since bulk waste pickup isn't for another month and a half, I spent the next couple hours breaking the lattice down, bundling it into three rolls of slats for storage, and cleaning the front yard of stray wood bits, nails, and staples. That was all the time we had on Saturday.
Late Sunday morning, I found a very efficient way to quickly dull razor blades. Carving through the face of four layers of granulated shingles makes quick work of blunting your knife. A blade lasted only about one linear foot before it had to be replaced. I made good use of a Stanley Quick-Change Utility Knife , making it easy to constantly flip and swap blades. I used a Edge Cutting Guide
 , normally for a router or circular saw, to keep my line.
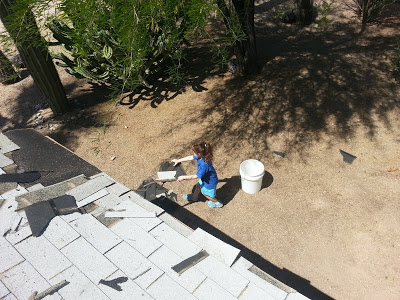
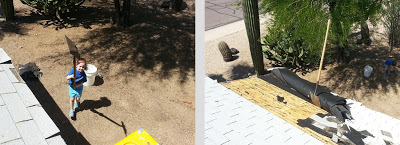
This was some tedious, hot work. I took my time, really wanting that shingle edge to look straight and clean. At least the yard didn't get too messy. Each time I gave the all clear, Gracie would scurry up and pile the bits of shingles and tar paper that rained down below. It took a bit longer because I had to be extra careful about nails and keeping the drop zone clear of my happy little helper.
I sat down for a cold drink and called my young squire for my weapon. I recall that I'd seen on one of the multitude of DIY shows on cable, that a flat blade shovel is the tool of choice for stripping shingles. Time to put it to the test. My blade, young Padawan...
The shovel stripped the roof like a champ. Two minutes and the deck was clear. I ran into some old termite damage out at the far edge, not a good sign.
 |
| "...I smote it's ruin upon the mountainside" |
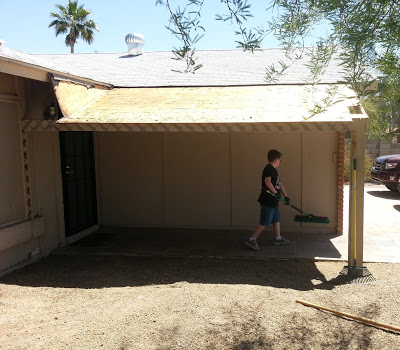
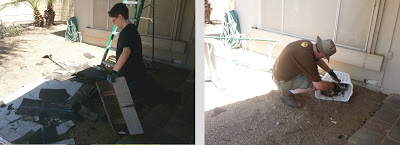
Once again, a diabolical lack-of-fun reared its ugly head, cleanup. Jack donned a pair of gloves and came out to lend a hand. We drug the pile over to the "alley" beside the garage and piled it on a tarp for disposal later. It's nice to have a larger kid who can really pitch in and help. It made much shorter work of the mess.
 |
| Yeah, that's a laundry hamper from the garage. Shhhhhhhh..... |
We finished tidying up and left it alone for a few hours while we ran some errands. After all, it was only 87 degrees, and not quite miserable yet.
I returned to the task late afternoon, as the day's heat reached it's peak. The FUBAR and mighty sawed-off, sledge hammer rained their fury upon the decking, as if wielded by the Norse God of Thunder himself. Timbers splintered like toothpicks; a cloud of dust rose from the site.
Since we have to find a way to get rid of all the waste later and have to store it. We spent the extra time pulling all the nails. I brought in a pro. Gracie was a marvel of nail-yanking prowess. She threw herself into it with such a gusto that she soon bounced the hammer handle off her forehead. Don't worry, the hammer's fine, it's a Klein Heavy-Duty  .
.
 |
| It was nothing that couldn't be fixed with a hug, a bag of ice and a stiff drink. |
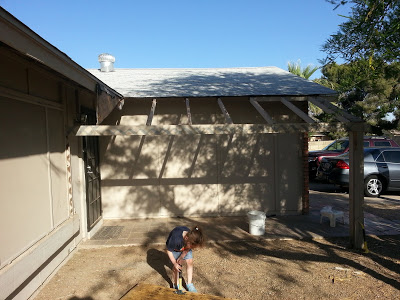
After the weekend's third cleanup. We called it quits. The carcass is picked clean, down to the sun-bleached bones in the desert.
 |
| Break time is over young lady. |
Did I mention the temperature? It's April 28th, and we've officially hit triple digits.
Summer in Phoenix. It has begun.
Enjoy your spring folks.
________________
<UPDATE> I tear the rest of this beast up the next weekend in the exiting conclusion to demo phase in: Tearing it all down! Bones and all
Father to Son DIY skills training
Since Jack's rapidly approaching teenagerdom, it's time the lad starts picking up some mad handyman skills. My dad started letting me help with projects when I was about his age and I still remember those times fondly.
The two of us left the ladies behind and took a Friday night, before-bed trip down to grab door #4 for our interior door replacement project, this one for Jack's own room. He examined a couple from the top of the stack for dents and scratches before choosing a nice specimen from the middle of the stack.
..and slipped away, like ninjas into the night.
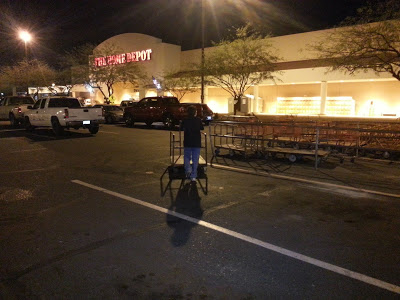
The two of us left the ladies behind and took a Friday night, before-bed trip down to grab door #4 for our interior door replacement project, this one for Jack's own room. He examined a couple from the top of the stack for dents and scratches before choosing a nice specimen from the middle of the stack.
 |
| Get that doggie rollin' |
He took charge of the six-wheeled beast-cart and headed out with the unmistakable din of rattling sheet metal and chattering caster wheels. He paused to treat me to some humor about what great stuff, Great Stuff is when we passed the display. Where does he get his goofball sense of humor anyway? We were having fun. Too much fun...
Folks, I'm just going to admit it; I let my guard down and paused like a slack-jawed yokel at the clearance rack. I should have known better to stop in such dangerous proximity to the kitchen section. Of course, I was immediately waylaid, out-of-the-blue by Mr.Smiling Clipboard Dude,
"Has anyone told you about what we're doing for customers tonight?"
CRAP! Amateur move, Mr. Smarty Pants DIY Guy. NO! No one had told me what they were doing for us customers tonight. I was snared like a gazelle drinking from the crocodile pond. Somehow, he sensed I'm a nice guy (chump) and I'd pleasantly engage in his conversation. I dutifully answered the questions about our kitchen and, ever so nicely, gave point-by-point details on our state of unhappiness with our cabinets and layout. I shared the plan for a total kitchen gut and re-model next year,... yes, including plumbing,... and electrical, ... aaaand new cabinets with taller uppers,...
 |
| You're going to have to sit this one out boy. Watch the master at work. |
We all know where this leads don't we? The pitch. It doesn't matter that I clearly, obviously have no reason to entertain his product; I just have to let him toss it out. But I know can still kick away from the crocodile. He's worked so hard, and I can't be rude in front of my son (or all those shiny new tools) can I? A slight pause, a friendly smile, and he lobs it:
"... consider cabinet re-facing" Yaaaaaaaay! We're almost done...
"Free in home estimate" Woooo-hooo! Now there's only my initial polite decline <kick> and his second, face-saving counter attack ...
"...just in case you want to consider it, as an option, anyway", offered with a kindly smile and an attempt to immediately schedule the estimator. I give my trusty standby, a pleasant second decline <kick> followed without pause by a quick, simultaneous thank-you / smile /cart acceleration, and finally the inevitable third decline mumbled over my shoulder as I depart <kick-kick-kick>. Checkmate. We're gone <run>. That's how it's done folks, it's a skill acquired by years of home center visits. I'm just glad my son was there to see it. (You may want to start easy, like a quick run of the dueling Cable TV vs. Satellite TV polo-shirted gauntlet in the back of Wal-Mart. This will sharpen your skills for the pro leagues)
We did a quick checkout, strapped down...
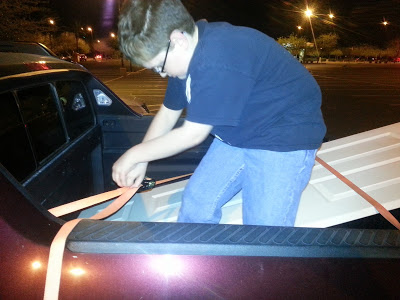 |
Sure, I could have hired a pro to extricate me from the salesman, but I did it myself and saved. You can do it too! Teach your children well.
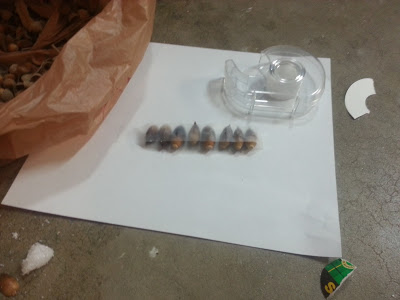
AZ DIY Girl?
 This is a blog about tools, renovation, woodworking, and just plain-old fixing stuff,.... not crafting. But, it's also about being a Dad. When I went out to check the lights in the garage/ workshop I stumbled upon evidence of a little DIY crafter in our midst. In hindsight, our little family pizza and a movie dinner had been quiet,... too quiet.
Gracie knows that projects, even crafting projects, get done in the workshop. I guess this includes the space a few feet in the door, right in the traffic path. Evidently, she does not think workshop etiquette requires any cleanup before returning to the family room to snuggle on the couch and that leaving her trip-hazard strewn minefield is A-OK.
My pint-sized worker had gotten into the wood scrap bin and pulled rocks from her toy pickup truck in the corner. She added some styrofoam, twigs, crayons, about 1.25 miles of frosted tape, and finally, the coup-de-grâce, a sack of acorns collected from the park.
Being the Master of Workshop-mans-ship that I am, I clearly lead by example. My work habits serve as the gold standard for my pupils to follow. Clearly, my practice of bringing delicious consumables into the workshop was the tidbit that Gracie chose to put into practice this day, as is evidenced by the slice of Little Caesar's, cheese "...and only little meatballs (sausage) Daddy!" pizza.
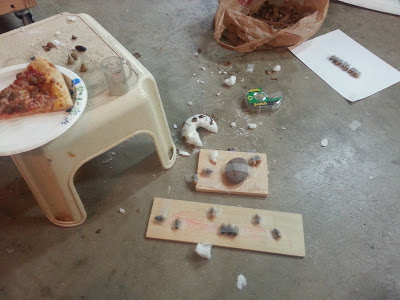
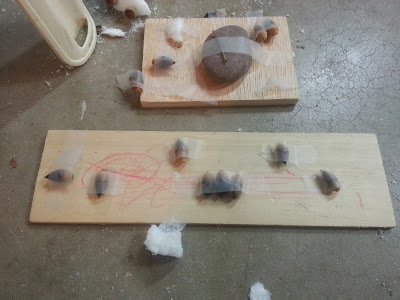
Feast your eyes on these one of a kind, hand made, "Decorations for Easter".
 |
Crafting Ladies of the Blogosphere, you are hereby on notice. There's a 5 year old dynamo of pure creative genius hot on your heels, and she's not afraid to use excessive amounts of frosted tape. Reading, writing, and typing are the only hurdles; it won't be long. Stay sharp ladies.
 |
| The competition |
_________________________
<UPDATE> Once again, I'm honored to be featured by So I Married a Craft Blogger on his Man Up Link Up XII.
Of course, mine being the only submission by a dude, being reviewed by a dude, through a fog of testosterone, I stand a pretty good chance of being noticed when compared to the mysteries of actual-skilled, crafty ladies. It didn't hurt that I adjusted the title when sharing to "So I Fathered a Craft Blogger?" Trevor writes a great, humorous blog about A Man's View of the World of Craft Blogging. Check it out!

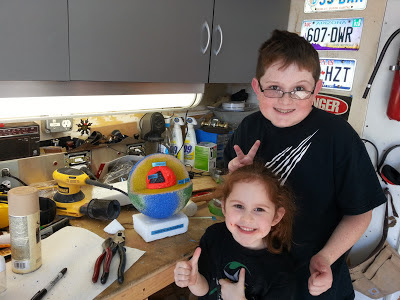
School Projects in the workshop
A home workshop lends itself naturally to kid's school projects. It's nice to draw on leftover paint, scraps, and widgets from previous projects and applying them to school projects. It's been rewarding to start working with the kids on kindergarten posters, through elementary school dioramas, and even cub-scout pinewood derby cars.
The best part is the transition from working significantly hands on as a parent to protect the kids from sharp blades and to teach them the possibilities of school craft projects, to a point that the kids take the lead.
Jack had to do a project showing the layers of the earth, for 7th Grade Science (which of course he dropped on us Sunday morning). The concept was his idea completely, he asked us to pick up some Styrofoam spheres to make a cut-away, and questioned me on how to decorate them. He described what he wanted, right from the start.
Aside from some assistance with spray painting and sawing the unwieldy globe (with a hack-saw), he really ran with it.
Spray-Paint?!!! Yeah, we learned that spray-paint and Styrofoam are not really friendly together. The paint melts the Styrofoam, shrinking it, pitting it, and making a lovely snap-crackle-pop sound. We managed to get a decent finish by lightly dusting it with the paint.
Together we experimented with spray painting a continents on cardboard before we attacked the globe. We sliced up smaller globes, painted them, and assembled the whole thing with toothpicks. He labeled the whole thing using a label maker. It was a four-handed job to wrap the labels on finishing nails to make flags.
The best part is the transition from working significantly hands on as a parent to protect the kids from sharp blades and to teach them the possibilities of school craft projects, to a point that the kids take the lead.
Jack had to do a project showing the layers of the earth, for 7th Grade Science (which of course he dropped on us Sunday morning). The concept was his idea completely, he asked us to pick up some Styrofoam spheres to make a cut-away, and questioned me on how to decorate them. He described what he wanted, right from the start.
 |
| No the sander was not used on this project, but the pliers were! So it's a messy workbench. |
Aside from some assistance with spray painting and sawing the unwieldy globe (with a hack-saw), he really ran with it.
Spray-Paint?!!! Yeah, we learned that spray-paint and Styrofoam are not really friendly together. The paint melts the Styrofoam, shrinking it, pitting it, and making a lovely snap-crackle-pop sound. We managed to get a decent finish by lightly dusting it with the paint.
Together we experimented with spray painting a continents on cardboard before we attacked the globe. We sliced up smaller globes, painted them, and assembled the whole thing with toothpicks. He labeled the whole thing using a label maker. It was a four-handed job to wrap the labels on finishing nails to make flags.
 |
| Another decade of projects on the way. |