


In all my DIY’ing years, I’d never installed a toilet. Turns out, it’s really not that difficult. I did have a couple of unforeseen challenges along the way. Check out the American Standard VorMax install.
Read MoreBathroom Light Upgrade with Classic Look LED Bulbs
Replacing a bathroom light fixture is an easy fixup. I found some cool LED light bulbs that look like classic glass bulbs.
Read MoreGetting Photos on the Walls and Other Foolishness
Adding some inexpensive photos and frames changes the feel of a room. Plus, some fun with Photoshop foolishness to recruit This Old House's Norm Abram to Twitter.
Read MoreInstalling a Humidity-Controlled Switch for a Bathroom Fan
Installing an automated Leviton Humidity Sensor / Fan Control in the bathroom to control the exhaust fan.
Read MoreFix-It: The Fantastical Powers of J-B Weld - Repairing the Vanity Mirror
I needed to repair a broken hinge on our bathroom vanity mirror. I unleashed the rack hard repair powers of J-B Weld epoxy.
Read MoreCleaning and drying out after a plumbing leak isn't as fun as it sounds
After an in-wall plumbing leak, I start the clean-up / dry-out. I have to cut an access hole and treat for mold and mildew. Fun fun fun!
Read MoreHow to repair a plumbing leak inside the wall, a tale of high adventure.
After finding a plumbing leak and tearing holes in the all, it's time to repair the pipes. Soldering and using handy push-fit connectors.
Read MoreSurprise! Finding a leak inside the wall.

I could hear something inside the wall. Note: This phenomenon, is generally what we like to call in the homeowner business, "bad news". Rarely, do noises in the walls turn out to be the shifting of gold doubloons sliding off a big bundle $20 bills onto a pile of 30 year old Apple Computer stock. No, it usually means you are going to spend money, lots of it. It is, however, a perfect opportunity to practice up on your curse words.
With the shower valve opening too small, I couldn't see into the wall, but I could hear water spraying. With the crud-circle buildup around the valve cover as a guide, I cut the hole larger with a rotary tool. The fumes and dust of cutting fiberglass were pretty strong, so I opened a window, turned on the exhaust fan, and slipped into the manly-pink 3M Professional Multi-Purpose Respirator
 |
| "No Luke, I am your Father" - D. Vader |
 |
| I don't see any hidden treasure either. |
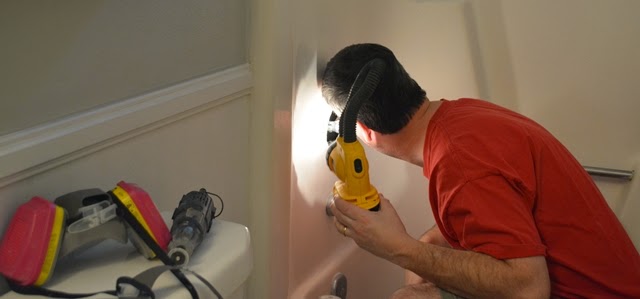
Just like plumbers have done for hundreds of years, I stuck my smartphone up to the hole and took a flash photo for a better look.
 |
| Fact: This age-old smartphone trick is believed to first been used in Boston, circa 1771.
- The More You Know
|
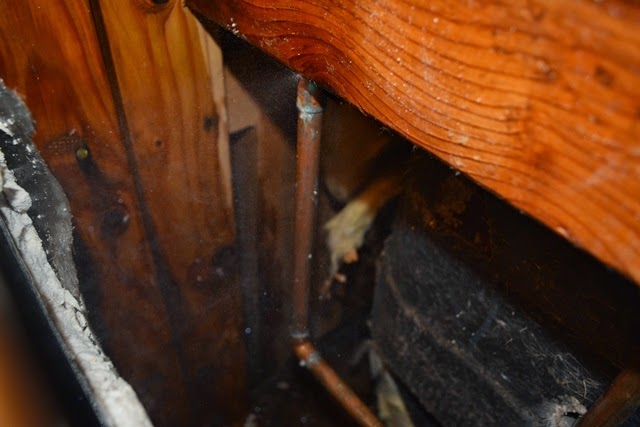
I could now see the leak. How the heck to fix this? There's a fine mist of water spraying, away from me, out the back of a 90 degree elbow, behind the wall of a one-piece shower / tub unit. Sure, this yellowing, beat-up old tub is on the eventual replace list, but there's no time or money for that now. I surely can't carve a hole through it and shut down one of our bathing locations.
 |
| The culprit. |
I checked the other side of the wall, our master bathroom. Now folks, correct me if I'm wrong, but when you press on a wall, it shouldn't bend right? Even if it's over an absolutely hideous 1970's gold marbled counter top?
 |
| Wasn't there a bending wall scene in Poltergeist? |
The side piece of the back splash (side splash (?)) is a separate piece. I figured I could cut the caulk, remove it, cut a hole in the drywall behind it, and if the DIY gods smiled upon me this day, quickly repair the issue.
Of course, that was before I simply plunged my knife through the caulk and spongy, wet drywall with ease. I slid the blade through the wall, like it was oatmeal.
 |
| This is not the work of a Sheetrock saw, just a simple pocketknife blade. |
Fan-freaking-tastic! My Facebook followers have already seen my happy face, bright-eyed with the magical wonder that is a handful of sopping insulation and the joy of beholding of drywall unable to hold its structural integrity. It's a face from the musty, recognizable smell, the smell of my weekend evaporating and my wallet flying open.
Great.
 |
| Can't you just see the joy on my face? |
With the wall open, and the insulation out of the way, I was greeted by a effervescent mist of water, steadily wetting the inside of our walls and soaking the floor of the cavity.
 |
| Cool mist. |
I could feel a J-nail holding the pipe, tight against the 2 x 4 cross-member that was there simply to secure the plumbing. The wood was blocking any hope of repair, so it got hacked out with a Reciprocating Saw .
.

Since we still had a load of laundry on rinse cycle, I didn't want to kill the water to the house quite yet. A gob of duct tape (the crowning achievement of modern civilization) and did a hasty wrap job, keeping the water from spraying in my face. A bucket placed below, began to collect the dripping water.

The bucket filled in 20 minutes. I figure there was at least 5 hours of leaking water so there is a minimum of 15 buckets of water loose in the cavity. Spec-freaking-tacular!
 |
| At least it was a small bucket. |
A few years ago, I'd bought a Bernzomatic Trigger Start Torch kit. I use the case to keep all manner of plumbing stuff in one place. I lugged it into the bathroom to see what I had to work with.
 |
| Sure it's a nice torch kit, but can you take your eyes off that delicious 1970's counter top? |
After shutting water off to the whole house, I used a Mini Tubing Cutter from my kit to slice the section out. These are handy little tools. They simply slide over the pipe and twist around it. You tighten the knob every few rotations, which drives the cutting wheel deeper into the pipe, until it finally snaps off, clean and straight.

It's a handy little gadget. This one really needs a replacement cutter wheel, but it made the two cuts.

Next up! Off to the friendly neighborhood hardware store to buy some copper.

This is running long, so I'll break it off here and tackle the repair next time. The bathroom window is open, there's a fan down in the wall and another one on the counter top. This mess needs to get dried out before the wall can be sealed up.
Any chaos in your weekend friends?
UPDATE: Here's the plumbing repair. At first, I make it look hard by failing miserably...
Fixing it up, again
 At some point in the ongoing adventures of home ownership and remodeling projects, I think everyone finds themselves at the point where they are re-remodeling or fixing stuff they were already proud to have called finished.
Upon study, it's my hypothesis that this natural phenomenon, normally brought on my age or changing tastes, is greatly accelerated by the presence (infestation) of the pint-sized interlopers commonly referred to as "children".
One of my early (pre-azdiyguy.com) projects in this house was the remodel of our guest bathroom. Along with new cabinetry, the train-rack towel rack, vanity top, paint and pluming fixtures, we'd installed wainscoting. I'd made it from a 1/4" x 4' x 8' particle board panel with a beaded finish and trimmed it out with wide base molding and chair rail.
 |
| I think a cannon exploded right about here. |
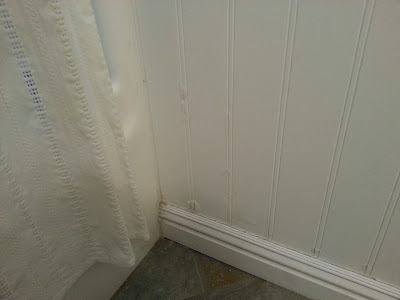
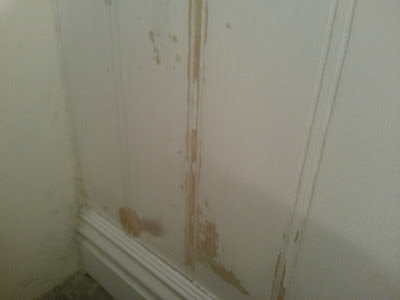
Now two years later, next to the bathtub where a deluge from countless water-gushing naval engagements had been fought by our little pirates, the panels have become damaged.
Evidently, I didn't seal them up well enough when I painted them. The decorative grooves had let splashed water into the fiberboard, and it has swelled horribly.
 |
| Ohhhhhh,..... the horror! |
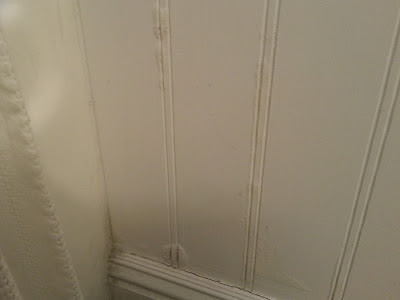
Luckily, in the dryer than dry climate of the Sonoran desert, the panels were bone dry. The swollen spots were not spongy at all; they were left hard nodules of ugliness. It took just a few minutes of sanding with my sweet DeWalt random orbit sander and some 220 grit sandpaper to get all the swelling knocked down and the panel smooth again.
 |
| Sand-tastick |
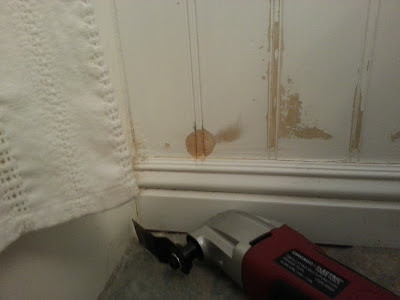
Unfortunately, the worst area was swollen so thickly that sanding it had completely taken out the groves (beading?). That would certainly look stupid if I simply painted it. I tried to cut new grooves with a razor knife and a straight edge, chisels, and even sandpaper folded over a thin piece of plastic. Nothing worked well enough for me to really dig in with confidence.
Staring slack-jawed at my garage tool cabinet, I finally remembered my oscillating, multi-tool. It's an inexpensive Harbor Freight  version, but its served me admirably well on two projects already. Sure enough, plunge cutting and giving it a slight wiggle scored the new lines in mere seconds. The grooves on the existing panels are already a little rustic, so the hand-held cut matched up just fine.
I finished it up with some fresh caulk and a coat of KILZ primer . I taped the whole panel off with my favorite painting buddy, Frog Tape
 , and painted it a fresh, glossy white. I think I sealed it up pretty good.
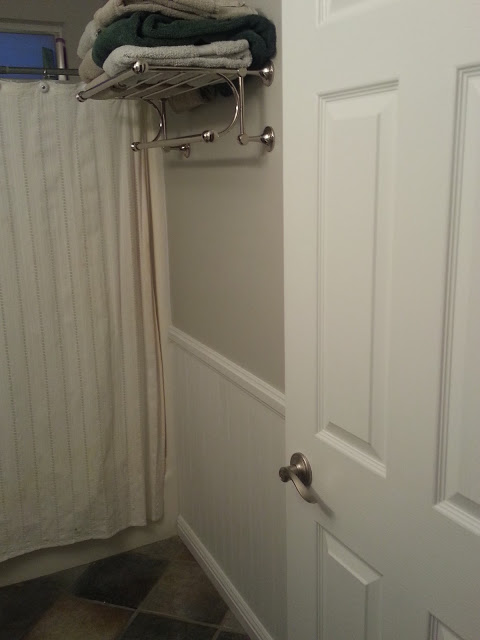
Fixed. Repaired. Re-remodeled. It looks nice against the new door I think. Hopefully, our youngest is at an age that we can keep the raging geysers of Poseidon's oceanic tempest under control.
How about you? You get tired of fixing up stuff you've already fixed?
Replacing our bathroom exhaust fan
Both of our bathroom exhaust fans are shot. The one in our guest bath was a beast at one time; it sounded like an F-16 afterburner on takeoff and moved air like a pissed-off hurricane. I'm surprised it didn't pull the door off its hinges. Certainly, it blew too much of our costly air conditioning up into the attic. Now it's fried.
A trip to the home center for a replacement found me staring slack-jawed at a huge display of ceiling-suck-age options, ranging from $30 to $200.
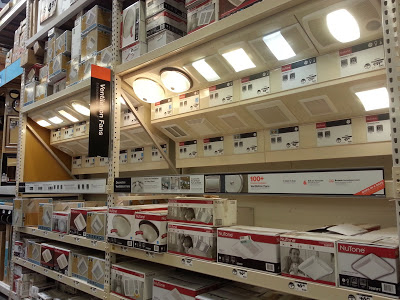
Uhhhhh,... I came prepared complete with the info of: about 12" x 12" square. I was certainly not prepared with CFM measurments, Sone ratings or, most importantly, funds up to $199.99. Since the slack-jawed, staring approach didn't seem to resolve much after a few minutes, I did some split-second Matrix style education,... I looked it up on the smartphone. I find that the deal on CFM ratings is that it's the speed / amount of air the fan moves, in cubic feet per minute. I found a formula and plugged in our measurements:

Now that it's all done, I guess I should have tested the fan to make sure this one wasn't a dud. Luckily, it worked just fine. I actually had to strain to hear it. I almost miss the clattering din of the old one.
 UPDATE!! I'm honored to have this story chosen to be featured an Bob Vila's website as part of the "Bob Vila Nation" of contributors from the blogging community. Please check it out and give me a vote by the hammer image, if you like the story.
A trip to the home center for a replacement found me staring slack-jawed at a huge display of ceiling-suck-age options, ranging from $30 to $200.
Uhhhhh,... I came prepared complete with the info of: about 12" x 12" square. I was certainly not prepared with CFM measurments, Sone ratings or, most importantly, funds up to $199.99. Since the slack-jawed, staring approach didn't seem to resolve much after a few minutes, I did some split-second Matrix style education,... I looked it up on the smartphone. I find that the deal on CFM ratings is that it's the speed / amount of air the fan moves, in cubic feet per minute. I found a formula and plugged in our measurements:
Cubic Feet = Length: 9 ft. x Width: 5 ft. x Height: 8 ft. = 360
360 cu. ft. ÷ 60 minutes per hour = 6
6 x 8 air changes per hour = min 48 CFM fan needed
I bought a Hampton Bay (#986 755), 50 CFM, 0.5 Sone (Ultra Quiet) for $ 48.97. It turns out the old one was rated for 180 CFM and screamed its furious banshee wail at 5.0 Sones. Folks with bigger bathrooms will need bigger fans, and deeper wallets.
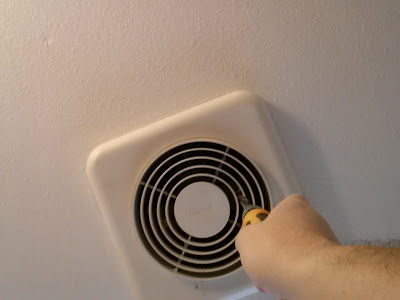
Back at home, I tried to pull the cover and found that this one was held in by rusted screws, not the handy springs I'd seen more recently on our other fan. Up close, this cover is a yellowed, paint spattered mess. I cut the paint and caulk from the edge with a utility knife before I pulled it down.
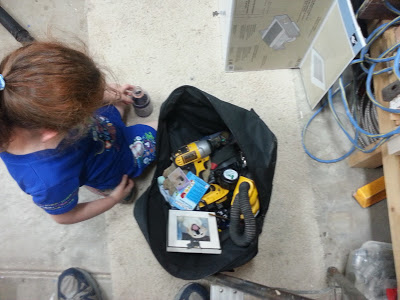
Next, I geared up for the dreaded attic crawl. Our attic is a filthy, itchy mess of ancient, blown-in insulation horror. It's never fun. I loaded a tool bag with all the tools and material I might need. When I returned from changing into long pants, a long sleeve shirt, and a spare t-shirt wrapped around my head and tucked into the back at my neck, I found my tool bag had been substantially supplemented.
Gracie was worried about me going into the attic, without her. She'd helpfully loaded up my tool bag with:
- (1 ) box of Band-Aids (Angry Birds)
- (3) tape measures
- (1) Diet Coke
- (1) Photo of Kirby (our dog who passed in 2010)
- (1) Doggy Valentine's card
- (1) Hand drawn "note" with hearts and "Daddy"
- (4 ) Pretty rocks
- (1) Small bag of 1/2" nuts and bolts
- (7) 3" finishing nails
- (1) Extra dust mask
Of course, I had to lug the extra stuff up there, just in case.
I traversed the attic, which ended in a miserable, belly-crawl across the rafters. It was 86º degrees outside in Phoenix; in the attic, it was damn hot. In the light of my headlamp, the fan appeared, it was unfastened and completely without a duct. From what I know, venting your moist shower air directly into your attic is commonly referred to as extremely stupid. It's not going to freeze in Phoenix, but it could cause mold issues and who knows what else. I didn't see any evidence of problems, but it was a dark, hot mess, and I wasn't going to loiter.
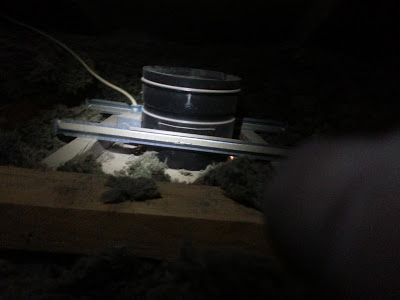 |
| I could see the target in my high-beams. |
I lifted the old fan out of the way. Luckily, there was enough slack in the electrical line to push the unit back to where I could at least crouch to work on it. With the hole open, there was a sudden burst of excited chatter from the bathroom below. I couldn't get close enough to the hole to look down. I held my camera phone over the edge to take a blurry recon shot:
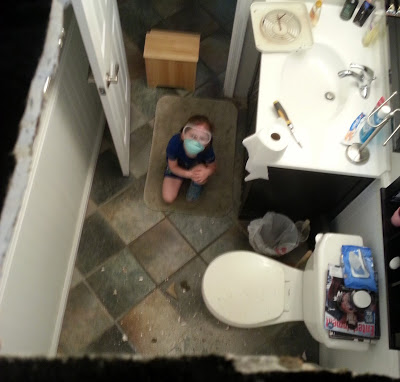 |
| Daddy's helper. Thanks for the Coke sweetie! |
With the power off, I opened the wiring compartment and took the wires out of the wire nuts. I slid the existing, three wire cable into the compartment of the new fan and clamped it down, using the connector (NM 3/8-Inch Clamp Type Connector ) I had installed earlier, in the comfort of the garage. This particular unit used the push-in style quick connectors for the wiring. Normally, I cut them off and make a tight, twisted joint with my Linesman Pliers
 and wire nuts, but in the dark, hot attic, I was pleased to go with the plug-and-play approach.
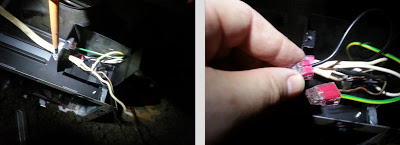 |
| Clamp, plug & play! |
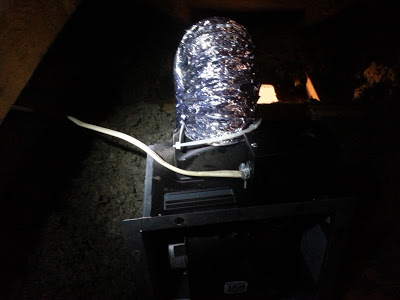
I had bought a wall vent ducting kit as well. The 4" flex duct attached to the fan exhaust port with an included zip-tie. I added a quick wrap of the metallic foil tape that I had left over from the ceiling project. I shoved the new fan back over the hole and screwed the supports to the nearby studs.
 |
| Duct,..duct,... duct,... GOOSE! |
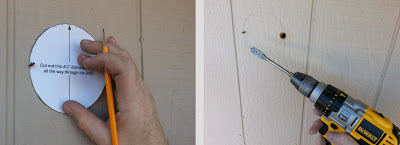
QUICK TIP: Ready to run the duct to the outside, and having pulled the bone-headed move of drilling exterior holes into framing members in the past, I took the time to drive a screw through the wall from the inside, so I could find the location easily from the outside, no measuring!
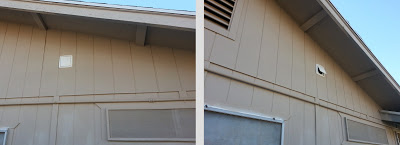
Finding the screw was easy. I shifted to the right to avoid the groove in our "lovely" T-111 siding and traced the 4" hole using the template supplied with the duct kit. Drilling a larger hole near the side of the line with a Spade Bit allowed for saw blade access.
Grumbling about the lack of a cordless jigsaw in my collection of power tools, I was forced to the disagreeable task of stringing out an extension cord, like a chump. This Black & Decker Jigsaw is actually the first power tool I ever purchased as a homeowner. It was bought for slicing a countertop to fit a new refrigerator in our first house, probably in 1999. I don't use it a ton, but it's held up very well for a lightweight, economical-grade power tool. Here's their current version, the Black & Decker 4.5 Amp Variable Speed Jigsaw
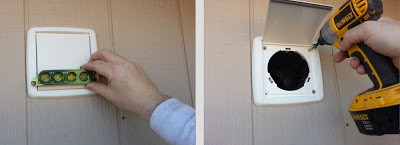
The duct kit came with a exterior vent with a flap door. An included sheet metal, rigid duct tube snaps into the back and is fed through the wall into the attic. I put a my small torpedo level on a straight line to square it up. Four wood screws zapped in quickly with the impact driver
 .
.
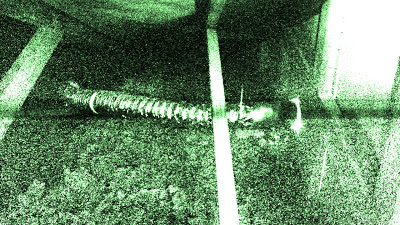
Back in the attic, I attached the flex duct to the rigid duct tube, again with a zip tie and some foil faced, adhesive tape to seal it up. Per instructions, I kept the flex duct in a gentle curve, without making any tight corners. The attic rat mission is an operational success. This highly classified image shows the target has been taken care of:
 |
| Classified: Just between us right? |
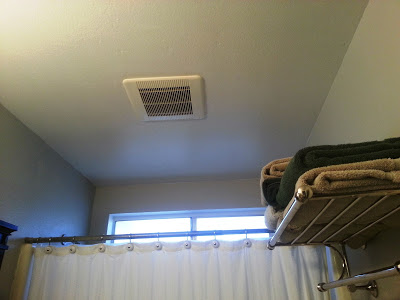
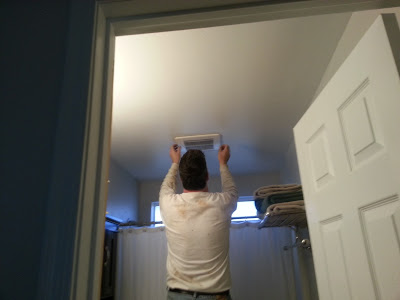
Returning filthy-clothed to the sweet, air conditioned goodness of inside, I popped the beautiful, new fan cover in place, this time with the easy, snap-in retention springs.
 |
| Note a very important detail in this step: no bald spot. |
The exterior vent flap works well. It swings open and closed as needed.
 |
| Thar she blows! |
This was a medium difficulty project. Anytime attic work is required, it's a bit difficult and unpleasant, but you can do it. Keep your feet on solid framing and watch out for nails and open electrical connections.
It's not an exciting project to have done; we had a fan and we have a fan again. Just an unforeseen, necessary repair, not a desired improvement project. At least it's quiet and looks much better than the dated, ugly one. Plus, we now have exterior venting.
Thoughts? Comments? I'd love to hear from you.
____________________________________________________
UPDATE!! I'm honored to have this story chosen to be featured an Bob Vila's website as part of the "Bob Vila Nation" of contributors from the blogging community. Please check it out and give me a vote by the hammer image, if you like the story.