


I had an awesome experience at the DeWalt 2017 press event in Nashville, TN. Check out my highlights of their new and upcoming tools. Hint: Cordless, cordless, cordless!!! #toughinthesouth
Read MoreHow To Easily Clean Rust From Tools
Our daughter left one of my shovels out in the yard to rust and decay. I'm trying out a quick and easy rust treatment product: WD-40 Specialist - Rust Remover Soak and bringing it back to life.
Read More
DIY Metal Bookends - A First Brazing Project
I'm trying out brazing steel with the Bernzomatic Oxygen Torch for the first time. Check out how to build these these cool hand-tool bookends!
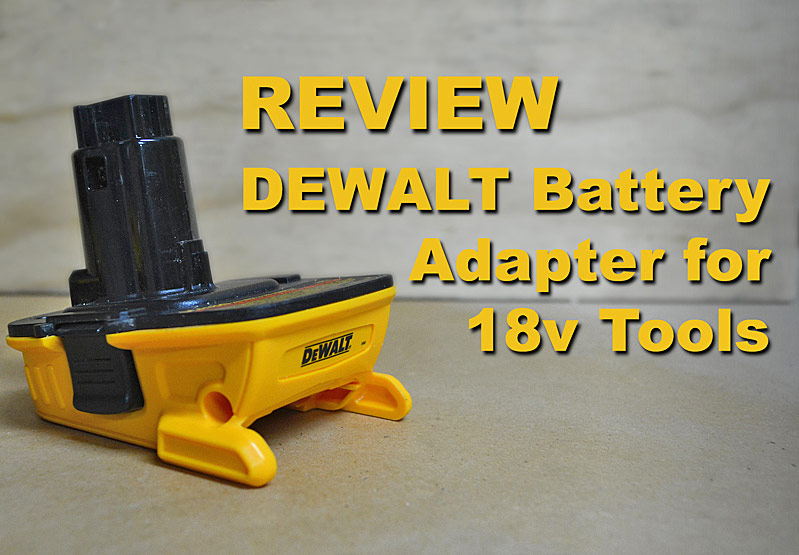
Read MoreReview: DeWalt Battery Adapter for 18 Volt tools to 20V MAX Batteries
Regular readers of this blog know that I've been personally wielding DeWalt 18 volt cordless tools on my projects for years. I love 'em; absolutely no complaints.
When DeWalt gave me an early-bird chance to try out their new battery adapter and bring modern battery technology to my older tools, I couldn't wait to put it in action. I've run it through its paces for a month on a variety of my tools.
I believe DeWalt's 18 volt line of cordless tools has been in the market for about 20 years. It's been one of the most popular lines of professional-quality cordless tools, for a very long time. They're certainly the most common brand on the construction sites I've visited.
I've had my own set for about 8 years, and all the tools are still going strong. They've outlasted and out performed any other brand of cordless tools I've owned by several years, leaving me a bit of a fan-boy.
This battery adapter is a huge deal. Years ago, I worked a second job, at a department store selling their popular exclusive brand of tools. It was common that I'd bear the brunt of a shopper's frustration when they learned that each year's version of the store-brand tools had an battery configuration incompatible with the prior model. It was odd, even though each generation was a same voltage, NiCd battery, there would be a slight change to a a bump or ridge on its case, preventing interchange between versions. People would end up purchasing new tools, rather than ordering older batteries from the factory. Was it an "engineered obsolescence" sales scheme? Although many people bought new cordless tool sets, lots left to shop elsewhere, swearing off the brand as they went out the door.
DeWalt on the other hand, has supported tools that last for a seriously long time. You can go to hardware store, home center, or Amazon.com today and get an 18 volt NiCd battery, or even a brand-new 18 volt tool. That's simply incredible, considering the modern system of 20V MAX tools has been out for 4-5 years. The introduction of this battery adapter is awesome; now we can start transitioning towards newer technology, bit by bit, piece by piece.
I own three 18 volt XRP batteries. I've worked them hard over the years. One recently decided it was time to retire and refused to take another charge. The other two are showing signs of age with their full-charge run time declining slightly. I'm still running them hard.
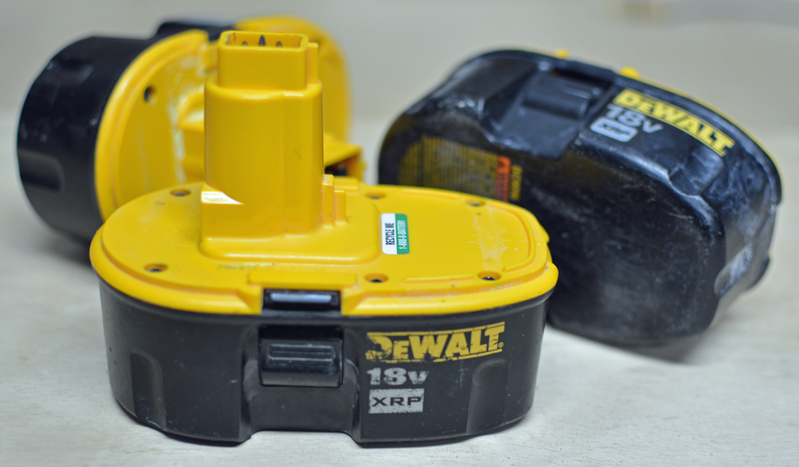
The grizzled veterans
These 18v batteries are beasts. They pack a lot of punch and run for a long time, even at their advanced age. I've never have trouble working two to three tools on a project, cycling between my three batteries. Now with one retired, I don't want to spend the dollars on replacements, when the modern stuff is so much better. The new Lithium Ion batteries pack much stronger punch with a better power to weight ratio, almost no self-discharge, and a cool led "fuel gauge".
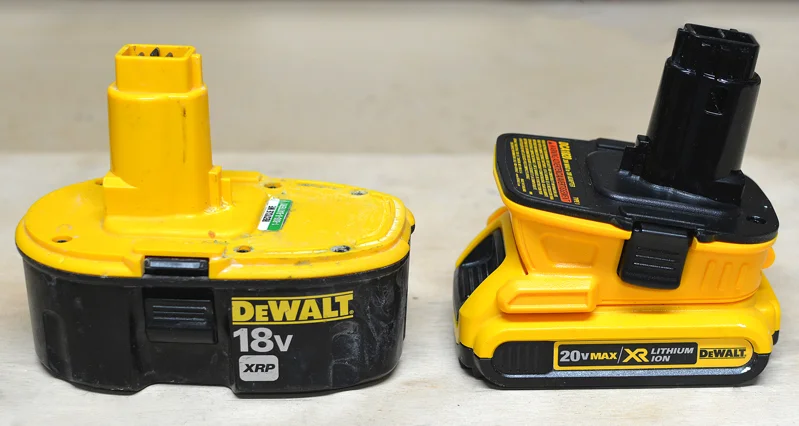
Check out the size difference between the 2 amp hour Lithium Ion 20V MAX battery pack that came with my DeWalt Cordless Oscillating Multi Tool and one of my my beefy 18v XRP nickle-cadmium packs. There's a significant weight difference too.

NiCad vs, Lithium Ion
Obviously, there's more than a little physical difference between the old plunge-in style NiCd and the slide-on Lithium Ion. That difference is what the Dewalt Battery Adapter overcomes. It also holds the pack at a slight angle, presumably to mimic the tool balance we are accustom to with the old packs.
I slipped the adapter into my 18 volt Reciprocating Saw, just as I would the standard battery pack. It felt like it was of the same beefy plastic the tools are constructed from. There was a slight color variance, but I'm fairly sure that's due to 8 years of Arizona sun beating down on my tools as I work. Of course, I'm not going to complain about color variation, these are workin' tools after all.

The base of the adapter has the same electrical connections as the modern DeWalt MAX tools. The battery pack slides on from the front and locks onto the adapter.

Since February in Arizona isn't about shoveling snow, I let the DeWalt 18v Cordless Reciprocating Saw chew on some yard work for a bit. I cut palm tree fronds, trimmed the mesquite, and chopped up a dead cactus. I wasn't sad to see that stinker go either. It was the son-of-a-gun that seemed to shoot spines at me whenever I was in its vicinity. It still managed to get one last parting shot when I accidentally flipped a chunk up into the front of my shirt, leaving some painful little holes in my chest.
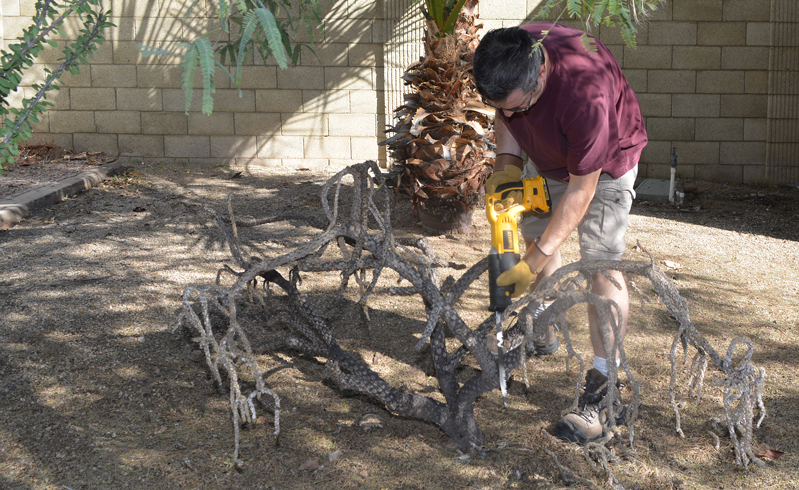
The saw ripped along, fast and powerful. It balanced good in the hand with the new batter set-up. I finished with plenty of juice in the battery.

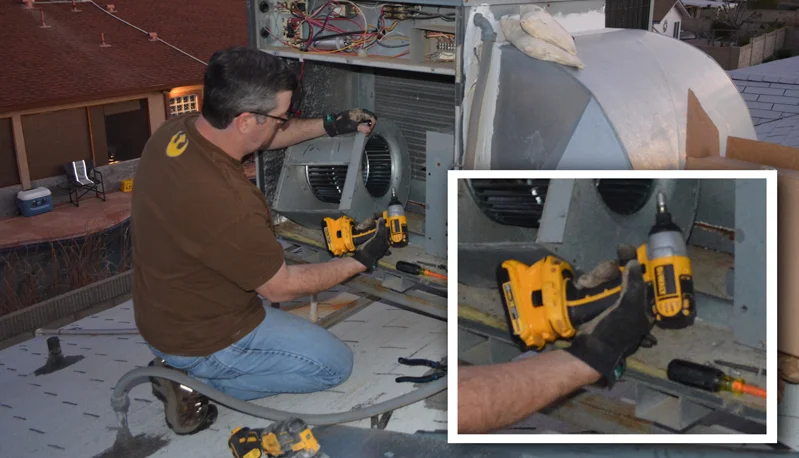
Another adventure where I brought the battery adapter into play was the repair of our rooftop heat pump (Post: Cold at Night! A DIY Heating Repair Adventure ). I removed and replaced a bazillion screws with my DeWalt 18v 1/4" Impact Driver fueled by the 20V MAX Lithium Ion battery through the adapter. I ran the impact driver until the sun went down,...literally.
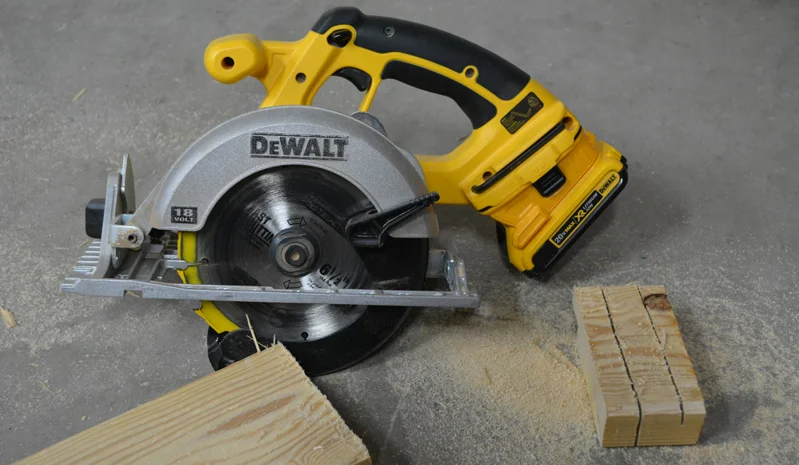
The battery adapter with the 20V MAX battery pack with worked just fine in my circular saw as well. Power and speed, making sawdust in the garage.
I understand the adapter works with most, but not all of the legacy DeWalt 18 volt tools loose in the wild, but it worked with my whole arsenal. I tested the rest of my collection with success. The adapter worked well with my cordless cut-off tool , my XRP Hammerdrill / drill / driver , and my flexible floodlight. The only complaint I have is that it takes a bit of extra muscle to remove the adapter; it seems to latch in tighter than the 18v battery packs themselves. Not a problem if you are just changing the batteries, but if you want to slip the whole deal on another tool, it takes just a little extra grunt.

I'm really happy with this cool widget. Frankly, I'm surprised DeWalt even produced it. Who could complain if they slowly phased out the 18 Volt line after such a long operational lifespan? Not only do they continue to support the older line, they chose to offer this adapter as a bridge to their current line. That's loyalty to your customers my friends.
I used a single 2 amp hour 20V MAX battery on my tools. I believe it outperformed the 18v XRP packs on their best day. DeWalt also makes larger-capacity 20V MAX packs, ranging up to a 5 amp hour beast.
The DeWalt Battery Adapter for 18V Tools is available now, in two configurations:
DCA1820 - DeWalt Battery Adapter for 18V Tools (inc. adapter)
DCA2203C - DeWalt Battery Adapter Kit for 18V Tools (inc. adapter, (2) 2 amp hour 20V MAX batteries, and a charger)
Keep an eye out, I'm going to be running this little champ on some upcoming projects.

This is not a sponsored post, but my friends at DeWalt did send me
a demo unit to try. All opinions and experiences are 100% my own.

Review: DeWalt 20V XR Lithium-Ion Oscillating Multi-Tool

I picked up a DeWalt 20V XR Lithium-Ion Oscillating Multi-Tool recently and ran it through its paces on a recent, closet remodel project. Spoiler: I'm really pleased with it.
An oscillating multi-tool is a handy class of tool that features an interchangeable blade or attachment that rapidly rotates back and forth, on the horizontal axis. The blade travel is slight, nothing like the inch or so of travel of a big, bad reciprocating saw. These tools can make fine cuts in difficult to reach areas, even straight, plunging cuts. Many brands of Oscillating Multi Tools have appeared over the last several years, along with accessories beyond cutting blades.
My first OMT experience
I became more familiar with the somewhat new class of Oscillating Multi-Tools, having started with a cheapo import model that sold me on the concept. I bought the thing on a whim, on a weekend coupon sale. I found loved the things a multi-tool could do. I've used it to slice door molding, cut drywall and siding, trim bamboo flooring, and even hack shingles.

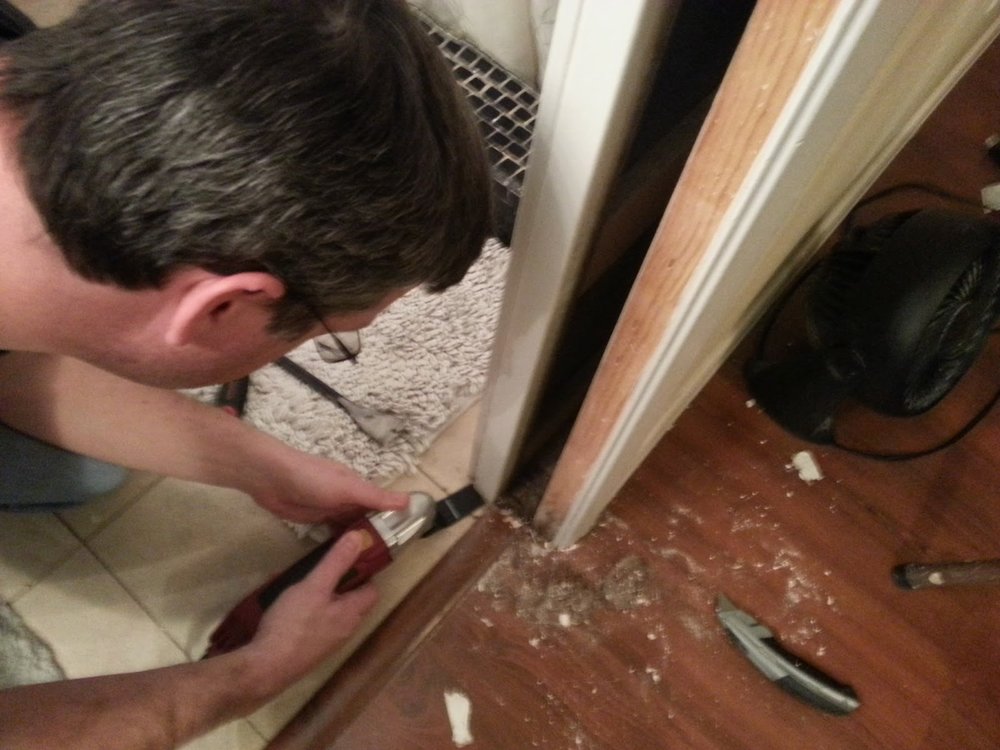
It was a perfect type of tool to have in the cabinet, and got more use than I thought it would. I loved the concept, but I did have issues with the tool itself. I tore up the cheap wood cutting blades like crazy. Blade changes were a pain and I had to periodically re-tighten them the with an allen wrench. The tool was loud and sent a lot of vibration up my arm. I decided to replace it because it got really hot under extended use, feel the heat through work gloves hot. Still, I got a decent life span from the tool, considering the price.
The Upgraded Experience
I wanted to a cordless model, so I decided to buy the DeWalt, the #1 Best Seller seller on Amazon.com, with a 90% five-star rating. The version I bought is the DEWALT DCS355D1 20V XR Lithium-Ion Oscillating Multi-Tool Kit which came with a bag and a bunch of accessories. This kit costs a little under $200, less for the bare, cordless tool less if you already have enough 20V MAX batteries and prefer to buy the attachments a la carte. A similarly outfitted kit can be picked up for about $50 less for the corded model. I've also seen it included with some of the larger, cordless combo kits, if you are financially blessed enough to bag a sweet pile of new lithium-ion power tools in one swoop, and make me horribly jealous.
blade mounted 90 degrees to the tool
I figured these things were suited for nail encrusted wood, so they'd be good for cutting bare framing nails. I think there was too much wobble in the way I was holding the tool. I managed to dull the blade up more than I'd hoped, but it worked.
Using Off Brand Blades
The next task I tried was to cut a large drywall opening for my in wall closet shelving project. For this cut, I used a blade I already had in inventory. It was a Harbor Freight, 4" crescent shaped, steel blade. with the wide, curved tooth edge, I could cut a long line, changing the angle of the tool, so my grip and arm position could be adjusted for comfort. DeWalt makes higher-quality, similarly-shaped blade, but I wanted to test the included universal accessory adapter included with the kit I'd purchased.
This piece utilizes a the bolt and washer type connection similar to my old tool, but it snugged up much tighter. It allowed me to use the off-brand blade without any issue.
An off brand blade mounted via the Universal Accessory Adapter
Oscillating Tool Guide System
Cutting those long, straight lines freehand was a concern before I started, but it was a piece of cake. First of all, this tool is smoooooth.
I don't know if it's better build quality, or the brushless motor, but the DeWalt didn't vibrate and rattle as much as my old tool. It positively purred in my grip. Fitted with the removable DeWalt Oscillating Tool Guide System
(included in the kit), I was able to roll along, pressing the guide against the wall as I went, for added stability.
Oscillating Tool Guide System
It's stable enough to comfortably cut one handed, almost like a pair of scissors.
One-handed, overhead cutting, using the Oscillating Tool Guide System
Accessory Changes
The DeWalt uses a tool-free, accessory clamp system, with a big spring-loaded lever and those gripping teeth I mentioned earlier. The tapered teeth slip into holes in the blade and grip tight. This is one of those features I didn't know I missed when using my original tool. I had simply dealt with hunting around for the special Allen wrench to make changes and periodic re-tightening.
Quick, tool-free blade change
Battery life

I challenged the multi-tool during my project, by performing plunge cuts inside the wall cavity through 2x4's. I completely cut through the boards in four places; two locations were actually doubled 2x4's. I sliced a couple nails in the process too. All of this, including the drywall cutting, was done on a single battery charge, with juice to spare. DeWalt claims a 57% increased run-time due to the brush-less motor. I was really pleased, because I only have the one 20 V MAX battery on hand. My aging fleet of cordless tools are running on last generation, monstrous Ni-Cad batteries that I couldn't swap into the tool.
The tool was powerful, yet lightweight and easy to handle. I could fit the thing inside the wall cavity, with enough room for my fingers to grip it. Of course, my entire hand wouldn't fit in there to pull the trigger comfortably, but there is a trigger lock feature to keep it running, something else my original tool didn't enjoy.
Tight Spaces
It plowed through the cuts fairly quickly. Of course, it was slower than a reciprocating saw would have done, chewing full-speed. I probably wouldn't reach for this tool in an open stud-wall situation with both tools on hand, but that's not what it's made for. This little soldier is a commando, trained for precision strikes, in difficult-to-reach territory and, with a variety of accessories, it's prepared to take whatever weapon it needs to complete that mission.
Plunge cutting a 2x4
Light it up
Seriously? A headlight? It's another feature I would not have actively added to my shopping list, thinking it a silly inclusion, like dealer added pin-striping and mud-flaps on a car. However, at the end of the day, I absolutely loved it; I was lining up my cuts on pencil lines, hiding in the shadowy recesses of a wall cavity. It was awesome.
In fact, at one point, because I can be an idiot, I dropped my remote camera trigger down inside the wall and simply shined the tool's LED headlight down the wall to locate it.
(Note: The Oscillating tool does not include any feature whatsoever to reach three feet down inside a tight wall cavity and fish a feeble-fingered Blogger's critical, photography item out. Disappointing, you'd think they'd have thought of that and added some kind of Bat-Grapple thing. I gotta deduct points for this omission.)
Bright idea
I found the tool versatile and enough to use throughout the entire project, I even used it like a pair of power shears to cut the beadboard backer. I rough cut it to size, then trimmed it flush, once it was tacked in place.
Detail Sanding
I popped on the sander accessory and gave my project a good once over. The kit I purchased includes this fitting, plus a decent supply of sandpaper, in three grits.
How do you like my dust extraction system in the background? Wintertime in Phoenix baby!
Detail Sanding attachment with 120 grit
No complaints on the sanding, I slipped a piece of 120 grit on the hook-and-loop pa and went to town. I rounded the edges slightly, cleaned up my puttied nail holes, and gave the whole piece a once over, including the inner corners. The tool was easy to handle. I loved not having to fiddle around with a clumsy power cord while I sanded the piece.
Bottom line, I really like this tool. I'm sold on the concept of a multi-tool in general, but this DeWalt came through with everything I wanted, and more. It's well balanced, powerful, and gets great battery life. You will not be disappointed if you add this gem to your DIY tool arsenal.
This is a non-sponsored post, but I have included Amazon.com affiliate links for your convenience. If you make a purchase through one of my links, I'll earn a modest commission to help run the site, at no additional cost to you. Thank you for all your support.
Favorite Stuff DIY 2015
2015 Favorite DIY Stuff: DeWalt Lithium Ion Cordless Oscillating Multi Tool, Bernzomatic TS8000 Trigger Start High Intensity Torch, Keen Utility Braddock Work Boot, Uvex Safety Glasses, Bessey BV-CO30 Clamp Base Vise
Read MoreCutting with Fire: DIY Metal-Cutting with an Oxygen Torch

This year, I've been trying out all kinds of handheld torches, using several types of fuel. The tool geek in me really wanted to challenge myself and move up to something even more serious. Luckily, I got my hands on a
Cutting, Welding, and Brazing Torch Kit , the big, hot Mamma of the Bernzomatic line.
I've done recent torch projects with butane (up to 3,150° F), projects with propane (up to 3,600° F), and projects with hotter burning MAP-Pro (up to 3,730°).
The Bernzomatic OX2550KC, is the next step up. It uses a dual-gas fuel setup; burning both MAP-Pro and pure Oxygen. This compact, fire-breathing beast can produce a flame up to an incredible 5,300° F! It's not even a commercial tool; it's something you can pick up for yourself at a hardware store or home center.
I wanted to try cutting metal with fire. I'd never done anything like it. I think this torch in cutting mode is probably best suited for metal stock, perhaps around 1/8" thick or so. So, naturally, I decided to push well past that on my very first task. I'd been wanting to remove an old, bent fence hinge from our block wall. It was there when we bought our home and has always been an eyesore. The trick would be to cut it off behind the face of the block, so I could patch over it. A reciprocating saw would be difficult to use in that spot. I'd bend the heck out of some blades, chip the wall up, and rattle the heck out of my arms.

It's time to go, Mr. Bent Hinge Pin
This torch doesn't work like a standard handheld torch, it takes a bit of fiddling to get the hang of it, but it's incredible when you do. After a little practice, I was able to perform the fine dance of easing more and more gas into the flame, making it hotter and hotter, a blue/white blade of flame.

The Bernzomatic OX2550KC Cutting, Welding, and Brazing Torch Kit This is a hose style tool, with fuel cylinders placed remotely, away from the torch head. Starting the torch requires opening the MAP-Pro valve, ever so slightly and using a handheld sparker to ignite it.

“Come on Baby, Light my fire.”
It takes a different approach, too much gas flow and the flame will go out with a quick blast and a "pop!"
Since I'm used to using a standard, handheld torch which can be instantly lit with a hearty blast of flame, it took me a several tries to figure out that I needed to use a very light touch. The MAP-Pro fueled flame needed to be quiet and soft, waving gently like a stick pulled from a camp fire. I learned to ease the MAP-Pro flow down even more, until the base of the flame barely touched the torch nozzle.

Isn't it soft and cuddly?
Next came the oxygen. Its valve appears to be finely threaded, because you can turn it quite a bit before the oxygen gets flowing. It's great for controlling the release of a very small amount of gas and easing it up slowly. Too much oxygen, too quick, and "pop" out goes the light. In that case, everything has to be shut off to safely start again.
Speaking of safety, you'll note I stepped up my gear a couple notches for this project. First,since there would potentially be sparks and molten metal, I wore long pants and shirt sleeves (in Arizona even!). Beefy, long-wristed welding gloves would protect my hands if anything spattered. I capped my natty ensemble off with some Mad Max eye-protection, exchanging my normal safety glasses for a shaded, welding mono-goggle. I wouldn't take any chances with my already crappy eyes and a blinding, white-hot flame.

Fire, when you can't see the whites of my eyes.
As I slowly eased more oxygen into the flame, it snapped from the slowly waving, orange flame, to a crisp jet of blue-white fury. To cut with this rascal, I had to get it as hot as possible. It took a few tries, but I got the hang of dancing my hand between the MAP-Pro and Oxygen valves, until I got a real tight blast going.

The perfect flame of awesomeness
With my finely-tuned fire-knife ready, I eased the absolute hottest point up to the metal hinge. The tip of the innermost cone of blue flame was the sweet spot. It was a 1/4" of legendary dragon-fire.

I slowly eased the cutting tip of flame back and forth, ever so slightly, watching the metal turn red-hot. Soon, the surface was liquified and starting to flow. I could move a gelatinous blob of molten metal around with the tip of the flame.

I was really getting going when the flame died out. Getting the initial feel for working the tool sucked down quite a bit of oxygen. I'd run out, just when I was having fun. I ran out to the hardware store and grabbed another, which was perfect, because they had just finished making the first batch of popcorn for the day.
The second time, with the learning curve behind me. I got my flame ripping in no time. I was once again in the molten metal business.

"Hot"
As I cut, it seemed like the liquid metal helped accelerate the process, it kept the hinge piece stay glowing hot.
The camera, just doesn't do it justice. Even through the shaded goggles, it looked incredible, like a movie scene from a steel mill. It was too fun to be work.

Hotter
I tapped on the piece few times with a pair of pliers and could easily bend it. A couple flaming minutes later, I grabbed ahold and snapped it off without effort.
Hottest
Although the red glow faded very quickly, the piece was still dangerously hot. I could feel the heat radiating from it on my weekend-stubble chin. Even after cooling on the ground for several minutes, it still scorched the board I set it on like a wood burning iron.

It was a shame I was done. It was just too much fun.
Naturally, the kid in me decided I really needed to push the remaining bit of metal back, just a little deeper into the block face, because,... molten metal!
I sparked up some fire again. I really had the hang of lighting the torch by this point, quickly getting the flame into good cutting shape. With the flame concentrated in a recessed hole in the block, it created an oven of incredible heat, liquefying the metal in seconds.

The Bernzomatic Cutting, Welding, and Brazing Torch Kit really is a cool tool. I pushed it hard on my first foray, not only cutting, but cutting a really thick piece of metal. I think I may do a more crafty-dude project with thinner metal at some point. I'm also looking forward to using it to try brazing, basically a big-kid version of soldering, to weld metal together.
What do you think? Ready to try this powerhouse of flame?


This is a sponsored post. I am a proud to be a Bernzomatic Torch Bearer, though all opinions expressed are 100% my own. I won't recommend products I don't believe in.
The Torch Bearers are a group of tradespeople, DIYers, culinarians, adventurers and artists brought together to create projects using Bernzomatic torches and share their knowledge and ideas with you. Check them out here and get inspired to create with fire.
Visit the other awesome Torchbearers and see what they are up to on the Bernzomatic Torch Bearer Site.
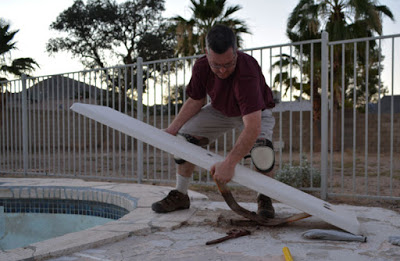
Removing Rusted Bolts with a Torch - Fire it up!
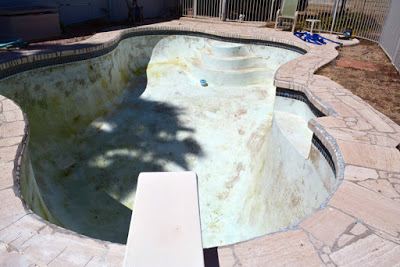
The old diving board must go. Unfortunately, the weathered, rusted bolts holding it down were frozen tight. I'd tried WD-40 in the past with no luck. I didn't want to spend a lifetime burning through reciprocating saw blades trying to cut through them. This was the perfect project to try a new technique, fire.
We're probably not going to replace the board during the pool remodel since it's a basically an inevitable trip to the emergency room, just waiting to happen. As fun as it is, we've had some close calls with the kids over the years. Now that the pool is empty, anyone that walks on it isn't just risking falling in a nice pool of water, they're risking a nine foot swan- dive onto the concrete below. Now that's a trip to the emergency room.
Since we're currently enjoying the horrors of Arizona summertime heat,and there was absolutely no shade on the diving board area, I waited until after dinnertime to head outside as the sun started to dip towards the mountain.
Not only was the diving board an injury magnet, it was in horrible shape. The base was a rusted eyesore. It sat on the section of deck where I had done my experiment in removing the horrible, slippery stone our predecessors had laid on top of the deck.
It was really more of a problem with the nuts, seized onto the bolts protruding up from the concrete deck. There was a bunch debris around those nuts, concrete dust, pebbles, and rusty corrosion. A wire brush cleaned it up reasonably well so I could get a clean shot at the nut and bolt.
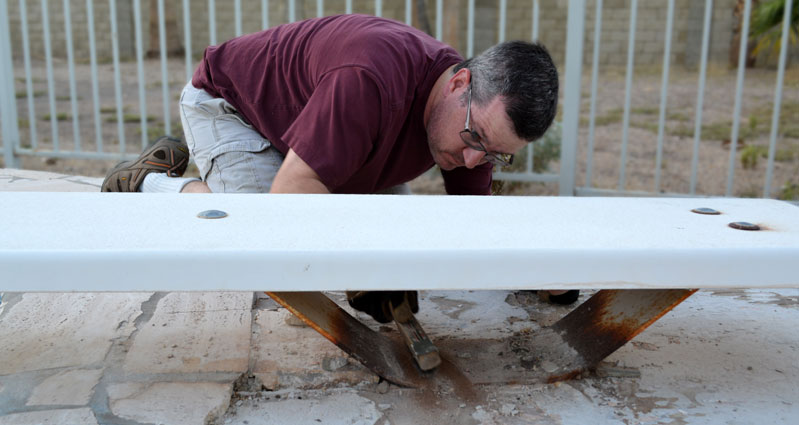
I tried, one last time, to macho-man those rusted nuts off with sheer brute force. No luck. The lower jaw of my crescent wrench actually flexed a bit and seemed like it was going to break. Looking at the photo, I realize my hand would have slammed into the base of the board if the wrench had broken. Gloves or not, that may have resulted in some broken fingers. You may argue with me, but I consider broken fingers undesirable. I'm kooky like that.
Torch time! For this awkward location, I chose the Bernzomatic Trigger Start Hose Torch. I could keep the gas bottle back from my work area and use the smaller torch head to reach into the space below the board and still see what I was doing. This particular torch also has the ability to use MAP-Pro gas in addition to normal propane.
MAP-Pro burns hotter, 3,730° F, over Propane's 3,600° F. Propane should do the trick, MAP-Pro will just do it faster. I like faster when I'm sweating out in the heat with a handheld flamethrower and there are frosty beverages to be had when the job is done.
Check out the cool holster. It even has a metal sleeve for a hot torch.
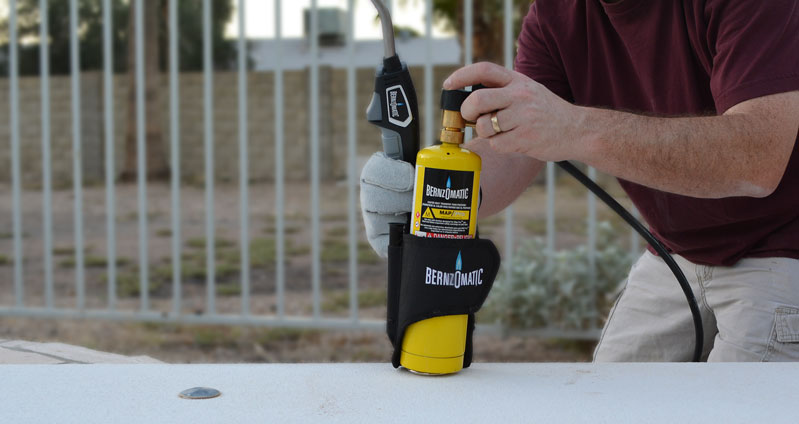
The BZ8250HT - Trigger Start Hose Torch
The BZ8250HT - Trigger Start Hose Torch
With some WD-40 residue still on the nut, I laid down some fire on it. I got it HOT, blasting flame and slowly moving it around for 30 seconds or so. The idea is that the metal expanding breaks down the corrosion. The heat draws the WD-40 into the threads, similar to the way solder gets sucked into a plumbing joint when a fitting is heated.
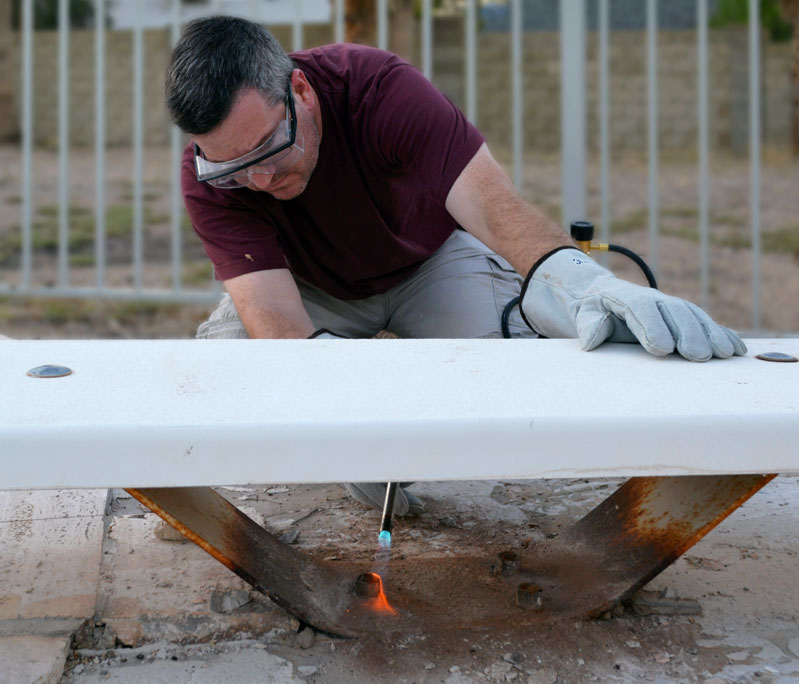
I slipped a monkey wrench into a steel pipe (actually an electrical conduit bender handle), to make a "cheater bar" for leverage, and rocked the nut back and forth a bit before putting some muscle to it. It broke free fairly easily and began to unthread.

Done deal. The nut un-threaded easily once I got it going. The threaded stud didn't snap off with the herculanean force I applied using the cheater bar.
The garage sale monkey wrench and the loosened nut, still warm.
I continued, using the same method for the other two nuts. It worked perfectly. Check out the clean threads on the left bolt below. I suspect with a little cleaning it could be re-used if I was simply replacing the board.

Free Tip of the Day: Don't touch!!!
The ancient art of leverage.
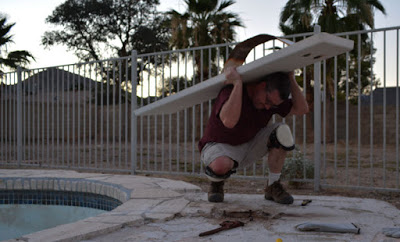
With all three nuts off, the board popped up easily.
I guess it's something you never think about in the course of a normal day, but if you ever wondered, I can assure you first hand that a diving board is heavier than it looks. As the sun slipped behind the mountain, I lugged the beast all the way to the front curb to throw it on the quarterly bulk trash pile...
Atlas AZ DIY Guy
...and lugged it all the way back, when I realized the city had already cleared the pile. I guess I'll have the pool demo contractor dispose of it or for the next bulk pickup.
This torch technique is definitely going in my DIY playbook. I'm also looking forward to more projects using the flexibility of the hose torch.
Frosty beverage time!

This is a sponsored post. I am a proud to be a Bernzomatic Torch Bearer, though all opinions expressed are 100% my own. I won't recommend products I don't believe in.
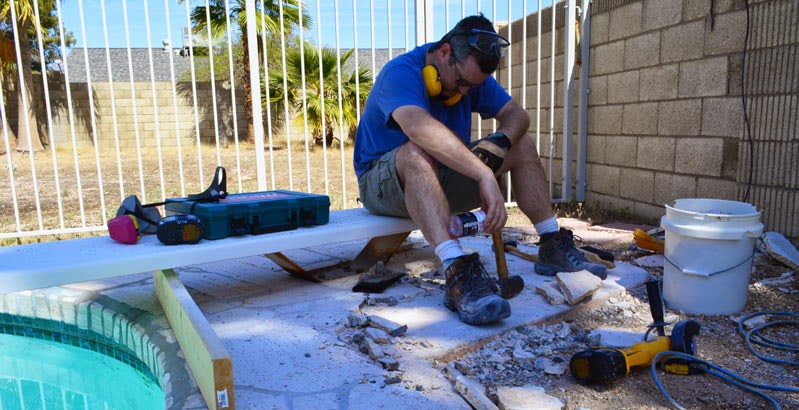
There's Always a Bigger Hammer - The Paving Stone Demolition Experiment

'm trying to remove the cemented-in mystery stone from our pool deck. The same stuff is on our patio, so if I'm successful, I may go after that area too. Why would I do that? Cause it's ugly, bad stuff.
You can read about this delightful stone in my last post about our upcoming swimming pool renovation if you like, or you can stay here for the hard-core, hammer-slammin' action.
To update progress on the renovation, I've had two pool contractors give renovation options and quotes for a total pool re-do / repair. The first contractor thought we could remove the mystery stone from the original deck, and cover it with brick pavers. The second promoted jack-hammering the deck down to dirt and starting from scratch, with a new acrylic coated concrete cool-deck.
We're considering both approaches, but the paver idea hinges on successfully removing the stone, and they want $2,000 to do that.
Just to remove the stone, not to buy or install the pavers. Holy crap!
I decided to see if I could do it myself. I didn't think I had the proper tools for this operation, but a test run with what I had, could determine if it could be done at all. Of course, this job was too big for Sweetness, my trusty electrician's hammer, so I upgraded to a mini sledge and a mason's chisel. I'd used the duo years ago, to split bricks for a mailbox project. I figured they should at least get me started with the necessary destructive experiment.
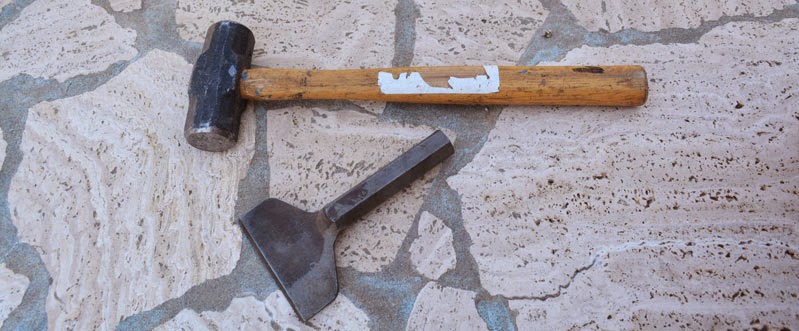
Mini-Sledge and a Mason's Chisel
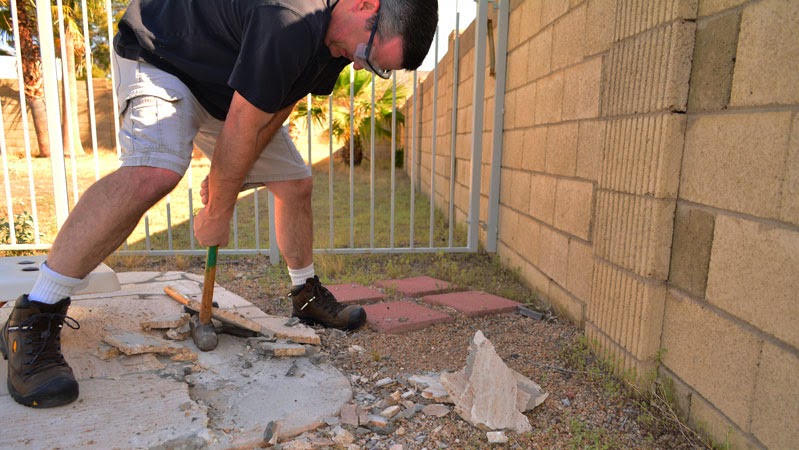
It was easy enough to chip the concrete off the edges of the original deck slab, but it was seriously tough going to get the stones to release. I had to chip along as much of the edge as I could, before driving the chisel under the stone. Finally, I'd give it a few solid whacks to break it free.
"tink,..tink,.tink,..tink..crack..."
After a while, I got a small area cleared. A few stones were up, broken to bits, but there was some concrete bedding left behind. It probably wasn't the best hammer and chisel combination to be using, but it proved that the stone could be removed. It would only take a "short" 3 years of solid evening and weekend work to plink my way through all of it.
I chose to move up a level in hammer options. Tucked in my arsenal of hand-held concussive forces is Mjölnir, my mightiest hammer option. It is truly a hammer worthy of a Norse God, and it came to my possession through a character of mythological proportions, and I can't believe it's not been featured on this blog yet.

Mjölnir, next to a mere mortal's hammer.
Mjölnir is actually a weathered, full-size sledge hammer with its handle sawn off for one-handed use. It was given to me years ago in my brief tenure as a construction worker, by Joseph, a foul-tempered Lebanese construction electrician, with muscled, fur-covered forearms the size of gallon paint cans. He was an intense, scary dude, physically incapable of rendering a single sentence without at least four curse words. In fact, sometimes his sentences were artistically woven entirely from curse words. For some reason, he liked me and let me keep this bastardized sledge. I think he wanted to craft a larger one for his own use. I don't know why; he could slam an eight foot grounding rod all the way into the ground as fast as you or I could push a thumbtack into a bulletin board.
Just like the God of Thunder, eh?
Mjölnir does its job. It hit with a tremendous impact, driving the chisel under the stone with only a few swings. It was horribly unwieldy though. Swinging a full-size sledge with one hand is a little more intense than swinging a tack hammer. I even managed to treat myself to a ricochet shot that slammed the mighty hammer into my foot, nearly knocking me over. It didn't hurt a bit at all though. It didn't hurt because I am one tough DIY'ing action hero of a man,... who just happened to be wearing steel-toe boots.

Steel-shod toes are happy toes.
I proved it was possible to remove the stone with a chisel and hammer, even a big damn hammer, but it was slow going and tough work. It physically wore me out. I thought perhaps I needed a better chisel, so I called it a day.
I had muscle aches on top of muscle aches the next morning. I'm out of shape for sure, but swinging an overweight hand-sledge in a crouched over position for hours and hours, days and days was going to be miserable. I clearly needed a better setup. Luckily, I'd won a Home Depot gift certificate at work and it was positively straining to free itself from my wallet. I headed over to my friendly neighborhood, big orange box store to check out the tools,... and visit Bad Dogs in the parking lot, of course.
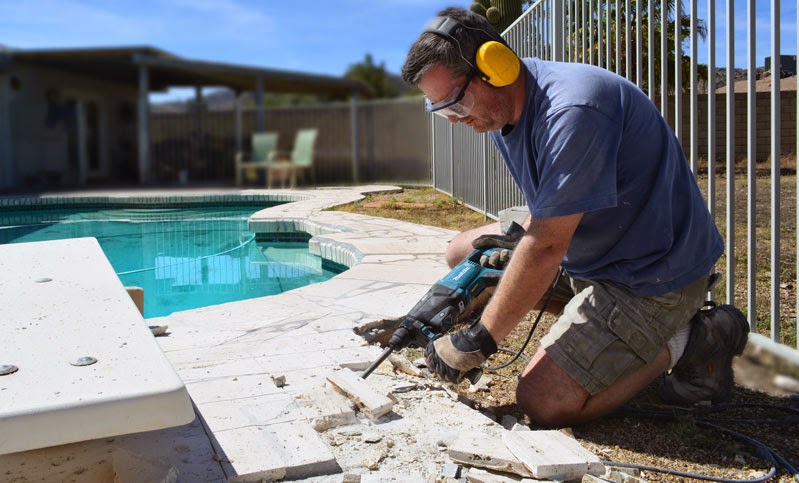
Naturally, I came home with a new power tool. Enter a big hammer drill, featuring 2.1 foot pounds of impact, 4,500 beats per minute. That's a pinch better than I can do by a hand. This bad boy is a beefy Makita HR2621 1" Rotary Hammer, with anti-vibration technology. A new self-sharpening SDS plus chisel bit came home with it.

An example of a well chiseled physique.
Unlike my 1/2 inch cordless hammer drill, this roto-hammer has a third setting:
- Drill Only - spinning for standard drilling through wood, etc.
- Hammer Drill - spinning, plus impacts, for drilling through masonry
- Hammer Only - the chuck does not spin at all, for chipping /digging, etc.
For this adventure, it was hammer only mode, the setting my cordless hammer-drill does not have.

Stop. It's Hammer Time.
Ohhh, hell yeah. This thing rippped up the "mortar bed" (?) of concrete the stones had set in much faster than the ol' hammer, chisel, and brute force I had been using. Unfortunately, it still took forever to pop the full size stones off, but it did it with a lot less effort. My visions or ripping through like a bulldozer, sadly, did not come close to reality. It was still slow going.

I switched to a stance I've learned from every single movie and TV show I have ever seen set in the streets of New York City, "jack hammering construction worker." I believe all aspiring, male actors in the city get their start in this role, well either that or "construction guy eating a sandwich, next to jack-hammering construction worker."
Either way, it was fun. It did make it easy to chip a few inches from the edge, fairly quickly.Still slow going, but again, less effort than swinging an oversize hand sledge. I even began thinking about a sandwich myself (I could totally nail that acting thing).
The "Construction worker with a jack-hammer" stance.
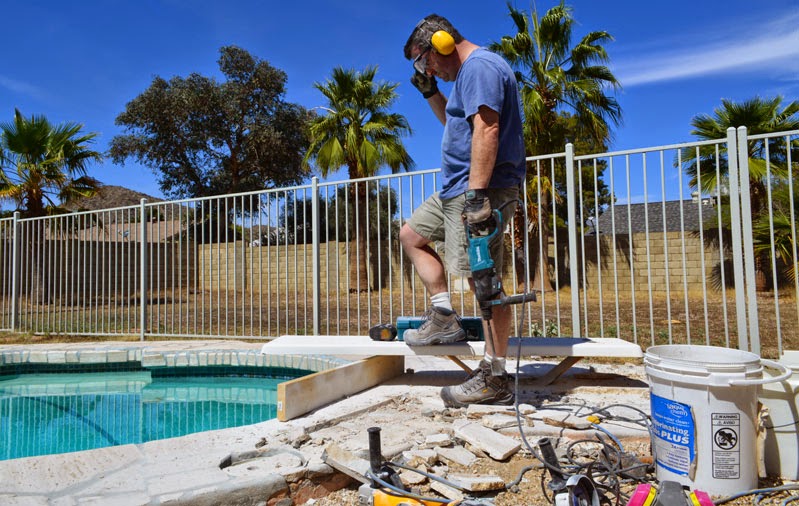
A friend at work had given me another idea to try. He'd thought that I should use a masonry blade in a circular saw to slice the top layer into pieces that would be easier to pop off. Maybe that would help. Of course, I didn't have a masonry blade on hand for the circular saw. I did, however, have a diamond blade mounted in my Cordless Cutoff Tool

It slices! It dices! It can even cut a tomato!
I did a decent sized section, but it really chewed through my batteries in the process. I guess the cheap blade and the heavy resistance of cutting a 3/4" thick stone and concrete really put a draw on the power. I emptied all three batteries. I had one on the charger as I tried whacking again with the big sledge and chisel, thinking I could simply pop the squares I had cut out. It was a little better.
That quickly led me to try sitting on the diving board breathing hard and drinking vitamin water, which worked nicely for me, but didn't accomplish any actual work.
Success at last!
The roto-hammer, made short work of it. I finally had the winning approach. The problem was, I couldn't charge batteries in the cut off tool fast enough to keep up with the cuts I needed. I'd need also to make more cuts to get the pieces to the best size.
In the end, it wouldn't be a problem, because fate had taken me by the hand and led me to the solution. Let me take you back in time to my the shopping trip, when I was literally standing in the checkout line of Home Depot with this:

After a few moments, the lady at the Pro Checkout called me over to her station, with no waiting in her line. As I walked over, I saw this:

Waszzat? A grinder included?
A speedy check of online reviews later and I'd added the first two Makita tools to my arsenal. At the time, I didn't know I'd want a grinder for this project. Sure, I've wanted one for a while, but "free" really closed the deal for me.
I switched the blade over from the cordless, and let this bad dog run free. With an inexhaustible supply of electricity and a much higher RPM, it tore through stone, rendering it into flying dust.
"All we are is dust in the wind,..dude."
-Bill and Ted
This was an easy tool to use, especially considering the incredible amount of work it does without much muscle power. It cut stone and concrete with almost no effort. I really like the second handle to keep it under control and prevent it from tasting human flesh. Its going to be active on lots of future projects around here.

I cut a grid-like pattern on both sides of the diving board, taking care not to cut too deep and damage the slab below. In hind-site, I think I'd make a good dentist. This is pretty much what they do right?

I had finally, finally arrived at a good demolition solution. I'd cut the grid roughly into 6 inch squares. The roto-hammer slid right under the corners at a low angle. Within just few seconds, I could hear the sound change and the "tile" would pop up, usually in two pieces.
It was way easier than the sledge hammer approach. Still it was hot work. I really wanted to jump in that pool.
After a quick clean-up the deck was exposed. There was still a fair amount of mortar, but it could be cleaned up later if we decide to go this route. I figure I'd chip up the high spots with the roto-hammer and then get one of those cup grinding-wheels to clean up whatever was left. It can be done.

With the final process discovered, I think I can at least get the stone up in a couple weekends. But, for now, I'm going to stop, until we decide if we are going to resurface this with pavers or a coating or if we are going to have the entire deck demolished.
That I'm not going to do. Sure, I could get my hands on an electric jack-hammer and bust it up, but I don't have the expertise to avoid damaging any underlying structure that may need to stay intact. Plus, that is a lot of material to cart to the dump.
For now, I have this little heap. I'll smuggle a little out each week in the trash if I have to.

Favorite DIY Stuff 2014
DeWalt Right Angle Adapter Attachment, O'Keeffe's Working Hands Cream, Inferno Propane Torch, 3M Professional Multi-Purpose Respirator, Monkey Bars Yard Tool Storage Rack
Read MoreThe Front Yard Graveyard - Zombie Defense Give Away
Creating a Halloween graveyard in the flowerbed, zombie fighting advice and a tool rack give away. Plus a 15% discount coupon code from Monkey Bars.
Read MoreWeed Killing - Taking a flame thrower to this place!
Using a propane torch to kill weeds without chemicals. The Lincoln Electric Inferno in action!
Read MoreGiving Support - Securing Plumbing using Cool Tools.
I had to secure the plumbing inside the wall with no support. Bring in the Kreg Jig and a Right Angle Drill Attachment
Read MoreGarage Organization with Monkey Bars
Installing a yard tool organization rack by Monkey Bar Storage.
Read MoreWear N Write - Clever Dry-Erase Notepads, Perfect for DIY'ers
Reviewing the Wear-N-Write. a wearable, portable whiteboard.
Read MoreFavorite DIY Stuff 2013 - PT I
Victorinox Swiss Army SwissTool, Red Wing Moisture Wicking Socks, Carhartt Nail Apron, Diablo Demo Demon Carbide Reciprocating Saw Blade
Read More
Review: Ryobi Door Latch Installation Kit
Reviewing the Rayobi Door Latch Installation Kit in action.
Read MoreInstalling drip edge, or maybe not...
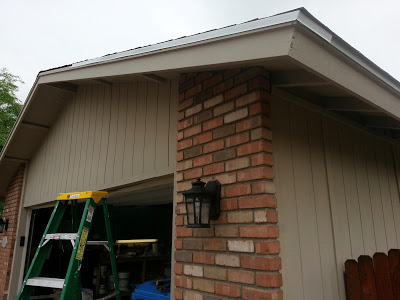
I'm really trying to wrap up the work on the front of the house. All that's left is replacing the drip edge that was removed when our predecessors built the dreaded tunnel of doom . I'd also torn off a good amount when I replaced the rotted facia boards.
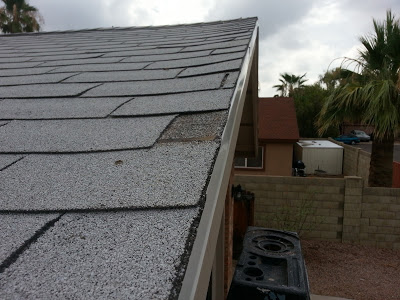
Drip edge is a sheet metal flashing strip that slides under the roofing and over the top edge of the facia. It has a slight kick at the tip that kicks water off, away from the wood to keep water from ruining it. Here's a good look at the old stuff I'd removed a few weeks back when I tore out the facia.

You may have noticed, my normal practice is to attack a project in a frenzy like a shark on the scent of blood until about 90% complete. This is normally where my eye wanders and I leave the project, moving on to the next. I don't recommend this, and I don't have any good excuse; I'm just letting you know my style.
The problem is that this time it's obvious. not only is there a bright white metal strip missing on part of our roof line, but there's the issue of the remaining shingles not being fastened very well. I'd pulled nails and staples in my demolition. Our area suffered a pretty strong storm last week that uprooted trees and ripped up roofs, even clay tile shingles. We were mostly spared, but there was a little issue with loose edge shingles.

I got up early this morning, to beat the heat but couldn't really fire up the air compressor to nail it without waking the neighborhood.

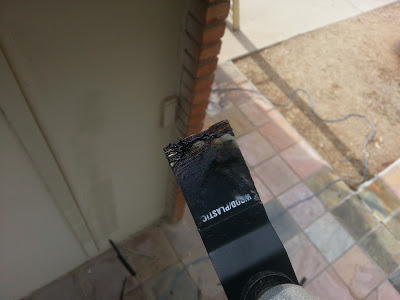
At least I could get to the quiet work of measuring, cutting, and dry fitting the edge. This stuff is hazardous. Just touching it, you can feel it really wants you to slide your bare hand along the edge, just once, so it can rip your tender flesh open. It wants to taste blood. I denied myself a trip to urgent care for stitches and slipped on some gloves.
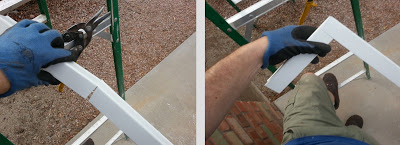
I took a quick tour around the rest of the house to see how the existing drip edge was installed around corners and peaks. It's pretty easy with a pair of tin snips. Here's an outside corner.
I slipped it into place, under the shingles, overlapping the next piece of edging. In some parts of the country, there's additional steps, such as getting it under the underlayment to prevent ice damming. Nothing we need to worry about here in Phoenix.
Heck, it almost never rains anyway.*
There were a few missing shingle parts from the storm. Luckily, I still have a scrap pile I can find some pieces to scavenge and cut here and there.
In one case, I happened to find the exact missing puzzle piece laying over by the neighbor's yard. I tucked him back in under his blanket, nice and cozy. I'll come back and fasten it later, when I nail in the edge.

I got the garage dry fitted and started wrapping around to the front, where the tunnel had been.
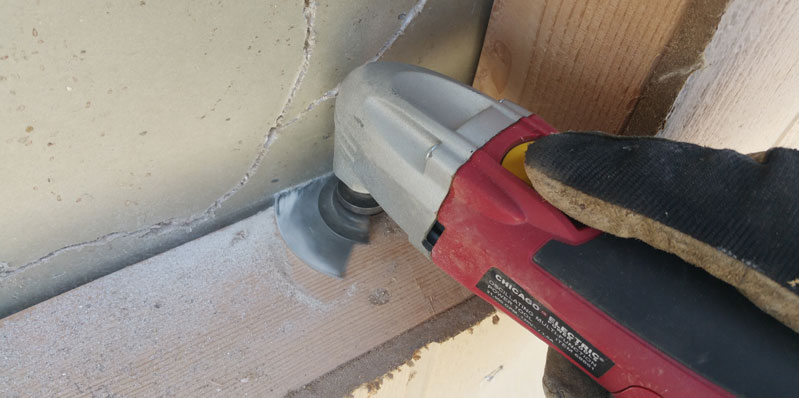
The trouble is, I had cut through two layers of shingles in the middle of the roof face to remove the section over the tunnel. The old roof buried below was sticking out too far. I'd have to trim it back, flush with the facia somehow. I tried a razor knife, but that was ridiculously difficult. I ended up using my oscillating multi tool, even though I only had a wood / plastic blade on hand. It did really good when cutting from below,...
for a while.
Yep. I destroyed the blade in a few short minutes.
I guess it's a trip to the hardware sto...."Boom!,... BOOOM!,... BOOOOOM! ....BOOOOOOOOOM...."
Someone to the south of us was evidently doing a reenactment of the cannonade, preceding the last charge in the battle of Gettysburg, early Sunday morning, no less.

Ahhhhhh,... crud.
Normally, I'm accustomed to seeing a bright blue beautiful sky over there. A couple more flashes and deep rolling booms re-awakened my long dormant Michigan weather sense.
"Fuuuuuuuuudgggggggge....." - Ralphie Parker
Everything was painstakingly dry fit into place. Shingles and edge would be blown to kingdom come in a storm. It looked like it was going to be a doozy. After a moment of cursing and staring stupidly to the south, I dropped what I was doing and fired up the compressor. I had originally intended to simply tack the edge into place with staples before nailing it with roofing nails and adhesive. I didn't even buy the nails yet. I grabbed the 18GA Stapler , scurried up the ladder, and started rapidly banging away. An adjustment to the depth wheel and it was sinking staples through shingles and edge easily, with the occasional spark from hitting granules.

It looked like the storm might just pass to the west. I got the garage face nearly fastened when a big boom from behind startled the absolute crap out of me. It was coming my way after all.
The stapler kept its cool and said, "Bang-ity, bang! bang! bang! bang!" getting me nearly to the end for the garage facia before the initial drops, preceding a cold sheet of rain hit me in the back.
* Heck, it almost never rains anyway.
Idiot.

So much for that. How are your morning plans working out?
______________________________________________

PS - A PORTER-CABLE 3-Tool Combo Kit is one of the very best tool investments I've made for renovation projects and woodworking. It's small and portable. I use mine with its included guns, as well as a big 2-Inch to 3-1/2-Inch Framing Nailer, filling tires and pool toys, and blowing stuff off with a blast of compressed air. - John
Mounting a new address plaque
As we touched up the front of the house (tunnel demo, facia, window sill, lighting, flower bed), it has become painfully obvious that the old address plaque is in dreadful shape. Mr. Sun has toasted it. One more summer will probably do it in completely.
 |
| Wait,... What's up with the address number?* |
An address sign is the house's "Hello" to the world,... or at least to visitors, Amazon.com deliveries, and, God forbid, 911 responders. In our neighborhood, emergency responders have done really well locating targets without using address signs. They've easily located night time emergencies due to the flames engulfing the structures.

...screw it in,..


This inexpensive plaque was one of the first things I had added when we moved in. It was a basic wooden plaque I painted and screwed on metal numbers. Cheap, easy, and effective. Besides the cracking paint and degrading wood, the newly installed light fixtures had a spacial conflict and wouldn't go up until I removed it.
 |
| Ok, ... DIY Guy, ... what the heck does that say?* |
So here it's sat for weeks, knee-high to a grasshopper. It's hardly welcoming, barely visible beside vehicles and behind the huge mailbox and palm tree.
 |
| It's so sad and lonely down there. |
Finally, the new one we'd ordered online arrived! Sweetie purchased a Whitehall 16"x 9" San Diego Carved Stone wall plaque from PatioSigns.com. This is 100% acrylic; hopefully, it will weather much better than the wood one. It seems like its made out of the counter top material. It's a nice look. The decorative border line and custom numbers are routed, rather than stuck on. The mounting screw holes are countersunk and there is a nice decorative ogee edge around the plaque. After finding an online coupon, she purchased it for $90.25, delivered. It's a custom piece, you get to pick colors and numbers. I feel it was pretty good turnaround, showing up on our doorstep in three weeks.
I measured the mounting hole locations and lined it up where we wanted it. I adjusted height to make sure the holes would land on a brick. I didn't want to hit weak mortar and have it blow out on me.
 |
| Well, isn't this is an unflattering, weak-chinned angle. |
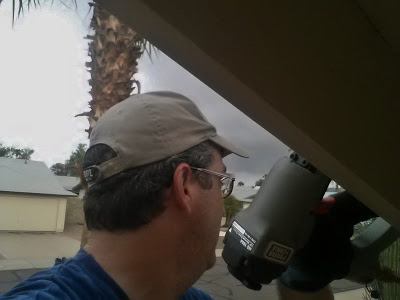
If you've drilled in brick before with a standard drill, you know what pain it is, even with a fresh masonry bit. A hammer drill makes it downright pleasurable (other than the noise). If you're going to buy a high-end cordless anyway, it's not too much more to get the hammer option. This is my DeWalt 18-Volt XRP in action. It's an older NiCad battery style from my cordless set but is still widely available. Newer, Lithium-Ion versions
 versions are smaller, lighter, and run longer.
Watch how much quicker a hammer drill works. I start here with normal drilling, then switch to hammer mode (both in the highest speed setting (3)).
Tap in some plastic masonry anchors,...
 |
| Official Klein Klein anchor tapping tool |
 |
| Official Klein Insulated plaque screwdriver |
... and "Hello"
Simple.
* So how do you write about an address plaque without actually sharing your address with the entire connected world? Do it the same way Spielberg creates dinosaurs, with modern technology. A little digital sleight of hand and the numbers are switched. Geeks - do you recognize the language? What's it say? (Hint: It's not Klingon)
SketchUp: Modeling my miter saw workbench
After years of being slightly aware of SketchUp, the free 3D CAD modeling software developed by Google, (now owned by Trimble), I decided it was time to give it a whirl. I was motivated by the excellent Google SketchUp Tips and Resources post on HomeFixated.com and followed the link to download the program. After watching a few of the tutorial videos, I felt reasonably confident in using the software; I dove headfirst into the deep-end of high-tech design wizardry.
It's fun to see it modeled, and clean in 3D, with the real workhorse stabled in my workshop. The story on building the real one can be found here: Building a Miter Saw Bench - Economical but Beefy!
Apparently, I like to do things completely bass-ackwards. I built this project first in the real world, many-many months before introducing it to the digital realms. I had done a quick and simple pencil and paper sketch in my Moleskine Classic Notebook , before jumping right into sawing lumber, and screwing screws with the Kreg Jig, redesigning and
  adjusting my half-baked plan as I built.
This bad-ass bench has been in real-word, front-line combat, supporting the mighty DeWalt 12-Inch Slide Compound Miter Saw in its sawdust-spraying missions for quite a while.
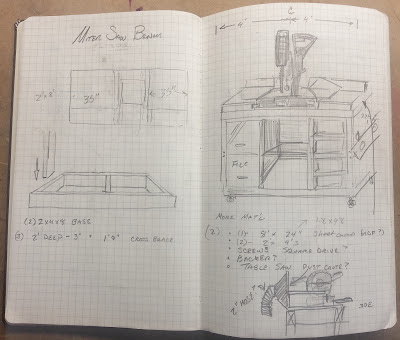
PARTS LIST:
Personally, I'm leaning towards starting my next project with SketchUp and finding my mistakes earlier. I'll still use the beloved Moleskine notebook though.
 |
| It's easier than it looks! |
Apparently, I like to do things completely bass-ackwards. I built this project first in the real world, many-many months before introducing it to the digital realms. I had done a quick and simple pencil and paper sketch in my Moleskine Classic Notebook ,
This bad-ass bench has been in real-word, front-line combat, supporting the mighty DeWalt 12-Inch Slide Compound Miter Saw
 |
| Right before the maiden voyage. |
You can see the general assembly in the photo above. The difference is, with the 3D model, I can do the Tony Stark design move, exploding and spinning it to show you the structure.
 |
| This is exactly how Iron Man was designed. Exactly. |
Plus, the whole thing can be disassembled in mere moments to a virtual lumberyard of precision-cut and stacked loveliness. Enjoy the parts list in its gleaming, three-dimensional-ness:
 |
| Because parts is parts |
- Vertical Structure: 10 ea. 2x4's (1.5" x 3.75" actual) x 29 1/4" long
- Bins: 4 ea. I actually built these for another project from 1/2" plywood and a 1/4" bottom. I used a dovetail jig, but it's not necessary for simple tool bins. 10.5" wide x 6.5" high x 16.25" long.
- Swivel Castors: 4 ea. I bought these 3" heavy-duty, locking swivel castors at Harbor Freight
- Bin Rack - back stop: 4 ea. - pine 0.5" x 1" x 14.25" (made from planed pallet wood)
- Bin Rack - rails: 8 ea. pine 0.5" x 1" x 21" (made from planed pallet wood)
- Top and Bottom Depth Structure: 10 ea. 2x4's (1.5" x 3.75" actual) x 21" long
- Base blocks: 4 ea. 2x4's (1.5" x 3.75" actual) x 3.75" long - for mounting the castors
- Top and Bottom cover: 2 ea. 1/2" plywood 24" x 96" (8 feet)
- Top and Bottom Width Structure: 4 ea. 2x4's (1.5" x 3.75" actual) x 96" (8 feet) long
- Work surface Center: 3/4" White thermally-fused melamine coated particle board 24" x 24"
- Work Surface Right: 3/4" White thermally-fused melamine coated particle board 24" x 23"
- Work Surface Center: 3/4" White thermally-fused melamine coated particle board 24" x 42"
- Two Drawer File Cabinet: (not shown above)
What do you think? SketchUp or actually sketch it up?
 |
| No, it's not a Leonardo da Vinci original, but I see how you might think so. |
Download and enjoy my 3D model free* from Trimble's Warehouse here: Economical Miter Saw Workbench.
* All rights reserved - AZ DIY Guy's Projects: . I hereby give license to individuals to build this bench for their own use. My design, plans, images, and model and may not be used for profit without my express permission. This means you Ted's Woodworking Plans.
If you build a version of my Economical Miter Saw Workbench, please send me some pics and a description. I'd love to feature your project here.