

This mesquite tree stump has got to go. I can’t get big equipment anywhere near it so I’m going to try to try a stump removal product.
Read More
Avoiding Needles, Spines, and Spikes: The Cactus Cleanup
It’s been a tough year in the front yard. Two of our cacti are dead. I have to get them out of the ground and move them to the curb for bulk trash pickup without impaling myself a thousand times on their spines. Maybe I should use the truck…
Read MorePatio Door Repair: Craftsman Trim
With our French Door’s threshold replaced, “project creep” has gotten a hold of me. I’m replacing the horribly-ugly exterior surround with a beautiful, new Craftsman-style trim.
Read MoreNotch, Bigfoot, and the Hunt for El Chupacabra in our Front Yard
I spotted a bizarre creature stalking our front yard late one night. Naturally, I set up a night-vision trail camera to solve the mystery. Check out the beasts I captured!!!
Read More
AZ Adventures: Boyce Thompson Arboretum State Park
The AZ in AZ DIY Guy is Arizona. Here's a weekend side trip we took to Superior for some outdoor adventure. Enjoy some desert photography and see why we love the wintertime in our adoped state.
Read More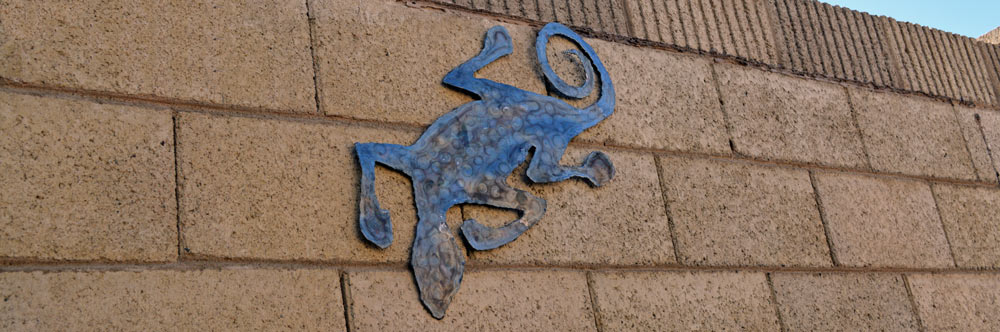
How to Make Rustic Metal Wall Art
Here's how I made this quick and easy metal lizard with a blowtorch. It's a really fun DIY project that looks great hanging outdoors.
Read MoreFollowing Up: Repair and Healing
A quick revisit to a couple past issues. Remember the cactus that fell over last year? How about the time I tried to chop off my thumb?
Read MoreKiller Bee Invasion - The Day Africanized Honey Bees Moved In
Once again, my weekend warrior plans got derailed. We were invaded by angry weekend warriors with stingers, Africanized Honey Bees built a new home 12 feet from our front door. It's us or them.
Read More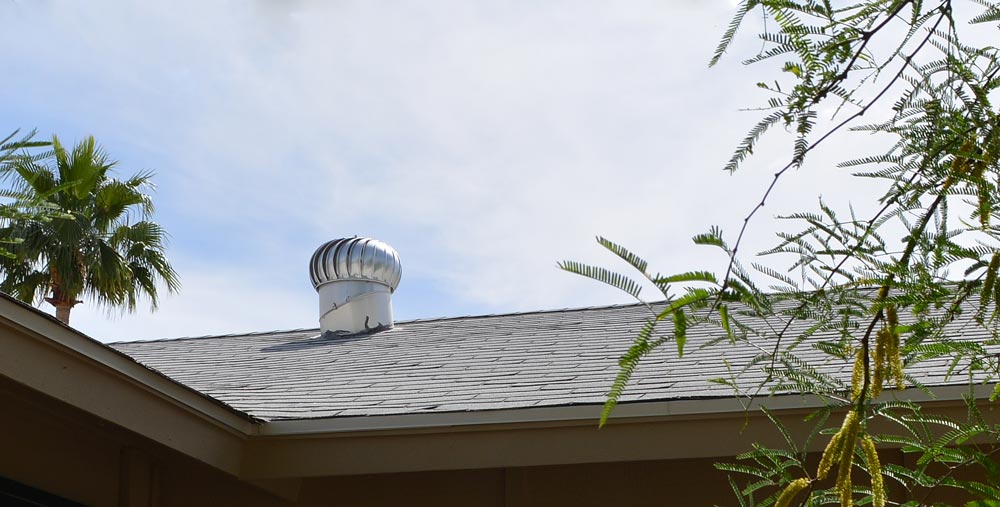
How to silence a squeaking rooftop vent
Silencing The Howling Turbine Vent
Our spinning, rooftop turbine vents were squeaking and squealing in the wind. I climbed up to the roof to quiet them down with a long-lasting WD-40 Specialist product. Here's how I did it.
Read More
How to Make an Attic Hatch from a Vent
I'm converting this original gable vent into a hinged hatch so I can access the attic easily for the upcoming kitchen remodel.
Read More
Wounded on the Weekend
My Saturday plans included yard work, not a trip to urgent care. Of course, I can't remember a time when my weekend intentions ever included emergency medical treatment.
Read More
Attempting a Storm-Downed Cactus Rescue
Another cactus was downed in the weekend monsoon storms. It's short, ugly fellow, and ripped completely out of the ground, but I'm going to see if it can be saved, with some advice from The azplantlady (No relation)
Read More
Cold at night! A DIY Heating Repair Aventure
Ahhh, wintertime in Phoenix. Although it's considered a paradise this time of year, the nights do get a bit chilly in the desert.
At some point during the winter, we finally give up and turn on the heat. When it dips down in the 30's at night for a few hours, our tender carcasses simply can't handle the frigid, Arctic rush of cold. Live here and you basically become a cold-blooded reptile. My 28 years of Michigan-tempered, icy-veined fortitude are long gone. Nowadays, we're bone-chilled cold at temperatures where mid-westerners would be happy swimming in a lake.
During these recent chilly nights, it started getting getting colder and colder, inside the house. Coincidentally, throughout the week, we noticed the sound coming through the vents from the attic was getting steadily louder. Louder airflow-ish sounds, nothing alarming, yet.
During an extra cold night, the noise got downright ridiculous when the heat kicked on, like the sound of a box of silverware tumbling in a clothes dryer full of rusty nails.
That sound was alarming. Nothing could be done at 2:00 am on a work night, so I turned off the heat, pulled up the blankets, and dozed back off to sleep.
HVAC = Heating, Ventilation, and Air Conditioning
Our heat comes from a heat pump rather than a classic gas or electric furnace. As I understand it, in simple terms, it's our air conditioner running in reverse. Heat and cold come from the same unit, up on the roof of the house. I guess it's more efficient in our weather environment. (Here's the scientific mumbo-jumbo , if you care.)
Give me the choice between attic work and working on the roof and I'll choose fresh air and open spaces, free of crawling in the dust and scratchy insulation, every time. I'd be checking this problem out, up top.
You too, eh?
In an incredible coincidence of crazy timing, I had just read a blog post by Sarah at The Ugly Duckling House where she had successfully fought back a furnace failure with the help and advice of an HVAC knowledgeable friend. I won't spoil her story, but she got through the ordeal relatively unscathed. Go ahead and pop over there to read her post . I'll wait.

Back already? She got lucky, right? I was hoping that I was facing some sort of pulley, wheel, or bearing that needed some quick lubrication, 'cause I really don't have an HVAC friend.
A quick fix (?)
When I got home from work the next day, I turned on the heat, grabbed some penetrating oil and a can of WD-40, and tugged a ladder to the front of the house.
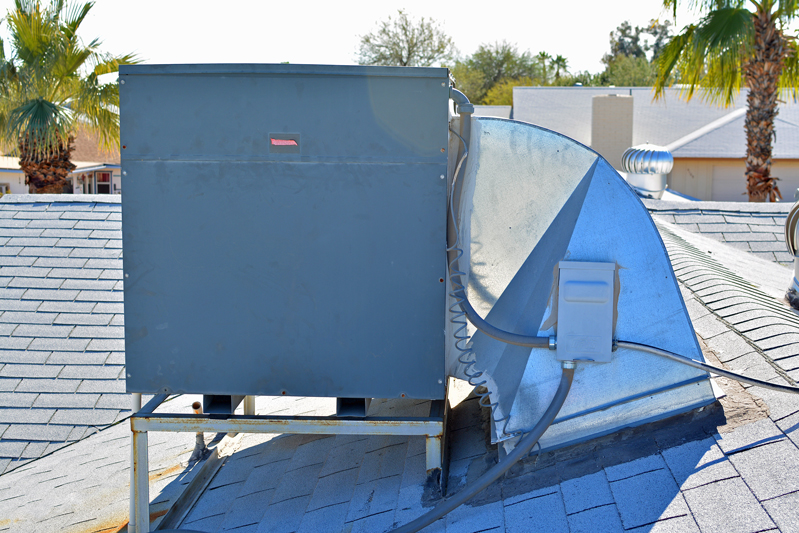
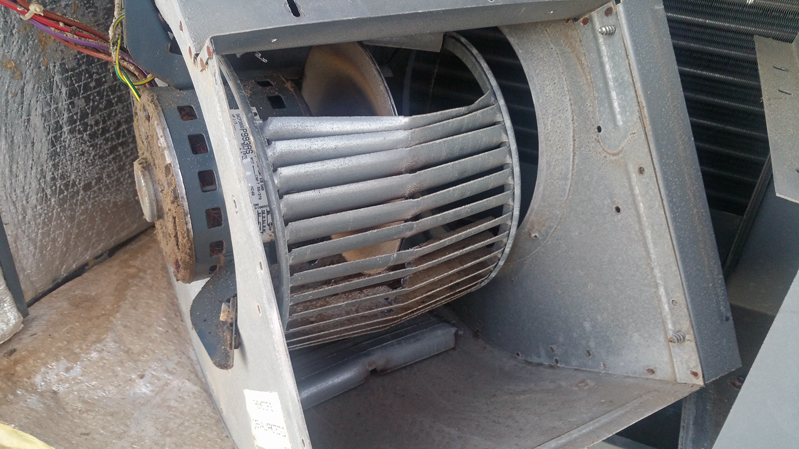
I scuttled up on the roof and opened up the side of the big metal box the noise was coming from, our AC unit. Inside was a blowing unit that looked a lot like the squirrel-cage floor fans that had filled our house after a big water leak a few years ago. I didn't need any expertise to tell that my pitiful, little can of WD-40 was not going to be the rescue hero I'd hoped it would be. The fan wasn't moving at all, but its central mounting hub(?) was completely detached and howling in fury. It was hard-core, metal-on-metal action, the hub was cutting into the inner edges of the fan vanes like a circular saw. Crap.
I pulled the fuse block, killing the power, removed the screws holding the fan unit to the duct-work, and pulled it back for examination. The fan was clearly destroyed, no fixing it. Some of the vanes were completely ripped off, others were bent, and then there was that whole thing about the central mounting hub being detached.
I buttoned the unit back up, climbed down, and started online research. Some sources recommended the complete replacement of the entire blower unit, motor and all. Best guess prices ranged from $400 - $1,000 to have a contractor do the work. Nope. Surely I could do it, right? Maybe I could even find the squirrel cage fan locally and perform the surgery myself.
Your Money is No Good Here
The next day, I spent my lunch hour driving around Phoenix to HVAC supply stores. What a freaking racket. While initially helpful, it was made clear that I couldn't get what I wanted because the supply stores wouldn't sell to the public. Apparently, I had to be a licensed HVAC contractor to buy parts; my money wouldn't be good in their fine establishments. One of my inquires was overheard by a grizzled HVAC tech slumped on a stool at the parts counter. This delightful gentleman treated me to a loud diatribe about how selling direct to "goddamn homeowners" took money out of his pocket!
I guess HVAC parts are distributed through a cartel or secret society that us bumpkin homeowners dare not be allowed to access.
Why is it you can buy electrical or plumbing parts at hardware stores, home-centers, and even grocery super-stores, but trying to buy parts for an HVAC system that you own, is somehow robbery? Heck, you can even buy automotive parts direct. I don't have a license to prepare and sell food, but I can sure go to any grocery and buy it to prepare in my own house. Old school, good old boy, supply-chain horse-crap, outdated in today's world, in my opinion.
Sorry dude. My house. My risk. My money.
If I hire you to do something and you bring your expertise, sweat, and disdain for handy homeowners, you can buy the parts. Otherwise let me fix my stuff. PS - I'm not calling your company anyway, Prince Charming.
Finally, I found a place that would sell me the fan. They still gave me a little trouble about the direct sale, but I talked them into it. It was just a fan, for God's sake, a few pieces of stamped metal. Forty bucks and I was out the door, in proud possession of my brand-new "blower wheel." If I could pull this repair off successfully, I'd save a bundle, as well as the time off work, waiting to meet a contractor.
Racing the Sunset
After work, I ascended the ladder again. This time I was loaded with the new fan, as many tools as I thought I might need, and a sack of the finest rooftop dining cuisine I could purchase through the closest drive through window. The sun was going down; I didn't have time to waste.
Rather than climbing up and down to flip breakers to disconnect power, I pulled the fuse block, right next to me.

AZ DIY Guy Scary Electrical Warning time

I buzzed the screws out of the side panel with the quick rat-tat-tat of my impact driver for the second night in a row. This time, however, there were cheap cheeseburgers and a big iced tea... so it was better.
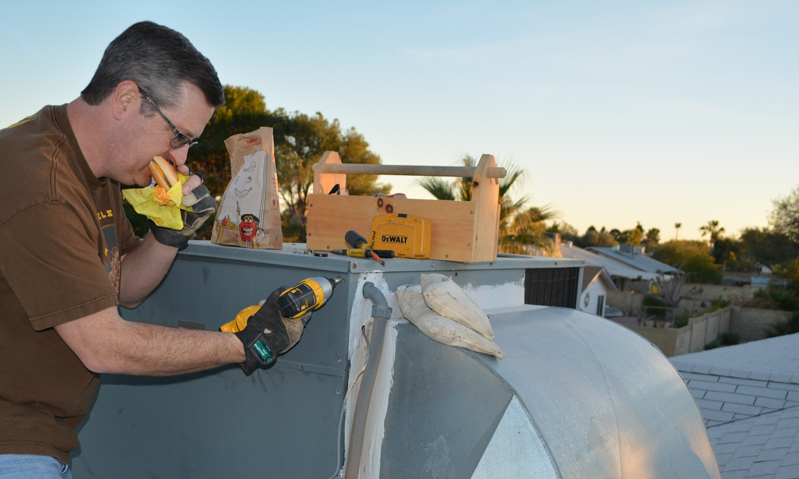
McLovin' it
The mountains to the west, were looking hungrily at the sun, already starting to swallow it. Time was not on my side.

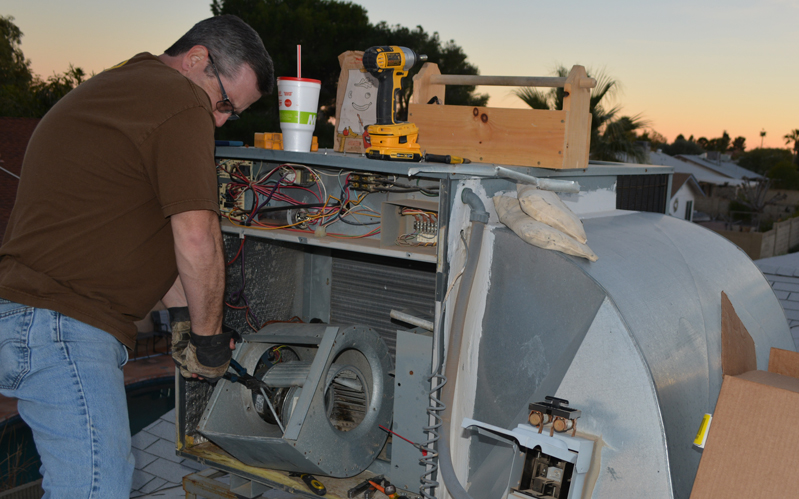
With the bent-up fan flopping around inside the housing, I had trouble getting the hub off the motor shaft. I put some muscle into my heavy linesman pliers and cut through the edges of the fan and pulled the beat-up thing out of my way.
Pro Tip:
The precise condition of our original fan is what a true professional may refer to as "toast."
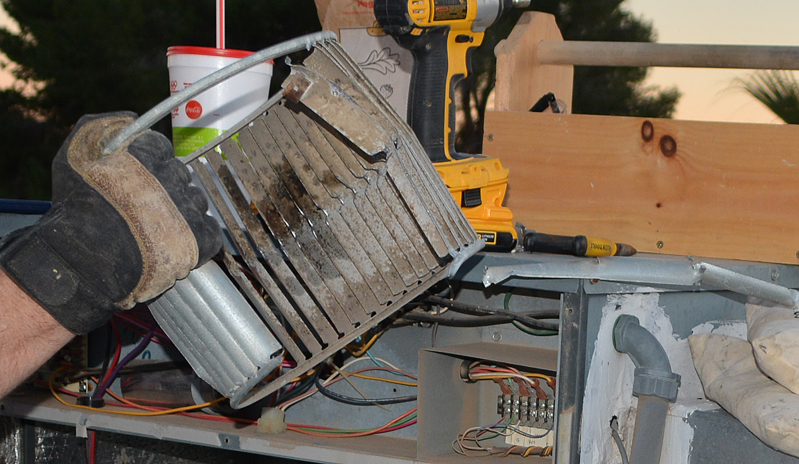
"This damn thing is toast!"
- AZ DIY Guy
I still had a heck of a time getting that hub off the motor shaft, even with the set screw completely removed. Somehow, inexplicably, beating on it with the linesman pliers didn't do the trick. I finally doused the shaft with the magical elixir, and member of the holy trinity of DIY , WD-40. After a brief hit with 220 grit, fine sandpaper I slid the thing off the shaft.

Beating, pulling, prying, bending,...
At this point, I'll take a moment and share a couple of AZ DIY Guy's fans, young and old:
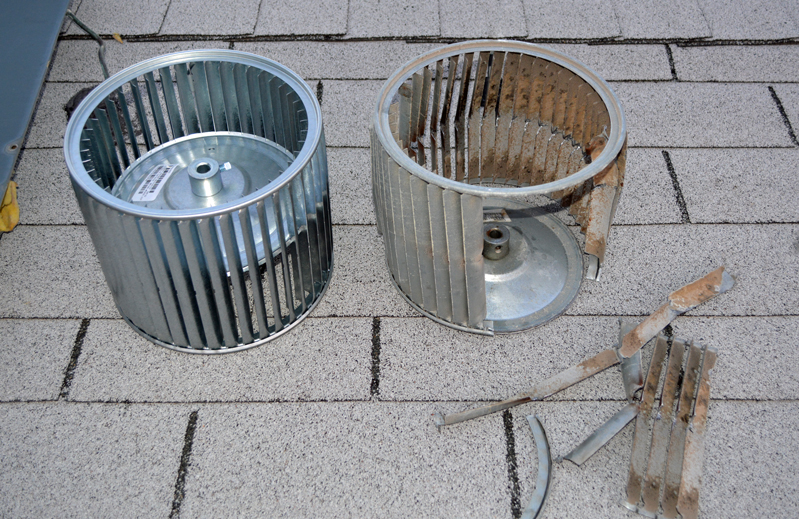
OK, technically, it's a couple "blower wheels", not fans.
I had to completely remove the motor from the housing to install the new fan. It's incredible that I can hold a motor in one hand that's powerful enough to blast air throughout the entire house.
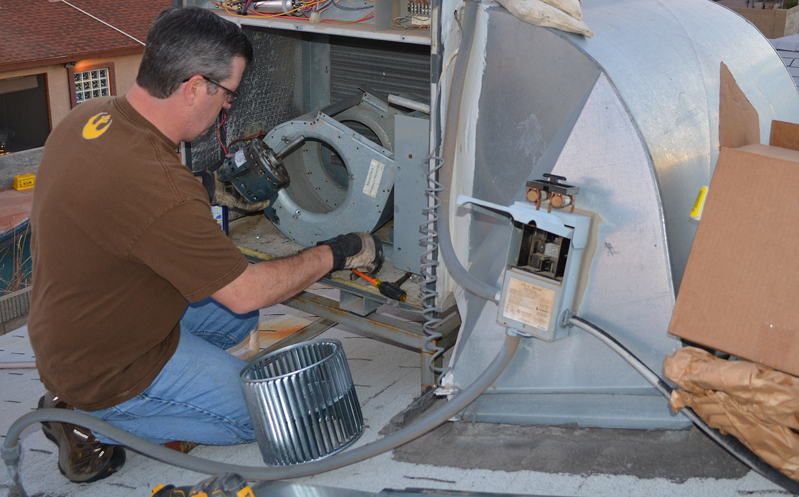
With the new fan slipped on the motor shaft, the motor got reattached. The fan hub's set screw tightened to a flat edge on the motor shaft. I snugged it up tight.

There were sheet metal baffles and brackets to reattach before I screwed the unit back on the duct work. This was one of those tasks where an impact driver simply shines. The time saved by using one with a magnetic driver tip, versus a screwdriver is incalculable. It gets the job done quick, nice and tight, without stripping any screw heads.
Wait, what the heck is that?
I'm not going to insult my eagle-eyed readers and assume my fellow tool-drooling, DIY lovers didn't notice the odd, bulbous protuberance on the hilt of my beloved impact driver. My nine-year-old, Dewalt Impact Driver has run on beefy, 18 volt, NiCad batteries since the day I took it out of the box. Now, DeWalt sent me a 20V MAX* Battery Adapter to try out. It allows me to run the compact, powerful Lithium Ion 20V MAX batteries that powers DeWalt's current line of high-end tools. I'll have a review up soon, but so far, it's awesome. The adapter should be available through retail very soon.
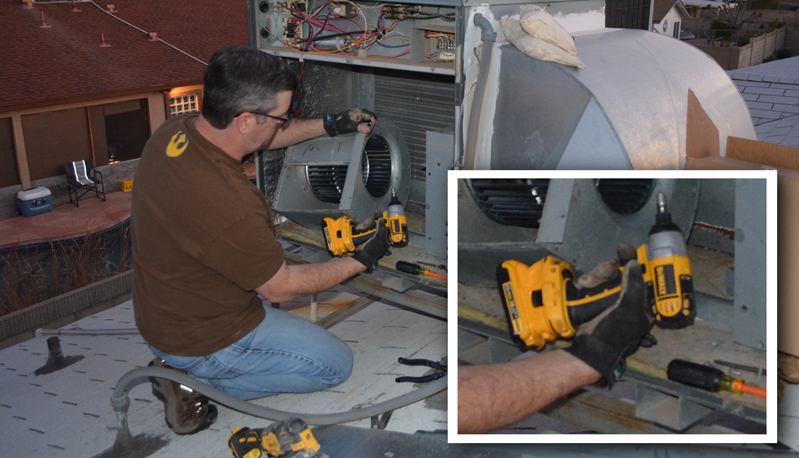
UPDATE: You can buy the 20V MAX* Battery Adapter now, an Amazon best seller. Here's my review!
I was still worried. Was the shaft bent, the motor damaged, unbalanced, whatever? Luckily, after a quick hand spin, the fan spun smoothly. I could feel a good push of air. So far, so good.
I pushed the fuse block back into the disconnect and fired the unit up. It worked. Smooth as silk. Air blasted.

By that point, my reality, not illuminated by camera flash , was pretty dark. I fumbled the screws I could find into place with the LED on the impact driver for a while.

Finally, I couldn't see enough to finish. Stupid in the dark. I gave up and climbed down to fetch a flashlight. Illuminated, I buttoned up the side panels, gathered my tools, parts, and fast food debris, and made several trips across the roof to the top of the ladder.
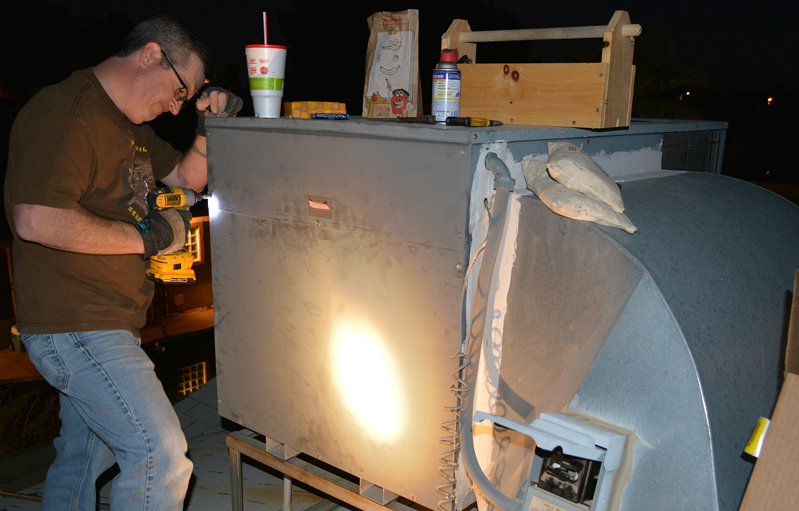
As the last, feeble glow of the setting sun slipped softly behind the mountains, I managed to avoid falling off the edge in the dark to spend the night in a broken heap in the flowerbed. I didn't trip over any vent stacks or fall through the skylight as I cleaned up. Nighttime on rooftops should be reserved for Peter Pan and fairy-dusted children, not middle-aged DIY guys.
By the time I was done, the air was already chilly; I was more than ready to enter the freshly warming house.
The silly thing is, I had rushed to complete the repair after work, risking rooftop darkness, to avoid any more cold nights for the family. It turned out to be the last cold night anyway. As of this posting, we've had record breaking, warm temperatures for mid February. Today should hit 87 degrees with night in the mid 50's. Paradise. I could have waited for the weekend.
How about it? Would you tackle something like this, or fork over possibly hundreds of dollars?
Tips for Using a Handheld Torch Safely

I've been doing a bunch of posts about projects using handheld torches this year and I have a lot more to share in the coming months. Torches are sweet, fire-spitting tools that really aren't scary to work with. Like any tool, they just have to be treated with respect and they are perfectly safe. I've going to share some safety tips and one ferociously close call that could have burned our house down.
My first rule for using a torch, is to stay mindful of my surroundings. Combustible materials inadvertently set ablaze could lead to disaster. I avoid or protect flammable stuff. I always do this. In fact, in the past, you've seen me use window cleaner to wet a wooden area, then add a flame proof mat, like when I plumbed to replace a hose bib on the back of our wooden-sided, very - flammable house.

Flame-proof mat in action.
Pictured Torch: TS4000-Trigger-Start Torch Head (with propane)
Like I said, I always do this. Unless, of course, I'm being a moron...
Recently, you may recall me weeding the yard with a Bernzomatic Lawn and Garden torch. Trust me, it's pure joy to incinerate and kill weeds this way, plus there's no nasty chemicals to deal with. In order to share this pure joy with you on this blog, I puttered merrily about the yard, flaming weeds. I moved my camera tripod around with me to capture the hard-core, flame-throwing action.

Good bye.
All was going well with this marvelous, photo-journalistic endeavour. I walked from the front yard to the side, sending weeds to their smoking doom and snapping pictures. I set the camera down over a particularly leafy little weed to get a close-up, before-and-after shot (all for you, dear reader), I leaned over to squint through the viewfinder and set the focal point, which of course was...
Mistake #1.

A particularly leafy weed.
With my face pressed against the camera, I heard a single, sharp cracking sound that made me think perhaps someone coming up behind me stepped on a dry stick. When I turned around, the sound instantly transformed into a fast, frying-bacon crackle and a sickening "whoosh!" I took a leisurely full second to stand, slack-jawed, with a burning torch in my hand, wondering how in the world I had managed to set a huge pile of dried palm fronds on fire. Flames exploded upwards, rapidly climbing the pile. The heap was stacked and waiting politely for bulk trash pickup a couple weeks later. Now it was rapidly and rudely turning into a flaming hell, just a few feet away from the house.
I clearly remember saying, "Uughhhtt!!!"
Sometimes in life, situations occur where curse words just don't do it. In the moment, I couldn't recall any actual words, curse or otherwise.
I shut off the torch, set it down, and ran at the pile. I knocked the biggest of the burning pieces off the stack with the sort of Kung-fu, whiptail kick maneuver that comes naturally to a person in fight-or-flight situations like this. Trust me, you would do it too, instant Kung-fu master style. I began to stomp my work boots on those flames, crushing them into submission.
Thank the heavens I hadn't been a complete idiot wearing sandals; boots were perfect. Oh, how I wished the camera had been facing the pile to see that bad-ass, action hero kick and stomp action. I even had the remote trigger in my hand the whole time, but the camera was pointed at that dang, particularly leafy weed. I was sure my Kung-fu firefighting moves looked cool.
No, they weren't cool at all, nor were they effective. The action hero bit evaporated away instantly. I had scattered glowing embers in my initial kicking and stomping assault that each latched hungrily onto fresh, bone-dry fronds. I continued to kick and stomp as fires continued to flare.
It was a loooong time that I leapt around in an insane hybrid dance. I was getting exhausted. The initial shock had worn off. I realized I wasn't losing the battle, but I clearly wasn't winning either. I was going to burn out before the fire would. I didn't think it would get to the house about 6 feet away, but I couldn't be sure. Even if it didn't, I really didn't want to have a neighbor call the fire department when they noticed the smoke. They'd probably present me with a nice, big fine.
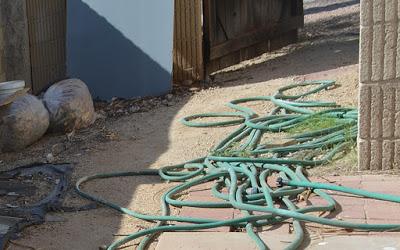
As I furiously danced and singed my leg hair off, my first thought was the garden hose. Could I unwind it from its hook in the front yard, turn it on, and run it all the way back around before the entire pile was engulfed? As I got ready to run for it, I noticed the pool remodeling contractor had left it in a tangle, about 5 feet away from the place I was furiously doing the crazy stomp dance. There was absolutely no way I'd get that mess working in time.
Nope. Nope. Nope.
How about the fire extinguisher?!!! Of course goofball! I had brought it out of the garage when I started torching.
Unfortunately, I had also left it in the furthest side of the front yard when I walked around the house, which of course was...
Mistake #2
I got a second burst adrenaline-fueled energy and ran faster than I had run 20 years, sliding in the gravel and spinning narrowly past the treacherous, spiked Saguaro cactus to grab that little red cylinder. I was back to the inferno in seconds, ripping the pull ring, and blasting the conflagration. The world disappeared in a massive cloud of yellow powder. Ever your devoted blogger, I spun the camera around for you to see the second, smaller blast.

Good times, eh? In the end, I know I was super lucky. What if I had rounded the corner and not heard that first crackle? The truth is, five solitary minutes of this pile blazing without any defensive fight could have cost us the house.

Scary, but easily avoidable. In this one, rare occasion, I didn't give my tool proper respect and it bit me. Moron.
Basic Torch Safety
Bernzomatic provides excellent documentation with their torches, plus they have some great resources on their general safety information page. Work safe. Don't be a moron
Here are their basics a nutshell:
- Read the safety warnings and instructions
- Use gloves and safety glasses
Blog Post:
Removing Rusted Bolts with a Torch - Fire it up!
- Check the seals. Don't use cylinders with damaged or missing seals. Get rid of cylinders with dirt or rust in the valve areas.
Blog Post:
Yard Cleanup - buckets, a pole saw, and a torch!
- Turn off a torch before attaching fuel. Hold the cylinder vertically when attaching it.
- Do not use tools to tighten, hand pressure only to avoid over-tightening.
- Check for leaks. Use soapy water on the connections and look for bubbles. Listen for hissing of gas. Feel for coldness. Smell for a rotten egg odor. Do not use if a leak is detected.
- Keep torches upright to prevent flare-ups or flashes. If it sputters or flares up, turn cylinder upright and turn it off. Vent unburned gas from the area.

Facebook Gallery:
Torch Lighting the Grill and Spiral Dogs!
- Allow torches to cool off. Remove fuel and replace caps.

Blog Post:
Re-Plumbing an Exterior Hose Bib - Fun with Fire!
- Don't drop, throw, or puncture the cylinders. Store them away from living spaces, children's access, ignition sources, and direct sunlight. Do not store fuel at temperatures above 120 degrees F (49 degrees C)
Just be smart. Think about what could happen and takes steps to prevent it. Keep an extinguisher nearby.
The easiest thing to remember is to look for ways for you or your stuff to get burned before you start. It's not just the flame, it's also the stuff you are applying the heat to and the stuff close to it. Think about where that drip of molten solder might go when you choose your footwear and where to put your arms and legs. Could an item you are heating or something nearby melt, drip, catch fire, spatter, spark, or explode?

Blog Post:
Burned Pallet Wood Pirate Flag
Work smart. You'll be fine. You'll have fun!
Cylinder Disposal
A great question that I heard asked by another Bernzomatic Torchbearer, in the early stages of the program was about what to do with the spent fuel cylinders. They last a good long time, even at the rate I've been torching, but they do eventually give their last hiss of gas as the flame slowly dwindles and winks out.

So what do you do with these non-refillable cylinders?

Since localities have different rules and regulations on how to properly handle these materials, Bernzomatic launched a great informational program called Cylinder Safe . This is a launching pad to get the details needed to safely use, transport, store, and dispose of the used gas cylinders.
I visited Cylinder Safe, at www.bernzomatic.com/cylindersafe and typed in my zip code. It gave me a website and phone number to my county's solid waste authority.

I got a call back from a really nice lady from Maricopa County (actually from the Solid Waste Program, part of the Water and Waste Management Division of the Environmental Services Department of Maricopa County). She gave some great information. Unfortunately, their static collection sites are on the fringes of the county, with the closest being a 40 minute drive. She gave me info for the City of Phoenix. Since we pay a residential waste collection fee with my utility bill, I could drop them off for free. It turns out they had a collection event at a local park, really close to us. Lots of cities have these events where you can hand off your hazardous household waste. My local event even took car tires, auto fluids, paint, batteries, appliances, electronics, pool chemicals, and yes,...
fire extinguishers.
Coincidentally, I just so happened to have one of those to drop off too.
Have fun torching my friends, and remember, don't be a moron.
Stay safe.


This is a sponsored post. I am a proud to be a Bernzomatic Torch Bearer, though all opinions expressed are 100% my own. I won't recommend products I don't believe in.
The Torch Bearers are a group of tradespeople, DIYers, culinarians, adventurers and artists brought together to create projects using Bernzomatic torches and share their knowledge and ideas with you. Check them out here and get inspired to create with fire.
Visit the other awesome Torchbearers and see what they are up to on the Bernzomatic Torch Bearer Site.
Burned Pallet Wood Pirate Flag

This wooden pirate flag is a cool project I came up with using free pallet wood and paint FIRE! The piece is something that just may be the start a decorative theme for our backyard / swimming pool area. The kids are going to love it.
I crafted this rustic, shipwrecked piece of maritime debris by taking the art of wood burning to a ridiculous extreme, torching the absolute heck out the wood with the fiery fury of Bernzomatic torches. Trust me, it's easier than it looks; I've got some tricks.The large board can be built many ways, but I'll walk through how I did it, because...

Salvaged Pallet Wood
I'd already torn the pallets apart, picked the choicest of boards, and removed all the nails and staples I could find (here). In order for the boards to nestle somewhat tightly together, I had to straighten the edges out a bit. Surprisingly, free pallet wood is not the straightest, purest of wood stock to start with. I probably won't be building an heirloom china cabinet out of it, but there are plenty of of cool projects to be done.
A board edge can be straightened a number of ways: with a power planer, a table saw, a router, a hand plane, etc. I'm lucky enough to have a joiner in my garage, designed to do the deed perfectly. Still, I didn't get too precise with it so I'd still get the rustic look of aged ship boards.
please no hidden nails... please no hidden nails...
Each board had its own character. It was weathered, warped, stained, and battered from the abuse of its former career, likely bouncing cross country in the back of a long-haul cargo truck raiding Spanish galleons, plundering their holds of priceless cargo from the New World. I cleaned up the best side of the planks with a good sanding.
Orbiting and sanding, randomly.
Assembling the Board
When they were smoothed up, I laid them out, arranging the varying thicknesses and colors in the most pleasing pattern and best fit. The knots and nail holes left no doubt this was used wood.
It was good that it was recycled, because it would be a real shame to build this thing out of select, beautiful grade-A planks from the store, only to heap on the abuse that I had planned for it.
I really didn't like how it still looked like obvious, salvaged pallet wood with the nail holes lined up in three rows. It didn't look anything like shattered timber scavenged from the hull of a battle-worn craft, washed up on a beachhead after a fierce naval engagement. It just looked like a pallet.
I chopped a few of the planks in two, whacking them randomly on the big miter saw.
Much better. The Jolly Roger would be burned onto a scrap hewn directly from the side of a fatally damaged vessel floundering in the pounding surf on the shores of an uncharted isle.
To build such a large piece, I used a Kreg jig to drill a series of pocket holes from the backside, along the mating edge of each plank. I placed a hole roughly every 6 inches or so along the entire length.
I applied glue to the edges, clamped, and ran the pocket hole screws tightly into place. There were a couple different thicknesses to the boards, since I'd salvaged them from a variety of obliging pallets.
There was no way I was going to take a chance with my thickness planer blades versus whatever bits of crud could still be embedded in the boards, so I simply pressed hard, downward as I screwed them from the backside. The face would be relatively flat.
Applying the Design
I'd blown up a Jolly Roger image on the computer and removed the black background (to save expensive toner). Unfortunately, I didn't have easy access to a large format printer to output the design in once piece. It was nothing some good ol' frosted tape couldn't fix. I simply overlapped several prints and taped them into place on my plank.
I used an X-Acto knife to cut out the pattern from above, scoring slightly into the wood surface.
I traced the scored lines with a pencil and did a little free hand drawing. For the teeth, I shaded the back of my pattern with the pencil, put it back on the board, and traced hard from above. Poor man's transfer paper.
Wood Burning the Design
The trick, of course, would be to control the flame along the edges of my pencil drawing. Luckily, I picked up this cool tip from Kayleen McKabe's Facebook post. Soaking Sodium Polyacrylate in water quickly expands into weird jelly-like, bead-ish stuff. I pushed it around on the work piece, effectively masking off the areas I didn't want burned.
This odd stuff is the magical absorbent product they put in diapers. It's also sold for science experiments (and pranks I would imagine). I hunted around locally before finding it on Amazon.com (HERE)

Even masked off, this was precision work. I used a sweet, little handheld torch to blaze the edges black. The Bernzomatic ST500-3-in-1 Micro Torch and Soldering Iron is a refillable, butane-powered mini-torch that comes with a variety of tool options. I set the fine-soldering and hot-air-blower tips aside and dialed in the pinpoint torch flame.
The micro torch was lightweight and comfortable to use, like a marker (a marker with a flaming hot jet of blue flame). It was plenty hot to blacken the wood in a few seconds. I worked it slowly away from the edge of the design by a few inches.
The sodium polyacrylate could be pushed around a little and re-used a couple times, but it was difficult to use for tight, precise work. It completely blocked the flame and left a crisp, somewhat lumpy edge. I wanted the finish to be a little more shaded and rustic.
I started using a drywall joint-taping knife as a flame shield. I found I could vary the flame intensity by letting it bounce off the blade and just lightly lick the wood or I could blast right against the knife edge, leaving a line crisp on one side and feathered on the other. I got pretty good at pivoting the knife around curved areas and varying how long I'd let the flame touch the wood. I did the swords and teeth entirely with this method.
With the basic edges laid out, I did a touch of free hand shading and expanded the black field further away from the design.
I did the outline of the entire design with the micro torch, only refilling it with butane four times.
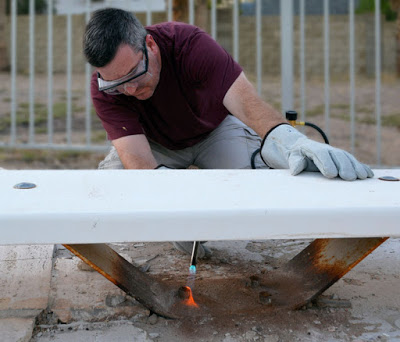
There was no sense using the micro torch to char the entire field. I broke out the big, bad Bernzomatic TS8000 High Intensity Torch, with propane, to lay down some serious flame.
I used this particular torch because I could adjust the flame level from a light "toast a marshmallow" all the way up to the hell-fire of "I love the smell of napalm in the morning." It made quick work of the job, blackening the whole plank.
The next day I decided I wanted to really burn the heck out of the right side and give it a more ragged edge. Even though I had a cup of water and a fire extinguisher in the garage where I'd started torching, I wasn't going to take any chances when I upped the ante to hotter burning MAP-Pro gas in the Bernzomatic TS8000 and literally set my project on fire. I took it outside, clear of anything combustible.
I burned the right edge and random parts of the flag until it started to check and turn to ash. It was glorious. I lowered the flame and went over the lighter shaded parts I could see better in the bright sunlight, darkening them even more.
Seeing it out in the light, I decided I wanted to shade and distress the design a even more. I brought the micro torch back out and did a little free hand work.
I had to quench some smoldering areas with a damp rag and aggressively brush the whole thing with my shop brush to remove the loose ash, before bringing it back into the garage.
Finishing
Since this would be displayed outside, I needed a serious protective shield. I cracked a can of spar urethane, the stuff they use on wooden boats. I chose a satin finish with a heavy dose of UV protection to shield it from the weather and our ever ferocious desert sun.
I started by applying the spar urethane over the "white" areas first, so I wouldn't contaminate them if any more of the black ash came loose.
Note: This serious, exterior grade urethane is NOT soap and water cleanup stuff. You have to be very careful not to spatter it on your beloved "The beatings will continue until morale improves" pirate t-shirt. If you need a pirate t-shirt like this one, I found it at a quaint little merchant you probably haven't heard of, called "DisneyLand".
Even though it was to be a rustic and not fine furniture, I kept the brush strokes with the grain of the wood. I didn't bother with a fine quality brush, just used cheap-o disposables. They got the job done just fine.
I applied three coats to the front, with serious drying time between. I applied a couple thick coats to the back, letting the urethane seep into the the pocket holes, sealing the screw heads from the elements.
Of course, I was less than pleased when I discovered urethane had seeped through the original pallet nail holes and adhered to the newspaper laid down to the finished design. It was embedded in the completed front side. I had to scrape and sand it down and recoat those areas. Ahhhh well, it's more distressing, for that battle-damaged authenticity today's aspiring pirate loves.
Installing the Flag
Eventually, after a few more coats of urethane and serious dry time, the deed was done. The Jolly Roger was ready to be run up. I used some zinc plated eyehole screws and stainless steel wire to hang it on the fence like a painting. Of course, most paintings don't require a masonry bit and the squeal of a hammer-drill to set the anchors.
On you honor, as a ruthless Pirate of the Seven Seas, do not reveal the location of the hidden grotto.
Remember...
This post is sponsored by the scurvy bilge rats of Bernzomatic.

I am a proud to be a Bernzomatic Torch Bearer, though all opinions expressed are 100% my own. I won't recommend products I don't believe in.
The Torch Bearers are a group of tradespeople, DIYers, culinarians, adventurers and artists brought together to create projects using Bernzomatic torches and share their knowledge and ideas with you. Check them out here and get inspired to create with fire.
Visit the other awesome Torchbearers and see what they are up to on the Bernzomatic Torch Bearer Site.
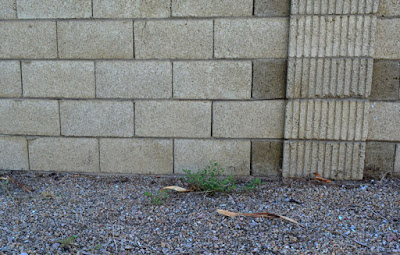
Yard Cleanup - buckets, a pole saw, and a torch!
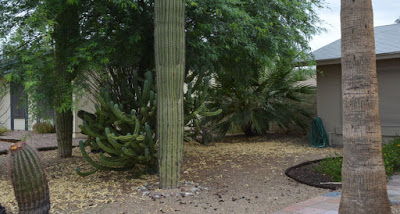
Living in an HOA community, even one started around 1971, requires us to keep our front yard looking sharp. Even with a desert landscaped yard, it means I have to occasionally face the Phoenix summertime inferno and engage in some dreaded yard work to avoid a friendly reminder in the mailbox and the judging, raised eyebrows of neighbors.
This time of year, with the horror of triple digit temperatures, yard work must be done like a commando strike, get in, get out,... and get on the couch with a frosty beverage.
I use whatever method I can to cheat and get done faster. If that means I forgo pulling weeds by hand and decimate them with a sweet, flame-throwing tool from my friends at Bernzomatic , then heck yeah! But more on that in a minute.
I'm going to share a few yardwork speed tips with you as I go. I realize not all my readers have desert landscapes, but these methods can be easily adapted elsewhere.
GET TO WORK!
It didn't help that I had really let it go for a while. To the delight of our expansive population of neighborhood rabbits, the mesquite tree had spent a great deal of its summer leisure time raining pale green seed pods on our landscape. They do an outstanding job of contrasting against the rocky yard to make it look extra scrubby and unkept. This is close combat work, to be picked up piece by individual piece.
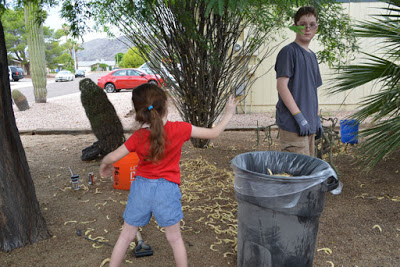
SPEED TIP#1: Recruit Free Labor
I'm a big proponent of conscripted labor. Sweetie and I knew this particular clean up project was coming, so a little over 15 years ago, we took certain steps (that shall not be described here) resulting in a teenaged laborer. I love it when a plan comes together.
For this task, I supplemented our normal teenage conscripted workforce with a longer range labor plan that we'd started developing over 7 years ago. She was a little squirrely, but through wholesale bribery I was able to get her out to help.
LEAVES and SEED PODS
SPEED TIP#2: The Ol' Bucket Trick
Buckets aren't just for holding paint kids. For hand and knees precision cleanup, it's incredibly quick to use a 5 gallon bucket as a low- level transitionary vessel to a larger garbage can lined with a lawn waste bag.

AZ DIY Guy: Representing the two local big box stores equally.
Step one is done. Get out of the heat and prepare for battle another day.
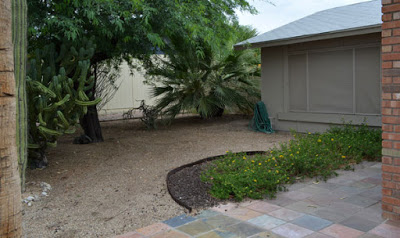
TREES
The palms were overgrown and had to be trimmed. That was on tap for the next morning. It's actually quite fun, blazing through them with an electric pole saw. Close to the ground, it's unbelievably quick work.
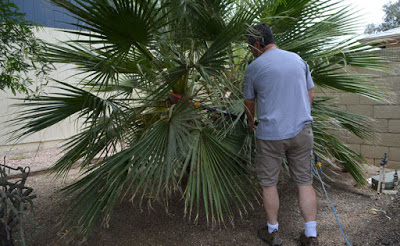
As I shift to the taller trees, it's slightly less fun. Staring sunwards with sawdust and sharp, serrated palm fronds raining down on me while attempting to maintain solid ladder balance is a ripping good time.

Ehhh... still fun.
SPEED TIP#3: No delays with chainsaws, keep 'em running smooth
When using any sort of chainsaw for yard work tasks, add bar and chain oil, every chance you get , or even more often. I loose so much time when a chain heats up, expands, and slips off. Sometimes it damages it and I have to grind the drive teeth with a rotary tool to get it back in the saw sprocket. It's at least a half hour each time. A full oil reservoir just keeps me working instead of fixing the chain.

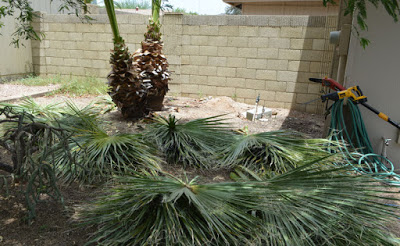
With bulk waste pickup a few weeks out, I lugged the fronds to a giant heap beside the house where they would wait, safely behind the fence.
WEEDS
Of course, next up was WEEDS.
I freaking hate weeding! In the land of very little rain, we still constantly have to fight weeds. The ones we get seem to be locked hard in the soil and are an incredible pain to pull out.
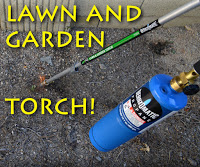
SPEED TIP#3: Fight weeds with a lawn and garden torch
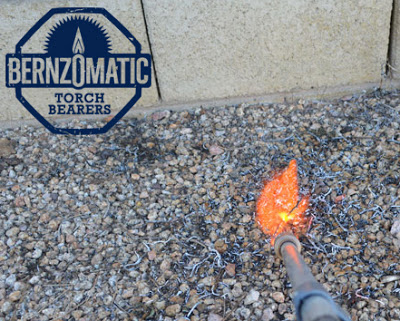
Weeding does not have to be done on you hands and knees, or with nasty poisons, I propose we fight weeds with fire, my friends.
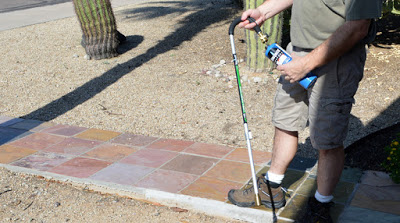
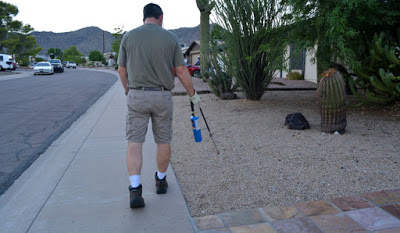
I used the Bernzomatic JT850 Lawn and Garden Torch, a lightweight, long-handled tool that looks like a steampunk walking cane. It's perfect for frying those devilish weeds.
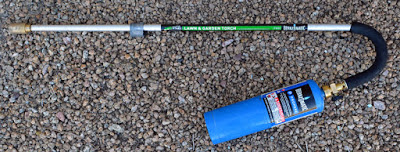
The Lawn and Garden Torch
The nice thing about this beauty is that it uses the same propane bottle from a standard handheld torch, or the type used in a camping stove.
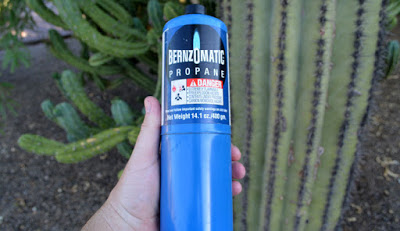
A long handled torch is absolutely wonderful for spot-killing weeds in non-combustible areas like desert landscaped yards, driveways or walkways, or stone-filled planting beds. I took it to the back yard first, to do some cleanup around the pool. After threading a bottle of propane onto the handle, I opened the valve, just a little bit to get the gas flowing. I found if I let too much out, it just won't light. There's a neat little sparking trigger built in, just to get the party started.

Auto start, no outside sparker needed!
I laid down some flames on the weeds that were taking root in the splash zone of the pool. This particular weed was more of a fine grass. The flame simply wiped it out in seconds. There was a slight crackle, a puff of smoke, and it was erased from the face of the earth.
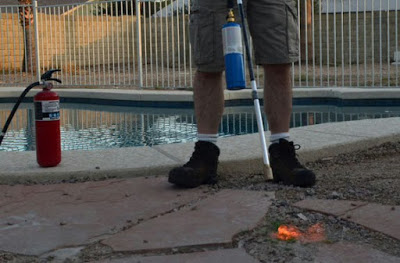

The fine grass was super quick to wipe out, I strolled around the pool with the sun still low in the sky slaying weeds. It really didn't feel like work; it was relaxing and even a bit fun.
I think I can speak for all dudes when I say there is a vestige of man-child that lives in all of us. We never outgrow the desire to: A.) blow stuff up or B.) burn stuff down. Sure it's an irresponsible urge, that's why you don't see grown men melting plastic army men with a magnifying glass. But dang, when we're allowed to burn stuff?!!! Sign me up! (Ladies,...there's a vestige of man-child in you too. Try one of these out and you'll be hooked .)
How about those hearty, tenacious weeds that won't release their steely grip in the driveway or sidewalk cracks? They are those ugly suckers that break off when you try to pluck 'em, only to re-spout from the roots craftily left behind. I've got the solution...
Targeting,... targeting...
Ohhh heck yeah,..
FLAME ON!
Fire!
The moisture in the stem boils instantly to vapor and destroys the cells that let water travel through the plant. You can hear a satisfying, audible crackle as it happens. Nothing is coming back from those roots, Nothing,
Who's next?
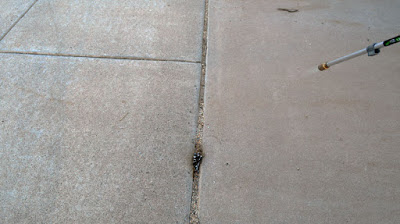
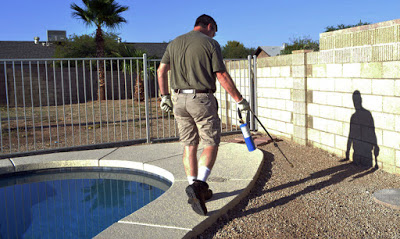
Target destroyed.
I took a stroll along the front sidewalk, engaging in a light search and destroy. Luckily, there wasn't anything too serious to engage up there, just some tall, spindly-stalked stuff which met its end as I ambled along.
I think the ants I saw in the area must have something to do with keeping lush, leafy type stuff down, but I'm not sure. They're not fire ants, but still the little buggers are not averse to biting you on the toe knuckle if you tarry too long in their territory wearing sandals.
Towards the fence line, there was the big, lush stuff, the leafy, salad greens looking weeds. If anyone asks, I really threw my back into it and laboriously weeded the area. Yard work is brutal.
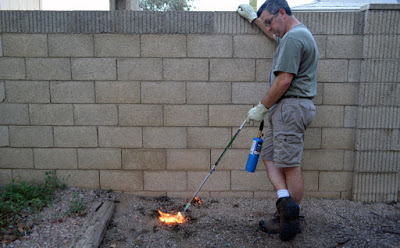
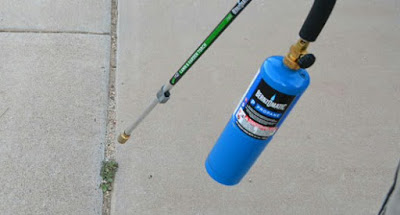
You can approach the lush, thick stalked stuff a couple ways. You can just kill it and let it dry out for a day or two before raking it up, or you can burn it to a crisp. Which will it be?
Option # 1 - Just kill the weed and let it dry: Generally, with the big stuff, especially in the back yard, I just hit it and come back later. Once the main stalk gets zapped, water cannot get to the rest of the weed. It won't survive and will just dry up. It's easy enough to rake up later.
Tick,.. tack,.. toe
Option #2 - Burn it to a cinder: If it's not too big, or if it's in an area you really want cleaned up right away, you can expend a little more propane and virtually vaporize it.
This rascal was a medium-sized growth, I could easily wipe out in a few seconds.
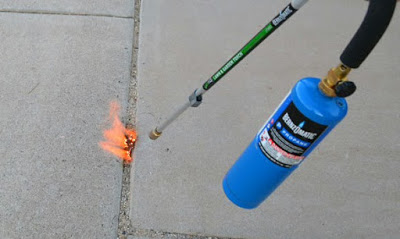
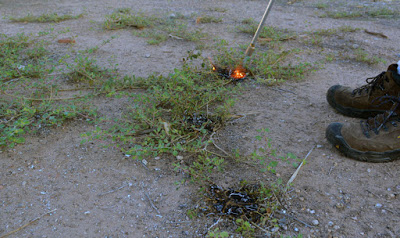
I kicked the dried, flammable sticks and leaves from the area and laid down some flame upon the interloping weed.

After about 30 seconds of heat, the weed was pretty much reduced to crispy ash. Seriously, you can't tell me this doesn't look like fun.
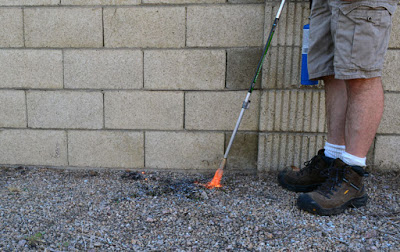
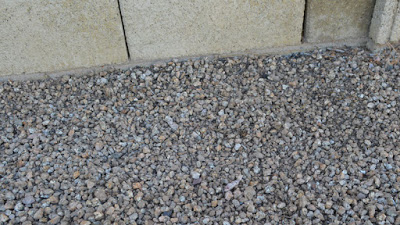
A quick touch up with a landscaping rake cleans up the ash and smooths the ground out a bit.
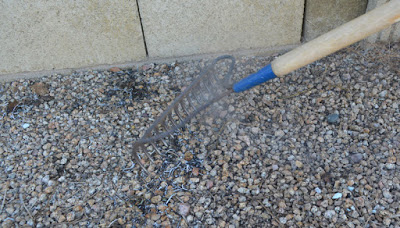
The weeds never existed. I was never here. You didn't see anything. Go back to your drink.
Some safety tips:
- I shot most of these photos in low light and shadows. Still, notice how difficult the flame is to see. Watch where you point this rascal. There can be 8 - 12" of flame you cannot see, especially in brighter light. It would be easy to set something on fire by mistake.
- Take extra care around plants you don't want to kill. I have a buddy that murdered his shrubs by letting the flame lick at their stems for a few moments. His wife was not pleased.
- This is seriously not flipflops or sandals work, especially with near invisible flame. I recommend wearing boots. There were a couple times I missed a small leaf of twig which then caught fire. I stomped those out before moving on. Boots are good.
- Keep your head on a swivel and mind your surroundings. Watch for flame ups where you don't want them. Make sure there is not anything smoldering before you leave an area. When in doubt, squirt the area with a hose.
- Keep a fire extinguisher nearby, or at least a garden hose.
- If you go time-traveling and end up facing one of those nasty, Victorian villains with a sword-cane and a twirled moustache, I heartily recommend lighting up this flame thrower cane while they are still pontificating. They'll never expect it.
- Don't torch weeds in your best clothes before a meeting with your priest, pastor, children's teacher, or boss. While any of the weeds may leave a slight burnt aroma on your clothes, others leave a definitively wacky scent, a scent I remember smelling in the area of lawn seats of certain rock concerts of my youth. Probably not an impression you want want folks to have of you.
That's it. The Bernzomatic JT850 Lawn and Garden Torch helped effortlessly wrap up the cleanup. I just can't help myself. I just keep going out and flaming other parts of the yard, whenever I see a few weeds crop up,
Flame on my friends.
This is a sponsored post. I am a proud to be a Bernzomatic Torch Bearer, though all opinions expressed are 100% my own. I won't recommend products I don't believe in.
The Torch Bearers are a group of tradespeople, DIYers, culinarians, adventurers and artists brought together to create projects using Bernzomatic torches and share their knowledge and ideas with you. Check them out here and get inspired to create with fire.
No ants were harmed in the making of this post, except perhaps a few of those toe-knuckle biting suckers, but they deserved it.
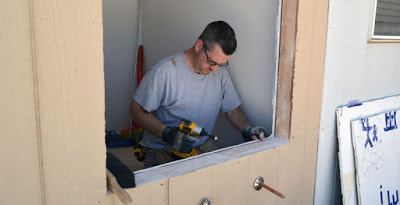
Adding a Window: The Install
So I'm installing a brand-new window where there wasn't one before. I'd already punched into the side of the house, framed the opening, and installed the siding. I'll include all the links at the end of this post if you want to start from the beginning and need an explanation why the hell I'd be putting a window in a little girl's closet.
The rough opening was ready but it didn't go all the way into the house. The back side of the drywall, temporary insulation, and some plastic sheeting have been desperately trying to keep the raging summer heat from infiltrating into our home. The insulation and sheeting were easy enough to rip out, but the drywall would require a little more of a precision touch.
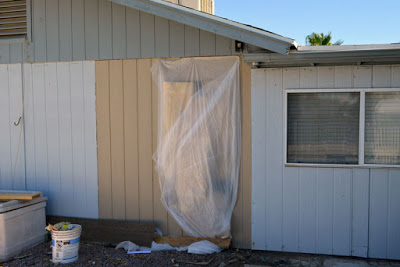
Good lord. This side of the house is ugly, eh? More to do, more to do.
I used the oscillating multi-tool to make a drywall plunge-cut, then traced it along the framing, cutting as close to the edge of the 2x4 as possible. I find this method a lot cleaner than the high-powered, devouring rage of a reciprocating saw.

I'd like to thank one of my coolest fans for being by my side...
I love this type of tool. Mine's an inexpensive, Harbor Freight model that I think I picked up for about twenty bucks a few years ago. Somehow, inexplicably it keeps on chugging. I really thought I'd have killed it by now and picked up a higher grade, more professional quality tool, but as long as it's still slicing and dicing, I'm taking it into battle.

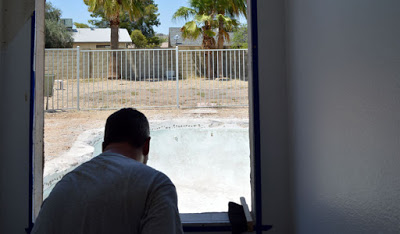
The drywall popped out easily. With Phoenix temperatures around 110 degrees, I can't express how pleased I was to be greeted with by a sweet blast of arctic-chilled, air conditioned goodness.
As I paused and enjoyed the enticing breeze from the inside of the house, I was jarred back to reality by the wailing sounds of despair howling from my wallet in my back pocket. It knew that cool air was a stream of cash, blasting unchecked into the desert heat and prodded me back to work.
"Break on through to the other side"
- Jim Morrison
The hole needed to be sealed fast. With the size of our next electric bill on the line, I vaulted like an action hero, into the closet (minus the combat roll). I started rapidly screwing the drywall edge into my newly framed window opening, the very essence of speed.
With the room door closed to retain precious AC, I got my first glimpse of what the world would look like through the new window. Of course, it was the apocalyptic scene of a partially demolished swimming pool. Lovely.
Moving back outside, I shifted to waterproofing the opening. Even though Phoenix has an annual rainfall of only about 8.03 inches a year. We've had some gully-washers dump a significant amount of that down in a matter of hours. In fact, last year there was an absolutely brutal dumping that closed the city. I needed to take sealing the window up seriously, or I'd regret it later. Summer monsoon season is on the way after all.
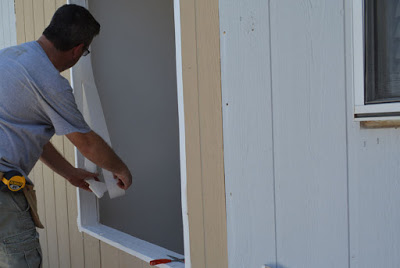
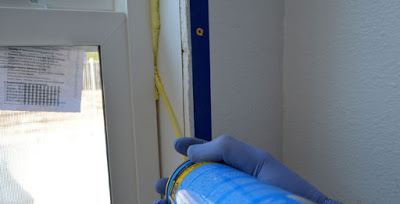
I reached, once again, into the magical box of samples that my friends at Echo Tape had sent me to play with a while back and extracted one of the thickest, toughest beasts of the bunch, their All Leak Repair Tape. I'd contacted them for a recommendation and this is the one they advised for the job.

Since water flows down, I started at the lowest portion of the opening and applied the tape. Each successive layer would overlap from above, like shingles. The front of the bottom edge got it first. I overlapped the front, cut the corners and folded them over, sealing the gap between the siding and framing.


This EchoTape, peel and stick stuff is tenaciously sticky; I could feel how tightly it grabbed hold as I burnished it into the wood with my hands. I really hope I don't have to peel it back up at some point.
Maybe I should have dry fitted the window before I got this far...crud.
Confidence friends. Moving on, I reinforced the corners next with a short piece.

The sides got it next, wrapped around the corners tightly and overlapping onto the bottom pieces

I may have overdone it a bit, adding a second layer, deeper into the framed area. Each time, I overlapped it. a little. With the bottom sill slightly angled outward, water would have to find its way outside, right?
I placed some cedar wedges on the sill, leveled them, and taped them in place. These would keep the window slightly elevated, allowing any potential invading water to drip outwards.
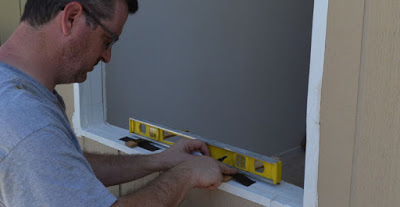
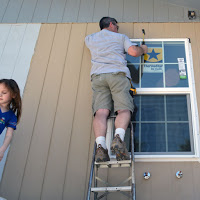
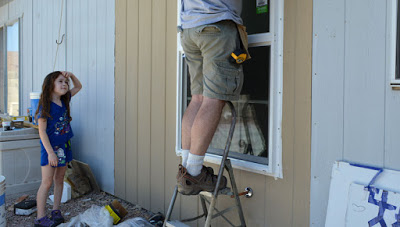
Go time. I slipped the new window into place and it actually fit! I CAN read a tape measure correctly once in a while!
Nice and easy, I laid it gently into a bead of silicone caulk behind the nailing flange, leaving a couple gaps at the bottom for water to escape.

Jack eyeballed it from the inside, so I could shimmy it slightly back and forth until there was an even gap.
Sweetness came into the fray to drive some 2 inch, galvanized roofing nails into the nailing flange. I started first in the corners then followed the manufacturer's recommended nailing pattern.
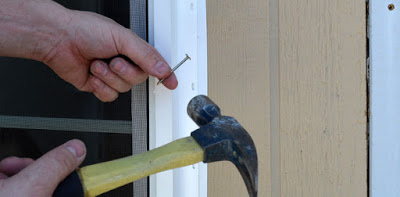
Sweetness
The site Superintendent soon showed up to survey the jobsite. She told the crew to quit lollygagging around and get her window the heck finished. I straightened up and scurried up the ladder to nail off the top.
After running out of white Echo Tape, I switched to black to wrap the top. This time, I applied it from the siding onto the nailing flange of the window, covering all the nail heads and open nailing holes.
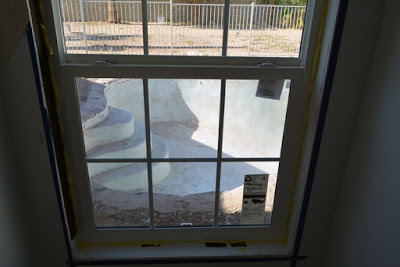
With that, the window is in.This particular unit is a ThermaStar by Pella 10 Series Vinyl Double Pane Annealed New Construction Egress Single Hung Window (Rough Opening: 36-in x 60-in; Actual: 35.5-in x 59.5-in).
I think they had the size we wanted in stock, but we special ordered this one with the internal mullions for about $210, delivered to our local Lowes. We're planning on all the windows being replaced eventually with this style. This one and the crummy one beside it are the only ones on the house that are double-pane, if you can believe it?..in Phoenix, Arizona, home of God-awful summer heat? That's the problem with a 1979 tract home.
.")
Nearly done, I still wanted to get it insulated before I could quit for the day. I used expanding spray foam, designed with low pressure expansion to keep from bowing and bending window frames.
This particular product is GREAT STUFF Window and Door Insulating Foam Sealant. .
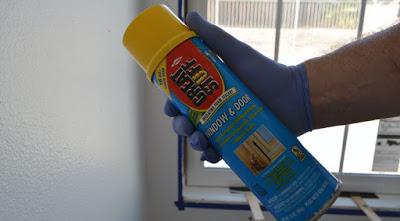
I would have called it "Damn Good Stuff", but that's just me.
I chose easy cleanup by wearing disposable Nitrile Gloves (I always keep a box around for painting and messy stuff). I slowly shot a stream of the foam into the gap, all around the window. I'll trim it back later when it's dry and I'm ready to install trim.
First Person Shooter View! It's just like you are there right?
Done deal. The window looks great, what a glorious view!!! Ohhhh yeah, a sparkling backyard oasis of summertime bliss, the glorious swimming pool. Simply gorgeous. Well, soon anyway. Hopefully.
There's more to do of course. A little more more waterproofing, interior and exterior trim, caulk and paint. Then the closet itself.

Background links:
As promised, here's the preceding required reading in my non-stop, action and adventure closet remodel / adding a window series:
- Closet Remodel and Emergency Escape
- Adding a Window: Framing Fun and Foolishness
- Adding a Window: Sliding on Some Siding
Update! Here's the next chapter:
And one more thing..
Thumb and Hammer - Home Improvement Podcast

I was recently honored to be interviewed by Doug who runs the Thumb and Hammer blog. Give it a listen to hear about how I got started in DIY home improvement the launch of the AZ DIY Guy's Projects blog. It was a lot of fun!
Check out the mp3 here, or iTunes here. Give him a good review over on iTunes too!
Thanks Doug!
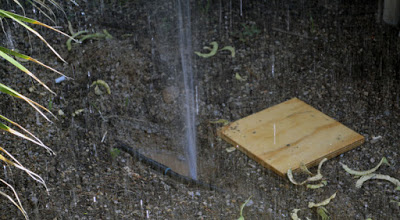
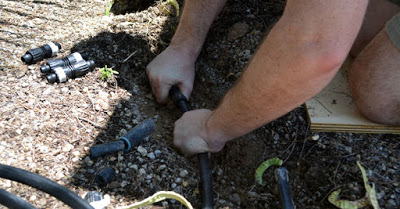
Breaking My Own Rules: Irrigation Repair Fail
I broke my own rules. Again. One of the AZ DIY Guy's Pillars of Wisdom is to always buy more material than necessary to complete a task. Otherwise when something goes wrong, (and it always does), it's another trip to the store. It adds up to serious, wasted production time.
In this case, it was the dang drip irrigation system that failed, again.
I've replaced most of it over the years, but the older sections continue to break. I ran out to grab breakfast, prior to attacking the window install project, only to return home to find a geyser spewing in the front yard.
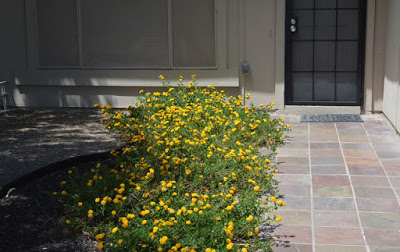
Of course. The flowers in the front beds had been looking dried out and crinkly lately. Lantana's usually do great in the Arizona summer, as long as they have water.
The leak must have been there for a while, escaping our attention, since the watering schedule happens when we are driving to work. Walking by the flowerbed multiple times a day, I didn't notice the absence of flowers indicated the plants were screaming in thirst. Their precious water was being diverted into our side-yard geiser.
Seriously, dried up and crinkly flowers.
I hauled out a mini spade and started shoveling. I knew the flexible line was buried shallow. I'd tied onto it a couple feet further along when I'd installed the flowerbeds last year.

The patented AZ DIY Guy's Kneeling Square of Plywood in action.
In the mud, I couldn't easily find the hole in the line, so I triggered the irrigation controller in manual mode.
Found it! I wouldn't get too hot for a while after a front yard shower.
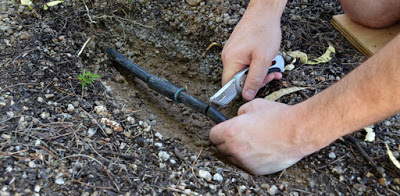
There was the leak alright. It was a small slit, probably where a rock had worked its way down through the soil and eventually rubbed through the tubing.
Do you see the leak? It's in low in the center. Look closely.
No problem. A compression coupling would be longer than that cut. It was just a quick trip to the hardware store away and I'd soon be back to regularly scheduled weekend DIY'ing.
I took the liberty of humming a merry tune to myself when I returned from the store 15 minutes later and started the quickest little fix in all of DIY-dom. I cut the split section out with a razor knife.
I slipped the coupling on and tightened it down on the feed side of the line. A cake walk.
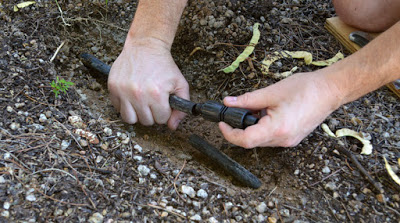
When I slipped it into the downstream side, the tubing split. Dang it! I pulled more of the run out of the ground thinking I could re-dig the trench and shorten it by pulling in a little of the curve.
But it was not to be the case, that brittle section was too long. It included two single-use couplings within inches. I'd need to replace the section, which would require a second coupling.
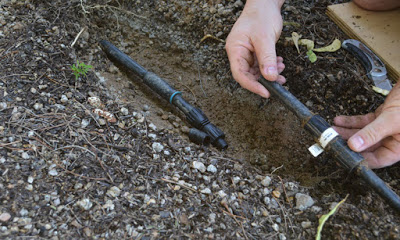
I searched the garage desperately for just one more coupling... please?... just one?... nope
Alas, it was time for...
Another trip to the hardware store...
Another conversation with a clerk to say I didn't need help finding anything,..
Another time poking around in the irrigation parts bins to find parts that still had the bar code stickers attached to a void a price check at the register.
Another side-tracked visit to the tool department to see if there was anything interesting, that wasn't their 20 minutes earlier...
Another wait in line,...
Another, "yes, found everything I needed,.. yes, I was just here,... yes, I am a club member, no,.. I lost my card,.. here's my phone number,... oh, that's right, the other phone number,...right, no debt button? push credit... here's my ID,... can I have a copy of the receipt?,...no I don't need a bag,..."
Another drive home, burning more gas...
Another big waste of time.
I came home with three-times the couplings I needed. I wasn't going down without a fight. Luckily, I had a fair amount of leftover tubing in the garage from redoing the back yard system. I cut out both single-use couplings and inserted some new tubing.
It was over in seconds. This is a very easy fix that should have taken a few minutes, if I had just followed my own advice and bought more than I needed on that first trip. What's a couple bucks to save a bunch of time? What's my time worth? Plus, there's two trips of fuel to consider.
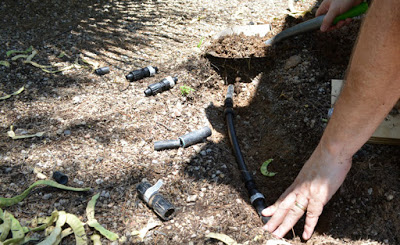
Either way, I now have two couplings in reserve and plenty of tubing. Next time, I can do a repair and be on to the day's normally scheduled programming without a trip to the store.
Less than a week later...
All was right in the world again.
Buy more than I need. Keep a stash for later.
Yep, Next time.
On another note, one of my projects was featured on a podcast this week.
If you aren't already aware of it, check out the
Home Repair Tutor Podcast

. In addition to two websites, great YouTube tutorials, and a huge Facebook group, my blogging buddy, Jeff Patterson, puts out a new, short podcast episode
every weekday
(!!!) I really enjoy his positive energy and great info. He shares tips, techniques, tricks, and deals on tools and materials. He also routinely features cool projects from other DIY bloggers.
This week, I was humbled to learn he featured one of my posts, along with a great project by Woodworking for Mere Mortals Check out the mp3 here, or iTunes here. Give him a good review over on iTunes too!
Thanks Jeff!
Adding a window: Sliding on some Siding
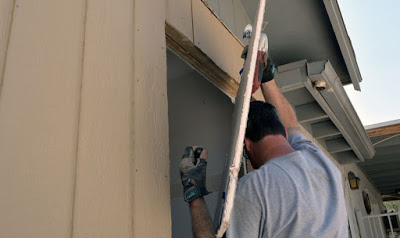
I've resumed exterior work as my install of the added window is looming. The special order even came in; the beautiful window is sitting calmly in the garage ready to be deployed to its new home. But first, I have to replace the siding I'd torn off, cut the opening around the new, framed window space, punch into the house, and prepare the opening to receive it.
Since I'd torn a piece of siding in half to get to the area for framing , I had to go back into demolition mode and make space for an new, full-sheet. It was back to more crow-bar and hammer work to rip the rest of the second sheet off. Once again, I was pulling nails and picking them up from the ground of my pool-side workspace.There's no sense in finding them later in the summer, whilst barefoot, if we ever get to swim again.

Nope, still no hidden treasure trove of Civil War Confederate gold.
It's so odd seeing the house half-naked like this. The reason I'm tearing it up and adding a full sheet from the left side is to keep the spacing of the boards equal, across the back of the main wall. The lower section on the right is part of an addition by distant predecessor, the home office space. It's the room against what was once the exterior wall of our daughter's bedroom and now blocks her original window location.
As you can see, I'm risking life and limb on this one. Not only do I have a mere razor's edge of shade available to hide myself from the ferocious Arizona summer sun's assault, I am working perched on the precipice of a cliff, above a concrete lined hole in the ground.
I couldn't use a full size sheet as I had planned. It turned out that 4x8 sheet of T1-11 siding is several inches too tall. It would need to be cut down to size.

Can you believe that a DIY "right tool for the job" renovation mad-man such as myself doesn't own any sawhorses or portable work tables to cut on?
I do have an empty swimming pool however.
That'll do.

That's not an ascot I'm wearing friends, I'm trying out one of those cooling towels.
I realized I'm never smiling in my action photos. I'm just doing my thing while the camera does its thing. I'm hot and thinking about my work, too busy for pleasantries. I figure I'd finally share one where I'm really letting my personality show.
Frankly, I think I look like an idiot when I grin like this:

Now that's a good lookin' dude, if I may say so myself.
Working alone can be a pain in the ass when dealing with big stuff like this. I had to somehow lift the big sheet into place (2 hands) to do some hammer and nail work (2 hands). That's four hands worth of work. It's not too heavy, it's just unwieldy. After several failed attempts, I finally made a simple lever with a Wonderbar and a 2x6. I was able to lift, hold, and slightly adjust the sheet around with one foot, just enough to get the first two nails in the sheet, holding it in place.

Die hard leverage action!
On the subject of the shoes...
I'm trying out some new Atlanta Cool work shoes my friends at Keen sent over for me to to put through their paces. These lightweight, breathable, steel-toe beauties have quickly become my summertime action worksite footwear. I've been giving them a beating for weeks and they still look great.
I used galvanized nails to attach the sheet. I don't need any more rusty nail heads around this place. As I pounded them in I almost always hit the studs. Marking their locations at the top, above the new sheet kept me mostly on target.

Now you know why I cut some fingertips off my left work glove.
With the sheet partially overhanging the window opening, it was easy enough to cut it out with a reciprocating saw. I traced the blade along the 2x4 frame as a guide. It was easier than it sounds. As long as I kept an eye on it, I could stay on track. It doesn't have to be laser straight anyway , the flange and trim will cover it.

A case of reciprocate-ocity.
I skipped across it in my last post, because I was talking specifically about the plumbing part of this project
. but I nearly forgot to put a support piece in place for the the new water line before covering it up. The Kreg Jig was the best solution for the tight space.
No going back to the cushy ergonomic comforts of the garage workbench for this one; I did the job in the wild,
like a savage. I zipped a couple pocket holes in each end of a 2x4 with the Kreg R3 Jr. Pocket Hole Jig.

No workbench, no worries.
Pocket holes worked out perfectly. I screwed the support piece in place, strapped the plumbing to it, and filled the cavity with insulation. Since it was near plumbing, I probably overkilled by using Kreg's Blue-Kote WR Pocket Screws. These 2 1/2" #8 coarse thread, washer head screws have a weather resistant coating, so why not?

I had to trim the next piece of siding for both width and height. In one of the more ridiculous moments of the day, I had to stick part of my arm out of the shadow and into direct sunlight.
Ridiculous!

A full 8 feet of straight edge got clamped down as a saw guide to cut the siding board to size. Unfortunately, I had a little wobble midway as I baby-crawled along at the side of the pool and messed up my cut. Luckily, the vertical batten will cover it when I trim out, but still, uncool. I remember a recent post over on my blogging buddy Jeff Patterson's Home Repair Tutor site on breaking down sheet goods. I'm convinced I want to add the Kreg Rip-Cut he used to my arsonal. Jeff, I too want to start "Cutting Plywood and Breaking Down Sheet Goods like a BOSS!! " Next time perhaps.
Crawling, like a baby,... a baby with high-speed, carbide-tipped power tool.
This next part had been worrying me for days as I mulled it over in my mind. I had one sheet of siding cut to fit and I had to punch two holes in it for the new water lines. If I was off by less than an inch on either of them it would be a serious miss. The whole sheet would be wasted or I'd have to come up with some sort of half-assed, ugly MacGyver'd solution to hide it.
I measured the heck out of it, pulling repeated dimensions from the top, bottom, left, right, a cactus, two palm trees. lunar shadows, sea-level, and a passing airliner. I transferred the measurements to the center points of where the pipes should be, muttered a prayer to the gods of DIY, and plunged in with a spade bit.

"oh please, oh please, oh please, oh please..."
There was no way to use my Wonderbar leverage trick on this one; I had to resort to an ancient technique called "man handling" to get the sheet into place. I can't really teach you the technique here because I can't spell the grunting sounds required. I probably shouldn't spell the muttered curse words either. I'll let the photos tell the tale.

I'm not sexist. Ladies can "manhandle" too. It may just take extra cursing.
Luckily, the stars aligned and the neighborhood airspace was spared the howls of rage that were inevitably going to be torn from my throat. The piece fit. Perfectly.
I was never worried.
honest

I love it when a plan comes together.
- John "Hannibal" Smith, Colonel. The A-Team
It was easier to nail up since the plumbing held it in place. Back with the reciprocating saw again, I cut out the rest of the opening.
A moment's pause please, if I may.
Between us, is it ok if I stop fighting the urge to call a reciprocating saw a "Sawzall". I'm using a sweet DeWalt brand saw and "Sawzall" is Milwaukee's term for its line, but dang it's a good one. Milwaukee wins. I just want to use the term it generically. It's like Johnson & Johnson's "Band-Aids" instead of "individually-packaged, perforated, personal adhesive strip bandages".
Come on, everyone just calls 'em sawzalls don't they? Can I just drop the whole pretense of being correct because I'm a "knowledgeable blogger",.. or because I "know what I'm talking about"...? I won't even capitalize it...
Back with the reciprocating saw sawzall again, I cut out the rest of the opening.

"..'cause I'm saaaaaw-zallin', ..yeah, I'm saaaaaw-zallin' "
- Tom Petty
This post is getting long already, and it got way too hot to keep going.

Adding a Window: Framing Fun and Foolishness
Kid Closet Remodel: Episode 2 I’m tearing the wall up from the outside, leaving nothing but drywall. I’m installing framing for the new window to go in.
Read More