

I made a super quick and easy shelf under the top of my workbench to keep my collection of cordless took batteries organized.
Read MoreUpgrading My Workshop with a Decorative Wall Covering
My garage / workshop’s were a hideous mess of lumpy drywall compound, holes, and mystery stains. I’m fixing it up with an awesome patterned wall covering from Decorative Ceiling Tiles.
Read More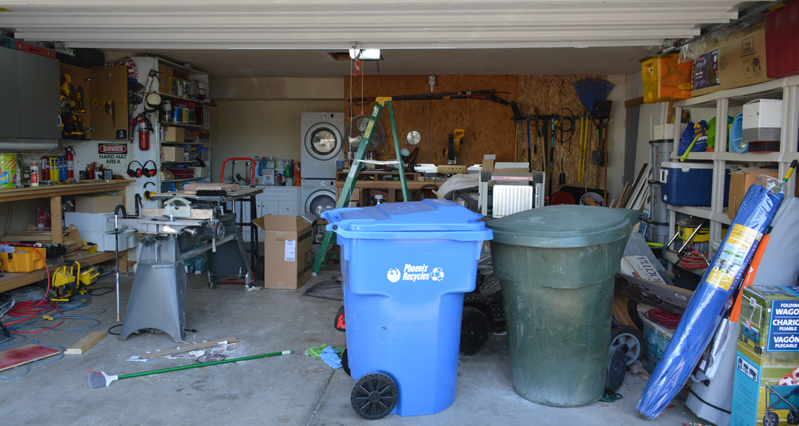
Garage, Workshop, or Dumping Ground?
We've lived in this house for 10 years. In all that time, we've never had our vehicles inside the garage, not once. The space has always been teetering between dumping-ground and workshop.
A dumpshop?
I've always envisioned it as my bad-ass workshop, but its certainly a multi-use room.
Bless my sweet wife, she's always happily allowed me my man-cave, without complaint.
Along with general family storage, I've slowly taken the place over with workshop stuff. My tool chest, workbench, the 5-in-one Shopsmith multi-tool, a thickness planer, and my beast-sized, custom-built miter saw bench dominate the garage workshop. I've got wood, hardware, and building material jammed in every nook and cranny. In true Arizona style, I also get to share the space with our laundry facilities.
Spring Cleaning
From a homeowner standpoint, we're at a cool spot in our parenting years. Finally, our youngest is starting to move away from massive kid toys. I started loading the truck with an outgrown bike, unused toy tool benches (2), a booster seat, and other stuff that has been cluttering the garage, unused for a couple years. I had boxes of books and clothing to get rid of as well. I'd making a quick Goodwill run.
I started clearing out the big toys and piles of junk accumulated through the winter, making way for upcoming spring and summer projects. It's incredible just how much stuff gets shoved in there. The biggest task is breaking down cardboard boxes that inevitably get chucked in a corner, too big to fit in the recycling bin, but too unimportant to take a razor knife to right away.
As I got loaded for the Goodwill delivery, a sneaky bastard of a rainstorm tore into the neighborhood. After quickly jamming everything left on the right side of the garage, it was a short sprint through the rain for the cab of the the truck. Better to get the truck under cover than than unload it in the rain.
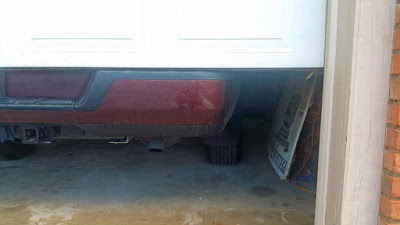
For the first time ever, I eased the Ridgeline into the garage. I nuzzled the nose right up against the miter saw bench, ever so slightly bumping into the 2x4's.

Now it is a garage, no doubt . Solid proof in the fact that, there was a mid-size, 4x4 pickup parked in it with the big rolling door...
...ahhh crap!

When one builds a monstrous " Economical but Beefy Miter Saw Bench", one needs to consider that a mere 2 inches less depth may be enough to allow for a garage / workshop hybrid. In my case,... the cargo was dry, but water was blowing in through a two foot tall shortcoming in my garage door closing ability.
The rain passed quickly, the front edge of the garage started to dry out, and the truck got loaded.

Pretty soon, I'm going to have to solve this Garage vs. workshop vs. dumping ground quandary. We've got a 16 year old now and only room enough in the driveway for two vehicles. My workshop is going to have to be much more flexible. Unless I figure out where to put another vehicle that will satisfy HOA rules, there's going to be a car in there, probably perpetually coated with a healthy layer of sawdust.
The Home Automation Project: Garage Opener Door Edition
Installing the Insteon Garage Door control and status kit as part of my home automation project.
Read MoreDIY Disaster - Score One for the Pack Rat
Bang! and then,... the smoke came out... blowing up my garage door opener.
I overheated our garage door opener and wrecked the capacitor. Here’s how I repaired it on a Sunday afternoon.
Read MoreDon't Kick the Bucket - Installing a 3 bucket storage rack
Garage organization with a Monkey Bars 5 gallon bucket rack. Easy install / quick project.
Read MoreThe Great Fall Workshop Cleanup
It looks like a cruise missile hit my garage workshop. With gorgeous Arizona winter weather rolling in, I gotta get this place ready for some DIY project action.
Read MoreMiter Saw Bench Revisited - Plus a Reader's Version
Dewalt 12" Double Bevel Sliding Compound Miter Saw work bench for wood working, economical but tough.
Read MoreDIY Workbench Upgrade + A Tool Giveaway!
A DIY Work Bench project with the new BLACK+DECKER 20V MAX Lithium Cordless Drill/Driver with AutoSense Technology
Read MoreGarage Organization with Monkey Bars
Installing a yard tool organization rack by Monkey Bar Storage.
Read MoreAdvanced Wall Clock Installing (Blogiversary Special Edition)
You could either hang a clock on a nail,... or you can do it right.
Read MoreBuilding the Ultimate Workshop Power Strip: More Power!!!
This technological terror is a hand crafted ULTIMATE garage workshop power strip.
Read MoreSketchUp: Modeling my miter saw workbench
After years of being slightly aware of SketchUp, the free 3D CAD modeling software developed by Google, (now owned by Trimble), I decided it was time to give it a whirl. I was motivated by the excellent Google SketchUp Tips and Resources post on HomeFixated.com and followed the link to download the program. After watching a few of the tutorial videos, I felt reasonably confident in using the software; I dove headfirst into the deep-end of high-tech design wizardry.
It's fun to see it modeled, and clean in 3D, with the real workhorse stabled in my workshop. The story on building the real one can be found here: Building a Miter Saw Bench - Economical but Beefy!
Apparently, I like to do things completely bass-ackwards. I built this project first in the real world, many-many months before introducing it to the digital realms. I had done a quick and simple pencil and paper sketch in my Moleskine Classic Notebook , before jumping right into sawing lumber, and screwing screws with the Kreg Jig, redesigning and
  adjusting my half-baked plan as I built.
This bad-ass bench has been in real-word, front-line combat, supporting the mighty DeWalt 12-Inch Slide Compound Miter Saw in its sawdust-spraying missions for quite a while.
PARTS LIST:
Personally, I'm leaning towards starting my next project with SketchUp and finding my mistakes earlier. I'll still use the beloved Moleskine notebook though.
 |
| It's easier than it looks! |
Apparently, I like to do things completely bass-ackwards. I built this project first in the real world, many-many months before introducing it to the digital realms. I had done a quick and simple pencil and paper sketch in my Moleskine Classic Notebook ,
This bad-ass bench has been in real-word, front-line combat, supporting the mighty DeWalt 12-Inch Slide Compound Miter Saw
 |
| Right before the maiden voyage. |
You can see the general assembly in the photo above. The difference is, with the 3D model, I can do the Tony Stark design move, exploding and spinning it to show you the structure.
 |
| This is exactly how Iron Man was designed. Exactly. |
Plus, the whole thing can be disassembled in mere moments to a virtual lumberyard of precision-cut and stacked loveliness. Enjoy the parts list in its gleaming, three-dimensional-ness:
 |
| Because parts is parts |
- Vertical Structure: 10 ea. 2x4's (1.5" x 3.75" actual) x 29 1/4" long
- Bins: 4 ea. I actually built these for another project from 1/2" plywood and a 1/4" bottom. I used a dovetail jig, but it's not necessary for simple tool bins. 10.5" wide x 6.5" high x 16.25" long.
- Swivel Castors: 4 ea. I bought these 3" heavy-duty, locking swivel castors at Harbor Freight
- Bin Rack - back stop: 4 ea. - pine 0.5" x 1" x 14.25" (made from planed pallet wood)
- Bin Rack - rails: 8 ea. pine 0.5" x 1" x 21" (made from planed pallet wood)
- Top and Bottom Depth Structure: 10 ea. 2x4's (1.5" x 3.75" actual) x 21" long
- Base blocks: 4 ea. 2x4's (1.5" x 3.75" actual) x 3.75" long - for mounting the castors
- Top and Bottom cover: 2 ea. 1/2" plywood 24" x 96" (8 feet)
- Top and Bottom Width Structure: 4 ea. 2x4's (1.5" x 3.75" actual) x 96" (8 feet) long
- Work surface Center: 3/4" White thermally-fused melamine coated particle board 24" x 24"
- Work Surface Right: 3/4" White thermally-fused melamine coated particle board 24" x 23"
- Work Surface Center: 3/4" White thermally-fused melamine coated particle board 24" x 42"
- Two Drawer File Cabinet: (not shown above)
What do you think? SketchUp or actually sketch it up?
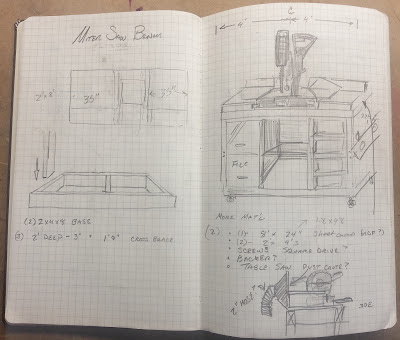 |
| No, it's not a Leonardo da Vinci original, but I see how you might think so. |
Download and enjoy my 3D model free* from Trimble's Warehouse here: Economical Miter Saw Workbench.
* All rights reserved - AZ DIY Guy's Projects: . I hereby give license to individuals to build this bench for their own use. My design, plans, images, and model and may not be used for profit without my express permission. This means you Ted's Woodworking Plans.
If you build a version of my Economical Miter Saw Workbench, please send me some pics and a description. I'd love to feature your project here.
AZ DIY Girl?
 This is a blog about tools, renovation, woodworking, and just plain-old fixing stuff,.... not crafting. But, it's also about being a Dad. When I went out to check the lights in the garage/ workshop I stumbled upon evidence of a little DIY crafter in our midst. In hindsight, our little family pizza and a movie dinner had been quiet,... too quiet.
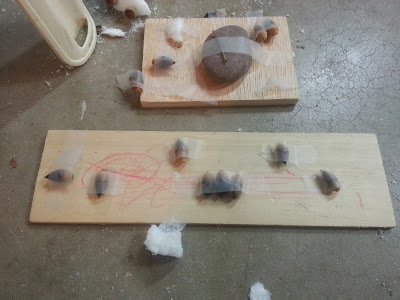
Gracie knows that projects, even crafting projects, get done in the workshop. I guess this includes the space a few feet in the door, right in the traffic path. Evidently, she does not think workshop etiquette requires any cleanup before returning to the family room to snuggle on the couch and that leaving her trip-hazard strewn minefield is A-OK.
My pint-sized worker had gotten into the wood scrap bin and pulled rocks from her toy pickup truck in the corner. She added some styrofoam, twigs, crayons, about 1.25 miles of frosted tape, and finally, the coup-de-grâce, a sack of acorns collected from the park.
Being the Master of Workshop-mans-ship that I am, I clearly lead by example. My work habits serve as the gold standard for my pupils to follow. Clearly, my practice of bringing delicious consumables into the workshop was the tidbit that Gracie chose to put into practice this day, as is evidenced by the slice of Little Caesar's, cheese "...and only little meatballs (sausage) Daddy!" pizza.
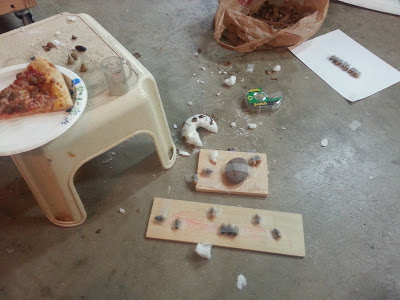
Feast your eyes on these one of a kind, hand made, "Decorations for Easter".
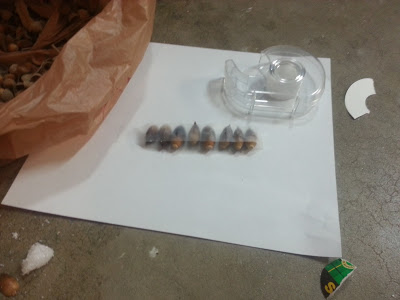 |
Crafting Ladies of the Blogosphere, you are hereby on notice. There's a 5 year old dynamo of pure creative genius hot on your heels, and she's not afraid to use excessive amounts of frosted tape. Reading, writing, and typing are the only hurdles; it won't be long. Stay sharp ladies.
 |
| The competition |
_________________________
<UPDATE> Once again, I'm honored to be featured by So I Married a Craft Blogger on his Man Up Link Up XII.
Of course, mine being the only submission by a dude, being reviewed by a dude, through a fog of testosterone, I stand a pretty good chance of being noticed when compared to the mysteries of actual-skilled, crafty ladies. It didn't hurt that I adjusted the title when sharing to "So I Fathered a Craft Blogger?" Trevor writes a great, humorous blog about A Man's View of the World of Craft Blogging. Check it out!

Power Tool Storage
 In cleaning up the garage after a couple weeks of heavy-duty weekend-warriorsmanship, I decided I'm not using my storage well enough. I'm having difficulty getting everything put away without heaping it up. There's two sets of double wall cabinets that I picked up on clearance about four years ago. They're cheap pressboard, but they're serviceable and seem to be holding up fine.
I picked some choice specimens from the scrap pile and used the illustrious Kreg Jig Jr. to screw a sub-shelf together. (Honestly, I look for excuses to make Kreg Jig Projects) I made it shallower than the shelf-pin holes so I could hang the blade-guard of the circular saw below its edge and still get the door shut. It's a better use of vertical space.
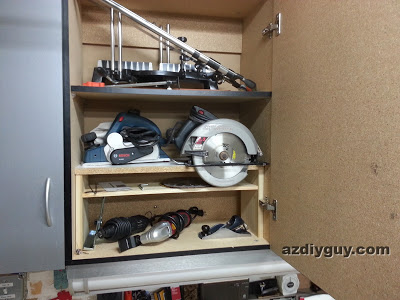
A thin (reclaimed pallet wood) shelf below the tool shelf holds extra blades and accessories. The whole sub-unit is able to slip out in one piece if necessary. There's plenty of room for more on the base of the cabinet. I stored my beloved Jorgensen Miter Saw way up top, where I'll need a step stool to reach it. I haven't used it since I got the mighty DeWalt Sliding Compound Miter Saw, but maybe I'll have a use for it and bring it back to the fighting front lines. Otherwise, I'll Craigslist (a verb now?) it later for a few bucks and clear the space.
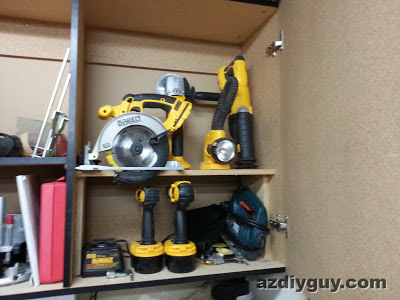
I made a similar unit over in the cordless-tool neighborhood, but without the sub shelf. It needed the room for the drill and impact driver to slip in and out, with their batteries attached. I'd robbed the factory shelf for another cabinet earlier, but this worked better due to the circular saw trick. I may add a second story riser, but this is doing the trick now. I drilled a hole in the base for the charger cord so I can top up batteries right in the cabinet. This cord is pugged into a switched receptacle so I can simply shut it off from below when I close down for the night.
I ran out of time for goofing around with the Kreg Jig and the Miter Saw making these high-end, custom-crafted beauties, so I just picked up a simple wooden box I'd made when I was practicing with the dovetail jig. Perfect! Yep, that's a dovetailed, 3/4" custom sander stand. You just can't put a price on such hand crafted finery when you're stacking a pair of wood chewing DeWalt sanders (Random Orbital & 1/4 Sheet Orbital)
 |
| The routers are upside down to protect the bits that are set juuuuuuust right. |
Done. All the tools are put away. I still need to re-jigger my whole storage setup at some point. I still have nail guns piled in a mechanic's tool chest drawer with other assorted stuff.
I even vacuumed the shop before coming in for pizza. Perhaps tomorrow after work, I'll pull out the planer and start working on interior door number three. This floor isn't meant to be free of sawdust for long.
Installing an LED Miter Saw Worklight
It's a little dim by my miter saw work bench. With my less than perfect eyes, its a little tricky to hit my marks. Yesterday, I received a work light system designed specifically for my saw. It's also supposed to project a shadow-line that gives assistance, similar to a laser. I'll review it later, but I wanted to share what the install was like.
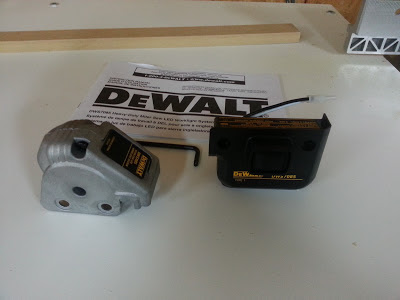 This is the contents of the DeWalt DWS7085 Heavy Duty Miter Saw LED Worklight System. It includes a switch assembly, a LED assembly, a T-20 Torx tipped Allen wrench, and an instruction manual.
The manual is short and sweet; it's illustrated and easy to follow. I gave it a quick preview and could tell this was going to be a simple operation. I briefly considered following the French instructions, but decided to use English, since I am admittedly, completely clueless about French.
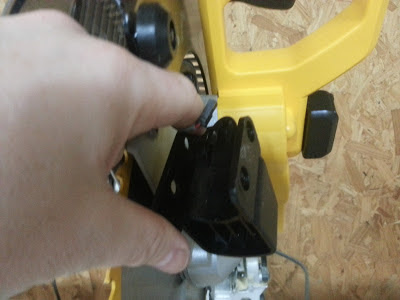
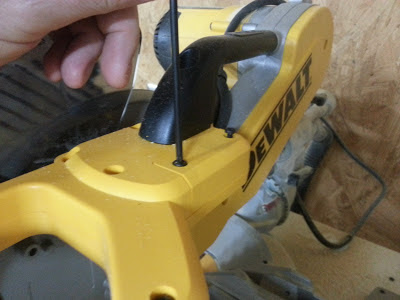 Working with the unit unplugged, you start with removing a couple of the Torx head screws to open an access point located on the top of the saw, just back from the main trigger / handle. The access cover gets discarded (or squirreled away forever, if your a pack-rat like me). Save the screws.
I locked the saw in the down position to make it easy to reach.
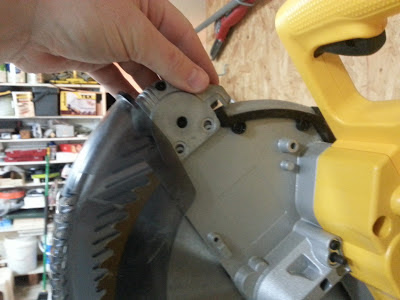
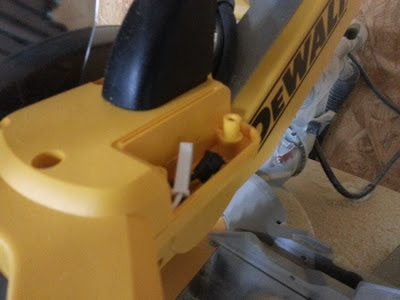 With the access cover off, there are two wiring connectors tucked in the cavity. It's an interesting testament to DeWalt quality that the cavity is totally enclosed; I had expected to see the electronic and mechanical guts of the saw visible when I removed part of the outer shell. The cavity was clean and sawdust free. This is obviously designed for easy consumer access for upgrades.
 The switch assembly, termed the "Worklight Power Supply (WPS)" was straight forward. The two wiring connectors snap into their respective mates. The connectors only fit in their proper locations and configuration, so even a knucklehead like me couldn't screw it up.
It takes a little fiddling to make sure they are tucked properly in the cavity and the wires don't get pinched. The WPS fits perfectly where the access cover once was.
 Next it's time to remove a black plastic thingie (a scientific term)that sits just above the leading edge of the blade, inside the blade guard. I raised the saw to the open position.
Again, using the supplied T-20 Torx wrench, I removed the screws holding it, two on each side. The two on the right and the one top left are easy to access from the basic, open position.
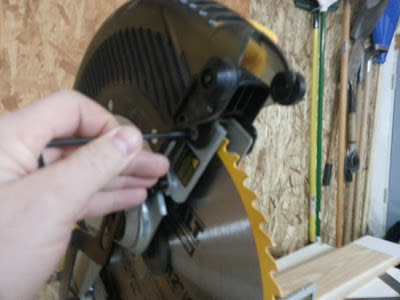 The forth screw is accessible by raising the blade guard. All four screws are easy to get out.
Two of mine were also very easy to drop, ricocheting off the floor to hide under and behind nearby stuff. I wonder how DeWalt engineered them to do that. They must have known would be time for me to take a stretch break and crawl around on the floor with my butt in the air, cheek pressed against the concrete looking for hiding screws.
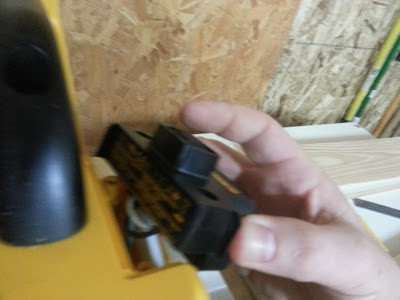
 The black plastic cover ("thingie") is fairly easy to wiggle out from behind the blade guard. There is another wiring connector tucked into it. Again, I squirreled the part away for the future. The directions state that it is unsafe to run the saw without either this cover or the work light installed, or risk "...serious personal injury". Good tip. They also warn you not touch the sharp point of the blade with fingers or hands, again at the risk of "...serious personal injury". That seems a bit more obvious. No warning about jamming my thumb in my left eye though.
 The cast metal work light assembly slips on easy enough. First, there is another simple wiring clip connection to make, followed by tucking the wires neatly inside, again without pinching them.
The four T-20 Torx screws taken out earlier (and found hiding under a tricycle) are replaced in the same way they were taken out. A quick test to make sure the blade guard moves easily, and surgery is complete Doctor!
The whole operation took about ten leisurely minutes, including the dropped screws and an interruption from a pint-sized visitor wanting Daddy to whip up some chocolate milk. It was not a serious challenge (the worklight or the chocolate milk); it was a pleasure to install. I suspect anyone that knows "righty-tighty / lefty-loosey" can handle it without sweat. If you see this as a difficult procedure, I submit that you stay away from a tool that includes a 12" carbide-tipped blade, that spins at high RPM.
I'll review this unit soon, when I get a chance to make some sawdust, but I couldn't resist setting the mood in the ole workshop before shutting down for the night:

UPDATE: Check out that sweet shadow line! I'm loving this thing!
The manual is short and sweet; it's illustrated and easy to follow. I gave it a quick preview and could tell this was going to be a simple operation. I briefly considered following the French instructions, but decided to use English, since I am admittedly, completely clueless about French.
I locked the saw in the down position to make it easy to reach.
It takes a little fiddling to make sure they are tucked properly in the cavity and the wires don't get pinched. The WPS fits perfectly where the access cover once was.
Again, using the supplied T-20 Torx wrench, I removed the screws holding it, two on each side. The two on the right and the one top left are easy to access from the basic, open position.
Two of mine were also very easy to drop, ricocheting off the floor to hide under and behind nearby stuff. I wonder how DeWalt engineered them to do that. They must have known would be time for me to take a stretch break and crawl around on the floor with my butt in the air, cheek pressed against the concrete looking for hiding screws.
The four T-20 Torx screws taken out earlier (and found hiding under a tricycle) are replaced in the same way they were taken out. A quick test to make sure the blade guard moves easily, and surgery is complete Doctor!
The whole operation took about ten leisurely minutes, including the dropped screws and an interruption from a pint-sized visitor wanting Daddy to whip up some chocolate milk. It was not a serious challenge (the worklight or the chocolate milk); it was a pleasure to install. I suspect anyone that knows "righty-tighty / lefty-loosey" can handle it without sweat. If you see this as a difficult procedure, I submit that you stay away from a tool that includes a 12" carbide-tipped blade, that spins at high RPM.
I'll review this unit soon, when I get a chance to make some sawdust, but I couldn't resist setting the mood in the ole workshop before shutting down for the night:
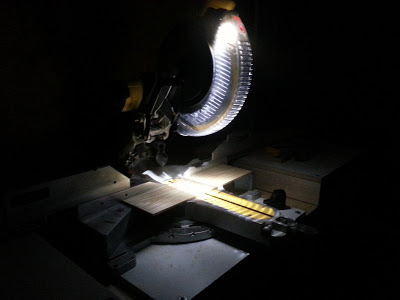 |
| Good night sweet prince. May you dream of large boards. |
UPDATE: Check out that sweet shadow line! I'm loving this thing!
 |
| Finally: A good comparison of photography with a DSLR camera instead of a camera phone. |
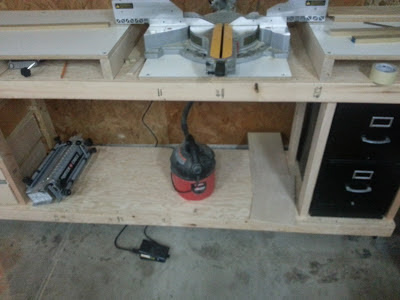
Inexpensive Foot Pedal Switch for Dust Collection
I picked up this foot pedal switch at Harbor Freight last weekend on a whim. It was only nine bucks. I meant to use it with my dust collection system on the table saw, because I have to walk over and switch-off the rear mounted switch to kill it.
Of course I bought the wrong one, not paying attention. I bought the Momentary Power Foot Switch (#96619) rather than the Power Maintained Foot Switch (#96618) that I would have preferred. The difference is that the "momentary" pedal only switches on while your foot is on it, not good for table-saw work, while the "maintained" pedal clicks on and stays on until step on it again.
Of course I bought the wrong one, not paying attention. I bought the Momentary Power Foot Switch (#96619) rather than the Power Maintained Foot Switch (#96618) that I would have preferred. The difference is that the "momentary" pedal only switches on while your foot is on it, not good for table-saw work, while the "maintained" pedal clicks on and stays on until step on it again.
 |
| This sucks! |
I ended up installing my little Craftsman "Clean and Carry" 1.5 HP / 2 gallon vac to my miter saw. I plugged it into the load side of the switch, plugged the switch in, turned on the vac. It worked perfectly when I stepped on the pedal. The miter saw is a walk up and cut type operation. Just step on the switch while you cut. It was pretty good. The dust collection pick-up on the saw on the other hand wasn't the best. But it still was better than nothing.
Watch that first step, It's a doo-oozy!
-Ned Ryerson, Insurance Salesman
I've seen how expensive these types of switches are elsewhere. Shopsmith charges $38.65, plus freight for theirs, of course it's a lot nicer unit. But for this price, the Harbor Freight unit seems pretty decent. I'll grab the maintained switch next time. Let's see how long they last.
Building a Miter Saw Bench - Economical but Beefy!
This is my easy-to-build, miter saw work bench made from 2x4's. It's a big beast!
Read More
Review: Kreg Jig Jr.
Reviewing the Kreg R3 JR. pocket hole jig. Simply awesome!
Read More