

I made a super quick and easy shelf under the top of my workbench to keep my collection of cordless took batteries organized.
Read More
Installing Knobs and Pulls with the Kreg Cabinet Hardware Jig
A tool review and how to install cabinet pulls and knobs with the Kreg Cabinet Hardware Jig. The kitchen remodel is half done!
Read MoreDIY Built-in-the-Wall Shelving - Reclaim hidden storage space in your home
How to add a beautiful, built-in shelving unit into a wall.
Read MoreGiving Support - Securing Plumbing using Cool Tools.
I had to secure the plumbing inside the wall with no support. Bring in the Kreg Jig and a Right Angle Drill Attachment
Read MoreDIY Workbench Upgrade + A Tool Giveaway!
A DIY Work Bench project with the new BLACK+DECKER 20V MAX Lithium Cordless Drill/Driver with AutoSense Technology
Read MoreQuick and Easy Shaker Drawer Fronts (Dodos vs Rabbits)

As part of my challenge to clean up all the loose ends around here, I'm attacking the project with renewed effort. To get back in action, I need to make four drawer fronts.
Initially, I was going with flat, recessed fronts. I even have them cut to size and sanded. The problem is, they simply look too plain. I wanted something a little more interesting.
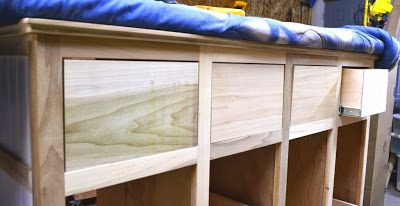 |
| Plain, like Saltines without the salt. Boring. |
Eventually, we hope to redo the kitchen with shaker style doors. I decided to take a crack at them for this project.
Now, if you actually want to do it properly, check out John's video from Our Home From Scratch. He has a great video on making Shaker doors properly, with tongue and groove assembly. Unfortunately, I don't have a dado (wide cut) blade for the table saw and my test attempts with my narrow kerf blade were tedious and gave less than great results. The normal router route won't work either; I don't have a router table or the proper bits. So, I'm not going to do it properly.
I've come up with my own quick and easy method. I think it's going to work.
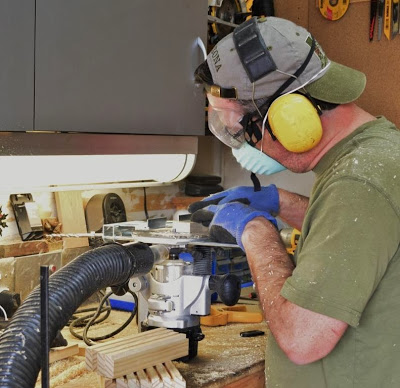
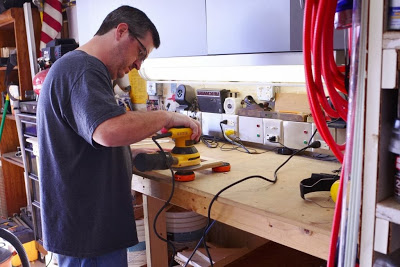
I'm using poplar, since it's affordable, durable and easy to work with. To save time ("quick"), I purchased 1 ½ " x ¾" stock to make the stiles (vertical) and rails (horizontal) rather than ripping boards on the table saw. I used my big, Sliding Compound Miter Saw which made it an operation of absolute sawdust-spewing joy, but it could be easily done with a miter box and saw
 or whatever other precision cutting methods your evil brain can devise. I mass-produced the cuts, using a stop block clamped to the fence for repetitive precision in my pieces. I was done in minutes.
 |
| An operation of absolute sawdust-spewing joy. |
Quick tip: When I have the tool set up and am making precise, repetitive cuts, I often make several extra pieces, if I have enough wood. It saves heartache later when, I inevitably pull some lame-brained move and screw up a piece (...which I did do).
Here's where I take a weird turn, away from conventional construction methods. I routed a "rabbet" in the back side of each piece. A rabbet is a like a dado but is missing one of the shoulders. Its just a recessed notch. However, a rabbit is nothing like a dodo.
On woodworking joinery, extinct terrestrial avians, and common Lepus currpaeums:

I made a makeshift router table, probably not my finest safety moment,... definitely not my finest safety moment.
 |
| Don't try this at home,... or at work,... or in a restaurant,... or in the shower. |
I made the cuts with a straight cutting bit, assembly line style, in several passes. One deep pass would be too deep and would get unwieldy (especially with my makeshift router table setup). There was no need to risk my fingers, trying rushing it through to quickly. The rails (horizontal) got a rabbet their whole length. The stiles got a rabbet that didn't show through on their ends.
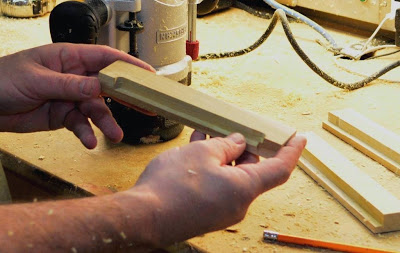 |
| A freshly prepared rabbet. |
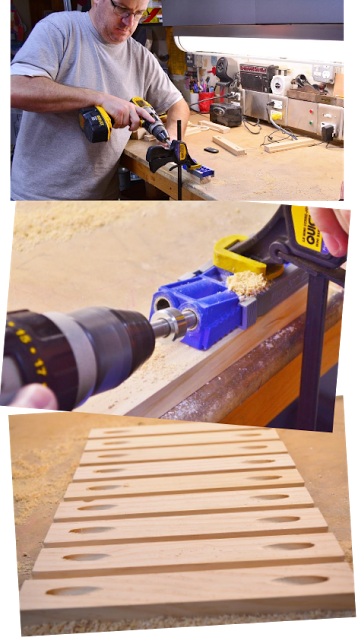
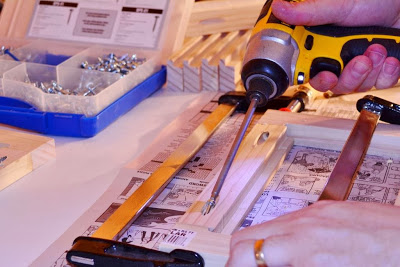
A glued butt joint might hold, but it wouldn't be exceptionally strong. Since our home is infested with rough-and-tumble children, I beefed it up with pocket holes and screws. I assembly lined all the pieces through the small, but mighty, Kreg Jr. Pocket Hole Jig  .
.
.
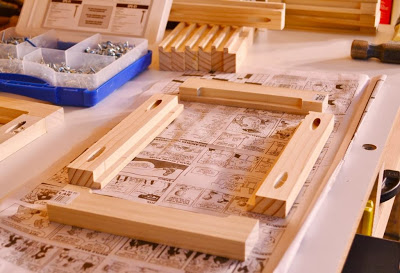
All the parts of the frame are complete. Time for assembly.
It was a standard glue-up. I use those cheap little welding flux brushes to spread it evenly.
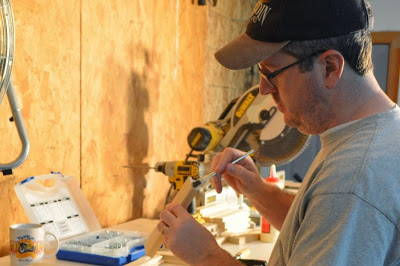
I clamped it together temporarily and drove fine-thread, square drive screws from my Kreg Pocket-Hole Screw assortment . This step was done on my miter saw bench, because it's really flat. My MDF workbench top is a gouged, bumpy surface from years of spills and abuse.
I was pleased to have spare pieces; exuberance with the impact driver split the hell out of one.
Of course, speaking of spills,... flopping clamps, hammer taps, and an impact driver didn't agree with my fresh cup of coffee. Another reason to use the miter bench, the melamine coating is good for cleanups.
 |
| I'm just glad I didn't knock my beloved Bad Ass coffee mug off the bench. |
Sweet success! The clamps came off as soon as the screws were in.

When they dried, I took them over to the disc sander to even out a little of the imperfections at the joints,...
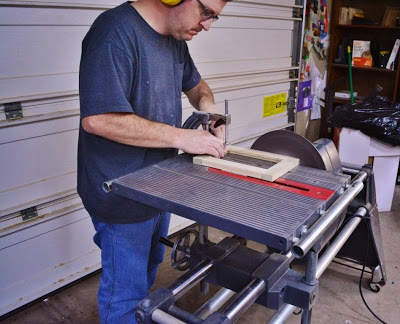 |
| I only took a little meat off my pinkie knuckle. |
...to the random orbital sander to smooth out the face,...
...and finally to hand sanding, for final finish and to ease the sharp edges.
Once again, continuing my veering off the beaten track of proven assembly methods, I'm using a technique I found to install glass panels in frames. Instead of glass panels, I'm using 3/16 inch thick plywood panels.

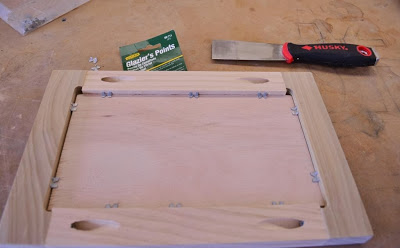
Using a stiff putty knife, I drove glazing points into the frames, pinning the panels in place. The gap allows for expansion and contraction of the wood.
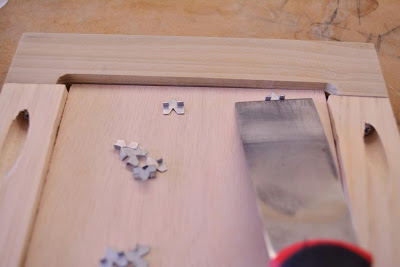
With all the glazing points in place, the panels are super tight.
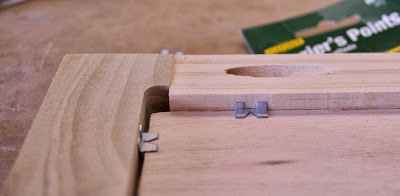
They don't even move when I pry with the putty knife. I think (hope) it's going to hold. When it's attached to the drawer, there will be even more pressure pinning it in place.
Since it was a lovely December day, I took them out to the driveway to spray them with primer. I keep a couple big, leftover Styrofoam blocks around for this sort of thing. Propping the pieces up on toothpicks lets me get the edges.
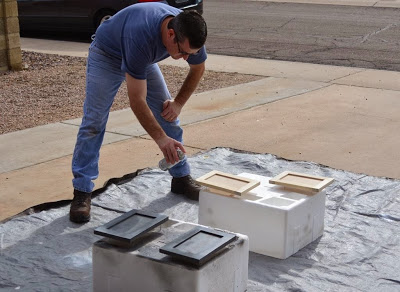
It was at this point I realized three things:
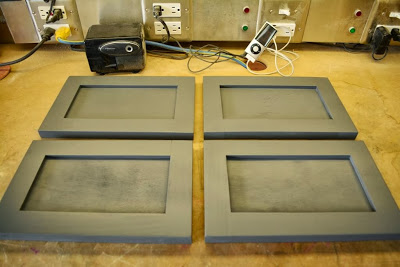
- That is some seriously dark primer. Painting these things white will mean more coats.
- In my zeal to get the panels in, and concentrating on setting my camera, I had lost focus and installed a couple of the panels backwards, rough, un-sanded side out.
- Idiot.
With the backwards panels it's going to take some more filler and sanding to to get these rascals smoothed out for final coat. But I think I have a decent solution for Quick and Easy Shaker drawers. We'll see how they last in the long run. If I have to re-do them later, it's a simple swap out.
Followup notes.
- On quick and easy: It was both, quick and easy but the many outfit changes (I'm a Grand Master of wearing solid color T-shirts) and the changes in lighting in these photos betray me. I picked away at this over several days, stepping out in the garage for a few minutes here and there between doing other stuff.
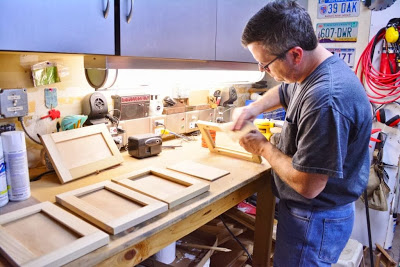
- Before mass producing the four fronts, I used the old Norm Abram's New Yankee Workshop trick of building a first pre-production copy. I worked out the problems and played with the technique before committing to building all of them. You'll see this mystery prototype in the background. It's assembled without glue, just the screws, but it's holding tight.
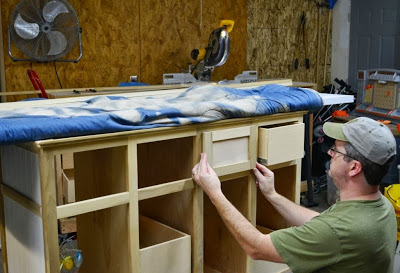 |
| Eyeballing the prototype piece on the actual project. |
Simple, easy, and inexpensive. What do you think?
Favorite DIY Stuff 2013 - Pt II
2013 Favorite DIY STuff: Molekine Notebook, Bench Cookie Work Grippers, DeWalt Self Leveling Laser Level, Kreg Jig Jr. Pocket Hole System
Read MoreSketchUp: Modeling my miter saw workbench
After years of being slightly aware of SketchUp, the free 3D CAD modeling software developed by Google, (now owned by Trimble), I decided it was time to give it a whirl. I was motivated by the excellent Google SketchUp Tips and Resources post on HomeFixated.com and followed the link to download the program. After watching a few of the tutorial videos, I felt reasonably confident in using the software; I dove headfirst into the deep-end of high-tech design wizardry.
It's fun to see it modeled, and clean in 3D, with the real workhorse stabled in my workshop. The story on building the real one can be found here: Building a Miter Saw Bench - Economical but Beefy!
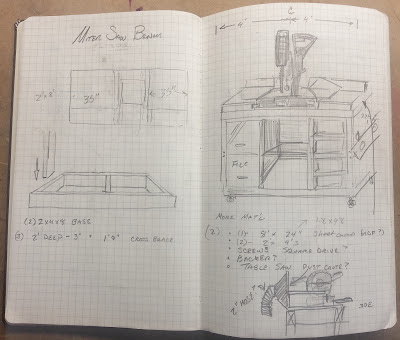
Apparently, I like to do things completely bass-ackwards. I built this project first in the real world, many-many months before introducing it to the digital realms. I had done a quick and simple pencil and paper sketch in my Moleskine Classic Notebook , before jumping right into sawing lumber, and screwing screws with the Kreg Jig, redesigning and adjusting my half-baked plan as I built.
This bad-ass bench has been in real-word, front-line combat, supporting the mighty DeWalt 12-Inch Slide Compound Miter Saw in its sawdust-spraying missions for quite a while.
PARTS LIST:
Personally, I'm leaning towards starting my next project with SketchUp and finding my mistakes earlier. I'll still use the beloved Moleskine notebook though.
 |
| It's easier than it looks! |
Apparently, I like to do things completely bass-ackwards. I built this project first in the real world, many-many months before introducing it to the digital realms. I had done a quick and simple pencil and paper sketch in my Moleskine Classic Notebook ,
This bad-ass bench has been in real-word, front-line combat, supporting the mighty DeWalt 12-Inch Slide Compound Miter Saw
 |
| Right before the maiden voyage. |
You can see the general assembly in the photo above. The difference is, with the 3D model, I can do the Tony Stark design move, exploding and spinning it to show you the structure.
 |
| This is exactly how Iron Man was designed. Exactly. |
Plus, the whole thing can be disassembled in mere moments to a virtual lumberyard of precision-cut and stacked loveliness. Enjoy the parts list in its gleaming, three-dimensional-ness:
 |
| Because parts is parts |
- Vertical Structure: 10 ea. 2x4's (1.5" x 3.75" actual) x 29 1/4" long
- Bins: 4 ea. I actually built these for another project from 1/2" plywood and a 1/4" bottom. I used a dovetail jig, but it's not necessary for simple tool bins. 10.5" wide x 6.5" high x 16.25" long.
- Swivel Castors: 4 ea. I bought these 3" heavy-duty, locking swivel castors at Harbor Freight
- Bin Rack - back stop: 4 ea. - pine 0.5" x 1" x 14.25" (made from planed pallet wood)
- Bin Rack - rails: 8 ea. pine 0.5" x 1" x 21" (made from planed pallet wood)
- Top and Bottom Depth Structure: 10 ea. 2x4's (1.5" x 3.75" actual) x 21" long
- Base blocks: 4 ea. 2x4's (1.5" x 3.75" actual) x 3.75" long - for mounting the castors
- Top and Bottom cover: 2 ea. 1/2" plywood 24" x 96" (8 feet)
- Top and Bottom Width Structure: 4 ea. 2x4's (1.5" x 3.75" actual) x 96" (8 feet) long
- Work surface Center: 3/4" White thermally-fused melamine coated particle board 24" x 24"
- Work Surface Right: 3/4" White thermally-fused melamine coated particle board 24" x 23"
- Work Surface Center: 3/4" White thermally-fused melamine coated particle board 24" x 42"
- Two Drawer File Cabinet: (not shown above)
What do you think? SketchUp or actually sketch it up?
 |
| No, it's not a Leonardo da Vinci original, but I see how you might think so. |
Download and enjoy my 3D model free* from Trimble's Warehouse here: Economical Miter Saw Workbench.
* All rights reserved - AZ DIY Guy's Projects: . I hereby give license to individuals to build this bench for their own use. My design, plans, images, and model and may not be used for profit without my express permission. This means you Ted's Woodworking Plans.
If you build a version of my Economical Miter Saw Workbench, please send me some pics and a description. I'd love to feature your project here.
Power Tool Storage
 In cleaning up the garage after a couple weeks of heavy-duty weekend-warriorsmanship, I decided I'm not using my storage well enough. I'm having difficulty getting everything put away without heaping it up. There's two sets of double wall cabinets that I picked up on clearance about four years ago. They're cheap pressboard, but they're serviceable and seem to be holding up fine.
I picked some choice specimens from the scrap pile and used the illustrious Kreg Jig Jr. to screw a sub-shelf together. (Honestly, I look for excuses to make Kreg Jig Projects) I made it shallower than the shelf-pin holes so I could hang the blade-guard of the circular saw below its edge and still get the door shut. It's a better use of vertical space.
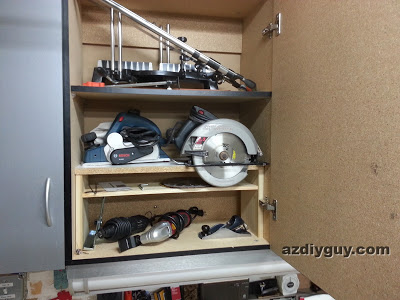
A thin (reclaimed pallet wood) shelf below the tool shelf holds extra blades and accessories. The whole sub-unit is able to slip out in one piece if necessary. There's plenty of room for more on the base of the cabinet. I stored my beloved Jorgensen Miter Saw way up top, where I'll need a step stool to reach it. I haven't used it since I got the mighty DeWalt Sliding Compound Miter Saw, but maybe I'll have a use for it and bring it back to the fighting front lines. Otherwise, I'll Craigslist (a verb now?) it later for a few bucks and clear the space.
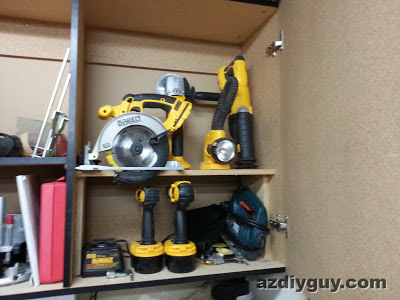
I made a similar unit over in the cordless-tool neighborhood, but without the sub shelf. It needed the room for the drill and impact driver to slip in and out, with their batteries attached. I'd robbed the factory shelf for another cabinet earlier, but this worked better due to the circular saw trick. I may add a second story riser, but this is doing the trick now. I drilled a hole in the base for the charger cord so I can top up batteries right in the cabinet. This cord is pugged into a switched receptacle so I can simply shut it off from below when I close down for the night.
I ran out of time for goofing around with the Kreg Jig and the Miter Saw making these high-end, custom-crafted beauties, so I just picked up a simple wooden box I'd made when I was practicing with the dovetail jig. Perfect! Yep, that's a dovetailed, 3/4" custom sander stand. You just can't put a price on such hand crafted finery when you're stacking a pair of wood chewing DeWalt sanders (Random Orbital & 1/4 Sheet Orbital)
 |
| The routers are upside down to protect the bits that are set juuuuuuust right. |
Done. All the tools are put away. I still need to re-jigger my whole storage setup at some point. I still have nail guns piled in a mechanic's tool chest drawer with other assorted stuff.
I even vacuumed the shop before coming in for pizza. Perhaps tomorrow after work, I'll pull out the planer and start working on interior door number three. This floor isn't meant to be free of sawdust for long.
Building a Miter Saw Bench - Economical but Beefy!
This is my easy-to-build, miter saw work bench made from 2x4's. It's a big beast!
Read More
Review: Kreg Jig Jr.
Reviewing the Kreg R3 JR. pocket hole jig. Simply awesome!
Read More