

Living Room Remodel: Episode 7 The living room is getting a crown molding upgrade. I’m using that floppy plastic stuff.
Read MoreLiving Room Remodel: Base Molding - Young Hands and Old Walls
Living Room Remodel: Episode 6 Dressing up the family room with tall floor molding. Our 13 year old jumped in to help (and try out a nail gun!).
Read More
Living Room Remodel: The Final Floor
Living Room Remodel: Episode 5 I finally got the hang of installing solid bamboo plank flooring over a cement slab floor. This time I made great headway and finished the whole floor!
Read MoreLiving Room Remodel: Glue-Down Showdown (Solid Wood Flooring)
Living Room Remodel: Episode 4 I’m laying solid wood planks down over concrete with the sloppiest adhesive ever conceived by man. It’s gonna be great!
Read MoreLiving Room Remodel: Preparation and Perspiration
Living Room Remodel: Episode 3 Before I can install a new wood floor, somehow I have to get rid of the ancient pile of drywall compound some drunken idiot left under the carpeting.
Read MoreLiving Room Remodel: Demo-licious!
Living Room Remodel: Episode 2 I'm doing demolition in the living room. Out comes the carpet, tack strips, and molding. We'll even get some paint on the walls!
Read MoreLiving Room Remodel: Here we go!
Living Room Remodel: Episode 1 It all begins here. The front room, entrance to the house, is going to get new paint, flooring, molding, built-ins, and tons of fun. 10,.. 9,… 8,… 7,… 6,… 5,…
Read MoreWear N Write - Clever Dry-Erase Notepads, Perfect for DIY'ers
Reviewing the Wear-N-Write. a wearable, portable whiteboard.
Read MoreDIY Lamp Repair - A Fixing Stuff Adventure

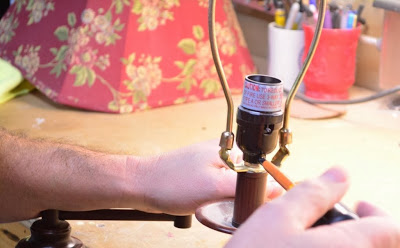
Lamps are simple creatures. Generally, they're a series of raceways that the electrical cord goes through to reach the socket for the light bulb. There's hollow tubes, threaded nipples, nuts, washers, lock washers, and screws, but that socket is where all the real action is. The rest is just decoration and structure.
To start, it's an easy operation to unscrew the finial that holds the shade in place.
 |
| This floral shade is way to pretty for my workshop. |
With the shade removed, guest of honor was immediately revealed, the socket. This is where the light bulb threads in and receives its life-giving electro-juice. Speaking of light bulb juice, it goes without saying, I hope, that this project should be done, with the lamp unplugged.
Our switch knob was mysteriously broken off. Those of you with children have undoubtedly heard many times before, "I don't know..." (what happened to it).

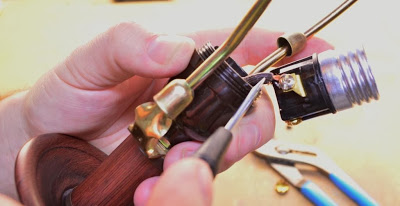
The next series of events was simply a dis-assembly process. First, I took out the little set screw that keeps the socket from unscrewing from the nipple. I use an insulated screwdriver, which not necessary here, but it's my favorite one, a nice comfortable Klein. Unlike the beautiful new one Jeff at Home Repair Tutor used on his florescent light repair last week, mine looks like it's served in front-line combat. I'm jealous.
 |
| Removing the set screw. |
This socket unscrewed in the middle. Some versions simply need to be popped open to expose the electrical connections.

There was no slack in the wire. I couldn't pull the socket from its housing to get at the screws, so I chucked the whole lamp up on the workbench and fed the cord up from the base, into the vertical, hollow pole.

Many floor lamps are simple, stick-straight units, but this one has an articulated arm. The power cord is fed through very narrow tubes with tight bends. I had to unscrew each section to get as close to the joint as possible, to feed the cord. Channel Lock pliers did the trick nicely.

Once the retaining nut is off, whole sections come apart easily. Little caps pop off to allow access to the joints. I took the liberty of promptly dropping this one and crushing it under my boot, like an oaf.

Once the joints were open, it was a "simple" matter of man-handling the cord up towards the socket, feeding it and pulling slowly, taking care not to damage the cord. Damaging the insulation is referred to, in technical, electrical terms as, "BAD". A bare copper conductor, without the protection of the rubbery cord coating, touching the metal parts of the lamp would cause a direct short, hopefully tripping a breaker, instead of much worse.
 |
| A little of the old push 'n pull technique |
With enough slack to pull the socket itself out, you can see there is a silver screw and a brass one, just like a a wall outlet. The important thing to watch here is identifying which wire goes where. You can't tell what color the they are. You can mark one with tape as you pull it off or, even better, look very closely at the two wires that make up the cable. In this case, the neutral (grounded conductor - normally a white wire) has ridges on the outer jacket, while the hot (ungrounded conductor - normally a black wire) is smooth. Remember this for later.
 |
| Like Ruffles, it has ridges. |
I still needed more slack to install a new socket. It wasn't easy at all. There was no space in those transitions and I had trouble getting the cord to budge. So, I used a trick a salty old electrician shared with me years ago. Normally, electricians use a special lubricant when pulling wire through conduit. In a pinch, he showed me they can use dish soap. I was in a pinch, so...
 |
| Yes, it's "green apple" scent. |
I fought the cord, bit by bit through the fixture, leaving slack at each elbow. The slippery soap helped, and kept me from damaging the wire.

With enough slack pulled and more than enough parts strewn haphazardly across my workbench, it was time to quest out into the open world for the replacement parts. I headed out to my friendly neighborhood hardware store with the old socket in my pocket and dreams that their popcorn machine would be in action. Surely they'd have something in stock I could use (besides a bag of free popcorn).
I faced the electrical lighting section at the hardware store. They had EVERYTHING! There's parts for all kinds of stuff that I never paid attention to. Heck, you can build your own lamp with the stuff they have here.
Note to self: future project - find a shapely, plastic woman's leg and make my own, fragile Christmas Story lamp to display in our front window. The wife will love it!

Of the various sockets, I chose a replacement 3-way rather than a standard on/off only switch. This allows the use of a bulb with three filaments for different lighting levels. This works nicely with a 30/70/100 watt light bulb. It's something you can retrofit onto an existing on/off fixture for a nice upgrade. They were actually the same price.

Returning home, sadly without any popcorn, I cracked the new socket open like an egg. It was a snap-together unit, rather than threaded like the old one.

The base then screws onto the nipple from the lamp and gets held in place again by the set screw. Its easy to peel the two wires apart by hand, since I finally had plenty of slack to work with.

Here's a close up of those ridges on the neutral wire. Take a look at a lamp cords in your house. They'll probably have these and you've never noticed it. I think it's a secret communication method left to us by Ben Franklin. The string hanging down from his kite with a key probably had ridges just like this. That dude was smart.
 |
| Believe it or not, I've never had a manicure my whole life. Honest! |
Remember to use the correct wire on the its corresponding termination screw - with the neutral landing on the silver screw. This is important. If you reverse the wires, the lamp will work just fine, but there's a safety hazard. The threaded shell for the lamp becomes the hot, electrified portion and the contact tab deep in the socket becomes the grounded neutral. This places the dangerous, "hot" way too close to accidental contact should anyone ever change a lamp with the switch on (and who hasn't done that?). Considering the lamp itself is metal, that's a recipe for pain, or worse.

I stripped the insulation back a half inch using wire strippers, twisted the strands together, and wrapped it around the screw clockwise. As the screw is tightened, it pulls the strands tighter rather than pushing back a rat's nest of frizzy copper. I wanted a good connection with no loose copper strands to sticking their electrified noses where they didn't belong.

After that, it was just a matter of reassembling everything I had taken apart, in reverse order. It's probably best to lay the pieces in order on your workbench rather than fling them randomly about like I did, resulting in a pissed-off Easter egg hunt. I fed the cable backwards through all the elbows until there was just enough to fit into the socket enclosure. All the various nipples threaded back in with their retaining nuts tightened.

I gently threaded the lamp in. Finally, the moment of truth, my friends.. (click)
 |
| Blinded by the light, revved up like a deuce, another runner in the night!! - Manfred Mann's Earth Band |
Now comes the victory parade. An adoring family gets to see witness this monumental feat of home repair triumph as it is transported, first to downtown New York for a ticker-tape parade, then to its home, by a comfy chair. Full disclosure: It's cold in New York and surprisingly inconvenient from Phoenix. I skipped that step.
There's nothing better than a nice book under the warm glow of a reading lamp...

There's nothing better than a nice book under the warm glow of a reading lamp...
zzzz....
Advanced Wall Clock Installing (Blogiversary Special Edition)
You could either hang a clock on a nail,... or you can do it right.
Read MoreQuick and Easy Shaker Drawer Fronts (Dodos vs Rabbits)

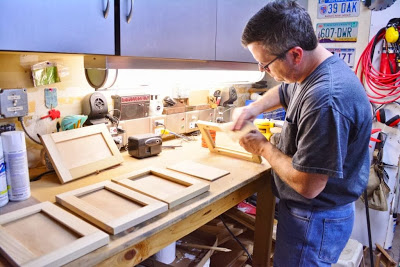
As part of my challenge to clean up all the loose ends around here, I'm attacking the project with renewed effort. To get back in action, I need to make four drawer fronts.
Initially, I was going with flat, recessed fronts. I even have them cut to size and sanded. The problem is, they simply look too plain. I wanted something a little more interesting.
 |
| Plain, like Saltines without the salt. Boring. |
Eventually, we hope to redo the kitchen with shaker style doors. I decided to take a crack at them for this project.
Now, if you actually want to do it properly, check out John's video from Our Home From Scratch. He has a great video on making Shaker doors properly, with tongue and groove assembly. Unfortunately, I don't have a dado (wide cut) blade for the table saw and my test attempts with my narrow kerf blade were tedious and gave less than great results. The normal router route won't work either; I don't have a router table or the proper bits. So, I'm not going to do it properly.
I've come up with my own quick and easy method. I think it's going to work.
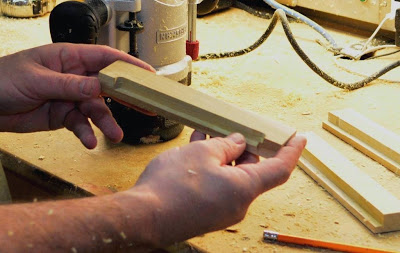
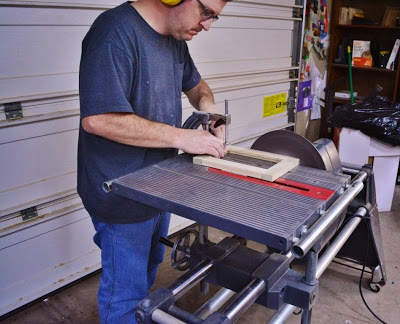
I'm using poplar, since it's affordable, durable and easy to work with. To save time ("quick"), I purchased 1 ½ " x ¾" stock to make the stiles (vertical) and rails (horizontal) rather than ripping boards on the table saw. I used my big, Sliding Compound Miter Saw which made it an operation of absolute sawdust-spewing joy, but it could be easily done with a miter box and saw
 or whatever other precision cutting methods your evil brain can devise. I mass-produced the cuts, using a stop block clamped to the fence for repetitive precision in my pieces. I was done in minutes.
 |
| An operation of absolute sawdust-spewing joy. |
Quick tip: When I have the tool set up and am making precise, repetitive cuts, I often make several extra pieces, if I have enough wood. It saves heartache later when, I inevitably pull some lame-brained move and screw up a piece (...which I did do).
Here's where I take a weird turn, away from conventional construction methods. I routed a "rabbet" in the back side of each piece. A rabbet is a like a dado but is missing one of the shoulders. Its just a recessed notch. However, a rabbit is nothing like a dodo.
On woodworking joinery, extinct terrestrial avians, and common Lepus currpaeums:

I made a makeshift router table, probably not my finest safety moment,... definitely not my finest safety moment.
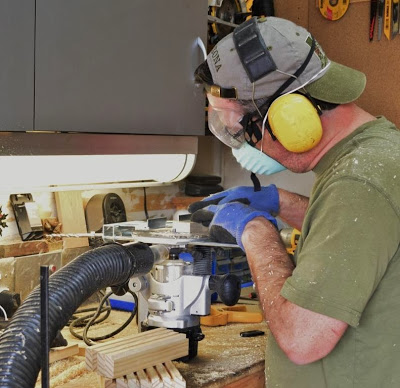 |
| Don't try this at home,... or at work,... or in a restaurant,... or in the shower. |
I made the cuts with a straight cutting bit, assembly line style, in several passes. One deep pass would be too deep and would get unwieldy (especially with my makeshift router table setup). There was no need to risk my fingers, trying rushing it through to quickly. The rails (horizontal) got a rabbet their whole length. The stiles got a rabbet that didn't show through on their ends.
 |
| A freshly prepared rabbet. |
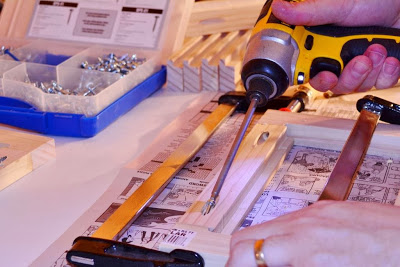
A glued butt joint might hold, but it wouldn't be exceptionally strong. Since our home is infested with rough-and-tumble children, I beefed it up with pocket holes and screws. I assembly lined all the pieces through the small, but mighty, Kreg Jr. Pocket Hole Jig  .
.
.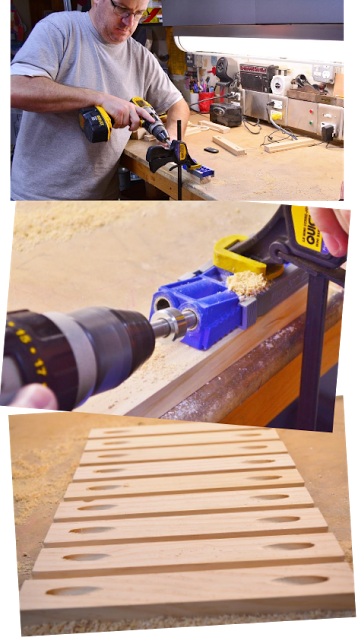
All the parts of the frame are complete. Time for assembly.
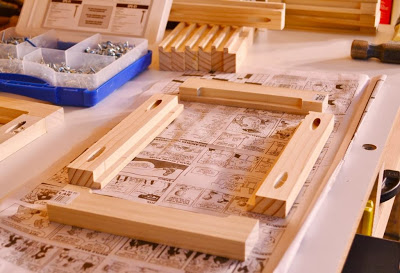
It was a standard glue-up. I use those cheap little welding flux brushes to spread it evenly.
I clamped it together temporarily and drove fine-thread, square drive screws from my Kreg Pocket-Hole Screw assortment . This step was done on my miter saw bench, because it's really flat. My MDF workbench top is a gouged, bumpy surface from years of spills and abuse.
I was pleased to have spare pieces; exuberance with the impact driver split the hell out of one.
Of course, speaking of spills,... flopping clamps, hammer taps, and an impact driver didn't agree with my fresh cup of coffee. Another reason to use the miter bench, the melamine coating is good for cleanups.
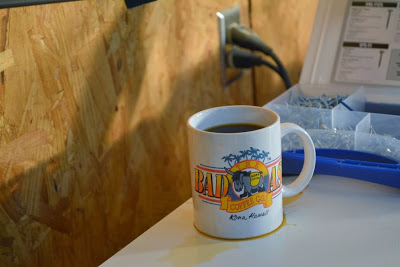 |
| I'm just glad I didn't knock my beloved Bad Ass coffee mug off the bench. |
Sweet success! The clamps came off as soon as the screws were in.

When they dried, I took them over to the disc sander to even out a little of the imperfections at the joints,...
 |
| I only took a little meat off my pinkie knuckle. |
...to the random orbital sander to smooth out the face,...
...and finally to hand sanding, for final finish and to ease the sharp edges.
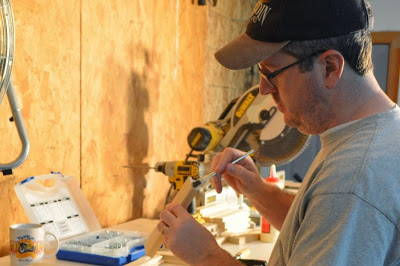
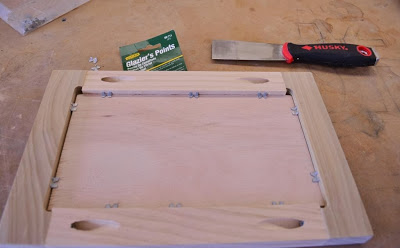
Once again, continuing my veering off the beaten track of proven assembly methods, I'm using a technique I found to install glass panels in frames. Instead of glass panels, I'm using 3/16 inch thick plywood panels.

Using a stiff putty knife, I drove glazing points into the frames, pinning the panels in place. The gap allows for expansion and contraction of the wood.
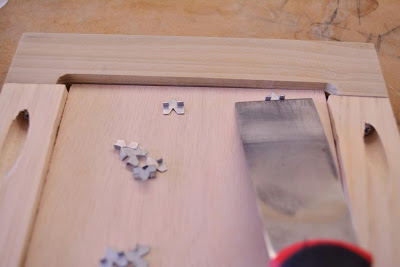
With all the glazing points in place, the panels are super tight.
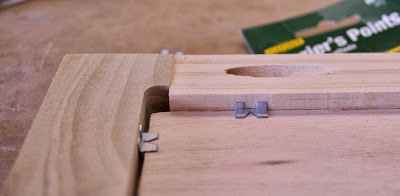
They don't even move when I pry with the putty knife. I think (hope) it's going to hold. When it's attached to the drawer, there will be even more pressure pinning it in place.
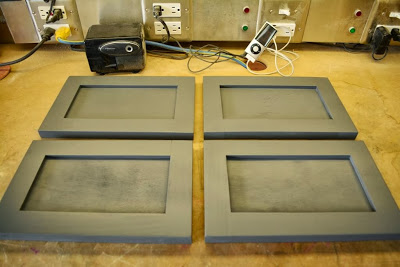
Since it was a lovely December day, I took them out to the driveway to spray them with primer. I keep a couple big, leftover Styrofoam blocks around for this sort of thing. Propping the pieces up on toothpicks lets me get the edges.
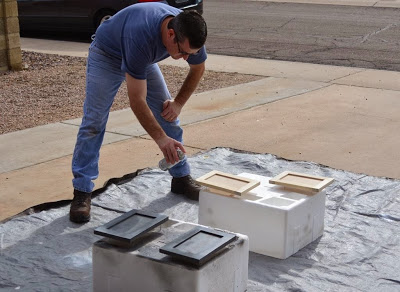
It was at this point I realized three things:
- That is some seriously dark primer. Painting these things white will mean more coats.
- In my zeal to get the panels in, and concentrating on setting my camera, I had lost focus and installed a couple of the panels backwards, rough, un-sanded side out.
- Idiot.
With the backwards panels it's going to take some more filler and sanding to to get these rascals smoothed out for final coat. But I think I have a decent solution for Quick and Easy Shaker drawers. We'll see how they last in the long run. If I have to re-do them later, it's a simple swap out.
Followup notes.
- On quick and easy: It was both, quick and easy but the many outfit changes (I'm a Grand Master of wearing solid color T-shirts) and the changes in lighting in these photos betray me. I picked away at this over several days, stepping out in the garage for a few minutes here and there between doing other stuff.
- Before mass producing the four fronts, I used the old Norm Abram's New Yankee Workshop trick of building a first pre-production copy. I worked out the problems and played with the technique before committing to building all of them. You'll see this mystery prototype in the background. It's assembled without glue, just the screws, but it's holding tight.
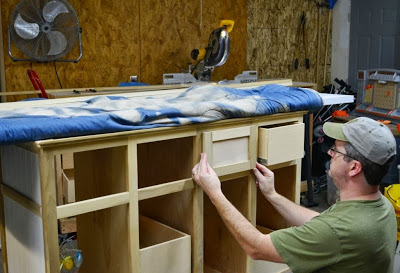 |
| Eyeballing the prototype piece on the actual project. |
Simple, easy, and inexpensive. What do you think?
Favorite DIY Stuff 2013 - Pt II
2013 Favorite DIY STuff: Molekine Notebook, Bench Cookie Work Grippers, DeWalt Self Leveling Laser Level, Kreg Jig Jr. Pocket Hole System
Read MoreFavorite DIY Stuff 2013 - PT I
Victorinox Swiss Army SwissTool, Red Wing Moisture Wicking Socks, Carhartt Nail Apron, Diablo Demo Demon Carbide Reciprocating Saw Blade
Read MoreBuilding the Ultimate Workshop Power Strip: More Power!!!
This technological terror is a hand crafted ULTIMATE garage workshop power strip.
Read MoreLoose ends - The Art of Incomplete
My mind is racing, planning the next big project; I'm positively drooling to get started. But, I simply must tie up a bunch of loose ends first. Not to brag, but I'm a fully-ordained Level Eight Grand Master of Getting Nearly Done. I get close to finish and immediately leap headlong into the next project. I figure 95% done is my sweet spot. My sweet, patient wife has the uncanny super power of noticing my talent and bringing it to my attention.
Here's a quick tour of some of the loose ends now haunting me (just in time for Halloween), in no particular order. I'm not proud.
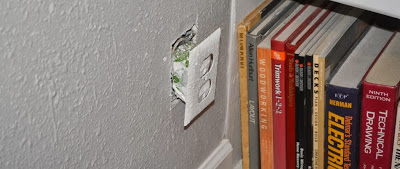
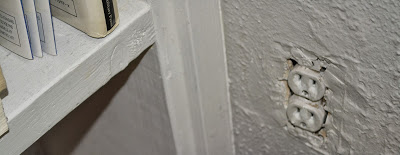
No plates: You've probably noticed my sweet, stainless-steel Wiremold 4000 power strip on my work bench in previous posts. It's my custom, Tim "The Tool Man" Taylor, over-engineered power strip, complete with individually switched receptacles with green and red indicator lights, partial GFCI protection, velcro mounted stereo speakers, a master kill switch, and a fake shurikin. Slick eh? But I never installed four cover plates,... in over four years.
 |
| Yes. That's an old throwing star back there. I don't know why. |
 |
| Proof that Frog Tape does have long term holding power. |
... behind the corner table...
... and on the other side of the wall, in the office, hidden behind the printer.
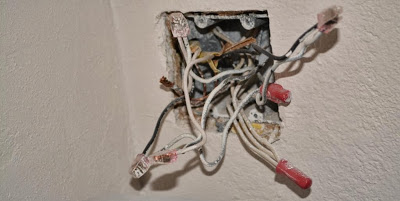 |
| I even crossed the wires so we have to turn on the exterior lights to make the office light come on. Not fixed. |
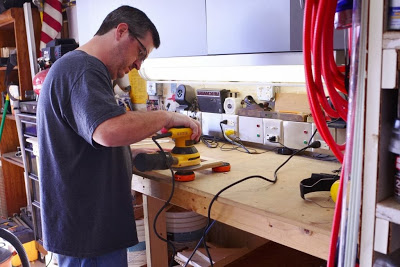
More and more Doors: I still have to finish the interior door replacement project, ... started 8 months ago. Ugghhh.... It's so stinkin' booooooring and repetitive at this point. Plane, prime, paint, paint, mortise, install hinges, hang, swear, adjust, drill, and install hardware. Repeat. Repeat again.
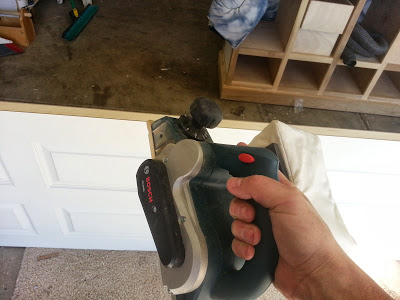 |
| Full disclosure, the power tool part is actually fun. |
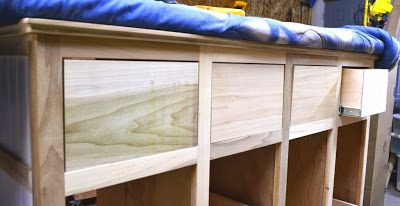
The Incredible Slow build: The master bedroom door is primed, ready for paint. You see that nifty painting stand / door holding bench under the blanket? That's another master-level, incomplete project. It's the famed hallway organizer project, as seen in most of my workshop photos. It's stalled, two and a half years in the making.
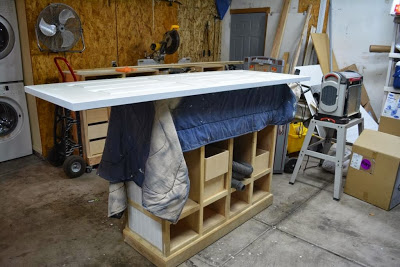 |
| I wish I could start over on this one, but I've put too much cash into it. |
Bunch O Chunks: Of course, I have many more garbage days worth of smuggling dried cactus chunks out in the weekly trash bin. I'm only a few weeks in, but I'm being realistic; I'll still be dealing with it after Christmas.
 |
| Chunk Chuck-er |

Looooooooser. Enough. I'm embarrassed. As soon as I finish this post and spel chek it, I'm going right out to the garage and
There and Back Again
I've gone dark for over a week, enjoying some time back in Michigan with family and friends. No projects, no tools. Just crisp fall air and overwhelming amounts of water and the color green. Living in the desert southwest is a land of beige and earth tones. There's nothing like this blast of fall color.


 |
| Ok. Gracie did have a little wood work project to do. |
We timed our trip perfectly. Michigan was beautiful, crisp temperatures in the mornings and evenings with warm sunny days (mostly). Sweetie and I felt a homesick, missing living there.
The kids had a blast. It was fall break in Arizona, but school was in session in Michigan. We had parks to ourselves, only sharing them with the seagulls, Canadian Geese, and Swan.
We enjoyed a day of apple picking, cider and donuts at the cider mill / orchard, where Gracie befriended several wooley caterpillars...
...and the other of our young offspring, quickly devised a rousing game of apple stomping.
We spent a nice evening at my folks place on the lake, ending with making s'mores.
Alas, work and school beckoned us home. The beauty of Michigan will soon give way to the horrors of winter driving, shoveling snow, and freezing one's butt off pumping gas. Arizona has passed through its time of summer inferno and is offering months of sunny, beautiful paradise. We'll miss everyone, but we'll miss them while we enjoy wearing shorts and sandals, picnicking in December.
We returned home, tired and jet lagged from the three hour time difference. There'd obviously been a wind storm, judging the amount of newspaper in the yard and pool, not to mention the submerged patio chairs. The pool was filthy with the vacuum tangled in a chair.
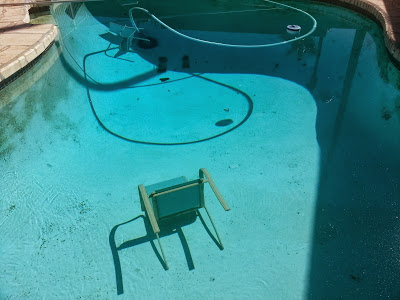 |
| Allow me to show you to your seat sir. |
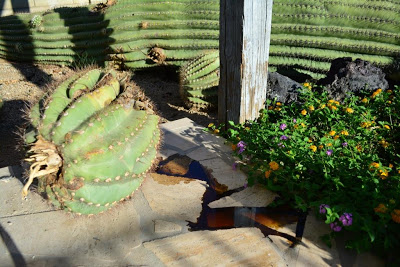
What a difference a couple weeks makes. The cactus I'd cut up and laid out is dramatically dried up. Most of it is crispy, like weathered cardboard, ready to be scooped up and thrown away.
 |
| Pita chips anyone? |
You know me; of course, with a post title of There and Back Again, there has to be a hobbit reference, right? A Lord of the Rings movie quote perhaps?
Nope. But it all comes together in the end...
This is a grand item of mystery we found laying smack-dab in the middle of our front yard, when we got home, right beside the walkway.
 |
| Take this back to Hobbiton please. |
Seriously, what the hell is this? Who leaves a collectible plate in someones yard when they leave town? More importantly, who owns a "collectible" plate featuring a freakish, barefoot circus-child that looks like one of Samwise Gamgee's hobbit children? "Little Strong Man" .... I just don't have a clue.
How to remove a fallen 16' cactus from your back yard
Can the world of DIY / Home Renovation blogging handle yet another post on how to remove a fallen 16' cactus from a backyard? I'm pretty sure all my peers have written similar posts on demolishing a towering saguaro, probably just about as often as they've come up with interesting new uses for pallet wood. No? Haven't seen any? Don't live in the Sonoran Desert? Well then, settle in for an adventure of a lifetime, because here's how it went down.
We'd lost one of our four big saguaros in a windstorm a couple weeks ago (Oh How the Mighty has Fallen). Now I've determined that a leak in our drip irrigation system completely saturated the soil, weakening the grip of the surprisingly small root mass. About a thousand pounds of waterlogged, spiny monolith crashed to the ground, leaving its severed appendages strewn across the landscape.


 |
| The grand inspector, surveying the scene. |
Now, how to get rid of it? I'd read about using a chainsaw to lop it into logs that look like giant sushi rolls. Of course, my chainsaw is merely a 9" electric pole saw, not much use here. Maybe I could buy a cheap one from Harbor Freight or rent one from Ace.
I know there is wood inside the cactus, that might be good for a future craft / decoration project. Could I could fillet it like a fish and save the core?
I loaded a 12" pruning blade into my beloved Cordless Reciprocating Saw
 and gave it a rip. It sliced like a warm knife through butter. Juice gushed out of the carcass, spattering me in the face.
The fleshy pulp felt smooth and a little slimy. It smelled fresh vegetables, a bit like jicama. I started lopping off big chunks rapidly, starting with one of the detached arms. The blade occasionally made contact with the wood core of the trunk, so I'd ease back, trying not to damage it too much.
 |
| Slice 'n dice |
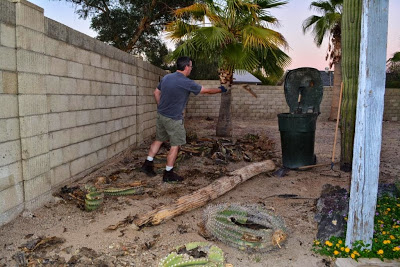
I'm not much of a videographer, but I thought you'd like to see what it was like sawing through the pulpy goodness with a reciprocating saw. If you watch closely, you'll see where your's truly manages to stick himself in the hand with a spine. Evidently, Mr. AZ Dumb-ass Guy, thought that wearing gloves while slicing up a freaking, cactus with razor sharp spines was just too much effort this first day.
Jess commented on the last post that a sturdy pitch fork would make handling cactus chunks much safer on the hands and feet. Of course, since I'm not raising miniature donkeys, I don't own a pitchfork. I used the next best thing, a sturdy steel landscaping rake. It did the trick. (Thanks Jess!)
It was like dragging whale blubber across the landscape. I laid out the squishy chunks in rows to start drying. I'm going to have to parcel this over several weeks into the trash bin. I don't have an alternative, since there's not another bulk trash pick up until December, and I don't want to slime my truck by taking it to the dump myself.
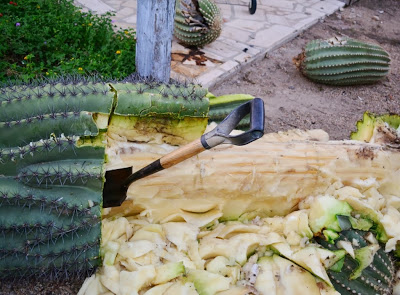
I took a break to handle some kid obligations and charge the saw's batteries, but came out later in the evening. I tried another tactic, a mini-spade shovel. It sliced and diced really well. I scooped the fleshy pulp off the inner woody skeleton; it was like carving a pumpkin.
It killed my back to hack and pry, stooped over with that little shovel, as I simultaneously tried not to slip in the goop or impale myself on the horrendous needles all around me. These things are tough, medieval-style caltrops that would puncture the sole of my boot with ease.


 |
| Don't tread on me. |
I called it a night. It was an easy choice, since I had managed to spatter cactus juice in my eye and rub it in with the back of my hand. My eye was an burning, bloodshot mess.
A fresh day followed, with a fresh approach. I went full-on, flat-blade shovel on this sucker. This time, I wore gloves.
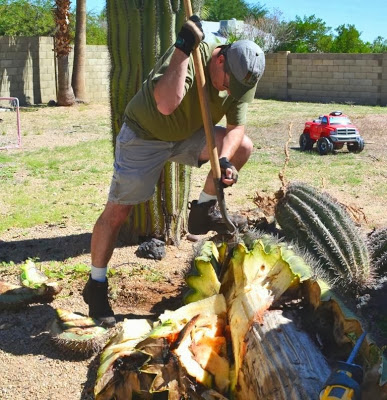 |
Photo tip: It's considered much more manly to have a work truck parked in the
background, especially when it looks like you're raising the flag over Mt. Suribachi.
|
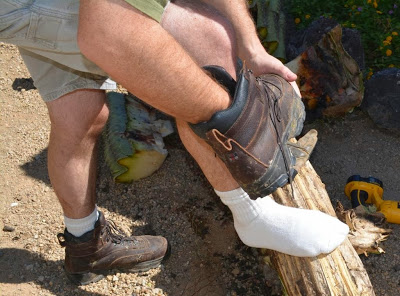
It worked like a charm. I was tearing through cactus at a rapid, pulp-splattering pace, rending nice juicy slabs off, one after the other. Then, of course, seconds after the photo above was taken, a meaty slab flopped down on my right foot.
It got my attention. Of the 4 spines that punctured my boot and broke off in it, one in particular really pissed me off when it stabbed into my toe.
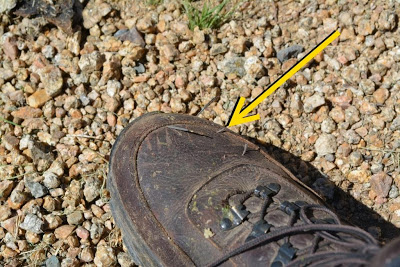 |
| That's the little bastard that got me. |
The toe wasn't bad, not much more than a scrape. I bled more from the gash my finger suffered in the ten minutes of fiddling around, trying to get the spine out of my boot without breaking it off inside. It just stinks that I have perforated my new, formerly-waterproof, Red Wing work boot.
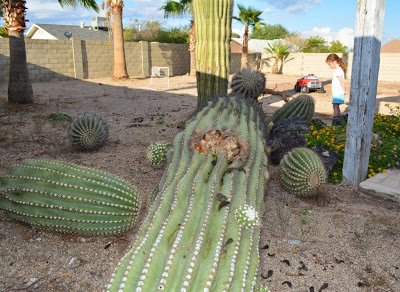
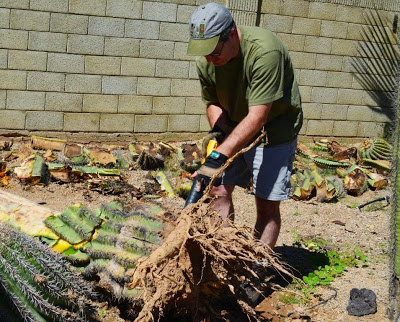
Back in action, it was a matter of picking the bones the rest of the way clean...
...and sawing off the root mass.
What a dang mess. I've got a massive elephant graveyard of saguaro chunks drying in the sun.
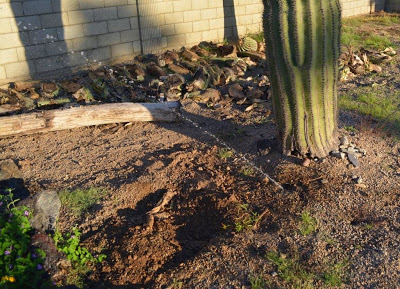
Now it's just a matter of metering out the chunks into the weekly trash as they dry out. Luckily, monsoon season is over and it's not humid anymore. The carcass is cleaned down to the big woody pole. I think it's pulp filled and will eventually dry hollow. I'll post updates on Facebook as it dries. We'll see if it's worth making something out of.
I have to fix the drip irrigation leak before it makes the other one topple. That big sucker will take something out if it falls.
What do you think? Have I prepared you to handle your next 16' fallen cactus monster crisis in Michigan, Pennsylvania, Georgia, or wherever you live?
Re-securing the Border (Not that Border)
Recall this awesome, recycled-tire-rubber landscaping border I installed earlier in the summer? I still love the stuff. It was easy to work with and looks great.
 |
| "...earlier this summer" |
Well,... then this happened:
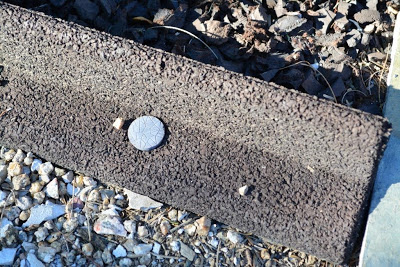

The heads of the stakes faded to a nearly white color, in roughly a month and a half. They look like buttons on a coat. It really makes the border look weird. Crud.
After a couple weeks grumbling about it, and hoping it lawn elves would work their magic, I finally checked out EcoBorder's website for contact info to complain. I found their FAQ's addressed the issue. They know about it and are tackling it head on:
NOTICE: It has come to our attention that some of the stakes sold with our EcoBorder "L" product last year (estimated time frame between July and August 2012) have a raw material defect. In our ongoing efforts to use recycled materials in our products, we have learned that some of the recycled raw material plastics used in those stakes (we expect about 3% of product sold over that time) have this issue. Due to an adverse reaction from some impurities found in those materials, some stakes purchased in those months could turn white. With product quality and customer satisfaction as our top priorities we apologize greatly to any customers that have experienced this. In response, we vow to "make it right" with any customers that this may have affected.
If you were affected by this issue, please email us a photo (to: mail@ecoborder.com) of the stakes along with a count of how many replacement stakes are needed. In response, we will send out top quality replacement stakes at no cost to you. Once again, we apologize for this issue and will do whatever it takes to make sure that you our customers see our unending dedication to a quality product and customer service!
I contacted EcoBorder through the site and quickly received an email, followed by a phone call from their Florida HQ (not a call center on the other side of the planet). They offered a genuine apology and an explanation. They didn't dodge the issue or accuse me of living in a God-forsaken, uninhabitable desert wasteland where the sun savages any material known to man. They didn't question my installation methods or ask if I'd hosed the area with Vietnam war era, carcinogenic defoliants. They truly, humbly apologized and took accountability. I never even got a chance to fence a rude tech support operator with my well-honed, rapier wit. It was refreshing.
EcoBorder knows there was a very small lot of stakes that were discovered to have a defect in a UV protecting ingredient. They've adjusted suppliers and resolved the issue. It's been difficult for them to locate the affected batch, since it's scattered across the country, carried by the two big home center chains.
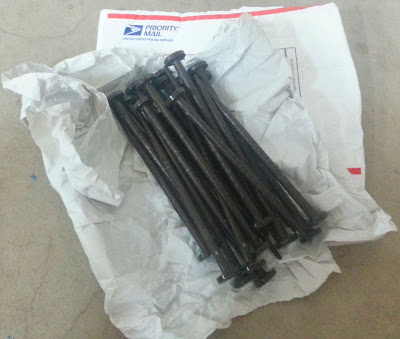
A supply of fresh replacement stakes was quickly shipped. I received an email with tracking information. They arrived a couple days later.
EcoBorder knows there was a very small lot of stakes that were discovered to have a defect in a UV protecting ingredient. They've adjusted suppliers and resolved the issue. It's been difficult for them to locate the affected batch, since it's scattered across the country, carried by the two big home center chains.
A supply of fresh replacement stakes was quickly shipped. I received an email with tracking information. They arrived a couple days later.
Do I want to re-install what I've already installed? Nope.
Do problems occasionally happen in the world manufacturing stuff? Yep.
Heck yes; it just happens. I like how EcoBorder dealt with an unfortunate issue straight on. No dodging. No questioning. No games. No delays. They just handled it. That's class. That's customer support. Seriously, that's good business sense. In my opinion, this is a case study in how companies should handle problem products.
I'd like to get more of this stuff for the back yard landscape. I support good, companies, manufacturing in the USA, that stand behind their products and I like this product.
I'll head out there with a hammer and whack these new ones in.
__________________________
Disclaimer: I have no relationship with EcoBorder (Although, I do host affiliate ads from Home Depot, where it is sold). I selected and purchased the initial product with my own hard-earned cash. They were aware of and responded favorably to my unsolicited blog post on their product. As consumer and a blogger, I believe their response was genuine, and not influenced by the fact that this issue happened to affect a blogger, although, I imagine they're probably not celebrating that it happened. In no way did they try to influence my response as a blogger. That's class. - John
Oh, How the mighty has fallen!
I have many, many items to tackle around here. Now that we have the swimming pool somewhat on the mend, I'm exited to get to the next items on my list. But first, once again, Murphy's Law stepped in this week, just to keep life interesting.
You can only imagine how it felt to get home from work one afternoon and head out the back door, to check on the pool, only to find one of the most striking features of our back yard destroyed. It was a stop-cold-in-my-tracks moment...


Stay tuned folks. I'll share the adventure, even though 99.9% of my readers probably won't get much use out of a "How to remove a fallen 16' cactus from your back yard" post in their lifetime.
You can only imagine how it felt to get home from work one afternoon and head out the back door, to check on the pool, only to find one of the most striking features of our back yard destroyed. It was a stop-cold-in-my-tracks moment...
 |
| Aaaaaaghhhhh!!! |
This was a sixteen-foot tall Suguaro Cactus (Carmegiea gigantea), not the biggest, by far, but an awesome multi-armed monster, at least 100 years old. It was the best-looking of the four tall boys on our property.
I found this pic in my misting system post. You can see most of him still standing, mid summer (and some gratuitous, hard-core Weber BBQ action).
 |
| Pay not attention to the horrible porch; it's on the list. |
Now the beast has fallen. We had a heavy monsoon storm that must have saturated the soil too much. I suspect yet another drip irrigation leak in the area as well. The surprisingly small root system just couldn't hold up.
 |
| The inspector. |
On the bright side, it fell in one of the two narrow directions where it wouldn't damage anything else. It missed the porch, the block fence, the BBQ, most of the flowerbed, the pool fence, and the surviving (taller) Saguaro. It also land on anyone; which would have been fatal. We'll count our blessings.
I don't even know where to start with clean-up on this one. It must weigh more than a ton. The tiny little arm bud, that augured into in the flower bed, weighs 60 lbs on the bathroom scale.
 |
| This 60 lb. ball punched a 3 inch deep dent into the flower bed. |
I think I may need to get a chain saw and finally purchase a wheelbarrow. There's absolutely no way to get equipment like a Bobcat or forklift into the back yard. I'm surely not going to hire a crane to reach over the house and lift it out.
It's been sitting, cracked open and leaking some sort foul juice like a Graboid from Tremors* for a few days now.
 |
| Graboid juice |
What a loss. We can't replace this beast. I'll figure out a way to dice it up and store it for the next quarterly bulk trash pick-up (since the most recent was last weekend, of course). Maybe I can plant some of the arms that weren't damaged in the impact.
I grew up chopping-up and hauling ice-storm damaged trees out of our yard in Michigan. This is another challenge entirely. It goes without saying that this is going to be a very delicate operation. I rolled one of the arms with my foot and a spine punched right through the sole of my shoe. This monster bites.
 |
| This isn't your little window-sill garden cactus my friends. |
*As my Facebook followers know, I've referenced Tremors twice, recently. I don't know why. I guess it's time to bust out the DVDand visit Val and Earl. I do miss those idiots.
The Great Debate: Hiring a Pro vs DIY (Replacing Swimming Pool Equipment Edition)
My whole concept is Do IT Yourself . I write this blog hoping to empower others to do the same by sharing my experiences, triumphs and challenges. Truly, I believe homeowners can do nearly anything themselves with the right tools, materials, and knowledge. I enjoy doing it myself, have saved tons of money, and have a lot of experience being dissatisfied with the results from people I've hired in the past. I guess I expect absolute perfection for my hard earned money.


UPDATE: I after re-doing some electrical myself and digging up the pavers in advance of the new install, the work is done. The technician arrived early and lugged in a bunch of new parts and pieces.

However, there are times were the time spent muddling through a project is just not worth possible savings, fun, bragging rights, or the experience gained. Sometimes there are expensive, specialized tools required, that I'd never use again. A mistake I make can cost me, where the mistake a contractor makes, should have to be corrected on their dime. There may be product warranties to consider as well. True craftsmen, can get results even the most gifted DIY'er can hardly hope to obtain.
So, can I follow instructions, tear out and replace all this mess? Yes, I think so. It's mostly a PVC pipe and glue project. Can I get it done in a few hours and be confident? No. It would probably take me all weekend and infinite trips to the hardware store to do it.
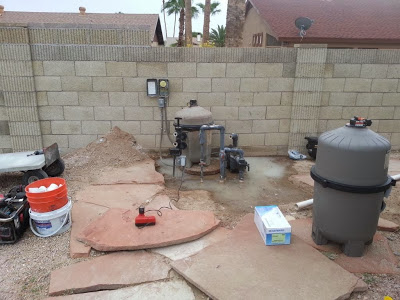
So, today it happens. I had already cleaned out the dirt around the horror-show above and repaired some of the electrical last weekend (check it out here). We have an experienced professional from one of our local pool stores coming with brand spanking new equipment.
Here's the scope:
- A new cartridge filter to replace the aging DE filter (the big R2-D2 looking thing) so back-washing and dealing with that messy white powder is a thing of the past. Old leaky here has been a maintenance nightmare. It would need hundreds of dollars in replacement parts if we wanted to save it. A cartridge filter will reduce my maintenance time greatly.
- Replace the pool pump. The existing motor is doing fine, since the it was replaced a year ago (home warranty!!!) but, we expect to save about $700 annually in power consumption by upgrading to a modern, variable speed pump. Plus, the unit is tired and has air and water leaks.
- Adding a salt water cell. This is actually exciting. We are going to nearly eliminate our chemical dependency (and cost!!!!) by converting salt water to chlorine. Everyone I talk to who's made this conversion has loved it.
This is coming to us at a heart-stopping cost of nearly $4,000. No, we cannot afford it. But, we also cannot afford to let this beast nickle and dime us to death, while we spawn water creatures in it's foul depths. We are still in swim season here and cannot take advantage of it. I've spent untold hours and about $1,000 this year alone in chemicals and parts trying to keep this priceless awesomeness...
 |
| No swamp. |
...fom reverting again to Dagobah, in the blink of an eye.
 |
| Swamp. |
The total cost of this renovation includes about $380 in labor (and that's on special this month). Still steep, but I think it's worth it. I don't think I need to surrender my DIY Guy credentials on this one.
Hire or DIY? The great debate. I nearly always choose DIY. I've hired out for roofing and plan to hire out for window replacement (if we can ever afford it after this pool debacle). I only do so much electrical myself because I have been trained, but suggest most people bring in a pro for anything major. How about you; what's on your hire vs. DIY list?
Homework: There's a neat article Marcie Geffner wrote last year for Bankrate.com, titled Remodeling Yeilds Rewards, Vexations where she compares my successful family room remodel experience to cautionary advice from the authors of Home Improvement For Dummies. I do their cautionary, contrasting point of view vs. my gung-ho, I-can-do-anything approach. Doing research, I found their website diyornot.com, which provides lots of info on DIY vs. hire. It's a very good site. I just get a vibe that it's pushing the hire direction a bit hard, especially with an apparent choice of advertisers directed towards for hiring contractors. Maybe I'm a bit sensitive because I love the do it yourself approach. Heck, I have ads for tools and materials on my site. - John
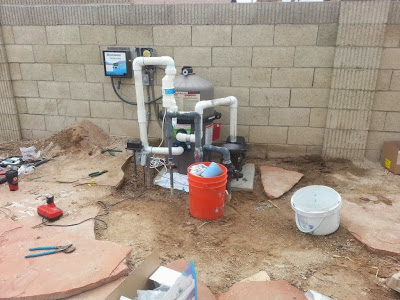
He installed the equipment in the existing footprint, using a bunch of the existing plumbing. You can see the salt cell standing vertically in the center and its new computer on the wall.
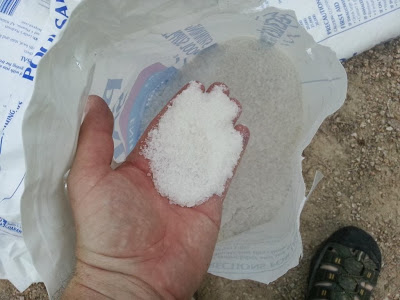
I did the honors and dumped seven huge bags of special swimming pool salt in the pool. They say it was special salt, but I think its the same stuff they put on those big salt pretzels at the mall. Shhhhhh....
When it was wrapped up, we had a completely new mechanical system,.... and some exciting new financing payments. We're really happy we did it. This winter I hope to drain and re-coat the pool, maybe the decking. Who knows, I may even do some cool new landscaping and a screen to hide the equipment. Next summer should be a great swim season!