

This is the final episode of the Great Family Room Remodel, the last five full days of work. The electrical trim, crown molding and baseboards get wrapped up.
Spoiler Alert! If you've stumbled into the mess without first reading the exciting beginning of the saga, head over to the beginning at The Great Family Room Remodel - Part I
Workday 15:
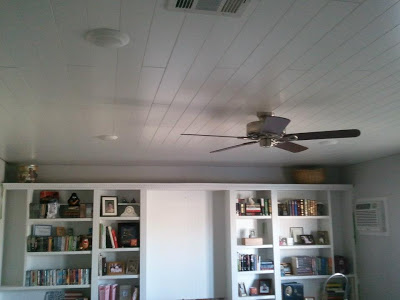
Electrical Switching is done and the can lights are lit!

I'm really excited about these dimmable L.E.D. fixtures. The light is decently warm at 3000k, much better than the CFLs I've seen. Each puts out the equivalent of a 75 watt incandescent at only 14.5 watts. They dim to 5%. We have more than twice the light of the old twin 60w ceiling fan for less than half the energy. It's spaced more evenly around the room. Plus, they generate less heat, which reduces the A/C load. They supposedly last 32 years. Commercial Electric T91: $39 each at Home Depot. They take about a minute to install in a standard can, including opening the box and climbing the ladder.

t took a bit of fiddling around to get the dimming to work. Dimmer switches specifically for LED fixtures didn't work. I ended up going to their website and figuring out which standard dimmer to use.
The three gang switch box includes a dimmable toggle switch, a speed control switch for a ceiling fan, and a standard toggle switch that controls a receptacle hidden above the bookshelves for Christmas lights or perhaps a string of future LED rope light for ambient lighting.
Workday 16:
I put up the ceiling fan, which is pretty much a must-do for every room in the house when you're in Phoenix. We chose one without the light kit this time since the cans do so well. We gained a lot more vertical space in the room. This will be much more comfortable on the old noggin when I'm jumping around like a fool with the kids, playing with the Xbox Kinect.
Rather than more white on white, we went with a brushed nickel with dark wood blades. We may change the blades in the future, but we like the way it looks now.
We pulled down the plastic sheeting protecting the bookcases. Aaaaaaghhhh. Everything was coated with drywall dust. Jennifer & I spent the rest of our work time cleaning everything up. I'm still going to do some work on the shelves to make them a bit more usable later.
Workdays 17 & 18:
80' of crown molding in 16' lengths loaded with less than 5 feet of bed space.

Putting up the crown molding was slow going since I hadn't done it before. We chose a simple, clean profile since there is so much detail on the dentil molding and the bead board in the room. We thought it would look too busy.
This is Trimfinity Crown Molding from Home Depot. It's is made from 90% recycled plastic (50% post-consumer, 40% pre-consumer). Mostly polystyrene. It's economical
too, much cheaper than wood and a bit less than MDF (which chips too easy IMHO).
After fighting the 16' lengths home, I decided to only put it up about 4-5' at a time. It's just too floppy to work with a long stick and make it look good, by myself. It cuts , nails, and takes paint like wood. I can hide the scarf joints pretty good.
<update - I wouldn't do this again in the future. Too many joints across the room, in four months, about half of them have opened up and need to be caulked. I'll have help next time instead of stubbornly doing it alone>
I'm using the method (from Tom Silva of This Old House) where I butt a stick to the wall and back cope one mitered cut rather than a dual-mitered corner that will open up later.
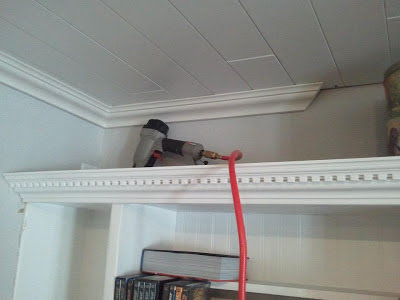
Note the gap at the wall and the face screwing at the edge, hidden by the crown.
Workdays 19 & 20:
Final details. We decided on a 6" tall, simple profile base molding. It seems to go with our somewhat classic look to the room. It was a bit tricky to place because the floor was so wavy. When I installed the first piece using a level, with the highest point touching the floor, I had a 2" gap by the edge. It had to be torn out. I ended up warping the molding to keep it somewhat uniform in it's distance from th
e floor. It looks good to the eye. Once again, I wish our predecessors had originally put a flat floor in. No way we can afford to tear it out and re-do it now.

I decided I really do prefer the green Frog Tape for masking. It leaves a much crisper paint edge than anything else I've tried. There was a lot of hating on their FB site, but it sure worked well for me, on pretty fresh paint, with no issues. It worked equally well edging the crown molding. Those are my cheap computer speakers on the left. I use them with an iPod or the Kindle Fire (as show in the awesome Dodo case) to play music while I work.
That's pretty much it for the project. Just a final clean-up and moving back in. We need some new furniture to get it right. I'll do a final reveal when it's all set.
The budget was about 10 - 20% high, but I really blew the timeline. 5 workdays turned into twenty, plus several evenings during the workweeks. We're really pleased with the results. I'll check back in with more updates as more tweaks get accomplished.
And the next major project is... ?

