

Leaping headlong into the a large-scale dry walling adventure, I learn a lot,.. and it gets messy. It's really not that difficult of a job, but it's also not the most fun of the DIY tasks I've tackled.
Work Day 5:
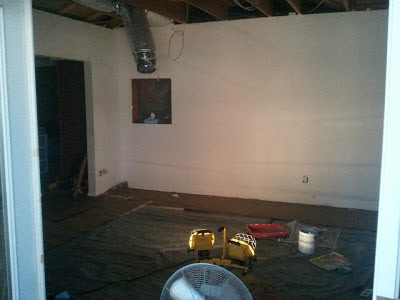
The wall is mostly skinned with sheet-rock and the electrical receptacles are adjusted forward. I made a big mess, wore myself out, and really didn't have much fun. I learned some things I'd probably do differently next time. After much study and consideration, I have come to the educated conclusion that I am not a rabid fan of the dry wall installing arts.

This was only the second full-day workday, but I don't feel like I accomplished much. It's probably due to buying, loading, and unloading all that drywall. I simply must pick up the pace tomorrow. I did enjoy the time I took to grab a "Bad Dog" Italian Sausage, Chips, and a Coke combo from the stand in front of H' Depot.
I tried a drywall dimpler driver in my impact driver, (BTW - of the most awesome tools ever) by but didn't really like it much. A simple magnetic driver tip did the trick. You can still see the header sticking out at the upper left. I'm skinning it over with a thinner 1/4" sheet of sheet rock.
Workday 6:
Another grueling day of drywall. I had to fix and add a bit of framing here and there. The new wall is getting close to finished. Another coat of compound and a sanding, it will be ready for paint (primer?). I'm using sanding screens purchased from Amazon.com on a Kobalt sander / stick thingy I bought at Lowes. Both worked pretty good. My shoulder muscles are begging for mercy. If I had it to do again, I'd look into some sort of vacuum equipped sander. The dust gets everywhere,... EVERYWHERE!
This back, outside wall is going to be a trick. I started cutting a nice neat line where you see the laser from the awesome DeWalt Laser Chalk Line. The dang wall crumbled about an inch lower, at the top of a sheet, right where they had nailed the edge track for the suspended ceiling. It was a thick gob of drywall compound the length of the room, leaving a ragged edge.
As a little bonus surprise:
(Future Challenge #1)
I found three 4" electrical junction boxes hidden up there, with the covers facing the opposite direction where I couldn't get into them. No cable clamps either. An illegal installation / code violation, by some putz ahead of me. I'd already sealed up and finished the wall with the previous box so I can't easily run new wiring at this point. I'll have to move on with the project. I've mapped them out and will open up the house's exterior sheathing later to fix it. Who'd do that Jake-leg wiring crap in their own home and leave it like that?
Workday 7:
The drywall is finally completed. No more header sticking out! There were a couple old places I'd liked to have given some more attention, but the clock is ticking.
My lovely wife took a couple days off to help.
The back, outside wall's existing texture was so rough it would scrape the skin off a passing rhino. Sweetie spent hours first sanding with the screens then used the random orbital sander with a heavy grit paper to knock down the horrible texture.
She sanded, and sanded while I mudded and cut in the new sheetrock, filling the strip around the top of the three remaining walls. My poor wife seems to be allergic to drywall dust. She's feeling miserable.
See the lights? Because it's flipping DARK! No more leisurely afternoon completions, we're burning the midnight oil and we're exhausted!
Workday 8:
<Ozzy mode = On>
I... am...TEXTURE... MAAAAN!...
nuh-nuh-nuh, nuh-nuh-nuh-NUGHT!
<Ozzy mode = Off>

Nice Shootin' Tex
This little Wagner "Power Tex" texture sprayer blows chunks!.. in a good way. It's worth it's weight in gold. Not counting tarps and taping the room up, it took one hour to shoot the whole room. That's from taking it out of the box, thinning the compound, practice in the back yard, and two cleanups.
Done!
It looks pretty good too. I blasted it over the formerly rough / now sanded wall, the new flat wall, and the one with the weird troweled texture. It's all a spatter-ish / knockdown texture now.
No compressor, just a small electric turbine + thinned drywall compound = nice textured walls and one heck of a mess on every surface in four of the surrounding States. Next time I'll wear a hat and keep my mouth closed. That stuff tastes like... unpleasant.
We got a quick coat of primer and two coats of paint on the wall before shutting down for the night. It looks pretty good.
Now that this dark chapter is behind us:
- Are you sick of hearing me whine about #&$*%#$!!! dry walling?
- Wanna' see that big bad nail gun come out to play again?
- You like gladiator movies Timmy?
Well then kiddies, tune in next time as the most exciting adventure of our times continues in: The Great Family Room Remodel - Part IV (A New Hope)

