Before and After: Family Room

I pulled our old, nearly-dead (mostly dead?) computer from the closet this week and managed to extract all our old files from the hard drive. I was pleased to find a few grainy photos of the family room from when we first moved in. I'd described the look of the original "built-in" shelves in the first of the Great Family Room Remodel posts, but didn't know I had the photo's show them.

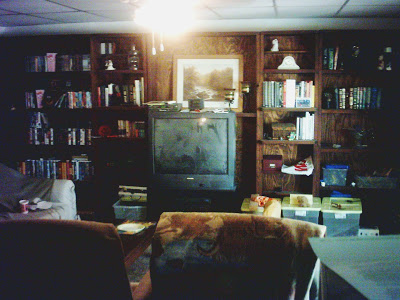
Late 2005: The prior owner's stuff, as they were departing.
While the photo's quality stinks, reality wasn't much better. My best guess is that this is a time warp back to the 1980's, television, massive audio speakers and all.

These built-in bookcases were created in five sections from 2" x 10 3/4" boards (2 x 12?) and a plywood backing. They were actually fairly well constructed. They were stained dark, with no protective finish. With the thick shelves and dark color, the unit appeared too heavy for the small room. It really gave it a basement cave-like feel. 

We moved into the house and just and lobbed our stuff up there. 

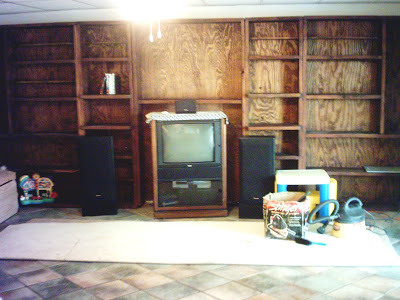
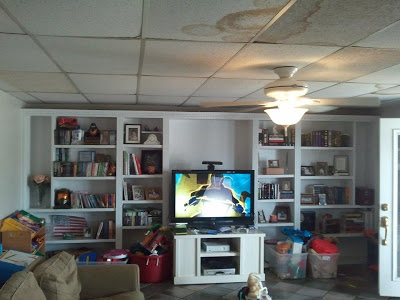
Early 2006: the dusty television years.
It's hard to believe this 6 year old, Alien Bounty Hunter is now a teenager.

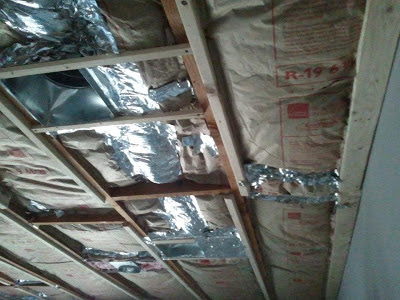
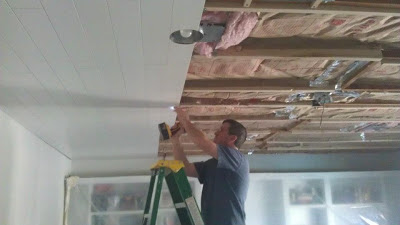
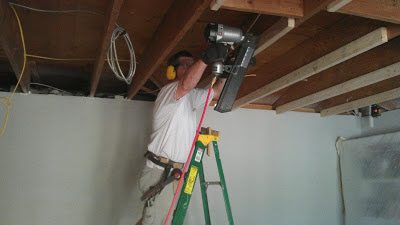
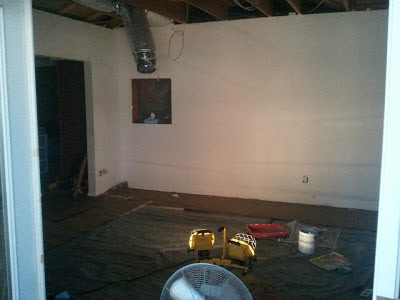
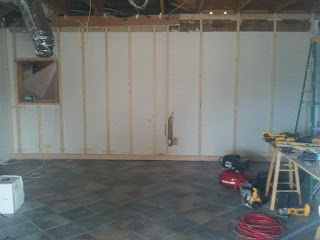
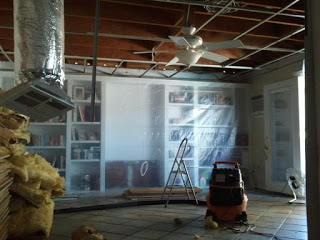
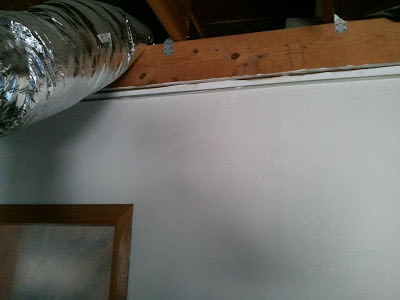
We spruced up the shelves in 2006 with molding, bead board panels, and crisp, white paint. I built a custom TV stand soon after. In about 2008, we installed french doors. There the room sat for years, with its horribly, stained, way too low (7' 5") drop ceiling and the ceiling fan finial that hung 3/8" below the peak of my melon-shaped head.


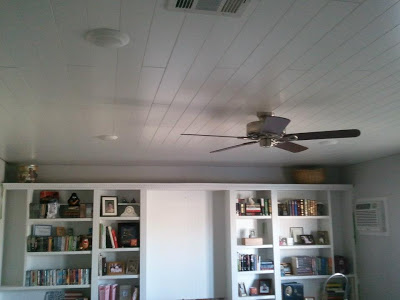
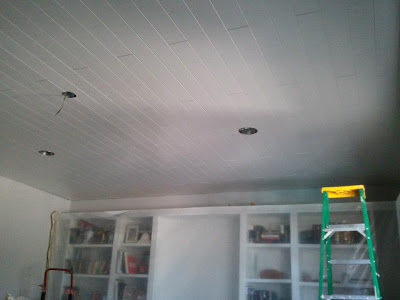
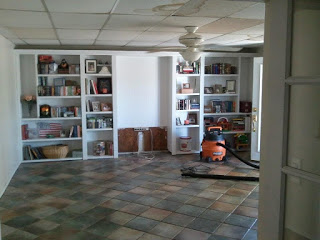
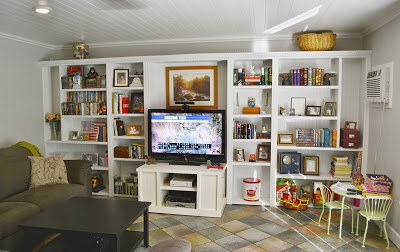
The remodel finally happened. We loaded our beat up old furniture back into the room. Recently, we replaced the old sectional couch and added some accessory tables (IKEA). Finally, a proper reveal with the new ceiling is worth while. Compare the distance from the top of the bookcase to the ceiling; we went from 7' 5" to 8' 1", an 8 inch gain! I can't even hit my head on the ceiling fan when I jump. It only took 7 years!!!

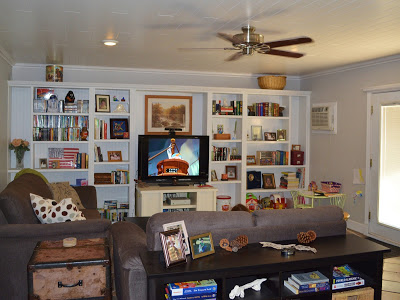
It's a bit busy, but it's our main hangout. 
The kid infestation is still in full bloom.
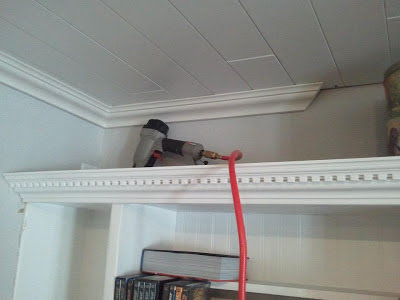
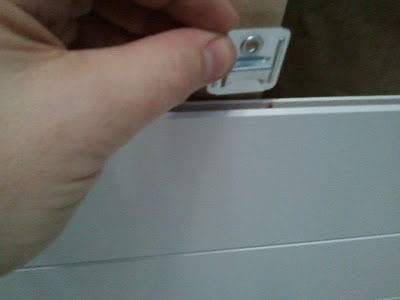
I used a lightweight foam crown molding to cap off the book cases.
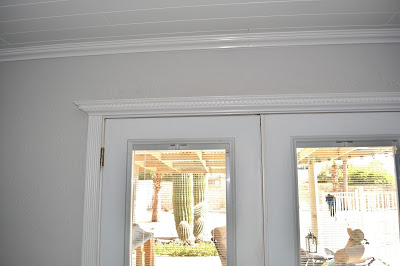
The french doors got capped off with the same dentil molding. We
used Jeld Wen doors with the built in shades from Home Depot.
I actually started the AZ DIY Guy's Projects blog with the remodel. You can see it unfold in seven exciting installments here, starting with my first post ever.  Things did not go entirely smoothly, but it's done. It's the project that was featured in the Bankrate.com article (Yahoo finance and Fox Business).

Featured on Yahoo Finance!

A few weeks ago, I was contacted by Marcie Geffner,  a reporter for Bankrate.com. She interviewed me about the experience with our family room remodel. We talked about the challenges of time, cost, and unexpected surprises in DIY remodeling. It was a fun experience.

This morning I discovered her article on Yahoo Finance. It's exciting to be part of something like this so early in my blogging "career". I guess since I've been dragging my feet on an "About Me" page, the article can serve for now. There's lot more of my personal story here than I've posted thus far on my own.


It's cool to be to be offered as the confident, experienced DIY'er vs. beginners in an article that also includes expert commentary by the authors of Home Improvement for Dummies, especially when I often feel like a Dummy myself when my adventures go awry. Here's their book on Amazon.com.  I haven't read it, but I'd like to at some point; it looks good.

 Enjoy the article:

Bankrate.com: DIY remodeling yields rewards, vexations
Yahoo Finance: DIY remodeling is rewarding when not frustrating
Fox Business: DIY remodeling is rewarding when not frustrating
Hey Fox, What's up with replacing the pictures of me with a a younger looking dude? I'm not tool wielding eye candy anymore?

Oh yeah, before notice it. I really don't run wiring with a big ol' framing nail gun as captioned in the article.

The Great Family Room Remodel: Part VII

This is the final episode of the Great Family Room Remodel, the last five full days of work. The electrical trim, crown molding and baseboards get wrapped up.

Spoiler Alert!  If you've stumbled into the mess without first reading the exciting beginning of the saga, head over to the beginning at The Great Family Room Remodel - Part I

Workday 15:

Electrical Switching is done and the can lights are lit!

I'm really excited about these dimmable L.E.D. fixtures. The light is decently warm at 3000k, much better than the CFLs I've seen. Each puts out the equivalent of a 75 watt incandescent at only 14.5 watts. They dim to 5%. We have more than twice the light of the old twin 60w ceiling fan for less than half the energy. It's spaced more evenly around the room. Plus, they generate less heat, which reduces the A/C load. They supposedly last 32 years. Commercial Electric T91: $39 each at Home Depot. They take about a minute to install in a standard can, including opening the box and climbing the ladder.

t took a bit of fiddling around to get the dimming to work. Dimmer switches specifically for LED fixtures didn't work. I ended up going to their website and figuring out which standard dimmer to use.

The three gang switch box includes a dimmable toggle switch, a speed control switch for a ceiling fan, and a standard toggle switch that controls a receptacle hidden above the bookshelves for Christmas lights or perhaps a string of future LED rope light for ambient lighting.

Workday 16:

I put up the ceiling fan, which is pretty much a must-do for every room in the house when you're in Phoenix. We chose one without the light kit this time since the cans do so well. We gained a lot more vertical space in the room. This will be much more comfortable on the old noggin when I'm jumping around like a fool with the kids, playing with the Xbox Kinect.

 Rather than more white on white, we went with a brushed nickel with dark wood blades. We may change the blades in the future, but we like the way it looks now.

We pulled down the plastic sheeting protecting the bookcases. Aaaaaaghhhh. Everything was coated with drywall dust. Jennifer & I spent the rest of our work time cleaning everything up. I'm still going to do some work on the shelves to make them a bit more usable later.

Workdays 17 & 18:

 80' of crown molding in 16' lengths loaded with less than 5 feet of bed space.

Putting up the crown molding was slow going since I hadn't done it before. We chose a simple, clean profile since there is so much detail on the dentil molding and the bead board in the room. We thought it would look too busy.

This is Trimfinity Crown Molding from Home Depot. It's is made from 90% recycled plastic (50% post-consumer, 40% pre-consumer). Mostly polystyrene. It's economical

too, much cheaper than wood and a bit less than MDF (which chips too easy IMHO).

After fighting the 16' lengths home, I decided to only put it up about 4-5' at a time. It's just too floppy to work with a long stick and make it look good, by myself. It cuts , nails, and takes paint like wood. I can hide the scarf joints pretty good.

<update - I wouldn't do this again in the future. Too many joints across the room, in four months, about half of them have opened up and need to be caulked. I'll have help next time instead of stubbornly doing it alone>

I'm using the method (from Tom Silva of This Old House) where I butt a stick to the wall and back cope one mitered cut rather than a dual-mitered corner that will open up later.

Note the gap at the wall and the face screwing at the edge, hidden by the crown.

Workdays 19 & 20:

Final details. We decided on a 6" tall, simple profile base molding. It seems to go with our somewhat classic look to the room. It was a bit tricky to place because the floor was so wavy. When I installed the first piece using a level, with the highest point touching the floor, I had a 2" gap by the edge. It had to be torn out. I ended up warping the molding to keep it somewhat uniform in it's distance from th

e floor. It looks good to the eye. Once again, I wish our predecessors had originally put a flat floor in. No way we can afford to tear it out and re-do it now. 

I decided I really do prefer the green Frog Tape for masking. It leaves a much crisper paint edge than anything else I've tried. There was a lot of hating on their FB site, but it sure worked well for me, on pretty fresh paint, with no issues. It worked equally well edging the crown molding. Those are my cheap computer speakers on the left. I use them with an iPod or the Kindle Fire (as show in the awesome Dodo case) to play music while I work.

That's pretty much it for the project. Just a final clean-up and moving back in. We need some new furniture to get it right. I'll do a final reveal when it's all set.

The budget was about 10 - 20% high, but I really blew the timeline. 5 workdays turned into twenty, plus several evenings during the workweeks. We're really pleased with the results. I'll check back in with more updates as more tweaks get accomplished.

And the next major project is... ?


The Great Family Room Remodel series:  

Part I • Part II • Part III • Part IV • Part V • Part VI • Part VII  • Before and After: Family Room.

The Great Family Room Remodel - Part VI

After tragedy, travel, family illness, and getting back to work, it was tough to get rolling on the project again.

Spoiler Alert!  

If you've stumbled into the mess without first reading the exciting beginning of the saga, head over to the beginning at 

The Great Family Room Remodel - Part I

As I have been recounting The Great Family Room Remodel story on this site, I've known this chapter was coming and planned on glossing over a big gap in the progress due to family tragedy, as I had originally done on my Facebook posts. I like to keep my stuff light, somewhat humorous, and not too personal. Now, months later, I feel it's an integral part of the story and I should share it; it's reality of life. Life has a way of getting in the middle of projects. Plans get derailed.

Jef:  12/21/1971 - 05/09/2012

May 9, 2012, my youngest brother Jim called me at work, from Michigan, to tell me that our other (middle) brother Jef had been taken to the hospital with some sort of heart trouble, and was in intensive care. Jim was far from the hospital, but on his way, and would call me back when he got there. His next call, an hour later, was the absolute worst news; Jef had died. He was 39. Jim, his wife, and Jef's wife were in really rough shape at the hospital. I had to tell our parents, via telephone, that their son had passed. That memory will haunt me forever. I was, and remain, crushed and heartbroken. I'd never lost anyone close to me in my entire life. We left that night, on the red-eye flight, for Michigan.

The next days were a blur. Visitations, the funeral, and family visits were an overwhelming crush of emotions. We got back home, exhausted, roughly a week later. My poor wife was severely sick. I had no steam left, or interest to working on projects. The house remained a wreck.

Jef was a truly good man and I miss him terribly. He left a beautiful family, his wife and three very young children. The amount of friends and people he had touched in his life was simply staggering. At the time, we had no idea what had caused his young heart to stop working. Now we have an idea, a belief. I'm not sharing specifics at this time. However, my personal decision and advice, based on my belief, is to stay away from energy drinks,

especially the popular shot-size energy supplement drinks

. I'd boycott stores that sell it, but there don't seem to be options for stores that don't. I've blocked them from advertising on my site.

Jef's family, May 2012, in Florida, on vacation.

Before we returned, Jef's wife encouraged me to get back to work on the family room. She said she and Jef had been following my Facebook posts, and enjoying the progress. He'd want me to get back at it.

Throughout the summer, a group of Jef's friends, still close since childhood and high school, my brother, parents and I set up a trust fund for the future education of his children. This will be an ongoing project for years.

Hug your spouse and your kids.

Workdays 13 & 14:

After tragedy, travel, family illness, and getting back to work, it was tough to get rolling on the project again. My heart just wasn't in it. But once I got started, it was really great to be using the tools, making sawdust, and blasting the iPod. Mr. Nugent may be a bit of a nut lately, but some of

his old stuff

sure gave me a boost in production. All the planks are up and it looks great.

The last row was a bear to slip in place, getting the tongue and groove together without too much gap at the wall. I also had a devil of a time with dark fingerprints this time for some reason (easily cleaned with Costco baby wipes). I still can't believe how well it worked out; in all the cuts for length, edging, can lights, A/C, and the fan, I only screwed up once and cut a board backward; measure 3 times and cut once.

By over ordering by 10%, just in case, I have a box and a half of spare planks to put in the attic, in hopes that I'll never need to make a repair. If we didn't have them, certainly the roof would be leaking by tomorrow and we'd find this particular plank out of production.

Of course there's still lots of work to do, but the end is in sight. We're ready to stop living like cave people in the dining room.


THE GREAT FAMILY ROOM REMODEL SERIES:  

Part I • Part II • Part III • Part IV • Part V • Part VI • Part VII  • Before and After: Family Room.

The Great Family Room Remodel - Part V

The Weekend Warrior is back. After a getting back to work for a week, we get back in action on the weekend. Real progress continues with more framing, insulating, and the actual installation of the ceiling planks gets underway.

Spoiler Alert!  

If you've stumbled into the mess without first reading the exciting prequels to the saga, head over and start from the beginning at 

The Great Family Room Remodel - Part I

All tucked in.

Workday 11:

Saturday: I managed to finish the framing at the sloped edges of the room to allow for end fastening of the planks. I had to rip some 2x4's on the table saw for the width of the room and create a bunch of short brackets to hold them. A slow process, since no two framing members were alike up there. I managed to get them up and finished insulating and taping the ceiling by the end of the day. Once again, the DeWalt Chalkline Laser Level  was invaluable for getting everything level.

A close up of the clip for the groove on the planks.

Workday 12:

Sunday:

Finally,

the ceiling planks are going up. It's a neat system. It took a bit to do the math, rip, and fasten the first edge piece, by face screwing the edge into the framing. 

Once that was done, the planks started slipping in quickly. It's all tongue and groove with a screw-in clip for each rafter.

 I launched a bunch of those screws around the room throughout the day, before finally realizing I needed a #1 Phillips driver bit instead of the standard #2.  I used my impact driver to drive the screws which really sped things up and was lighter than lugging the full size drill overhead all day.

It's starting to look like a finished project!

The can lights and vents slowed me down a bit, due to all the cutting with a jigsaw. Masking tape on the shoe of the jigsaw kept me from scratching the finish. I had to make cuts on three to four planks for each can light because the openings were wider than the planks. I used a paper template that came with the cans.  By the end of the day, four cases were installed, about 1/3 of the room. The room already looks better and is holding temperature nicely.

I really like the plank system. As I mentioned in Part I, they are Woodhaven 1148B Ceiling Planks by

Armstrong Residential Ceilings 5" wide x 84" long x 3/8" thick. They are an engineered board, like hardboard with a smooth, white painted finish.

We ordered them online through Lowe's and picked them up at their local home center.

It's a good looking system. You take the cut end from a finished row and start the next row with it. This way the plank seams are nicely staggered, creating a diagonal pattern.

Next, I'm derailed by family tragedy, but return with: The Great Family Room Remodel Part VI

THE GREAT FAMILY ROOM REMODEL SERIES:  

Part I • Part II • Part III • Part IV • Part V • Part VI • Part VII  • Before and After: Family Room.

The Great Family Room Remodel - Part IV

One last big weekend of atop a ladder leveling and insulating the ceiling before the end of my time off of work. Major problems are solved and this project is taking shape.

Workday 9

I went with leveling the ceiling using kiln dried 2x4's nailed to the side of the framing members. After much thought and a couple conversations with the resident "expert" old dudes at Home Depot, I thought it would be better. They are bit wider to nail to, will split less, and were much straighter than the 1x material I was looking at. Believe it or not, the price was about the same.

Why did I still have that sheet rock saw on my belt?

I made the little wooden T-Square that's sticking through the top of the ladder in the picture. There's a pencil line around the vertical, hanging part. I'd hang it off the 2x4 and adjust height until it lined up with the laser. I'd throw on a quick clamp, hang on tight, and zap it with the nailerSkadoosh!

The whole room had dead level framing members in about half a day. There's no way I could have done it alone, without a nailer.

I moved into wiring can-lights. We're going to have more than just the ceiling fan for general lighting. I plan to use dimmable LED's, if the light color isn't too harsh. The new work style cans were about $60 at 'Depot for a box of six, including the trim rings (which I threw away).

From this angle, you can't tell my head is shaped like a toaster.

The LED's I want to use only require a small octagon box, but I want to have the option later to go for a full can light.

I had the whole electrical diagram sketched out in advance. It's easy to get lost with all that spaghetti in the ceiling and miss a crucial piece. There's will be no attic access in this room, so recovering from a stupid omission would be darn near impossible.

I love Moleskine notebooks. They are fun to flip through months after a project is completed.

It takes a plan to be The Man with a Plan, so here's my plan,... man.

For this same reason, I ran good speaker wire from the entertainment center area to the walls and buried it, just in case we want to install a surround sound system in the future.

In an attempt to get ahead for the next, and last, full workday before "vacation" is over, a late run for insulation was in order. I brought Jack as the loading crew; I told him it builds character to load a truck.

Lift with you knees boy!

At 6.5" thick, R-19, it's not quite as thick as recommended for ceilings in the blistering hell-fire heat of Arizona, but we are nearly doubling the thickness of what was up there, just 3.5".

Workday 10:

The insulation is up and mostly sealed with tape, except for the East and West tapered edges. That will take some extra framing work to create a nailing surface to fasten the ends of the planks. I left a few inches above and around the soffit vents for air circulation. I also kept the craft paper backing away from the can lights (which were rated for direct insulation contact), just in case.

Burn baby burn,... lights that is.

The can lights work with temporary compact fluorescents installed to test. There is already a change in temperature. It's staying cooler.

It's Sunday evening. I'm out of time and not completed. Vacation is over; I have to go back to work tomorrow and have evening commitments most nights. Time to clean up a bit and aim for substantial completion next weekend.

I really thought I'd be relaxing with a completed project the last couple days of my vacation. I clearly underestimated the amount of work this project would take. I figure I'm at about 85% complete and I'm tired...

Cleaning up for the week. So that's what the floor looks like again.

The "vacation" blitz-week is behind us. Now we have to shift into pure weekend-warrior mode.

  • This project will be done in another day or two tops!...right?..right?
  • We're coming in under budget!,...right,...right?
  • What new tool comes out next?

Visit us next time, hero's and villains, for the next stunning chapter of America's favorite: The Great Family Room Remodel - Part V

THE GREAT FAMILY ROOM REMODEL SERIES:  

Part I • Part II • Part III • Part IV • Part V • Part VI • Part VII  • Before and After: Family Room.

The Great Family Room Remodel - Part III

Leaping headlong into the a large-scale dry walling adventure, I learn a lot,.. and it gets messy. It's really not that difficult of a job, but it's also not the most fun of the DIY tasks I've tackled.

Work Day 5:

The wall is mostly skinned with sheet-rock and the electrical receptacles are adjusted forward. I made a big mess, wore myself out, and really didn't have much fun. I learned some things I'd probably do differently next time. After much study and consideration, I have come to the educated conclusion that I am not a rabid fan of the dry wall installing arts.

Dry Wall Madness and a Green Handled Broom

This was only the second full-day workday, but I don't feel like I accomplished much. It's probably due to buying, loading, and unloading all that drywall. I simply must pick up the pace tomorrow. I did enjoy the time I took to grab a "Bad Dog" Italian Sausage, Chips, and a Coke combo from the stand in front of H' Depot.

I tried a drywall dimpler driver in my impact driver, (BTW - of the most awesome tools ever) by but didn't really like it much. A simple magnetic driver tip did the trick. You can still see the header sticking out at the upper left. I'm skinning it over with a thinner 1/4" sheet of sheet rock.

Workday 6:

Another grueling day of drywall. I had to fix and add a bit of framing here and there. The new wall is getting close to finished. Another coat of compound and a sanding, it will be ready for paint (primer?). I'm using sanding screens purchased from Amazon.com on a Kobalt sander / stick thingy I bought at Lowes. Both worked pretty good. My shoulder muscles are begging for mercy. If I had it to do again, I'd look into some sort of vacuum equipped sander. The dust gets everywhere,... EVERYWHERE!

This back, outside wall is going to be a trick. I started cutting a nice neat line where you see the laser from the awesome DeWalt Laser Chalk Line.  The dang wall crumbled about an inch lower, at the top of a sheet, right where they had nailed the edge track for the suspended ceiling. It was a thick gob of drywall compound the length of the room, leaving a ragged edge.

As a little bonus surprise:

(Future Challenge #1)

I found three 4" electrical junction boxes hidden up there, with the covers facing the opposite direction where I couldn't get into them. No cable clamps either. An illegal installation / code violation, by some putz ahead of me. I'd already sealed up and finished the wall with the previous box so I can't easily run new wiring at this point. I'll have to move on with the project. I've mapped them out and will open up the house's exterior sheathing later to fix it. Who'd do that Jake-leg wiring crap in their own home and leave it like that?

Workday 7:

The drywall is finally completed. No more header sticking out! There were a couple old places I'd liked to have given some more attention, but the clock is ticking.

 My lovely wife took a couple days off to help.

The back, outside wall's existing texture was so rough it would scrape the skin off a passing rhino. Sweetie spent hours first sanding with the screens then used the random orbital sander with a heavy grit paper to knock down the horrible texture.

She sanded, and sanded while I mudded and cut in the new sheetrock, filling the strip around the top of the three remaining walls. My poor wife seems to be allergic to drywall dust. She's feeling miserable.

See the lights? Because it's flipping DARK! No more leisurely afternoon completions,  we're burning the midnight oil and we're exhausted!

Workday 8:

<Ozzy mode = On>

I... am...TEXTURE... MAAAAN!...

nuh-nuh-nuh, nuh-nuh-nuh-NUGHT!

<Ozzy mode = Off>

Texture Man

Nice Shootin' Tex

This little Wagner "Power Tex" texture sprayer blows chunks!.. in a good way. It's worth it's weight in gold. Not counting tarps and taping the room up, it took one hour to shoot the whole room. That's from taking it out of the box, thinning the compound, practice in the back yard, and two cleanups.

Done!

It looks pretty good too. I blasted it over the formerly rough / now sanded wall, the new flat wall, and the one with the weird troweled texture. It's all a spatter-ish / knockdown texture now.

No compressor, just a small electric turbine + thinned drywall compound = nice textured walls and one heck of a mess on every surface in four of the surrounding States. Next time I'll wear a hat and keep my mouth closed. That stuff tastes like... unpleasant.

We got a quick coat of primer and two coats of paint on the wall before shutting down for the night. It looks pretty good.

 Now that this dark chapter is behind us:

  • Are you sick of hearing me whine about #&$*%#$!!! dry walling?
  • Wanna' see that big bad nail gun come out to play again?
  • You like gladiator movies Timmy?

Well then kiddies, tune in next time as the most exciting adventure of our times continues in: The Great Family Room Remodel - Part IV  (A New Hope)

THE GREAT FAMILY ROOM REMODEL SERIES:  

Part I • Part II • Part III • Part IV • Part V • Part VI • Part VII  • Before and After: Family Room.

The Great Family Room Remodel - Part II

The remodel gets truly underway. I unleash an unrestrained fury of cleanup, rough wiring, and hard-core, precision nail-gunnery.  

Spoiler Alert! 

If you've stumbled into the mess without first reading the exciting prequel to the saga, head over to 

The Great Family Room Remodel - Part I

April 21, Workday 2:

Pretty much a cleanup and haul out day. There were mountains of stained ceiling tiles, heaps of itchy, dusty insulation rectangles, and a mess of twisted metal t-track to get rid of. I had Gracie, the little "helper" demanding to be part of the action. It slowed production; I had hover to make sure she didn't hurt herself, but I wouldn't have it any other way. It was some good old Gracie &Daddy fun time .

Sometimes on these DIY remodel projects you just have to

 swallow your pride and bring in a seasoned professional.

Today, I had an apprentice Electrician.

Workday 3:

  Jack helped feed a couple cables to feed existing lighting on the back porch. He was a big asset, while Mommy kept the little dynamo occupied in the other room. With an open ceiling it's easy to route the new cable around the room. It's a 20amp circuit, so I'm using 12/2 wire (2 - #12's plus a ground). We're going to add switching next to the French doors for the patio, rather than the opposite side of the room where my predecessor put it. We're taking this opportunity to get the switching the way we want it.

Gracie got ahold of the camera. 

With workday #3 is complete, it's the last day of my pint-sized superintendent being underfoot; she's back to pre-school tomorrow. Basic rough in of electrical is complete. New cable TV / Internet home runs have been pulled through the attic (at a delightful 102 degrees today). A new data cable is installed from the office internet router to the X Box under the TV. A new phone line is coiled in the attic for a future expansion. 

Raticus Nesticus

The rats-nest will be a 3 gang switch box. There will be switching for can lights, the ceiling fan, and a receptacle above the bookshelves for holiday lights or maybe a string of rope-lights for ambient lighting. There are also cables from here to the back patio door area where I'm relocating switches for exterior fixtures.

Green baggin' it today

Workday 4:

Jack's hanging out with the Bagster Bag before heading off to school. All the old insulation, tiles and track fit, no problem. There's still some room for topping off. $29 for the bag at Home Depot, about $100 for Waste Management to come get it.

We have an empty room to work with.Blitz Week begins. 8:00am and it's already 90 degrees. I have the castle to myself.

Skadoosh!

I decided to fur (furr? phurr? pfurr? ) out the wall with 2x2's. I don't know the best way to hide that header, but this is what I chose to do, for timing. I'm really sold on the new framing nailer. I'm running it with a 2 gallon Porter-Cable pancake compressor, sitting outside to keep the noise down in this unfurnished echo chamber. Compared to using a hammer and nails or driving screws, it just gets the job done, right the heck now. Plus, it's good fun!

I like to say, "Skadoosh!" when I pull the trigger. I managed to still feel manly when saying it due to the good 3 day stubble beard.

A tidy worksite is a happy worksite

Done for the day. The wall is furred out. Only nailing to the studs inside the wall, it's weird that half the wall is 24" stud spacing while the other is 16" spacing.

I even swept up and put everything away, nice and neat, before the family came home, and met them at the door with a smile. Out for dinner everyone! I'm sure I'll do this every day.

<UPDATE: What an idiot. Later, the project, the room looked a cruise missile hit, and I was working past dark, exhausted beyond belief.>

Overall, a good day with a lot accomplished. I cannot wait to use the framing nailer again. I've had a 3 gun set for a couple years (brad, finishing, and stapler), and they really do their jobs, but this big beast is heavy-duty fun, big board, big nails, and big BANG!

It's a Porter-Cable FR350A Round Head 2-Inch to 3-1/2-Inch Framing Nailer that I bought on Amazon. I did my research first and I'm really pleased with the choice.

Please leave me your comments on the project so far. I'm figuring this out as I go.

Next, I'm looking forward to the experience of large scale dry walling. I've done a couple small projects over the years like patching the removal of an in-wall medicine chest. Easy stuff, how hard can a one whole wall and a 12" band around the top of the room be? <UPDATE: Idiot. Drywall work suuuuuuuuks!>

Check it out in:  The Great Family Room Remodel - Part III


THE GREAT FAMILY ROOM REMODEL SERIES:  

Part I • Part II • Part III • Part IV • Part V • Part VI • Part VII  • Before and After: Family Room.