

One last big weekend of atop a ladder leveling and insulating the ceiling before the end of my time off of work. Major problems are solved and this project is taking shape.
Workday 9
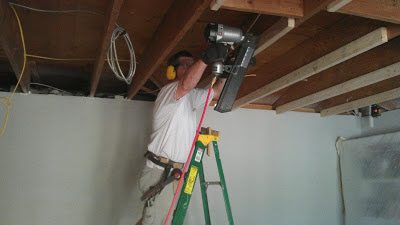
I went with leveling the ceiling using kiln dried 2x4's nailed to the side of the framing members. After much thought and a couple conversations with the resident "expert" old dudes at Home Depot, I thought it would be better. They are bit wider to nail to, will split less, and were much straighter than the 1x material I was looking at. Believe it or not, the price was about the same.
Why did I still have that sheet rock saw on my belt?
I made the little wooden T-Square that's sticking through the top of the ladder in the picture. There's a pencil line around the vertical, hanging part. I'd hang it off the 2x4 and adjust height until it lined up with the laser. I'd throw on a quick clamp, hang on tight, and zap it with the nailer. Skadoosh!
The whole room had dead level framing members in about half a day. There's no way I could have done it alone, without a nailer.
I moved into wiring can-lights. We're going to have more than just the ceiling fan for general lighting. I plan to use dimmable LED's, if the light color isn't too harsh. The new work style cans were about $60 at 'Depot for a box of six, including the trim rings (which I threw away).

From this angle, you can't tell my head is shaped like a toaster.
The LED's I want to use only require a small octagon box, but I want to have the option later to go for a full can light.
I had the whole electrical diagram sketched out in advance. It's easy to get lost with all that spaghetti in the ceiling and miss a crucial piece. There's will be no attic access in this room, so recovering from a stupid omission would be darn near impossible.
I love Moleskine notebooks. They are fun to flip through months after a project is completed.
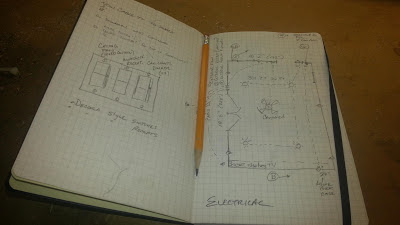
It takes a plan to be The Man with a Plan, so here's my plan,... man.
For this same reason, I ran good speaker wire from the entertainment center area to the walls and buried it, just in case we want to install a surround sound system in the future.
In an attempt to get ahead for the next, and last, full workday before "vacation" is over, a late run for insulation was in order. I brought Jack as the loading crew; I told him it builds character to load a truck.

Lift with you knees boy!
At 6.5" thick, R-19, it's not quite as thick as recommended for ceilings in the blistering hell-fire heat of Arizona, but we are nearly doubling the thickness of what was up there, just 3.5".
Workday 10:
The insulation is up and mostly sealed with tape, except for the East and West tapered edges. That will take some extra framing work to create a nailing surface to fasten the ends of the planks. I left a few inches above and around the soffit vents for air circulation. I also kept the craft paper backing away from the can lights (which were rated for direct insulation contact), just in case.

Burn baby burn,... lights that is.
The can lights work with temporary compact fluorescents installed to test. There is already a change in temperature. It's staying cooler.
It's Sunday evening. I'm out of time and not completed. Vacation is over; I have to go back to work tomorrow and have evening commitments most nights. Time to clean up a bit and aim for substantial completion next weekend.
I really thought I'd be relaxing with a completed project the last couple days of my vacation. I clearly underestimated the amount of work this project would take. I figure I'm at about 85% complete and I'm tired...

Cleaning up for the week. So that's what the floor looks like again.
The "vacation" blitz-week is behind us. Now we have to shift into pure weekend-warrior mode.
- This project will be done in another day or two tops!...right?..right?
- We're coming in under budget!,...right,...right?
- What new tool comes out next?
Visit us next time, hero's and villains, for the next stunning chapter of America's favorite: The Great Family Room Remodel - Part V

