


Kitchen Remodel: Episode 2 Before I tear the kitchen cabinets and soffit down, what's up there, behind the ugly wallpaper? Hopefully, there's no hidden structure or duct work, just a nice ceiling,... and a cache of lost Confederate Gold
Read More
Kitchen Remodel - Early Planning and Research
Kitchen Remodel: Episode 1 It's time to get serious. This 1979 kitchen is going down. It's probably going to take a long time, fast food, and paper plates as we phase this thing. I'm going to share the nuts and bolts of the journey as we go. Check out the early stage of the plan and the challenges we need to overcome.
Read MoreHow to Customize a Hockey Stick and Make it Extra Special
Enjoy the playoffs with this customized hockey stick. Wooden hockey stick and a blowtorch? It works! Here's how I did it.
Read More
How to Easily Restore Headlights to Beautiful, New Clarity
I've never tried restoring crusty, yellowed headlights before, although I've seen the restoration kits available for years.
For whatever reason, I thought of the whole headlight restoration concept was an "As Seen on TV!!!" late night infomercial type product, like spray on hair, or a that blanket with sleeves that prevents a gruesome death by strangulation risked by a normal, highly-dangerous blankets. I figured the products would improve my headlights a little bit, or at least they wouldn't be harmful to try. Likely, I'd eventually replace the lights from a junkyard recovery place or ebay anyway.
If you follow me on Facebook (please), you know I inherited my Dad's beloved Miata MX-5. I shipped it from Michigan to Arizona, about a month ago. This car needs some TLC.
The little convertible is well used and seasoned by the elements and wildlife. It had been stored outdoors, year round at my parent's lakeside home and hadn't been driven the last three months before my Dad passed away.
Yep that's bird poop - Photo by Jim
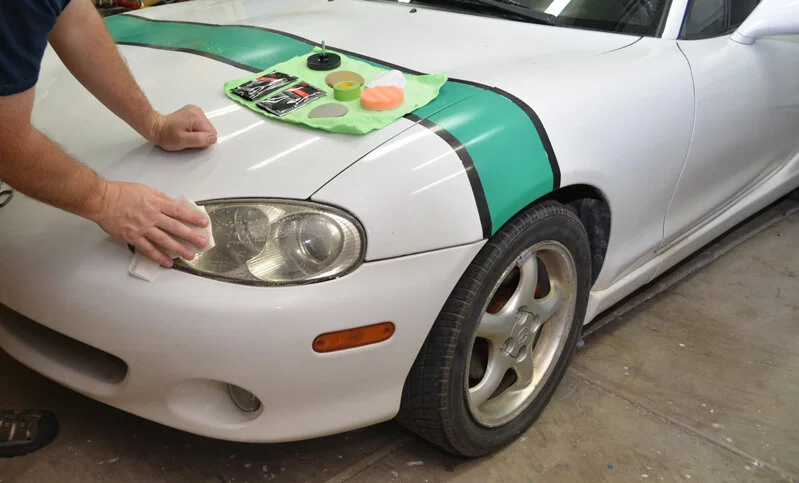
So the old girl is weathered. Since it arrived, it's been tucked in the garage, eating up my workshop space. The photos doesn't really show how bad the headlights are. They are beat up and fogged with age. A brief night drive showed the yellowing and reduced illumination. In this tiny car, I want to see, and be seen, as best I can, thus the idea to try out a headlight restoration project.
I picked up a 3M Headlight Restoration Kit - Heavy Duty with Drill-Activated Sanding from the assorted products available at my local auto parts store. I knew the 3M name and I also liked the whole "drill activated" part. Any chance to use power tools instead of elbow grease is alright in my book.

The 3M Headlight Restoration Kit
Despite the glorious photo depicted on the box. I didn't let my expectations get too high for great results. I tore into the packaging and got to work. I'm going to share how it went down, step-by-step.
Spoiler: the results were freaking incredible . Read on!
The kit came with an assortment of parts and pieces that I laid out on the hood on a towel. There were assorted grits of sandpaper, a couple spongy things, tape, a drill piece, and a couple packets of fluidy stuff.

The microfiber cloth was not included
PREP WORK
I've never done this project before, and I'm not much of a car guy, but I have a power drill and know how to read instructions. How hard could this project be for a DIY, home improvement dude with a 3 day growth of chin stubble?
Step One:
The headlight got a nice, soap and water bath. I cleared away the layer of dust and crud from months of sedentary rest beside the lake and 3,000 miles of high-speed, trans-American highway travel atop that foul-mouthed Russian's auto-hauler rig.
Rub a dub dub
Step Two:
I taped off the area around the lens with the included masking tape. Doing so would protect the painted surfaces. It additionally helped me definitively determine that any future trim painting or detailing would not be a bright, lime green color.

mellow yellow
SANDING THE LENS
Step Three:
The drill disc got chucked into the drill. This particular kit requires a 1200-1600 rpm drill. On my DeWalt, that's second gear, the middle speed.

No. I do not recommend hammer drill mode.
Step Four:
The 3M kit makes it easy by coloring the sanding discs by grit. The first one is yellow, 500 grit. It goes on with simple hook-and-loop connection. Just center it and press it on.

500 grit sandpaper disc
Step Five: Go Time!
With a "medium to light" pressure I started buzzing the spinning disc across the face of the lens. After one pass, I was clearly past the point of no return. It instantly fogged the lens to nearly opaque. Nervously, I pushed through and kept grinding the yellowed surface away. I also plowed through some minor dings in the surface, probably from loose rocks pinging off for 15 years, dropped from Michigan gravel hauling trucks.

Step Six:
The lens was covered with a fine powder of chalky plastic dust. It was completely fogged over by a finely etched layer of scratches. The lens was toast, completely unusable as a headlight at this point. But the yellowing was completely gone. The color was completely white. All the powder needed to be wiped off. and the lens inspected. I ground a little bit more with the yellow disc to get a deep scratch and the tiny remains of a last rock divot smoothed out. I wiped it down again; it was still more opaque than transparent, but it was smooth.

Step Seven:
Swap the yellow 500 grit sanding disc for a white 800 grit disc. It's easy with the hook and loop connection, but I was extra careful not to rip the disc off too carelessly and risk tearing the "hook" / attaching surface from the foam disc.
Step Eight:
With the finer sanding disc installed I made a few "medium to light" pressure passes across the lens. The lens was still fogged, but it was clearing up rapidly. It was starting to look much better. The scratches were finer and I could see into the light enough to see the lamps again.

Step Nine:
It's a repeat of Step 6. I cleaned up the plastic dust, retouched any areas that needed a little more attention with the drill and wiped it clean.
Step Ten:
The white disc got peeled off and a green foam disc got added. It felt pretty soft, barely any noticeable grit to it at all. Based on the labeling of P3000, I guess it's a 3,000 grit abrasive.
Step Eleven:
I didn't expect this step at all. The directions had me lightly mist the green disc as well as the surface of the lens with water. Just wet, the lens looked pretty good. I started running the 3,000 grit disc.

Step Twelve:
As soon as I started grinding with the P3000, the light plastic dust and the water turned into a white slurry. I made 4-6 passes across the lens after the slurry appeared. Even with wet mushy slime, it was looking good.

Step Thirteen:
Once again, wipe the lens to clean it up, regrind any little touch-up areas, and give it a final wipe. Holy cow. It looked pretty nice.

THE BIG FINISH!
Step Fourteen:
Next up, an orange sponge got installed on the disc pad holder. The kit referred to it as a "compounding disc"

Step Fifteen:
I got to tear into the first of the liquid packs, and squirted a small dollop of rubbing compound onto the compounding disc.

Steady,…steady…
To reduce spatter, I smooshed the rubbing compound around across the face of the light before turning on the drill.

Step Sixteen:
Holding the pad flat against the lens I fired up the drill and buzzed it around the whole area. The clarity was simply incredible. According to the instructions, you can go a few steps back, to the white disc if necessary, but my first finish was absolutely perfect.

Step Seventeen:
I peeled the masking tape.

A quick wipe with a microfiber cloth and the refresh is complete. Gorgeous!

Step Eighteen: Protection
The second packet of liquid is a Synthetic Wax Protectant product. I applied it with the same microfiber cloth and quickly buffed it off

Done!
I am seriously impressed. These headlights from 2001 look brand new.

Just like new
The project took about 20 minutes to do, for both lights. Even though it was only the headlights. it seemed to take years of age off the car.
I know somebody is happy...

Smile!
This post is not sponsored. I plucked the 3M kit off the shelf at my local auto parts store on a whim. The experience and opinion is 100% my own. I numbered the steps to mirror those in the manufacturer instruction.
These kits are available at auto parts stores and on Amazon.com:
UPDATE: It seems they’ve updated the packaging a bit. Here’s the new version:


How to Make Easy Electrical Repairs with a Torch
Last fall, while doing routine maintenance, I managed to damage some of the wiring for our pool equipment. It was a small control / sensor cable to the saltwater chlorination cell. I slapped a band-aid fix on it to get it working, and, of course, promptly forgot about it for the next few months.
Now that daily temperatures are spiking up above 100° F in Phoenix, the pool is getting heavy, summertime use. When I fired up the squirting water jets to delight our youngest, I noticed I'd never gotten back to doing a proper repair on the wiring.
I'd simply twisted on a couple wire nuts and wrapped the thing in electrical tape. My haphazard fix was still hanging there, suspended like a cocoon. Electrical tape isn't a long term fix, especially when its exposed to the elements.
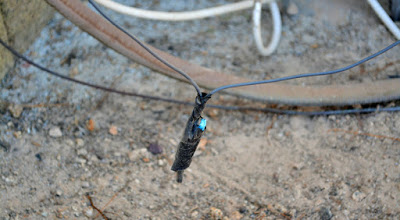
Soon will come a beautiful butterfly!
Since this is a tiny, exposed cable, it didn't make sense to install some sort of slice box. I couldn't even replace it because it is attached directly to the sensor in a water pipe. I decided I'd solder the wires together and protect them with some heat shrink tubing.
I gathered my tools and went out early; I could work in the shadow of our block fence and not get sun baked. I unplugged the little control wire from the salt chlorination control box, the one end I could disconnect easily.

I cut the power to the system to keep it from running and removed the now crispy electrical tape and wire nuts. I cut and stripped the cable back to expose the two wires within, being careful not to nick any protective insulation.
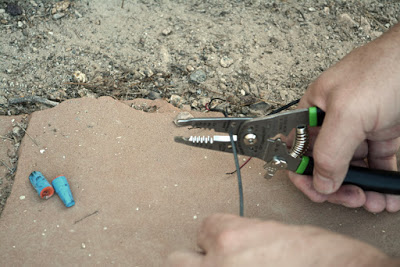
My splice would be protected by heat shrink. These little straw shaped tubes come in various sizes and can be found in the electrical section of the hardware store or home center.

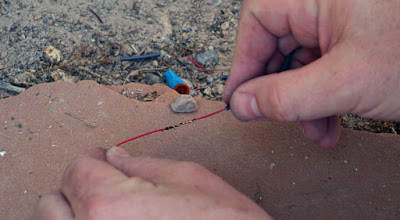
I slid a couple up the cable for later. Once I joined the wires, it would be impossible to get the heat shrink on.
Full mighty moron disclosure: Looking forward to the next steps, I actually twisted the wires together and forgot the heat shrink. Luckily, I remembered, just in time, and spared the neighborhood a torrent of choice language that would have inevitably spewed from my spot behind the block wall.

Installing Heat Shrink Tubing
After stripping back the insulation to the bare, copper conductors, I twisted them together, like an "X," winding them tightly.

Do the twist!
Together, the two pieces without insulation were roughly the same diameter as a strand, with the insulation still intact.
Give it a little tug to be sure it's tight
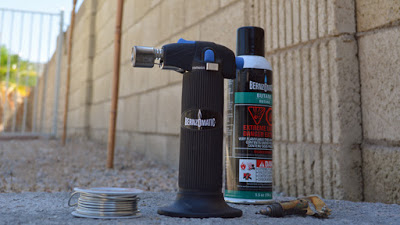
They make a special solder for electrical / electronic use.

Bernzomatic Electrical Solder
I'd used a similar micro-torch to do the pencil flame detail work on my Burned Pallet Wood Pirate Flag project. This time, I chose the Bernzomatic Trigger Start 3-in-1 Micro Torch.. It also features an open pencil flame if desired, but for electrical repair, I installed an included fine soldering tip.

The Bernzomatic ST2200T-Trigger Start 3-IN-1 Micro Torch
This little powerhouse runs on butane, like a cigarette lighter. Unlike an electric soldering iron, I was able to go cordless and work out in the backyard.
I found the trick that works for me was to heat the wire for a bit and then touch the solder to it, right up against the tip of the iron. It melts and flows into and around the strands of the wire. If I got a little too globby with the solder, I could shave excess off by reheating it with the tip of the iron.

I'd offset the splices to keep the diameter down and reduce a chance of the conductive metal from touching together. I wrapped both of the soldered joints tightly with electrical tape to hold them in place and offer a bit of insulation.
When the torch cooled down, I unscrewed the tip to convert it to hot air blower mode.

After removing the point, it becomes pointless.
I topped up the reservoir with a fresh dose of butane.

I slid the heat shrink over the repaired section and pushed the trigger button. Inside, the flame blew HOT but didn't shoot out the end, torch style. There's a screen in the tip that diffuses the flame into a blast of heat.

Full of Hot Air
I slowly fanned the torch along the length of the heat shrink. This ¼" tube started about the size of a fast food straw. It slowly shrunk, tightly around the cable, nice and snug. I overlapped two of the pieces to fit the entire length of my repair. You can buy the stuff in a roll and cut it to size. In hindsight, I should have taken that route, but this overlap should hold up fine.
"There was significant shrinkage"
- George Costanza
Nice and snug. The heat shrink fit perfectly around the cable. It would be much better suited to resist errant splashes from the pool and weather than my half-baked, wire nut cocoon.
I wrapped the cable up to keep it off the ground, plugged it back in, and fired up the system. The final, most important step involved parking my posterior on a deck chair under the umbrella with a frosty beverage. I had to put my feet up and watch my work for a while. Don't forget this step.
"Cannon ball!"
- Gracie

This is a sponsored post. I am a proud to be a Bernzomatic Torch Bearer, though all opinions expressed are 100% my own. I won't recommend products I don't believe in.
The Torch Bearers are a group of tradespeople, DIYers, culinarians, adventurers and artists brought together to create projects using Bernzomatic torches and share their knowledge and ideas with you. Check them out here and get inspired to create with fire.
Visit the other awesome Torchbearers and see what they are up to on the Bernzomatic Torch Bearer Site.

DIY Lap Desk with Burned Wood Finish
As the kids get older and move up through school, access to the family computer for this desert-dwelling, DIY-blogging dad has been getting more and more scarce.
Finally, since the beginning of the year, I've been putting all my content together on my handy Surface Tablet. Usually, this consists of me on the couch or propped up in bed with the tablet perched on a decorative pillow. I peck away at the keys while the computer wallows around like a sinking barge.
I've wanted to build some kind of lap desk for quite a while, but now that I've been precariously blogging on a pillow or a few months, I decided it was time to get it done.
This lap desk is a cool, inexpensive project that can be done in a couple hours with some basic tools. I still wanted mine to be visually attractive, so I did a cool torch-burned finish to bring out the detail in the wood.
Desktop Construction
I started by picking out some 1 x 6, select-pine boards. I chose straight, clean boards with some neat character in the grain. Since I'd be slightly burning them later with a hand torch, I'd bring out and celebrate that character. Boring, old straight grain wouldn't be very visually interesting would it?
I also wanted a smooth surface for writing or using a computer mouse. The select pine is nicely sanded on all sides and is free of knots.
Three, warp-free, straight-edged beauties, with plenty of character.
As usual, I decided to overbuild; no dainty little teacup sized desk for me. I'd build a monster, 16 1/4" deep by 22" wide panel to top my lap desk. I'd be able to land a standard World War II naval fighter plane on the deck of this beast.
I picked the most interesting sections of grain and lopped the boards into three properly sized planks on the miter saw. Any type of straight cutting saw can do this step, but I seriously love the speedy precision of a miter saw.
I cut them one at a time, but did a final precision shave to the end as a group, just to ensure the boards were perfectly the same length.
One of the reasons I chose the select pine is that it is pretty straight and smooth on all sides. I was able to lay the boards out as a tight-fitting panel, right from the store. I didn't have to run them through the table saw or jointer to square up the mating edges. Of course select grade costs more than rough lumber, but it's a real time saver.
I drilled a series of pocket holes along the length of the boards. They'd get screwed together and be workable sooner than glue-only assembly.
Even if I'm screwing a panel together, I like to use a good wood glue, to keep it super solid. It also fills any minor gaps that may appear between the boards.
TIP -
Flip the middle board over so the circular end grain curves in the opposite direction as the boards it will be mated to. Wood can cup slightly as it ages. If all three boards cup the same direction. In time, the piece could develop a significant curve, rendering it unusable.
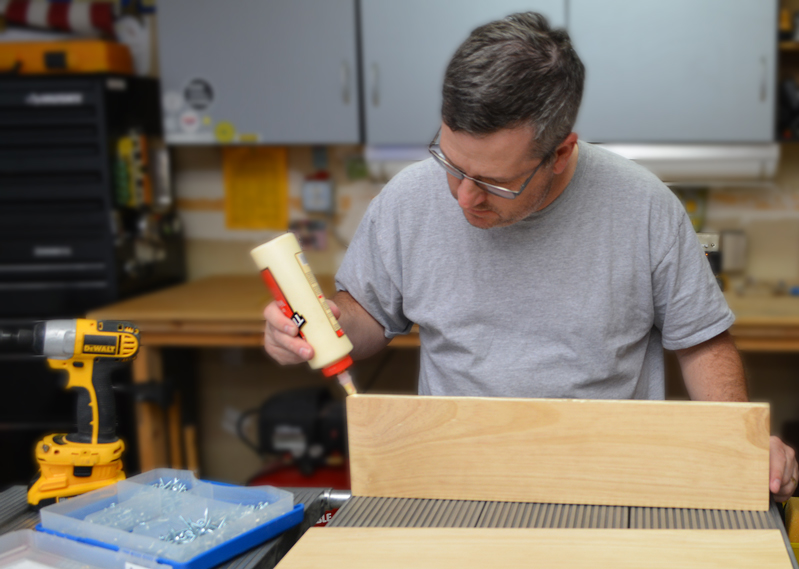
I clamped the panel together to avoid shifting and ran pocket hole screws in with an impact driver.
The select pine is pretty smooth stuff right from the store, but there are still little dings, dents and imperfections. I gave the whole piece a good, long sanding with 220 grit paper on the random orbital sander. It also cleaned up the slight differences in the mating plank edges as well as a little bit of dried glue.
I'm a smooth operator
I eased the edges with a piloted round-over bit in the router, flipped the panel over, and rounded the bottom side.
Shown with an optional arm-hair, sawdust-catching feature.
A quick hand sanding with 220 grit got the whole piece nice and smooth.
Finishing the Top - Flame On!!!
This is where it gets really fun. Fresh pine is pretty pale in color and doesn't show much character unless you stain it, OR use a cool wood-burning technique with a handheld torch to bring out some visual interest.
I chose the Bernzomatic TS-8000 with a propane cylinder to toast my brand-new panel. I practiced with a piece of scrap wood for a while to get my technique in line before going live.
I set my panel on the garage floor, pulled the trigger to spark the TS-8000 to life, and floated the torch across the entire width of the panel. I moved the flame along the grain at a steady pace, similar to using a can of spray-paint.
I found it was best to burn the wood very lightly as I went, using those broad strokes. With more time under the flame, the darker it got. Just like spray paint, it's easy to overdo it if its held too long in one place.
Of course, I know all about overdoing it whilst burning wood. Last time I went for a torched wood finish, I didn't stop until it was charred coal-black. This time, I just wanted to toast it enough to bring out the character in the wood, and give it some color. I'd skip the skull and crossbones on this project too.
I continued to ease the torch back and forth, slowing down where I found an interesting detail in the grain that I wanted to bring out. The further I went, the more it felt like spray painting; I could blend the burned, patina effect by alternating the distance and angle of the flame to the piece.
There were a couple little areas I overcooked, but it was easy enough to touch them up with a light hit of the 220 grit sandpaper and a revisiting of the TS-8000's blue flame to blend it in nicely.
When the top was done, I toasted the edges and the bottom. The cushion wouldn't cover the entire back, so I wanted the exposed areas to have the same look as the top.
Once the torched finish looked the way I liked it, I wiped the piece down with a soft, slightly damp cloth to remove any loose soot. I gave it a good protective finish. I like to use several coats of a good-quality, clear lacquer spray, with a very light hand sanding between coats.
I used semi-gloss for this project
Look how rich the color is with this burned finish method. It's unbelievable that this is fresh, new wood, with no colored stain added. This was just pale, clean pine, lightly toasted by the TS-8000, and covered with a clear lacquer.
Burnt Wood Finish with Clear Lacquer Finish
Adding the Cushion
I'd never been in a fabric store before. I now know how it feels when someone goes into a lumber yard or hardware store for the first time. Weird terms, an unfamiliar method of purchasing, and a huge variety of product types confused the heck out of me.
Eventually, I found the upholstery section and picked a heavy -oven, earth-tone cloth, with bits of black in the texture. It looked very similar to to our living room couch.
A diamond in the rough
My next stop was the local craft store where I picked up a perfect-size piece of foam.
I cut a piece of 1/8" plywood to match the foam. It would form the top of the cushion piece and provide a solid surface to staple the upholstery.
Stapling with heavy-duty T-50 staples.
I tucked and wrapped the fabric like a present, popping a staple in every two inches along the edge of the plywood. I pulled the fabric up tight on the corners to give the whole cushion a slightly rounded, pillowed effect.
The plywood got a good dose of a super-strong Liquid Nails adhesive. I ran a bead of adhesive atop the fabric too, just to get a little extra locking power, but I kept it away from the edge where it could glop out and be visible.
The final step was to center the cushion on the back of the roasted-toasted desktop and mush it down to goosh the adhesive into both pieces. About 20 lbs. of old floor tile stacked atop a scrap piece of the thin plywood did the trick.
That's it! The final step is to let the Liquid Nails dry.
I'm actually sitting on the couch right now, with my handy new burnt wood lap desk, writing this blog post.
I sized this pretty large because I like to use a mouse instead of the track pad when I work. I also like to support my wrists while typing. It's plenty big, but still small enough to tuck behind the couch, under the bed, or in a closet for storage.
This beautiful lap desk is perfect for the compact Surface Pro with a type cover and its kickstand style setup. I also used a standard size laptop (Toshiba) for a while, just to put the desk though its paces.
An old Macintosh wasn't comfortable at all for some reason,...
I...can't. ..feel... my... legs. I guess a twelve-ton, 27-year-old Macintosh "Portable" isn't really the target machine for this particular lap desk.
This was an inexpensive and fun afternoon project. It's very easy to build with a variety of tools, materials, and methods.
I'm sure yours will turn out great!
This is a sponsored post. I am a proud to be a Bernzomatic Torch Bearer, though all opinions expressed are 100% my own. I won't recommend products I don't believe in.

The Torch Bearers are a group of tradespeople, DIYers, culinarians, adventurers and artists brought together to create projects using Bernzomatic torches and share their knowledge and ideas with you. Check them out here and get inspired to create with fire.
Visit the other awesome Torchbearers and see what they are up to on the Bernzomatic Torch Bearer Site.
Garage, Workshop, or Dumping Ground?
We've lived in this house for 10 years. In all that time, we've never had our vehicles inside the garage, not once. The space has always been teetering between dumping-ground and workshop.
A dumpshop?
I've always envisioned it as my bad-ass workshop, but its certainly a multi-use room.
Bless my sweet wife, she's always happily allowed me my man-cave, without complaint.
Along with general family storage, I've slowly taken the place over with workshop stuff. My tool chest, workbench, the 5-in-one Shopsmith multi-tool, a thickness planer, and my beast-sized, custom-built miter saw bench dominate the garage workshop. I've got wood, hardware, and building material jammed in every nook and cranny. In true Arizona style, I also get to share the space with our laundry facilities.
Spring Cleaning
From a homeowner standpoint, we're at a cool spot in our parenting years. Finally, our youngest is starting to move away from massive kid toys. I started loading the truck with an outgrown bike, unused toy tool benches (2), a booster seat, and other stuff that has been cluttering the garage, unused for a couple years. I had boxes of books and clothing to get rid of as well. I'd making a quick Goodwill run.
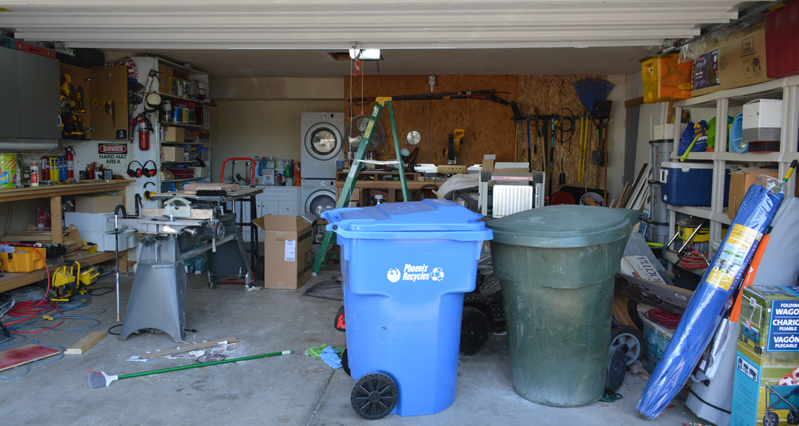
I started clearing out the big toys and piles of junk accumulated through the winter, making way for upcoming spring and summer projects. It's incredible just how much stuff gets shoved in there. The biggest task is breaking down cardboard boxes that inevitably get chucked in a corner, too big to fit in the recycling bin, but too unimportant to take a razor knife to right away.
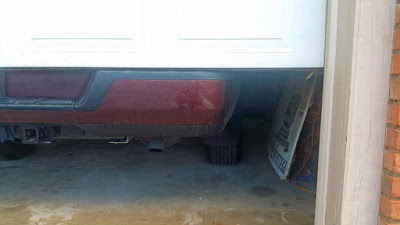
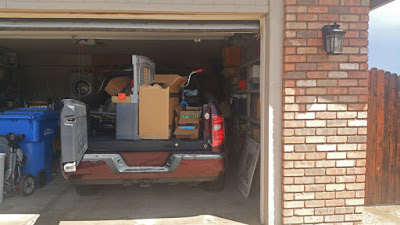
As I got loaded for the Goodwill delivery, a sneaky bastard of a rainstorm tore into the neighborhood. After quickly jamming everything left on the right side of the garage, it was a short sprint through the rain for the cab of the the truck. Better to get the truck under cover than than unload it in the rain.
For the first time ever, I eased the Ridgeline into the garage. I nuzzled the nose right up against the miter saw bench, ever so slightly bumping into the 2x4's.

Now it is a garage, no doubt . Solid proof in the fact that, there was a mid-size, 4x4 pickup parked in it with the big rolling door...
...ahhh crap!
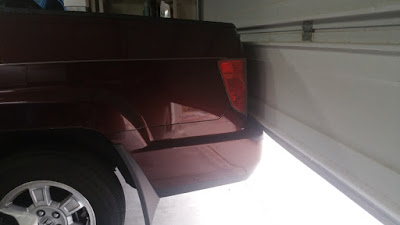
When one builds a monstrous " Economical but Beefy Miter Saw Bench", one needs to consider that a mere 2 inches less depth may be enough to allow for a garage / workshop hybrid. In my case,... the cargo was dry, but water was blowing in through a two foot tall shortcoming in my garage door closing ability.
The rain passed quickly, the front edge of the garage started to dry out, and the truck got loaded.
Pretty soon, I'm going to have to solve this Garage vs. workshop vs. dumping ground quandary. We've got a 16 year old now and only room enough in the driveway for two vehicles. My workshop is going to have to be much more flexible. Unless I figure out where to put another vehicle that will satisfy HOA rules, there's going to be a car in there, probably perpetually coated with a healthy layer of sawdust.
Life and Loss
I lost my dad on Good Friday. Cancer is a heartless bastard.
Read More
DIY Metal Bookends - A First Brazing Project
I'm trying out brazing steel with the Bernzomatic Oxygen Torch for the first time. Check out how to build these these cool hand-tool bookends!
Read MoreReview: DeWalt Battery Adapter for 18 Volt tools to 20V MAX Batteries

Regular readers of this blog know that I've been personally wielding DeWalt 18 volt cordless tools on my projects for years. I love 'em; absolutely no complaints.
When DeWalt gave me an early-bird chance to try out their new battery adapter and bring modern battery technology to my older tools, I couldn't wait to put it in action. I've run it through its paces for a month on a variety of my tools.
I believe DeWalt's 18 volt line of cordless tools has been in the market for about 20 years. It's been one of the most popular lines of professional-quality cordless tools, for a very long time. They're certainly the most common brand on the construction sites I've visited.
I've had my own set for about 8 years, and all the tools are still going strong. They've outlasted and out performed any other brand of cordless tools I've owned by several years, leaving me a bit of a fan-boy.
This battery adapter is a huge deal. Years ago, I worked a second job, at a department store selling their popular exclusive brand of tools. It was common that I'd bear the brunt of a shopper's frustration when they learned that each year's version of the store-brand tools had an battery configuration incompatible with the prior model. It was odd, even though each generation was a same voltage, NiCd battery, there would be a slight change to a a bump or ridge on its case, preventing interchange between versions. People would end up purchasing new tools, rather than ordering older batteries from the factory. Was it an "engineered obsolescence" sales scheme? Although many people bought new cordless tool sets, lots left to shop elsewhere, swearing off the brand as they went out the door.
DeWalt on the other hand, has supported tools that last for a seriously long time. You can go to hardware store, home center, or Amazon.com today and get an 18 volt NiCd battery, or even a brand-new 18 volt tool. That's simply incredible, considering the modern system of 20V MAX tools has been out for 4-5 years. The introduction of this battery adapter is awesome; now we can start transitioning towards newer technology, bit by bit, piece by piece.
I own three 18 volt XRP batteries. I've worked them hard over the years. One recently decided it was time to retire and refused to take another charge. The other two are showing signs of age with their full-charge run time declining slightly. I'm still running them hard.
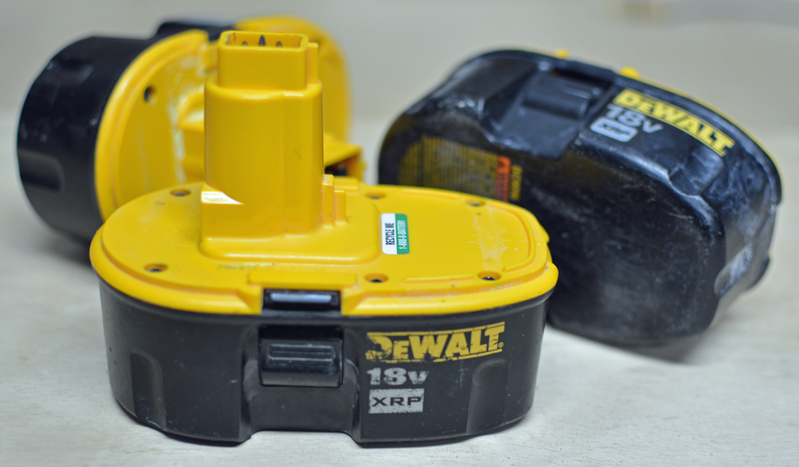
The grizzled veterans
These 18v batteries are beasts. They pack a lot of punch and run for a long time, even at their advanced age. I've never have trouble working two to three tools on a project, cycling between my three batteries. Now with one retired, I don't want to spend the dollars on replacements, when the modern stuff is so much better. The new Lithium Ion batteries pack much stronger punch with a better power to weight ratio, almost no self-discharge, and a cool led "fuel gauge".
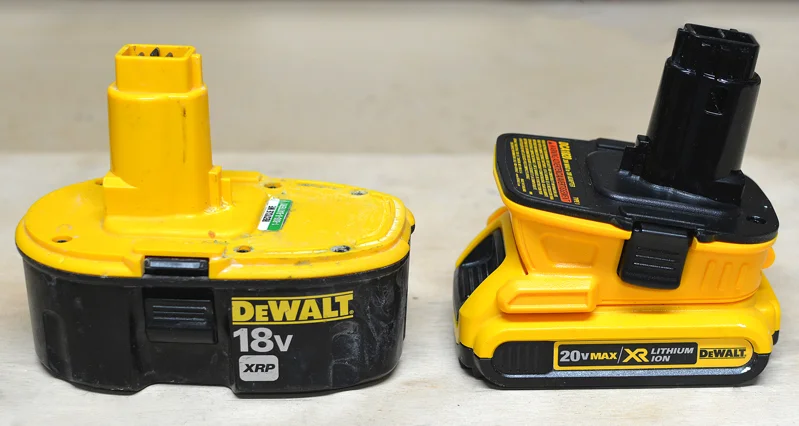
Check out the size difference between the 2 amp hour Lithium Ion 20V MAX battery pack that came with my DeWalt Cordless Oscillating Multi Tool and one of my my beefy 18v XRP nickle-cadmium packs. There's a significant weight difference too.

NiCad vs, Lithium Ion
Obviously, there's more than a little physical difference between the old plunge-in style NiCd and the slide-on Lithium Ion. That difference is what the Dewalt Battery Adapter overcomes. It also holds the pack at a slight angle, presumably to mimic the tool balance we are accustom to with the old packs.
I slipped the adapter into my 18 volt Reciprocating Saw, just as I would the standard battery pack. It felt like it was of the same beefy plastic the tools are constructed from. There was a slight color variance, but I'm fairly sure that's due to 8 years of Arizona sun beating down on my tools as I work. Of course, I'm not going to complain about color variation, these are workin' tools after all.

The base of the adapter has the same electrical connections as the modern DeWalt MAX tools. The battery pack slides on from the front and locks onto the adapter.

Since February in Arizona isn't about shoveling snow, I let the DeWalt 18v Cordless Reciprocating Saw chew on some yard work for a bit. I cut palm tree fronds, trimmed the mesquite, and chopped up a dead cactus. I wasn't sad to see that stinker go either. It was the son-of-a-gun that seemed to shoot spines at me whenever I was in its vicinity. It still managed to get one last parting shot when I accidentally flipped a chunk up into the front of my shirt, leaving some painful little holes in my chest.
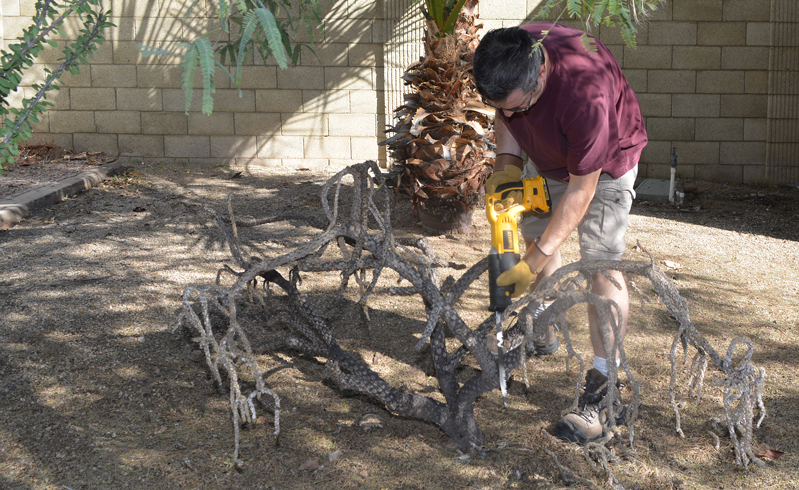
The saw ripped along, fast and powerful. It balanced good in the hand with the new batter set-up. I finished with plenty of juice in the battery.

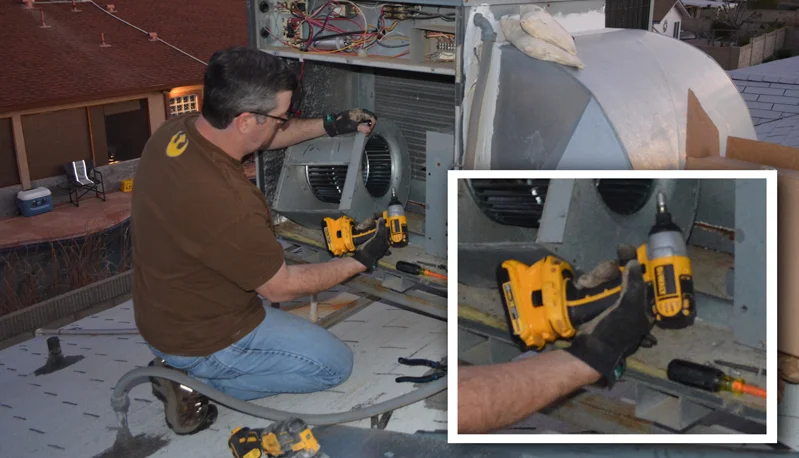
Another adventure where I brought the battery adapter into play was the repair of our rooftop heat pump (Post: Cold at Night! A DIY Heating Repair Adventure ). I removed and replaced a bazillion screws with my DeWalt 18v 1/4" Impact Driver fueled by the 20V MAX Lithium Ion battery through the adapter. I ran the impact driver until the sun went down,...literally.
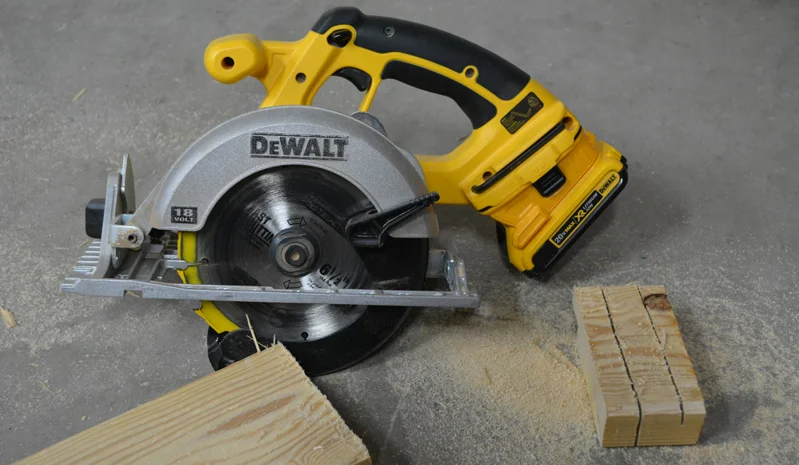
The battery adapter with the 20V MAX battery pack with worked just fine in my circular saw as well. Power and speed, making sawdust in the garage.
I understand the adapter works with most, but not all of the legacy DeWalt 18 volt tools loose in the wild, but it worked with my whole arsenal. I tested the rest of my collection with success. The adapter worked well with my cordless cut-off tool , my XRP Hammerdrill / drill / driver , and my flexible floodlight. The only complaint I have is that it takes a bit of extra muscle to remove the adapter; it seems to latch in tighter than the 18v battery packs themselves. Not a problem if you are just changing the batteries, but if you want to slip the whole deal on another tool, it takes just a little extra grunt.

I'm really happy with this cool widget. Frankly, I'm surprised DeWalt even produced it. Who could complain if they slowly phased out the 18 Volt line after such a long operational lifespan? Not only do they continue to support the older line, they chose to offer this adapter as a bridge to their current line. That's loyalty to your customers my friends.
I used a single 2 amp hour 20V MAX battery on my tools. I believe it outperformed the 18v XRP packs on their best day. DeWalt also makes larger-capacity 20V MAX packs, ranging up to a 5 amp hour beast.
The DeWalt Battery Adapter for 18V Tools is available now, in two configurations:
DCA1820 - DeWalt Battery Adapter for 18V Tools (inc. adapter)
DCA2203C - DeWalt Battery Adapter Kit for 18V Tools (inc. adapter, (2) 2 amp hour 20V MAX batteries, and a charger)
Keep an eye out, I'm going to be running this little champ on some upcoming projects.

This is not a sponsored post, but my friends at DeWalt did send me
a demo unit to try. All opinions and experiences are 100% my own.


Remove Paint from Metal Hardware - 3 Quick and Easy Steps
Here's how I stripped the paint off these hideous, painted-over hinges with some Bernzomatic firepower.
Read MoreInstalling a Closet Organizer - Easy DIY Project
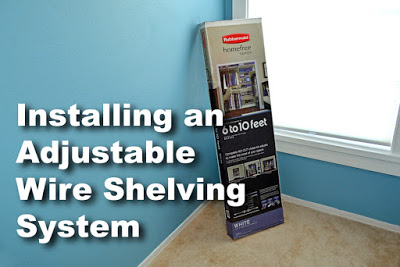
I recently wrapped up the remodel of our daughter's closet, with the finishing touch of an adjustable organizing system. Because sometimes I'm a bit of a pea-wit, I posted the final reveal without showing the install of his final, key component. We'd picked out a wire rack style system for speed, affordability, and the ability to adjust it our kid's needs as she grows from her elementary school years.
I bought a starter kit boxed system, the Rubbermaid HomeFree 6 to 10 foot No Cut Closet Kit
from Lowes. There was a display at the store along with a good stock of add-on options. I'd be able to customize the system to fit our needs.
I started the install with a blank wall, freshly painted and ready to go. Of course, if you are not a regular reader, I actually started with a single shelf, cave of doom, closet of horror, many months ago. There was sooo much work in getting the wall to its current blank condition.

The cave of Doom
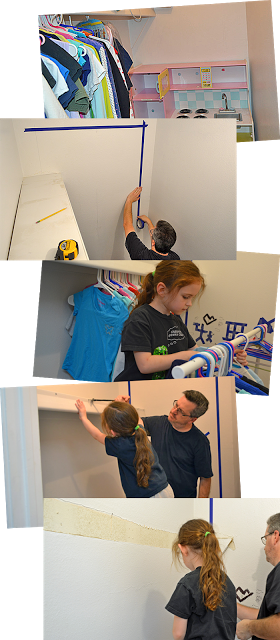
The install process started with locating the studs behind the drywall. Most of the weight needed to be held from solid framing, not the painted, paper-backed plaster of drywall.
It was a good thing too, I desperately needed an excuse to pick up a new toy, since my old stud sensor was toast. This cool little Zircon Studsensor e50 Electronic Stud Finder
did the trick nicely. It found both edges and projected an arrow for me to mark the target.

stay on target...
Since the far left edge didn't have a stud, I used one of the included plastic anchors. It had wings that folded inward to slip into a freshly drilled hole.

It got a quick tap tap from Sweetness to set it flush with the wall.

Sweetness!
Finally, there's a included little set-tool widget that comes with the kit. You push it into the drywall anchor, forcing the wings to splay out behind the drywall.

With the top rail screwed into that end anchor, I could pivot it until it was perfectly level. I pre-drilled through the drywall, into the studs and drove heavy screws with an impact driver.
.

This particular kit is expandable from 6 feet to 10 feet. The adjustability is accomplished by overlapping the top rail pieces, and telescoping outward until the space is filled. I drove the heavy screws into each stud, including the overlapped area.

There's a snap-on cover that helps space the verticals. I added a small one to space the first hanger a couple inches away from the wall.

The verticals simply hang on the horizontal bar.

A full-size spacer snaps into place, marking the location for the next vertical.

Each of the verticals got anchored to the wall with those same plastic anchors, just to hold them steady. The load bearing would be done from the horizontal rail, mounted securely to the wall studs.

The kit included extensions that hung from the verticals using a metal clip. They too got anchored in place.

The shelf hangers snapped securely in.

The wire shelves popped onto the hangers. At the rear of each hanger, was a sliding clip lever that locked it into place. Like the back rail, the shelves overlap and telescope to whatever custom length is required.

The shelf hangers do double duty by supporting clothes rod hangers as well.

I played around with several configurations, until I found one that I liked. I went with vertically stacked, double hangers, for the hanging clothes and a variety of shelves to hold her stuff.

I figure I at least quadrupled the horizontal storage on that wall by tearing out the single shelf and replacing it with this multi-level system.
A top shelf, high overhead would keep seldom used items for long term storage (or stuff that I want to get rid of, but our pint-sized pack-rat wants to hang onto forever).

No more wasted space, the entire wall is put to good use. I'm really happy with this Rubbermaid system. Although I was a first time user, I installed the whole thing in about an hour. It was incredibly easy to and looks pretty good for a kid's closet. The only negative I see is that we have to store her books horizontally or they will slip through the shelves. No biggie, I could lay a thin sheet of hardboard across those sections, if necessary.

There is even a shoe slipper (?) rack. Apparently it's so cool that our little lady actually puts her shoes away on her own, without being asked. Magic!

It holds Rudolph, rainbow star-spangled, AND panda slippers!
I had enough pieces and parts left over to customize a little section above the closet entry door, for more of that seldom used stuff. I had to take a hacksaw to the vertical pieces to fit, but it still worked out great.

I hope she doesn't spot that pain in-the-butt EasyBake Oven soon
Overall, it was a fun way to finish up the closet remodel. It was the step that made the little room functional, once again.
I may install the same system in our teenage son's closet too. It's a standard, front-facing closet layout, but it still uses that same single shelf with hanger setup that this walk-in originally featured.
The Rubbermaid system we picked up had plenty of expansion options on display, like drawers, baskets, and extra, original kit parts. I was able to build the configuration I wanted with the basic kit, right out of the box. I even have a few parts left over. I grabbed this particular kit for $178.00.
What do you think of wire shelving? I probably wouldn't use it in a master bedroom closet, but for kids, a pantry or a laundry room, I think it's perfect.

Non-Sponsored post.

Cold at night! A DIY Heating Repair Aventure
Ahhh, wintertime in Phoenix. Although it's considered a paradise this time of year, the nights do get a bit chilly in the desert.
At some point during the winter, we finally give up and turn on the heat. When it dips down in the 30's at night for a few hours, our tender carcasses simply can't handle the frigid, Arctic rush of cold. Live here and you basically become a cold-blooded reptile. My 28 years of Michigan-tempered, icy-veined fortitude are long gone. Nowadays, we're bone-chilled cold at temperatures where mid-westerners would be happy swimming in a lake.
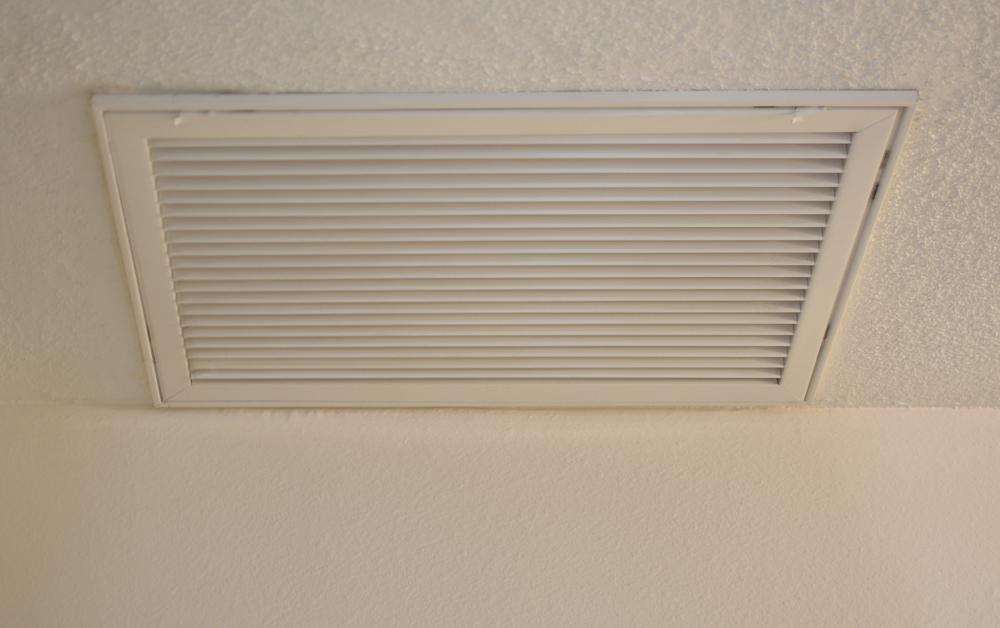
During these recent chilly nights, it started getting getting colder and colder, inside the house. Coincidentally, throughout the week, we noticed the sound coming through the vents from the attic was getting steadily louder. Louder airflow-ish sounds, nothing alarming, yet.
During an extra cold night, the noise got downright ridiculous when the heat kicked on, like the sound of a box of silverware tumbling in a clothes dryer full of rusty nails.
That sound was alarming. Nothing could be done at 2:00 am on a work night, so I turned off the heat, pulled up the blankets, and dozed back off to sleep.
HVAC = Heating, Ventilation, and Air Conditioning
Our heat comes from a heat pump rather than a classic gas or electric furnace. As I understand it, in simple terms, it's our air conditioner running in reverse. Heat and cold come from the same unit, up on the roof of the house. I guess it's more efficient in our weather environment. (Here's the scientific mumbo-jumbo , if you care.)
Give me the choice between attic work and working on the roof and I'll choose fresh air and open spaces, free of crawling in the dust and scratchy insulation, every time. I'd be checking this problem out, up top.
You too, eh?
In an incredible coincidence of crazy timing, I had just read a blog post by Sarah at The Ugly Duckling House where she had successfully fought back a furnace failure with the help and advice of an HVAC knowledgeable friend. I won't spoil her story, but she got through the ordeal relatively unscathed. Go ahead and pop over there to read her post . I'll wait.

Back already? She got lucky, right? I was hoping that I was facing some sort of pulley, wheel, or bearing that needed some quick lubrication, 'cause I really don't have an HVAC friend.
A quick fix (?)
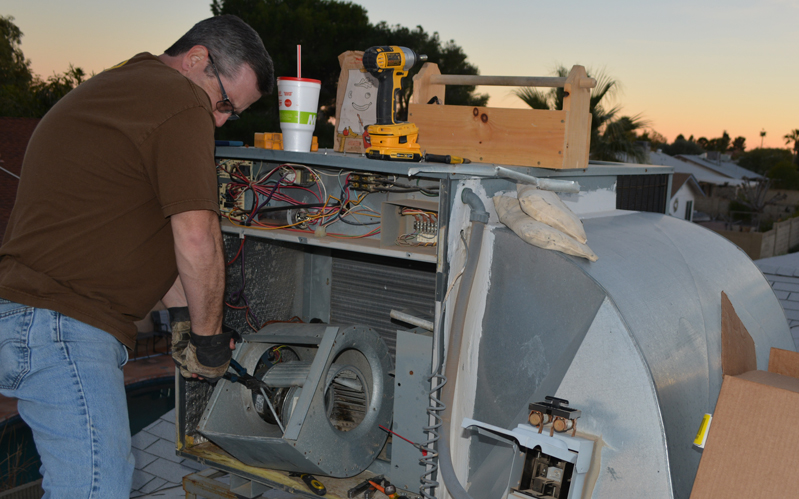
When I got home from work the next day, I turned on the heat, grabbed some penetrating oil and a can of WD-40, and tugged a ladder to the front of the house.
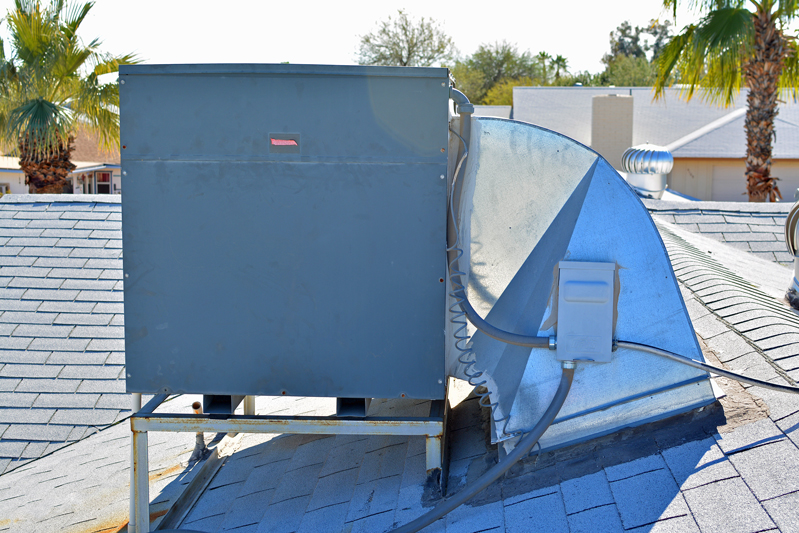
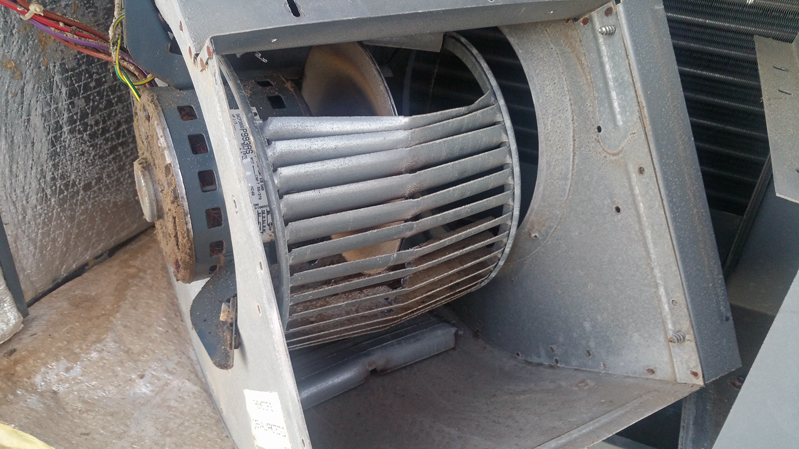
I scuttled up on the roof and opened up the side of the big metal box the noise was coming from, our AC unit. Inside was a blowing unit that looked a lot like the squirrel-cage floor fans that had filled our house after a big water leak a few years ago. I didn't need any expertise to tell that my pitiful, little can of WD-40 was not going to be the rescue hero I'd hoped it would be. The fan wasn't moving at all, but its central mounting hub(?) was completely detached and howling in fury. It was hard-core, metal-on-metal action, the hub was cutting into the inner edges of the fan vanes like a circular saw. Crap.
I pulled the fuse block, killing the power, removed the screws holding the fan unit to the duct-work, and pulled it back for examination. The fan was clearly destroyed, no fixing it. Some of the vanes were completely ripped off, others were bent, and then there was that whole thing about the central mounting hub being detached.
I buttoned the unit back up, climbed down, and started online research. Some sources recommended the complete replacement of the entire blower unit, motor and all. Best guess prices ranged from $400 - $1,000 to have a contractor do the work. Nope. Surely I could do it, right? Maybe I could even find the squirrel cage fan locally and perform the surgery myself.
Your Money is No Good Here
The next day, I spent my lunch hour driving around Phoenix to HVAC supply stores. What a freaking racket. While initially helpful, it was made clear that I couldn't get what I wanted because the supply stores wouldn't sell to the public. Apparently, I had to be a licensed HVAC contractor to buy parts; my money wouldn't be good in their fine establishments. One of my inquires was overheard by a grizzled HVAC tech slumped on a stool at the parts counter. This delightful gentleman treated me to a loud diatribe about how selling direct to "goddamn homeowners" took money out of his pocket!
I guess HVAC parts are distributed through a cartel or secret society that us bumpkin homeowners dare not be allowed to access.
Why is it you can buy electrical or plumbing parts at hardware stores, home-centers, and even grocery super-stores, but trying to buy parts for an HVAC system that you own, is somehow robbery? Heck, you can even buy automotive parts direct. I don't have a license to prepare and sell food, but I can sure go to any grocery and buy it to prepare in my own house. Old school, good old boy, supply-chain horse-crap, outdated in today's world, in my opinion.
Sorry dude. My house. My risk. My money.
If I hire you to do something and you bring your expertise, sweat, and disdain for handy homeowners, you can buy the parts. Otherwise let me fix my stuff. PS - I'm not calling your company anyway, Prince Charming.
Finally, I found a place that would sell me the fan. They still gave me a little trouble about the direct sale, but I talked them into it. It was just a fan, for God's sake, a few pieces of stamped metal. Forty bucks and I was out the door, in proud possession of my brand-new "blower wheel." If I could pull this repair off successfully, I'd save a bundle, as well as the time off work, waiting to meet a contractor.
Racing the Sunset
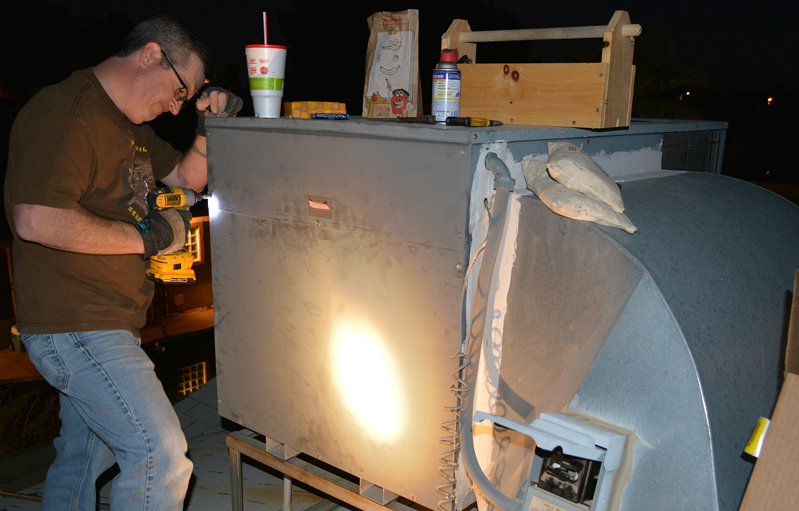
After work, I ascended the ladder again. This time I was loaded with the new fan, as many tools as I thought I might need, and a sack of the finest rooftop dining cuisine I could purchase through the closest drive through window. The sun was going down; I didn't have time to waste.
Rather than climbing up and down to flip breakers to disconnect power, I pulled the fuse block, right next to me.

AZ DIY Guy Scary Electrical Warning time

I buzzed the screws out of the side panel with the quick rat-tat-tat of my impact driver for the second night in a row. This time, however, there were cheap cheeseburgers and a big iced tea... so it was better.
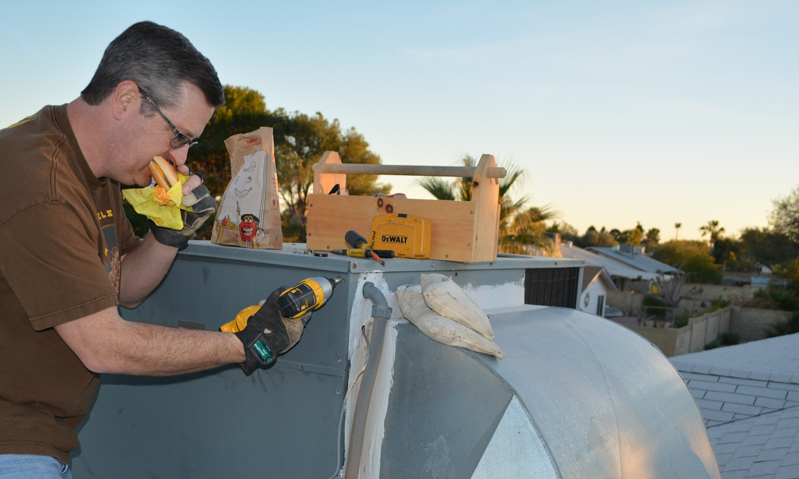
McLovin' it
The mountains to the west, were looking hungrily at the sun, already starting to swallow it. Time was not on my side.

With the bent-up fan flopping around inside the housing, I had trouble getting the hub off the motor shaft. I put some muscle into my heavy linesman pliers and cut through the edges of the fan and pulled the beat-up thing out of my way.
Pro Tip:
The precise condition of our original fan is what a true professional may refer to as "toast."
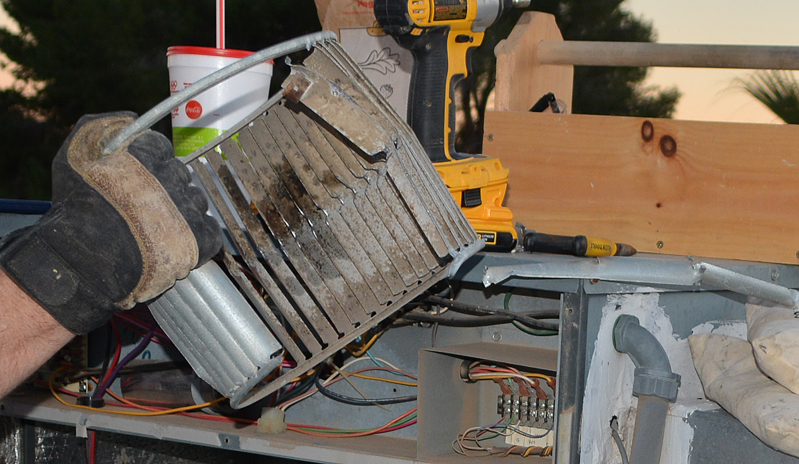
"This damn thing is toast!"
- AZ DIY Guy
I still had a heck of a time getting that hub off the motor shaft, even with the set screw completely removed. Somehow, inexplicably, beating on it with the linesman pliers didn't do the trick. I finally doused the shaft with the magical elixir, and member of the holy trinity of DIY , WD-40. After a brief hit with 220 grit, fine sandpaper I slid the thing off the shaft.

Beating, pulling, prying, bending,...
At this point, I'll take a moment and share a couple of AZ DIY Guy's fans, young and old:
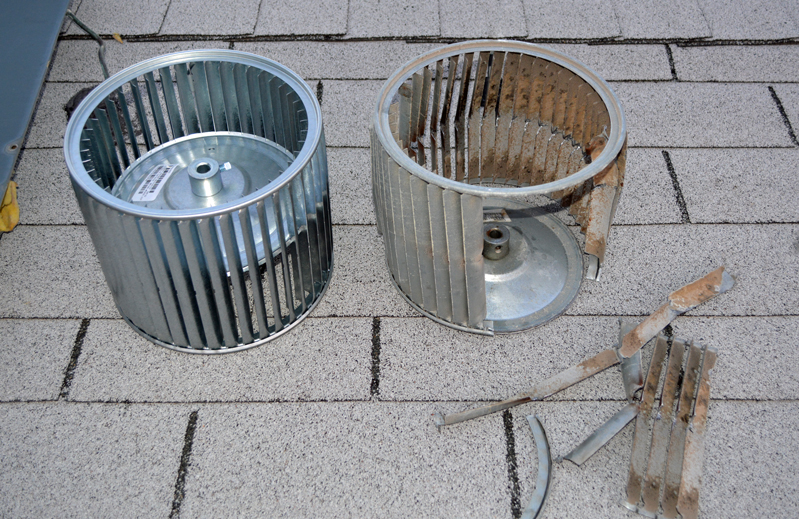
OK, technically, it's a couple "blower wheels", not fans.
I had to completely remove the motor from the housing to install the new fan. It's incredible that I can hold a motor in one hand that's powerful enough to blast air throughout the entire house.
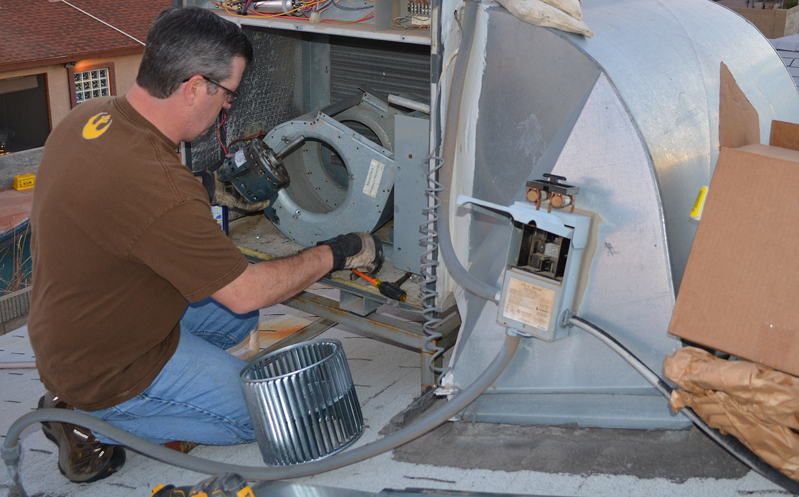
With the new fan slipped on the motor shaft, the motor got reattached. The fan hub's set screw tightened to a flat edge on the motor shaft. I snugged it up tight.

There were sheet metal baffles and brackets to reattach before I screwed the unit back on the duct work. This was one of those tasks where an impact driver simply shines. The time saved by using one with a magnetic driver tip, versus a screwdriver is incalculable. It gets the job done quick, nice and tight, without stripping any screw heads.
Wait, what the heck is that?
I'm not going to insult my eagle-eyed readers and assume my fellow tool-drooling, DIY lovers didn't notice the odd, bulbous protuberance on the hilt of my beloved impact driver. My nine-year-old, Dewalt Impact Driver has run on beefy, 18 volt, NiCad batteries since the day I took it out of the box. Now, DeWalt sent me a 20V MAX* Battery Adapter to try out. It allows me to run the compact, powerful Lithium Ion 20V MAX batteries that powers DeWalt's current line of high-end tools. I'll have a review up soon, but so far, it's awesome. The adapter should be available through retail very soon.

UPDATE: You can buy the 20V MAX* Battery Adapter now, an Amazon best seller. Here's my review!
I was still worried. Was the shaft bent, the motor damaged, unbalanced, whatever? Luckily, after a quick hand spin, the fan spun smoothly. I could feel a good push of air. So far, so good.
I pushed the fuse block back into the disconnect and fired the unit up. It worked. Smooth as silk. Air blasted.

By that point, my reality, not illuminated by camera flash , was pretty dark. I fumbled the screws I could find into place with the LED on the impact driver for a while.

Finally, I couldn't see enough to finish. Stupid in the dark. I gave up and climbed down to fetch a flashlight. Illuminated, I buttoned up the side panels, gathered my tools, parts, and fast food debris, and made several trips across the roof to the top of the ladder.
As the last, feeble glow of the setting sun slipped softly behind the mountains, I managed to avoid falling off the edge in the dark to spend the night in a broken heap in the flowerbed. I didn't trip over any vent stacks or fall through the skylight as I cleaned up. Nighttime on rooftops should be reserved for Peter Pan and fairy-dusted children, not middle-aged DIY guys.
By the time I was done, the air was already chilly; I was more than ready to enter the freshly warming house.

The silly thing is, I had rushed to complete the repair after work, risking rooftop darkness, to avoid any more cold nights for the family. It turned out to be the last cold night anyway. As of this posting, we've had record breaking, warm temperatures for mid February. Today should hit 87 degrees with night in the mid 50's. Paradise. I could have waited for the weekend.
How about it? Would you tackle something like this, or fork over possibly hundreds of dollars?
Steampunk Table Lamp
I love the techno-industrial, sci-fi look of Steampunk design. Check out this DIY construction I created with copper tubing and a Bernzomatic TS-4000 trigger start torch.
Read MoreRemodeling a Kid's Closet - Final Reveal
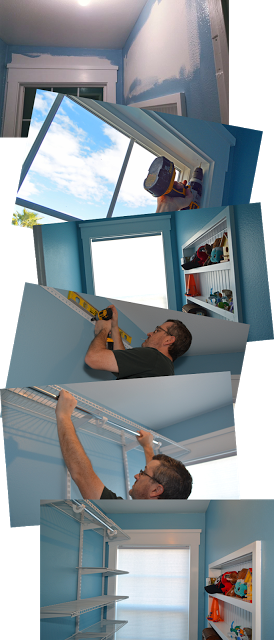
Our daughter's closet remodel is finally, finally done. It took way longer than it should have, but eh,..life, right? Plus, this wasn't just a dab-of-paint type project; I ripped into and through walls. Sawdust flew, drywall crumbled, and the light of day burst into this little room.
Before - Wasted Space
The closet was a huge mess. Although, it was a walk-in, it was small, and simply didn't offer a good use of of space. The doorway is offset, preventing storage on both walls.
There was just one shelf on the left, with a clothes-hanger lip, essentially a six-foot closet rod with heaps of kid junk piled on top. A battered play kitchen sat against the back wall, too heaped with books and toys to offer a play space, much less decent storage of any kind.
To cap off the challenge, her room was technically not a legal bedroom. Our DIY Predecessors had put an addition on the house, essentially burying the bedroom in the interior of the house, without an egress window, or second means of escape, in the event of a fire.
The Battle Plan
I boiled the project down into a three point scope:
- Add a window to the exterior wall, for natural light and an emergency exit
- Trim the window, remove the shelf, repair and repaint the walls
- Create and expand storage to make it usable beyond the elementary school years
Following is a quick chronological tour of the action as it went down. I'll share links to the original posts, in all their detailed glory, at the end of this post.
Please forgive the odd-angled photography; it's damn near impossible to frame good shots inside a 4x6 closet.
Demolition Party
We emptied the closet of Legos, army men, fast food happy meal toys, books, stuffed animals, loose change, and even a secret stash of fruit roll ups. There were some happy discoveries along the way, long lost toys and treasures.
I ordered the minimum size window to meet the egress requirements and laid out a rough opening with painter's tape. It was going to be a real trick to install shelving and a closet rod with the window effectively taking up the entire back wall. Eh,.. I'd figure that out later.
Gracie decorated what would be the opening with sharpies and more tape.
She was going to be a part of this project as much as possible. She was on hand to build a temporary clothing rack and load all her clothes so they could hang out in the dining room for a couple weeks several months.
We tore the self / hanger combo out together. The wall was pretty torn up, with nearly 40 years of paint and caulk build up and damage from who knows how many families moving in and out.

Luckily, for this project, we have a wood sided home. I hope to stucco it at some point, but for now, it just took a bit of saw-work to slice the exterior siding open. I later took a whole sheet off, in order to get at the framing from the outside.
Studs had to be cut out and reinforcing framing had to be put into place to form the rough opening. Man, I just
love using a framing nailer. There was even a little plumbing that had to be redone for the exterior spigot and the swimming pool's auto-fill device.
The wall cavity got fresh insulation before being sealed up again behind a new sheet of siding.
I punched through the drywall, trimming it flush with the new, rough opening.
I waterproofed the opening and slipped the brand new window into place. Exterior trim would come later.
Interior Trim and Walls
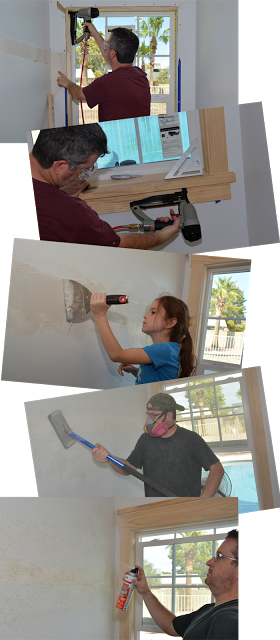
Back indoors, I wrapped the interior of the window opening with select pine, to hide the framing, insulating foam, and waterproofing membrane.
I trimmed the window with various sizes of select pine, creating an easy, nice-looking Craftsman style look. There were no miter cuts, just 90 degree butt joints. It's an experiment to see if we like it, before we replicate it elsewhere in the house.
My helper returned to repair the walls. She absolutely loved it; she absolutely made a mess. It was great.
I deployed my high tech, dust-extraction system in an attempt to keep drywall dust from getting everywhere in the house during sanding.
(Note: High-tech, dust-extraction = blowing a cheap fan out an open window)
Since this was a small wall area, I didn't deploy the big texture blaster I'd used on the family room remodel . I just used the canned stuff and sprayed the wall.
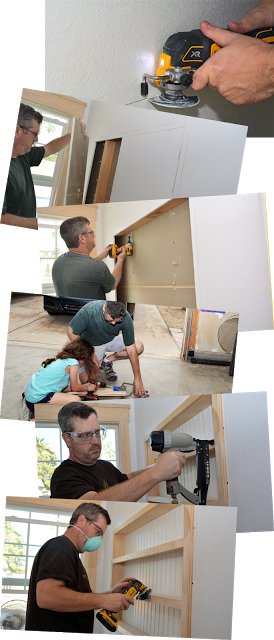
As sort of a project within a project, I decided to slice into the large, blank wall and create a recessed shelving unit. Why cover the wall with posters when some extra storage space could be stolen from the inner recesses of an interior partition wall?
I peeled a large section of drywall off, revealing the sweet, secret space hidden within.
It was not load bearing, but it was a big cavity. After I removed a couple studs, the opening got re-framed with 2x4's to keep the wall nice and stable.
Gracie and I built the shelf carcass in the garage with 1x4's pocket holes and bead board.
I pocket screwed a couple horizontal shelves in place and attached a face frame to give the piece a built-in look and give it just a little more depth.
This was a fun, little bonus addition to the closet that will grow over time, starting with Minecraft, Pokemon, and Shopkins toys. In the future, she will likely end up filling it with nail polish, perfume, or whatever our future teenage Gracie wants to load them up them with.
The finishing touches
Gracie chose blue walls. Don't even try to tell her blue is not a girl color. She'll probably bounce you off the sidewalk and tell you that, "YOU are a girl's color." Blue it would be then, with crisp, white trim.
Years ago, we had to have someone come to the house to measure and custom order cellular window shades. Now, thanks to the miracles of modern science and engineering, an average Joe can simply walk in from the street and snag them off the shelf at their local home center. No more Winnie the Pooh bed sheet for a window shade.
With the new window, slightly in the way, I couldn't use any form of end-to-end shelving. I went with a clean, white, wire shelving / organizing system, suspended from a horizontal support, screwed into the wall framing.
The system is adjustable, able to resize and adapt, with Gracie's growing need. We loaded it with plenty of shelves to hold her stuff. Some are far above her reach, for seldom used items.
Clothing hanger rods, were also included, with clips to hold them beneath a shelf.
The Final Reveal
The finished closet is chock-full of grade-school age, mighty, girl-of-action stuff. It's got natural light, with an egress window for safety, and a bit of fun style.
It's gone from from a boring, faded cave, heaped with debris dating back to toddlerhood to a colorful space with contrasting trim and shelving. The room looks and acts completely different.

Books don't do well vertically on wire shelving.
It's got plenty of storage and organization room now. We've pulled items into the closet, like the dirty clothes hamper, freeing up even more play space in her room.

Is it still technically a "shoe rack" with 75% slippers?
I even had enough leftover shelving pieces to build this little rack over the doorway, for stuff we rarely use.
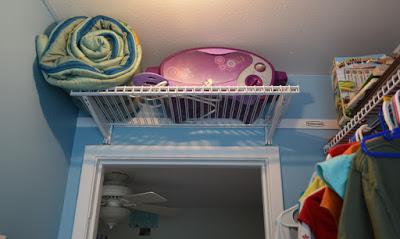
Honestly, I hope she forgets about that God-awful "Easy bake" oven.
With free space opened up in her bedroom, naturally we find Gracie spending more time playing and reading in her closet.

The curator in her element.
A glutton for punishment?
If you want to read the how I did it detail, step-by-step, as well as some of the decision making points in this project, check out the sub posts that tell the entire tale. Pour yourself a beverage, sit back with some munchies, and treat yourself to the whole story:
- Closet Remodel and Emergency Escape
- Adding a Window: Framing Fun and Foolishness
- Adding a Window: Sliding on Some Siding
- Adding a Window: The Install
- Super Easy DIY Craftsman Style Window Trim
- DIY Built-in-the-Wall Shelving - Reclaim hidden storage space in your home
- Installing a Closet Organizer - Easy DIY Project
I'd love to hear what you think of this one in the comments below. Thanks for reading!
Review: DeWalt 20V XR Lithium-Ion Oscillating Multi-Tool

I picked up a DeWalt 20V XR Lithium-Ion Oscillating Multi-Tool recently and ran it through its paces on a recent, closet remodel project. Spoiler: I'm really pleased with it.
An oscillating multi-tool is a handy class of tool that features an interchangeable blade or attachment that rapidly rotates back and forth, on the horizontal axis. The blade travel is slight, nothing like the inch or so of travel of a big, bad reciprocating saw. These tools can make fine cuts in difficult to reach areas, even straight, plunging cuts. Many brands of Oscillating Multi Tools have appeared over the last several years, along with accessories beyond cutting blades.
My first OMT experience
I became more familiar with the somewhat new class of Oscillating Multi-Tools, having started with a cheapo import model that sold me on the concept. I bought the thing on a whim, on a weekend coupon sale. I found loved the things a multi-tool could do. I've used it to slice door molding, cut drywall and siding, trim bamboo flooring, and even hack shingles.

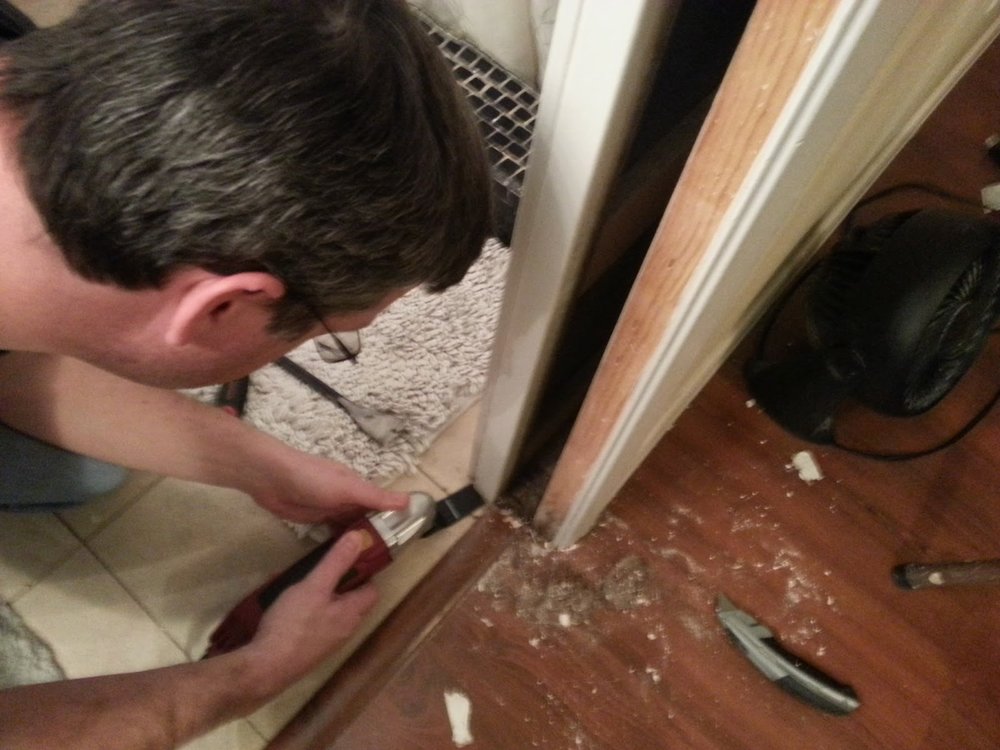
It was a perfect type of tool to have in the cabinet, and got more use than I thought it would. I loved the concept, but I did have issues with the tool itself. I tore up the cheap wood cutting blades like crazy. Blade changes were a pain and I had to periodically re-tighten them the with an allen wrench. The tool was loud and sent a lot of vibration up my arm. I decided to replace it because it got really hot under extended use, feel the heat through work gloves hot. Still, I got a decent life span from the tool, considering the price.
The Upgraded Experience
I wanted to a cordless model, so I decided to buy the DeWalt, the #1 Best Seller seller on Amazon.com, with a 90% five-star rating. The version I bought is the DEWALT DCS355D1 20V XR Lithium-Ion Oscillating Multi-Tool Kit which came with a bag and a bunch of accessories. This kit costs a little under $200, less for the bare, cordless tool less if you already have enough 20V MAX batteries and prefer to buy the attachments a la carte. A similarly outfitted kit can be picked up for about $50 less for the corded model. I've also seen it included with some of the larger, cordless combo kits, if you are financially blessed enough to bag a sweet pile of new lithium-ion power tools in one swoop, and make me horribly jealous.
blade mounted 90 degrees to the tool
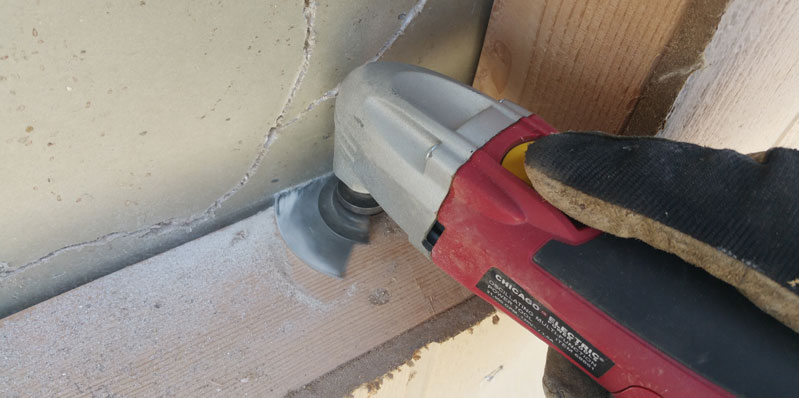
I figured these things were suited for nail encrusted wood, so they'd be good for cutting bare framing nails. I think there was too much wobble in the way I was holding the tool. I managed to dull the blade up more than I'd hoped, but it worked.
Using Off Brand Blades
The next task I tried was to cut a large drywall opening for my in wall closet shelving project. For this cut, I used a blade I already had in inventory. It was a Harbor Freight, 4" crescent shaped, steel blade. with the wide, curved tooth edge, I could cut a long line, changing the angle of the tool, so my grip and arm position could be adjusted for comfort. DeWalt makes higher-quality, similarly-shaped blade, but I wanted to test the included universal accessory adapter included with the kit I'd purchased.
This piece utilizes a the bolt and washer type connection similar to my old tool, but it snugged up much tighter. It allowed me to use the off-brand blade without any issue.
An off brand blade mounted via the Universal Accessory Adapter
Oscillating Tool Guide System
Cutting those long, straight lines freehand was a concern before I started, but it was a piece of cake. First of all, this tool is smoooooth.
I don't know if it's better build quality, or the brushless motor, but the DeWalt didn't vibrate and rattle as much as my old tool. It positively purred in my grip. Fitted with the removable DeWalt Oscillating Tool Guide System
(included in the kit), I was able to roll along, pressing the guide against the wall as I went, for added stability.
Oscillating Tool Guide System
It's stable enough to comfortably cut one handed, almost like a pair of scissors.
One-handed, overhead cutting, using the Oscillating Tool Guide System
Accessory Changes
The DeWalt uses a tool-free, accessory clamp system, with a big spring-loaded lever and those gripping teeth I mentioned earlier. The tapered teeth slip into holes in the blade and grip tight. This is one of those features I didn't know I missed when using my original tool. I had simply dealt with hunting around for the special Allen wrench to make changes and periodic re-tightening.
Quick, tool-free blade change
Battery life

I challenged the multi-tool during my project, by performing plunge cuts inside the wall cavity through 2x4's. I completely cut through the boards in four places; two locations were actually doubled 2x4's. I sliced a couple nails in the process too. All of this, including the drywall cutting, was done on a single battery charge, with juice to spare. DeWalt claims a 57% increased run-time due to the brush-less motor. I was really pleased, because I only have the one 20 V MAX battery on hand. My aging fleet of cordless tools are running on last generation, monstrous Ni-Cad batteries that I couldn't swap into the tool.
The tool was powerful, yet lightweight and easy to handle. I could fit the thing inside the wall cavity, with enough room for my fingers to grip it. Of course, my entire hand wouldn't fit in there to pull the trigger comfortably, but there is a trigger lock feature to keep it running, something else my original tool didn't enjoy.
Tight Spaces
It plowed through the cuts fairly quickly. Of course, it was slower than a reciprocating saw would have done, chewing full-speed. I probably wouldn't reach for this tool in an open stud-wall situation with both tools on hand, but that's not what it's made for. This little soldier is a commando, trained for precision strikes, in difficult-to-reach territory and, with a variety of accessories, it's prepared to take whatever weapon it needs to complete that mission.
Plunge cutting a 2x4
Light it up
Seriously? A headlight? It's another feature I would not have actively added to my shopping list, thinking it a silly inclusion, like dealer added pin-striping and mud-flaps on a car. However, at the end of the day, I absolutely loved it; I was lining up my cuts on pencil lines, hiding in the shadowy recesses of a wall cavity. It was awesome.
In fact, at one point, because I can be an idiot, I dropped my remote camera trigger down inside the wall and simply shined the tool's LED headlight down the wall to locate it.
(Note: The Oscillating tool does not include any feature whatsoever to reach three feet down inside a tight wall cavity and fish a feeble-fingered Blogger's critical, photography item out. Disappointing, you'd think they'd have thought of that and added some kind of Bat-Grapple thing. I gotta deduct points for this omission.)
Bright idea
I found the tool versatile and enough to use throughout the entire project, I even used it like a pair of power shears to cut the beadboard backer. I rough cut it to size, then trimmed it flush, once it was tacked in place.
Detail Sanding
I popped on the sander accessory and gave my project a good once over. The kit I purchased includes this fitting, plus a decent supply of sandpaper, in three grits.
How do you like my dust extraction system in the background? Wintertime in Phoenix baby!
Detail Sanding attachment with 120 grit
No complaints on the sanding, I slipped a piece of 120 grit on the hook-and-loop pa and went to town. I rounded the edges slightly, cleaned up my puttied nail holes, and gave the whole piece a once over, including the inner corners. The tool was easy to handle. I loved not having to fiddle around with a clumsy power cord while I sanded the piece.
Bottom line, I really like this tool. I'm sold on the concept of a multi-tool in general, but this DeWalt came through with everything I wanted, and more. It's well balanced, powerful, and gets great battery life. You will not be disappointed if you add this gem to your DIY tool arsenal.
This is a non-sponsored post, but I have included Amazon.com affiliate links for your convenience. If you make a purchase through one of my links, I'll earn a modest commission to help run the site, at no additional cost to you. Thank you for all your support.
DIY Water Heater Maintenance and Custom Drain Upgrade

It's been a year and a half since we replaced our aging water heater. The old one had become filled with sediment, rusted, and its elements burned up, destroying the unit. A water heater is an expensive appliance to replace. I don't want to do it again anytime soon, so I decided I'd do annual maintenance on it.
I also wanted to upgrade the cheap, plastic drain valve from the factory. With all the experience with soldering I've gotten this year as a Bernzomatic Torchbearer, I figured I'd craft a custom valve assembly that would allow me to direct a drain hose in a gentle sweep towards the out-of-doors. More on that in a minute.
The project is easy in concept, disconnect the unit (power and water), drain it, check the sacrificial anode rod, and replace the valve. Piece of cake , in concept. Disconnecting electricity was the easiest. I'd installed a simple shut off switch a couple years ago. It was an easy project that keeps me from running outside to shut off the power at the circuit breaker. Flip the switch and the unit is dead.
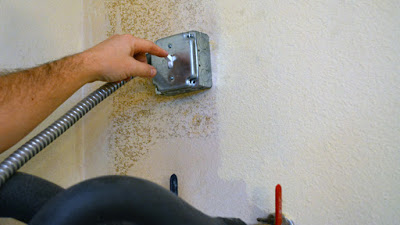
The water was also easy to disengage. When I'd installed this unit, I'd added valves on both the hot and cold water lines. (Of course, I'd reversed the red and blue colors for some pea-witted reason). I also turned on the hot water to the laundry tub, to empty the line a little.
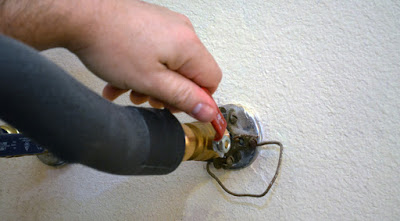
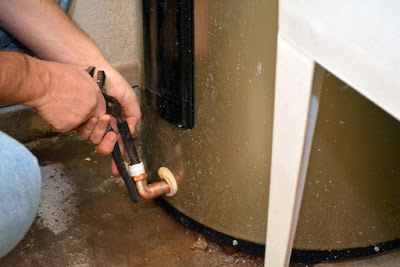
Moving merrily on to the next step to drain the water out, I attached a garden hose and opened the valve with a screwdriver to let the water flow freely.
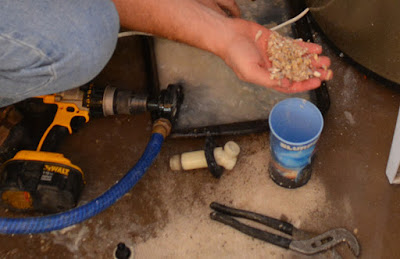
Yep -"flow freely". Dang it. It was completely jammed up with sediment. I couldn't get a drop through the hose. Even with the valve removed, only a dribble of water seeped out. This would not be the easy, piece-of-cake I'd imagined.
I started poking a piece of electrical cable in through the drain hole and twisting it around. I got a little water and oatmeal-looking sediment to come out.

After a healthy bit of poking, I got water and crud flowing a little faster. There wasn't enough pressure to push all the way through the hose, so I used a handy drill-powered pump to suck the water out of the broiler pan I was using to catch the gunk (shhhh...don't tell my wife). I started making a pretty nice mess, too.
Uuuughhhh...
When I figured I had enough water out of the tank, I opened the pressure release valve to reduce the vacuum in the tank. It helped speed up the flow.

After a while, I was able to hook the hose up with a 6" threaded nipple and empty the tank. I turned the cold water back on and off a few times to flush the rest of the sediment out of the tank.

Temporary loose valve.
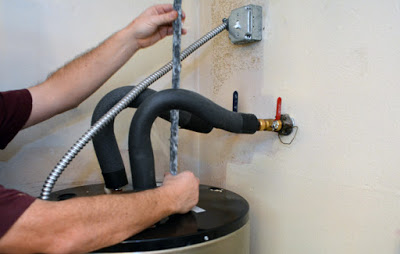
Finally, I got to start building my new drain valve assembly. I wanted a threaded 90-degree bend that was close enough to the tank to prevent tripping over. It also needed to be removable, in case I had another sediment clog.
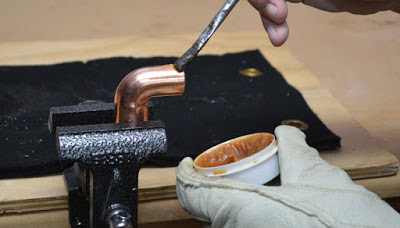
I clamped and cleaned a piece of 3/4" copper pipe and a threaded fitting, preparing them for soldering.

A little flux on both sides of the joint and the first piece was ready for the heat.
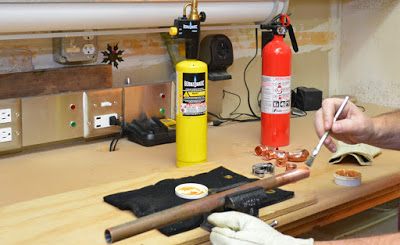
I laid down the heat on the fitting side of the union causing the flux to sizzle and bubble. The TS8000 High Intensity Torch is the sweetest, smoothest torch in the Bernzomatic line. I love its one-handed operation and the ability to upgrade from propane to hotter MAP-Pro gas.

The Bernzomatic TS8000 High Intensity Torch

This particular torch is good for larger pipe. On this 3/4" stuff, it was an absolute breeze. With the flux quickly bubbling under the ultra swirl, high intensity flame , I clicked the torch off and touched the seam with the solder which melted and was sucked into the gap.

A quick quench from damp rag and the piece could be safely handled.
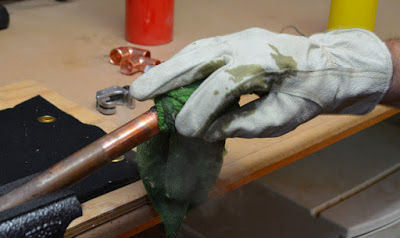
Since this is going to be an exposed piece, I touched it up with a quick dash of sandpaper. Beautiful.
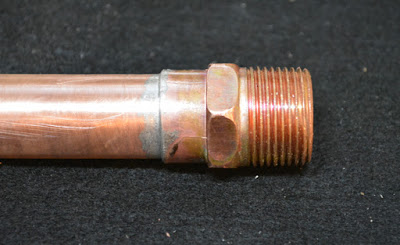
I've really come to enjoy the satisfaction of making a nicely soldered piece. It's actually fun, when you get the hang of it.
I'm really sold on the MAP-Pro with the TS-8000. It gets the piece hotter faster, really speeding up how quickly the solder will liquify. I think I'm sticking with MAP-Pro for my future soldering projects.
I repeated the same steps as I pieced together the new drain assembly.
Clean and Flux

Heat the fitting side until the flux bubbles and sizzles

Melt that solder!
The custom drain elbow was competed with a cleanup and a few wraps of teflon tape to the threaded fittings. This custom piece is quite a bit longer on one end due to the extra thick insulation of our water heater.
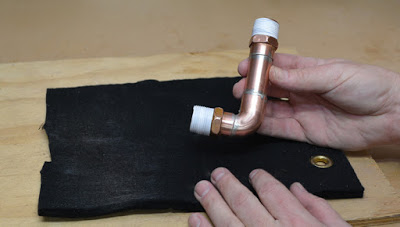
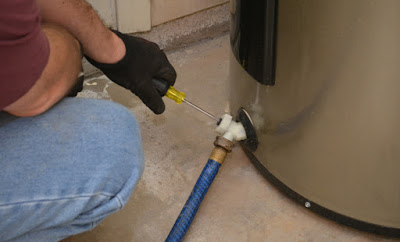
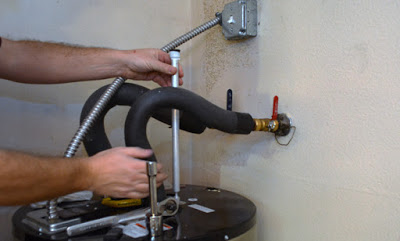
Back at my now soaked and spattered worksite, I threaded the new piece carefully into the drain hole of the heater. When I measured for the elbow, I'd marked the pieces to ensure that it would be parallel to floor when the piece was full threaded in place.
I'd chosen to install a threaded faucet rather than a soldered-on model so that I could remove it and spin the whole assembly off later. If I'd permanently attached it, the assembly would be too large to spin off in the event of another clog.
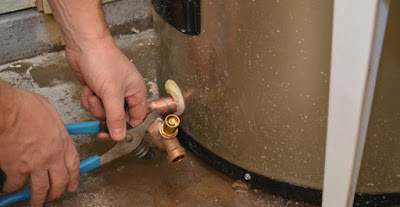
Done deal! The faucet I installed had a removable handle, so I could avoid having little hands messing around and spewing scalding hot water on themselves, flooding the garage. I hid the handle on top of the unit.

The last maintenance step was to check the anode rod. These are sacrificial shafts that stick into the tank from above and corrode over time. It's made from a material that is more susceptable to corrosion due to electrolytic action, so it gets eaten up before the lining of the tank. It greatly extends the life of the unit.
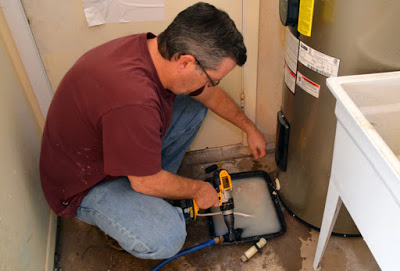
I'd picked up a rod when I was at the home center, so I was going to replace it regardless. It was a matter of popping a cap off the top of the unit, scratching some insulation out of the way and unscrewing it with a big 1 1/16 " socket, on a 1/2" drive ratchet.

It was a little chewed up, but would probably last another year or so. Still, I wanted to replace it anyway while I had the tank empty and the water off. Water heaters are expensive.
It was tough to get out because there was a low ceiling in that area due to a heating and air conditioning duct. I had to bend it.
The replacement anode rod was actually jointed, allowing it to flex in order to drop it into the tank. Handy, eh? Just a little teflon tape on the threads and screw it into place.
Note that this unit is an electrical model. I shut it down with the flick of a switch. If you have a gas model, you're going to want to turn off the heat before draining it. Check the manufacturer's instructions for a safe shutdown. Make extra sure there's no gas escaping while you work, especially if you are doing some flaming torch work in the area.
I filled the tank back up, fired up the power, and cleaned up the tools. Maintenance done. Next time it will be easier if I don't wait for the thing to fill up with gross sediment. Plus, I have a nice metal valve to speed the process. I think I'll adjust up to a 6 month draining schedule, just to keep it ship shape. I'd
autopsied our old one after I tore it out. I never want to see that absolute horror again.
Maintain your heater and save serious money down the road.
This is a sponsored post. I am a proud to be a Bernzomatic Torch Bearer, though all opinions expressed are 100% my own. I won't recommend products I don't believe in.

The Torch Bearers are a group of tradespeople, DIYers, culinarians, adventurers and artists brought together to create projects using Bernzomatic torches and share their knowledge and ideas with you. Check them out here and get inspired to create with fire.
Visit the other awesome Torchbearers and see what they are up to on the Bernzomatic Torch Bearer Site.
Favorite Stuff DIY 2015
2015 Favorite DIY Stuff: DeWalt Lithium Ion Cordless Oscillating Multi Tool, Bernzomatic TS8000 Trigger Start High Intensity Torch, Keen Utility Braddock Work Boot, Uvex Safety Glasses, Bessey BV-CO30 Clamp Base Vise
Read MoreDIY Built-in-the-Wall Shelving - Reclaim hidden storage space in your home
How to add a beautiful, built-in shelving unit into a wall.
Read MoreCutting with Fire: DIY Metal-Cutting with an Oxygen Torch

This year, I've been trying out all kinds of handheld torches, using several types of fuel. The tool geek in me really wanted to challenge myself and move up to something even more serious. Luckily, I got my hands on a
Cutting, Welding, and Brazing Torch Kit , the big, hot Mamma of the Bernzomatic line.
I've done recent torch projects with butane (up to 3,150° F), projects with propane (up to 3,600° F), and projects with hotter burning MAP-Pro (up to 3,730°).
The Bernzomatic OX2550KC, is the next step up. It uses a dual-gas fuel setup; burning both MAP-Pro and pure Oxygen. This compact, fire-breathing beast can produce a flame up to an incredible 5,300° F! It's not even a commercial tool; it's something you can pick up for yourself at a hardware store or home center.
I wanted to try cutting metal with fire. I'd never done anything like it. I think this torch in cutting mode is probably best suited for metal stock, perhaps around 1/8" thick or so. So, naturally, I decided to push well past that on my very first task. I'd been wanting to remove an old, bent fence hinge from our block wall. It was there when we bought our home and has always been an eyesore. The trick would be to cut it off behind the face of the block, so I could patch over it. A reciprocating saw would be difficult to use in that spot. I'd bend the heck out of some blades, chip the wall up, and rattle the heck out of my arms.

It's time to go, Mr. Bent Hinge Pin
This torch doesn't work like a standard handheld torch, it takes a bit of fiddling to get the hang of it, but it's incredible when you do. After a little practice, I was able to perform the fine dance of easing more and more gas into the flame, making it hotter and hotter, a blue/white blade of flame.

The Bernzomatic OX2550KC Cutting, Welding, and Brazing Torch Kit This is a hose style tool, with fuel cylinders placed remotely, away from the torch head. Starting the torch requires opening the MAP-Pro valve, ever so slightly and using a handheld sparker to ignite it.

“Come on Baby, Light my fire.”
It takes a different approach, too much gas flow and the flame will go out with a quick blast and a "pop!"
Since I'm used to using a standard, handheld torch which can be instantly lit with a hearty blast of flame, it took me a several tries to figure out that I needed to use a very light touch. The MAP-Pro fueled flame needed to be quiet and soft, waving gently like a stick pulled from a camp fire. I learned to ease the MAP-Pro flow down even more, until the base of the flame barely touched the torch nozzle.

Isn't it soft and cuddly?
Next came the oxygen. Its valve appears to be finely threaded, because you can turn it quite a bit before the oxygen gets flowing. It's great for controlling the release of a very small amount of gas and easing it up slowly. Too much oxygen, too quick, and "pop" out goes the light. In that case, everything has to be shut off to safely start again.
Speaking of safety, you'll note I stepped up my gear a couple notches for this project. First,since there would potentially be sparks and molten metal, I wore long pants and shirt sleeves (in Arizona even!). Beefy, long-wristed welding gloves would protect my hands if anything spattered. I capped my natty ensemble off with some Mad Max eye-protection, exchanging my normal safety glasses for a shaded, welding mono-goggle. I wouldn't take any chances with my already crappy eyes and a blinding, white-hot flame.

Fire, when you can't see the whites of my eyes.
As I slowly eased more oxygen into the flame, it snapped from the slowly waving, orange flame, to a crisp jet of blue-white fury. To cut with this rascal, I had to get it as hot as possible. It took a few tries, but I got the hang of dancing my hand between the MAP-Pro and Oxygen valves, until I got a real tight blast going.

The perfect flame of awesomeness
With my finely-tuned fire-knife ready, I eased the absolute hottest point up to the metal hinge. The tip of the innermost cone of blue flame was the sweet spot. It was a 1/4" of legendary dragon-fire.

I slowly eased the cutting tip of flame back and forth, ever so slightly, watching the metal turn red-hot. Soon, the surface was liquified and starting to flow. I could move a gelatinous blob of molten metal around with the tip of the flame.

I was really getting going when the flame died out. Getting the initial feel for working the tool sucked down quite a bit of oxygen. I'd run out, just when I was having fun. I ran out to the hardware store and grabbed another, which was perfect, because they had just finished making the first batch of popcorn for the day.
The second time, with the learning curve behind me. I got my flame ripping in no time. I was once again in the molten metal business.

"Hot"
As I cut, it seemed like the liquid metal helped accelerate the process, it kept the hinge piece stay glowing hot.
The camera, just doesn't do it justice. Even through the shaded goggles, it looked incredible, like a movie scene from a steel mill. It was too fun to be work.

Hotter
I tapped on the piece few times with a pair of pliers and could easily bend it. A couple flaming minutes later, I grabbed ahold and snapped it off without effort.
Hottest
Although the red glow faded very quickly, the piece was still dangerously hot. I could feel the heat radiating from it on my weekend-stubble chin. Even after cooling on the ground for several minutes, it still scorched the board I set it on like a wood burning iron.

It was a shame I was done. It was just too much fun.
Naturally, the kid in me decided I really needed to push the remaining bit of metal back, just a little deeper into the block face, because,... molten metal!
I sparked up some fire again. I really had the hang of lighting the torch by this point, quickly getting the flame into good cutting shape. With the flame concentrated in a recessed hole in the block, it created an oven of incredible heat, liquefying the metal in seconds.

The Bernzomatic Cutting, Welding, and Brazing Torch Kit really is a cool tool. I pushed it hard on my first foray, not only cutting, but cutting a really thick piece of metal. I think I may do a more crafty-dude project with thinner metal at some point. I'm also looking forward to using it to try brazing, basically a big-kid version of soldering, to weld metal together.
What do you think? Ready to try this powerhouse of flame?


This is a sponsored post. I am a proud to be a Bernzomatic Torch Bearer, though all opinions expressed are 100% my own. I won't recommend products I don't believe in.
The Torch Bearers are a group of tradespeople, DIYers, culinarians, adventurers and artists brought together to create projects using Bernzomatic torches and share their knowledge and ideas with you. Check them out here and get inspired to create with fire.
Visit the other awesome Torchbearers and see what they are up to on the Bernzomatic Torch Bearer Site.