

This technological terror is a hand crafted ULTIMATE garage workshop power strip.
Read MoreLoose ends - The Art of Incomplete
My mind is racing, planning the next big project; I'm positively drooling to get started. But, I simply must tie up a bunch of loose ends first. Not to brag, but I'm a fully-ordained Level Eight Grand Master of Getting Nearly Done. I get close to finish and immediately leap headlong into the next project. I figure 95% done is my sweet spot. My sweet, patient wife has the uncanny super power of noticing my talent and bringing it to my attention.
Here's a quick tour of some of the loose ends now haunting me (just in time for Halloween), in no particular order. I'm not proud.
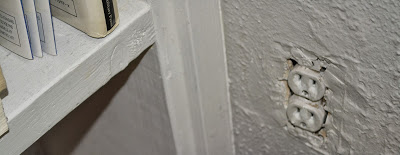
No plates: You've probably noticed my sweet, stainless-steel Wiremold 4000 power strip on my work bench in previous posts. It's my custom, Tim "The Tool Man" Taylor, over-engineered power strip, complete with individually switched receptacles with green and red indicator lights, partial GFCI protection, velcro mounted stereo speakers, a master kill switch, and a fake shurikin. Slick eh? But I never installed four cover plates,... in over four years.
 |
| Yes. That's an old throwing star back there. I don't know why. |
 |
| Proof that Frog Tape does have long term holding power. |
... behind the corner table...
... and on the other side of the wall, in the office, hidden behind the printer.
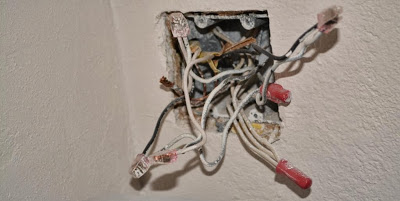 |
| I even crossed the wires so we have to turn on the exterior lights to make the office light come on. Not fixed. |
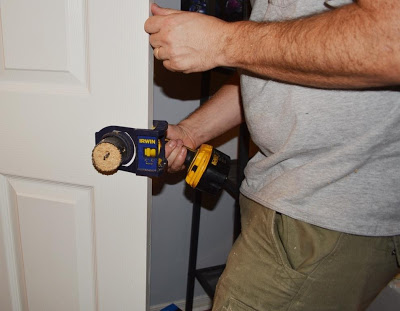
More and more Doors: I still have to finish the interior door replacement project, ... started 8 months ago. Ugghhh.... It's so stinkin' booooooring and repetitive at this point. Plane, prime, paint, paint, mortise, install hinges, hang, swear, adjust, drill, and install hardware. Repeat. Repeat again.
 |
| Full disclosure, the power tool part is actually fun. |
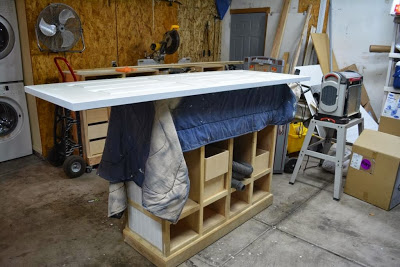
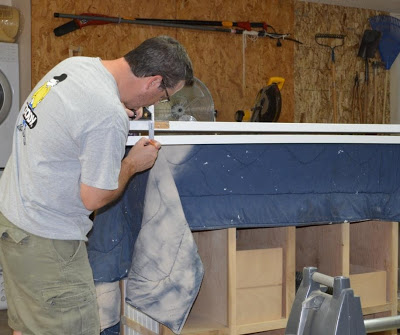
The Incredible Slow build: The master bedroom door is primed, ready for paint. You see that nifty painting stand / door holding bench under the blanket? That's another master-level, incomplete project. It's the famed hallway organizer project, as seen in most of my workshop photos. It's stalled, two and a half years in the making.
 |
| I wish I could start over on this one, but I've put too much cash into it. |
Bunch O Chunks: Of course, I have many more garbage days worth of smuggling dried cactus chunks out in the weekly trash bin. I'm only a few weeks in, but I'm being realistic; I'll still be dealing with it after Christmas.
 |
| Chunk Chuck-er |

Looooooooser. Enough. I'm embarrassed. As soon as I finish this post and spel chek it, I'm going right out to the garage and
There and Back Again
I've gone dark for over a week, enjoying some time back in Michigan with family and friends. No projects, no tools. Just crisp fall air and overwhelming amounts of water and the color green. Living in the desert southwest is a land of beige and earth tones. There's nothing like this blast of fall color.


 |
| Ok. Gracie did have a little wood work project to do. |
We timed our trip perfectly. Michigan was beautiful, crisp temperatures in the mornings and evenings with warm sunny days (mostly). Sweetie and I felt a homesick, missing living there.
The kids had a blast. It was fall break in Arizona, but school was in session in Michigan. We had parks to ourselves, only sharing them with the seagulls, Canadian Geese, and Swan.
We enjoyed a day of apple picking, cider and donuts at the cider mill / orchard, where Gracie befriended several wooley caterpillars...
...and the other of our young offspring, quickly devised a rousing game of apple stomping.
We spent a nice evening at my folks place on the lake, ending with making s'mores.
Alas, work and school beckoned us home. The beauty of Michigan will soon give way to the horrors of winter driving, shoveling snow, and freezing one's butt off pumping gas. Arizona has passed through its time of summer inferno and is offering months of sunny, beautiful paradise. We'll miss everyone, but we'll miss them while we enjoy wearing shorts and sandals, picnicking in December.
We returned home, tired and jet lagged from the three hour time difference. There'd obviously been a wind storm, judging the amount of newspaper in the yard and pool, not to mention the submerged patio chairs. The pool was filthy with the vacuum tangled in a chair.
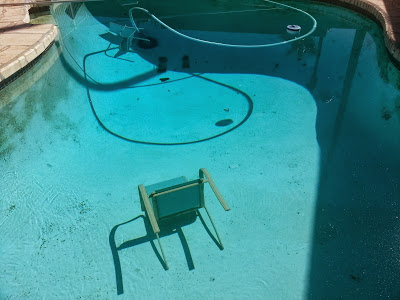 |
| Allow me to show you to your seat sir. |
What a difference a couple weeks makes. The cactus I'd cut up and laid out is dramatically dried up. Most of it is crispy, like weathered cardboard, ready to be scooped up and thrown away.
 |
| Pita chips anyone? |
You know me; of course, with a post title of There and Back Again, there has to be a hobbit reference, right? A Lord of the Rings movie quote perhaps?
Nope. But it all comes together in the end...
This is a grand item of mystery we found laying smack-dab in the middle of our front yard, when we got home, right beside the walkway.
 |
| Take this back to Hobbiton please. |
Seriously, what the hell is this? Who leaves a collectible plate in someones yard when they leave town? More importantly, who owns a "collectible" plate featuring a freakish, barefoot circus-child that looks like one of Samwise Gamgee's hobbit children? "Little Strong Man" .... I just don't have a clue.
How to remove a fallen 16' cactus from your back yard
Can the world of DIY / Home Renovation blogging handle yet another post on how to remove a fallen 16' cactus from a backyard? I'm pretty sure all my peers have written similar posts on demolishing a towering saguaro, probably just about as often as they've come up with interesting new uses for pallet wood. No? Haven't seen any? Don't live in the Sonoran Desert? Well then, settle in for an adventure of a lifetime, because here's how it went down.
We'd lost one of our four big saguaros in a windstorm a couple weeks ago (Oh How the Mighty has Fallen). Now I've determined that a leak in our drip irrigation system completely saturated the soil, weakening the grip of the surprisingly small root mass. About a thousand pounds of waterlogged, spiny monolith crashed to the ground, leaving its severed appendages strewn across the landscape.


 |
| The grand inspector, surveying the scene. |
Now, how to get rid of it? I'd read about using a chainsaw to lop it into logs that look like giant sushi rolls. Of course, my chainsaw is merely a 9" electric pole saw, not much use here. Maybe I could buy a cheap one from Harbor Freight or rent one from Ace.
I know there is wood inside the cactus, that might be good for a future craft / decoration project. Could I could fillet it like a fish and save the core?
I loaded a 12" pruning blade into my beloved Cordless Reciprocating Saw
 and gave it a rip. It sliced like a warm knife through butter. Juice gushed out of the carcass, spattering me in the face.
The fleshy pulp felt smooth and a little slimy. It smelled fresh vegetables, a bit like jicama. I started lopping off big chunks rapidly, starting with one of the detached arms. The blade occasionally made contact with the wood core of the trunk, so I'd ease back, trying not to damage it too much.
 |
| Slice 'n dice |
I'm not much of a videographer, but I thought you'd like to see what it was like sawing through the pulpy goodness with a reciprocating saw. If you watch closely, you'll see where your's truly manages to stick himself in the hand with a spine. Evidently, Mr. AZ Dumb-ass Guy, thought that wearing gloves while slicing up a freaking, cactus with razor sharp spines was just too much effort this first day.
Jess commented on the last post that a sturdy pitch fork would make handling cactus chunks much safer on the hands and feet. Of course, since I'm not raising miniature donkeys, I don't own a pitchfork. I used the next best thing, a sturdy steel landscaping rake. It did the trick. (Thanks Jess!)
It was like dragging whale blubber across the landscape. I laid out the squishy chunks in rows to start drying. I'm going to have to parcel this over several weeks into the trash bin. I don't have an alternative, since there's not another bulk trash pick up until December, and I don't want to slime my truck by taking it to the dump myself.
I took a break to handle some kid obligations and charge the saw's batteries, but came out later in the evening. I tried another tactic, a mini-spade shovel. It sliced and diced really well. I scooped the fleshy pulp off the inner woody skeleton; it was like carving a pumpkin.
It killed my back to hack and pry, stooped over with that little shovel, as I simultaneously tried not to slip in the goop or impale myself on the horrendous needles all around me. These things are tough, medieval-style caltrops that would puncture the sole of my boot with ease.


 |
| Don't tread on me. |
I called it a night. It was an easy choice, since I had managed to spatter cactus juice in my eye and rub it in with the back of my hand. My eye was an burning, bloodshot mess.
A fresh day followed, with a fresh approach. I went full-on, flat-blade shovel on this sucker. This time, I wore gloves.
 |
Photo tip: It's considered much more manly to have a work truck parked in the
background, especially when it looks like you're raising the flag over Mt. Suribachi.
|
It worked like a charm. I was tearing through cactus at a rapid, pulp-splattering pace, rending nice juicy slabs off, one after the other. Then, of course, seconds after the photo above was taken, a meaty slab flopped down on my right foot.
It got my attention. Of the 4 spines that punctured my boot and broke off in it, one in particular really pissed me off when it stabbed into my toe.
 |
| That's the little bastard that got me. |
The toe wasn't bad, not much more than a scrape. I bled more from the gash my finger suffered in the ten minutes of fiddling around, trying to get the spine out of my boot without breaking it off inside. It just stinks that I have perforated my new, formerly-waterproof, Red Wing work boot.
Back in action, it was a matter of picking the bones the rest of the way clean...
...and sawing off the root mass.
What a dang mess. I've got a massive elephant graveyard of saguaro chunks drying in the sun.
Now it's just a matter of metering out the chunks into the weekly trash as they dry out. Luckily, monsoon season is over and it's not humid anymore. The carcass is cleaned down to the big woody pole. I think it's pulp filled and will eventually dry hollow. I'll post updates on Facebook as it dries. We'll see if it's worth making something out of.
I have to fix the drip irrigation leak before it makes the other one topple. That big sucker will take something out if it falls.
What do you think? Have I prepared you to handle your next 16' fallen cactus monster crisis in Michigan, Pennsylvania, Georgia, or wherever you live?
Re-securing the Border (Not that Border)
Recall this awesome, recycled-tire-rubber landscaping border I installed earlier in the summer? I still love the stuff. It was easy to work with and looks great.
 |
| "...earlier this summer" |
Well,... then this happened:
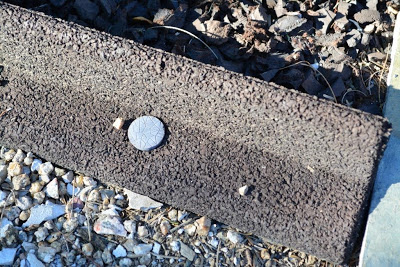

The heads of the stakes faded to a nearly white color, in roughly a month and a half. They look like buttons on a coat. It really makes the border look weird. Crud.
After a couple weeks grumbling about it, and hoping it lawn elves would work their magic, I finally checked out EcoBorder's website for contact info to complain. I found their FAQ's addressed the issue. They know about it and are tackling it head on:
NOTICE: It has come to our attention that some of the stakes sold with our EcoBorder "L" product last year (estimated time frame between July and August 2012) have a raw material defect. In our ongoing efforts to use recycled materials in our products, we have learned that some of the recycled raw material plastics used in those stakes (we expect about 3% of product sold over that time) have this issue. Due to an adverse reaction from some impurities found in those materials, some stakes purchased in those months could turn white. With product quality and customer satisfaction as our top priorities we apologize greatly to any customers that have experienced this. In response, we vow to "make it right" with any customers that this may have affected.
If you were affected by this issue, please email us a photo (to: mail@ecoborder.com) of the stakes along with a count of how many replacement stakes are needed. In response, we will send out top quality replacement stakes at no cost to you. Once again, we apologize for this issue and will do whatever it takes to make sure that you our customers see our unending dedication to a quality product and customer service!
I contacted EcoBorder through the site and quickly received an email, followed by a phone call from their Florida HQ (not a call center on the other side of the planet). They offered a genuine apology and an explanation. They didn't dodge the issue or accuse me of living in a God-forsaken, uninhabitable desert wasteland where the sun savages any material known to man. They didn't question my installation methods or ask if I'd hosed the area with Vietnam war era, carcinogenic defoliants. They truly, humbly apologized and took accountability. I never even got a chance to fence a rude tech support operator with my well-honed, rapier wit. It was refreshing.
EcoBorder knows there was a very small lot of stakes that were discovered to have a defect in a UV protecting ingredient. They've adjusted suppliers and resolved the issue. It's been difficult for them to locate the affected batch, since it's scattered across the country, carried by the two big home center chains.
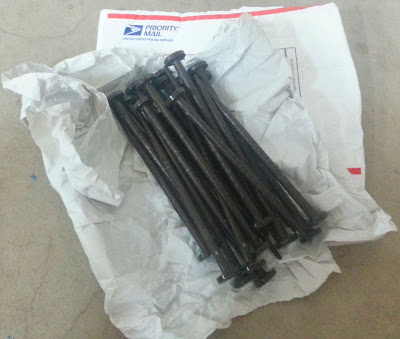
A supply of fresh replacement stakes was quickly shipped. I received an email with tracking information. They arrived a couple days later.
EcoBorder knows there was a very small lot of stakes that were discovered to have a defect in a UV protecting ingredient. They've adjusted suppliers and resolved the issue. It's been difficult for them to locate the affected batch, since it's scattered across the country, carried by the two big home center chains.
A supply of fresh replacement stakes was quickly shipped. I received an email with tracking information. They arrived a couple days later.
Do I want to re-install what I've already installed? Nope.
Do problems occasionally happen in the world manufacturing stuff? Yep.
Heck yes; it just happens. I like how EcoBorder dealt with an unfortunate issue straight on. No dodging. No questioning. No games. No delays. They just handled it. That's class. That's customer support. Seriously, that's good business sense. In my opinion, this is a case study in how companies should handle problem products.
I'd like to get more of this stuff for the back yard landscape. I support good, companies, manufacturing in the USA, that stand behind their products and I like this product.
I'll head out there with a hammer and whack these new ones in.
__________________________
Disclaimer: I have no relationship with EcoBorder (Although, I do host affiliate ads from Home Depot, where it is sold). I selected and purchased the initial product with my own hard-earned cash. They were aware of and responded favorably to my unsolicited blog post on their product. As consumer and a blogger, I believe their response was genuine, and not influenced by the fact that this issue happened to affect a blogger, although, I imagine they're probably not celebrating that it happened. In no way did they try to influence my response as a blogger. That's class. - John
Oh, How the mighty has fallen!
I have many, many items to tackle around here. Now that we have the swimming pool somewhat on the mend, I'm exited to get to the next items on my list. But first, once again, Murphy's Law stepped in this week, just to keep life interesting.
You can only imagine how it felt to get home from work one afternoon and head out the back door, to check on the pool, only to find one of the most striking features of our back yard destroyed. It was a stop-cold-in-my-tracks moment...


Stay tuned folks. I'll share the adventure, even though 99.9% of my readers probably won't get much use out of a "How to remove a fallen 16' cactus from your back yard" post in their lifetime.
You can only imagine how it felt to get home from work one afternoon and head out the back door, to check on the pool, only to find one of the most striking features of our back yard destroyed. It was a stop-cold-in-my-tracks moment...
 |
| Aaaaaaghhhhh!!! |
This was a sixteen-foot tall Suguaro Cactus (Carmegiea gigantea), not the biggest, by far, but an awesome multi-armed monster, at least 100 years old. It was the best-looking of the four tall boys on our property.
I found this pic in my misting system post. You can see most of him still standing, mid summer (and some gratuitous, hard-core Weber BBQ action).
 |
| Pay not attention to the horrible porch; it's on the list. |
Now the beast has fallen. We had a heavy monsoon storm that must have saturated the soil too much. I suspect yet another drip irrigation leak in the area as well. The surprisingly small root system just couldn't hold up.
 |
| The inspector. |
On the bright side, it fell in one of the two narrow directions where it wouldn't damage anything else. It missed the porch, the block fence, the BBQ, most of the flowerbed, the pool fence, and the surviving (taller) Saguaro. It also land on anyone; which would have been fatal. We'll count our blessings.
I don't even know where to start with clean-up on this one. It must weigh more than a ton. The tiny little arm bud, that augured into in the flower bed, weighs 60 lbs on the bathroom scale.
 |
| This 60 lb. ball punched a 3 inch deep dent into the flower bed. |
I think I may need to get a chain saw and finally purchase a wheelbarrow. There's absolutely no way to get equipment like a Bobcat or forklift into the back yard. I'm surely not going to hire a crane to reach over the house and lift it out.
It's been sitting, cracked open and leaking some sort foul juice like a Graboid from Tremors* for a few days now.
 |
| Graboid juice |
What a loss. We can't replace this beast. I'll figure out a way to dice it up and store it for the next quarterly bulk trash pick-up (since the most recent was last weekend, of course). Maybe I can plant some of the arms that weren't damaged in the impact.
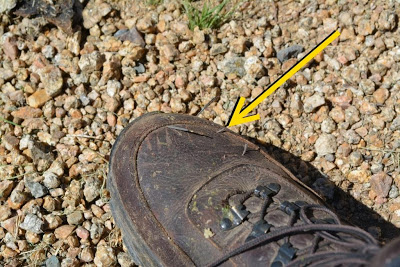
I grew up chopping-up and hauling ice-storm damaged trees out of our yard in Michigan. This is another challenge entirely. It goes without saying that this is going to be a very delicate operation. I rolled one of the arms with my foot and a spine punched right through the sole of my shoe. This monster bites.
 |
| This isn't your little window-sill garden cactus my friends. |
*As my Facebook followers know, I've referenced Tremors twice, recently. I don't know why. I guess it's time to bust out the DVDand visit Val and Earl. I do miss those idiots.
The Great Debate: Hiring a Pro vs DIY (Replacing Swimming Pool Equipment Edition)
My whole concept is Do IT Yourself . I write this blog hoping to empower others to do the same by sharing my experiences, triumphs and challenges. Truly, I believe homeowners can do nearly anything themselves with the right tools, materials, and knowledge. I enjoy doing it myself, have saved tons of money, and have a lot of experience being dissatisfied with the results from people I've hired in the past. I guess I expect absolute perfection for my hard earned money.

UPDATE: I after re-doing some electrical myself and digging up the pavers in advance of the new install, the work is done. The technician arrived early and lugged in a bunch of new parts and pieces.

However, there are times were the time spent muddling through a project is just not worth possible savings, fun, bragging rights, or the experience gained. Sometimes there are expensive, specialized tools required, that I'd never use again. A mistake I make can cost me, where the mistake a contractor makes, should have to be corrected on their dime. There may be product warranties to consider as well. True craftsmen, can get results even the most gifted DIY'er can hardly hope to obtain.
So, can I follow instructions, tear out and replace all this mess? Yes, I think so. It's mostly a PVC pipe and glue project. Can I get it done in a few hours and be confident? No. It would probably take me all weekend and infinite trips to the hardware store to do it.
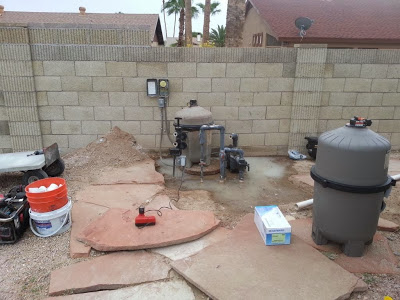
So, today it happens. I had already cleaned out the dirt around the horror-show above and repaired some of the electrical last weekend (check it out here). We have an experienced professional from one of our local pool stores coming with brand spanking new equipment.
Here's the scope:
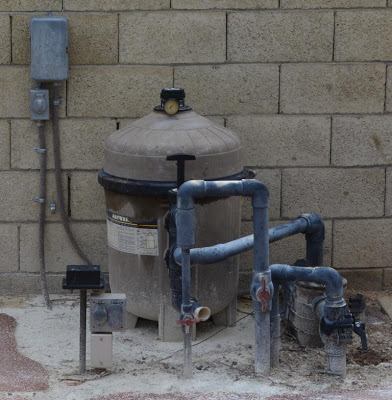
- A new cartridge filter to replace the aging DE filter (the big R2-D2 looking thing) so back-washing and dealing with that messy white powder is a thing of the past. Old leaky here has been a maintenance nightmare. It would need hundreds of dollars in replacement parts if we wanted to save it. A cartridge filter will reduce my maintenance time greatly.
- Replace the pool pump. The existing motor is doing fine, since the it was replaced a year ago (home warranty!!!) but, we expect to save about $700 annually in power consumption by upgrading to a modern, variable speed pump. Plus, the unit is tired and has air and water leaks.
- Adding a salt water cell. This is actually exciting. We are going to nearly eliminate our chemical dependency (and cost!!!!) by converting salt water to chlorine. Everyone I talk to who's made this conversion has loved it.
This is coming to us at a heart-stopping cost of nearly $4,000. No, we cannot afford it. But, we also cannot afford to let this beast nickle and dime us to death, while we spawn water creatures in it's foul depths. We are still in swim season here and cannot take advantage of it. I've spent untold hours and about $1,000 this year alone in chemicals and parts trying to keep this priceless awesomeness...
 |
| No swamp. |
...fom reverting again to Dagobah, in the blink of an eye.
 |
| Swamp. |
The total cost of this renovation includes about $380 in labor (and that's on special this month). Still steep, but I think it's worth it. I don't think I need to surrender my DIY Guy credentials on this one.
Hire or DIY? The great debate. I nearly always choose DIY. I've hired out for roofing and plan to hire out for window replacement (if we can ever afford it after this pool debacle). I only do so much electrical myself because I have been trained, but suggest most people bring in a pro for anything major. How about you; what's on your hire vs. DIY list?
Homework: There's a neat article Marcie Geffner wrote last year for Bankrate.com, titled Remodeling Yeilds Rewards, Vexations where she compares my successful family room remodel experience to cautionary advice from the authors of Home Improvement For Dummies. I do their cautionary, contrasting point of view vs. my gung-ho, I-can-do-anything approach. Doing research, I found their website diyornot.com, which provides lots of info on DIY vs. hire. It's a very good site. I just get a vibe that it's pushing the hire direction a bit hard, especially with an apparent choice of advertisers directed towards for hiring contractors. Maybe I'm a bit sensitive because I love the do it yourself approach. Heck, I have ads for tools and materials on my site. - John
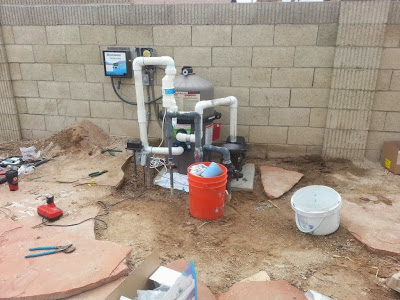
He installed the equipment in the existing footprint, using a bunch of the existing plumbing. You can see the salt cell standing vertically in the center and its new computer on the wall.
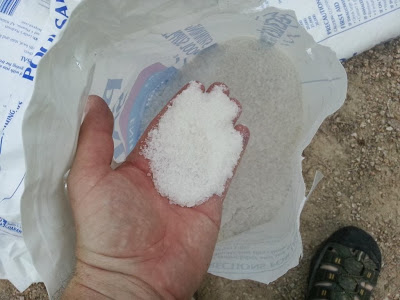
I did the honors and dumped seven huge bags of special swimming pool salt in the pool. They say it was special salt, but I think its the same stuff they put on those big salt pretzels at the mall. Shhhhhh....
When it was wrapped up, we had a completely new mechanical system,.... and some exciting new financing payments. We're really happy we did it. This winter I hope to drain and re-coat the pool, maybe the decking. Who knows, I may even do some cool new landscaping and a screen to hide the equipment. Next summer should be a great swim season!
A Relaxing Labor Day Project: Underground Electrical
So the pool's a swamp again, despite battling with all the modern chemical weaponry at my disposal. It's time to throw in the towel. We give up. It's either a dump truck full of fill-dirt or we scratch together enough money to replace all of our pool's mechanical equipment. Since a dump truck won't fit into the back yard (and I'm out voted 3 to 1), we're replacing the pool equipment, next Saturday. It's a spendy proposition. Do you hear the sound of our kitchen remodel disappearing? Those new, energy-efficient windows slipping from our grasp?
Even though I'd proclaimed it a no-project weekend, I started excavating the slab the equipment is sitting on. I thought I'd be nice and hopefully avoid the cost creep of having a pool tech digging at $80 / hour before dropping down a new slab. I dug it out pretty quickly.
Done!
Of course, it wouldn't be a ripping good DIY Guy project experience if it ended as neatly as that, would it? Nope. Remember Murphy's Law, my friends. I noticed this little gem of awesomeness:

More expletives. There's no 90 degree elbow to unscrew. It's a full 10 foot stick of rigid metal, threaded
conduit, wrapped in corrosion preventing rubber tape. Awesome. Guess what else?!!! There's cement covering it too. Oh, joyous day!! But that's not all; there's a thunderstorm bearing down on me. Sweeeeeeeeeeeet, now this is a holiday, my friends!!! So much for BBQ, it's going to be a carryout pizza night.

I put all the wiring back exactly the way it was before. I recommend you don't mess around with electrical near a pool if you're not really comfortable with it. Seriously, hire an electrician. There's a whole section of code devoted to it.


Even though I'd proclaimed it a no-project weekend, I started excavating the slab the equipment is sitting on. I thought I'd be nice and hopefully avoid the cost creep of having a pool tech digging at $80 / hour before dropping down a new slab. I dug it out pretty quickly.
 |
| One of the many leaks dribbling away. |
Of course, it wouldn't be a ripping good DIY Guy project experience if it ended as neatly as that, would it? Nope. Remember Murphy's Law, my friends. I noticed this little gem of awesomeness:
The electrical feed conduit is rusted completely through. This is the entry point for a 240 volt pump circuit and a 120 volt light and receptacle circuit, sitting next to 10,000 gallons of highly-conductive pool water where we run around barefoot and soaking wet. Professional electricians would call this condition, "not so good". I let a few choice expletives loose under my breath. I'd have to dig out the rigid conduit 90 degree elbow and replace it, maybe a couple fittings too. Skip the nap, but still, I'd be lighting the BBQ in no time.
 |
| "Don't you call me a mindless philosopher, you overweight glob of grease!" |
conduit, wrapped in corrosion preventing rubber tape. Awesome. Guess what else?!!! There's cement covering it too. Oh, joyous day!! But that's not all; there's a thunderstorm bearing down on me. Sweeeeeeeeeeeet, now this is a holiday, my friends!!! So much for BBQ, it's going to be a carryout pizza night.
I managed to beat through the concrete with my sawed-off sledge hammer and scratch down to the conduit to a coupling using a mini-spade, on my hands and knees. My full size shovel is a flat-blade, not at suited for trenching. I was pretty miserable in the heat.

Gracie and her dinosaurs helped further, by recreating the excavation of the Tanis Map Room from Raiders of the Lost Ark. That mini spade is perfect for her diminutive stature.
With the pipe out of the way, I pulled the nasty wire out; it would need to be replaced. The mess of junction boxes also needs to be replaced while I have it all torn apart. They're full of DE filter powder and rusted parts and the switch and plug are junk, all evidence of full water penetration. It's time for a shopping list and a trip to Home Depot.
 |
| The conduit on the left and the gounding box on top are brass, and in perfect condition. |
The thunderstorm blew in while I was in the store. Luckily, it moved through fast and didn't flood my trench. It simply introduced more delightful humidity. I brought home more than $ 120.00 of assorted loot to straighten out this rat's nest. It sure doesn't look like much stuff when I dump the bags.
 |
| Can you tell the new from the old? |
I re-jiggered the boxes a bit to neaten the installation and switched to PVC conduit to save cash, time, and corrosion. When it was time to pull wire through the conduit, I grabbed Jack to help by feed it, avoiding damage to the jacket, while I tugged the Fish Tape . Gracie lubed the wire with liquid dish soap to keep it sliding smoothly.
 |
| 100 degrees and humid after the storm. It's not quite as fun as it sounds. |
I put all the wiring back exactly the way it was before. I recommend you don't mess around with electrical near a pool if you're not really comfortable with it. Seriously, hire an electrician. There's a whole section of code devoted to it.
It's cleaned up, safe and fresh looking. The new junction box actually has a gasket and does not have the optional big drywall screws driven through it (as can be viewed with amazement in the second photo from the top). I installed a switched cover for the pool light rather than the flip-door style cover.
I filled in the trench with clean dirt, ensuring no rocks were anywhere near the PVC conduit. I soaked it down with the hose every few inches of dirt cover and compacted it. I don't want this caving in beneath the big paving stones later.
I'll clean up the area and leave it nice and accessible for the pool tech on Saturday. We are so ready to have this old, sucking money pit of a system replaced so I can spend my weekends doing productive projects (and actually swimming!), rather than repeatedly fighting the endless, loosing battle of the putrid swamp of Dagobah. Yep, I'm really ready for this crap to end.
 |
| Generally, you don't see pools this color outside St Patrick's Day |
I'm off to the pool store to stock up on some more chemical weapons.
Installing a water heater shut-off switch
Last time, I mentioned I couldn't quite get to a water heater maintenance program without doing some repairs first. I figure step number one is to bring the electrical up to snuff. I decided to install a disconnect switch by the unit, so I don't have to trudge to the outdoor electrical panel every time I want to shut the unit off.

Before I could get going on this part, I had to replace the breaker. My predecessors had installed two, single pole breakers, rather than one double-pole 30 amp breaker. Not cool my friends.
AZ DIY Guy's Scary Warning - Electrical Edition: Don't mess with electrical, unless you know what you are doing. 120 volts of household current can kill you just as dead as much higher voltages, it just lets you suffer longer, and folks can still recognize you in your casket. Plus, electrical issues can do a heck of a job burning your house right to the ground. When in doubt, get a professional electrician. If you do the This project is a snap for someone who's trained; it shouldn't cost too much. Even if you know what you are doing, I recommend you work it like it's live, even if it's not. Research legal requirements in your area before making changes to your electrical system. Finally, don't take my word for this stuff, I might be some random idiot on the internet.

No. Not cool at all. Those are separate breakers. I picked up a breaker at Home Depot for about 13 bucks. It was an easy swap; just a matter of turning off the main breaker for a minute while I slipped the two originals, popped the new one in, and re landed the wires.
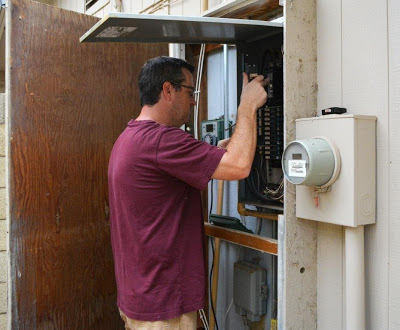
Of course it couldn't go perfectly. I noticed, for the first time that this particular circuit's wiring was aluminum. I hate that I have aluminum wiring. More on that later.

Cool. Very cool indeed.
I turned off the new 2 pole circuit breaker and moved inside to open up the junction box to find,... a gob of black electrical tape, discolored wire, and nicked insulation (clockwise below). Not good signs.
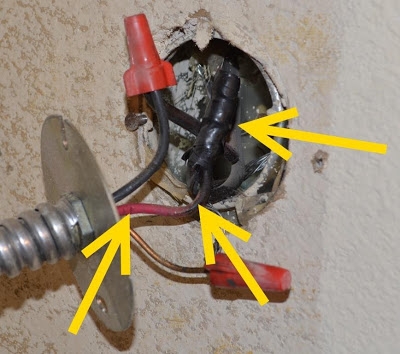
Since I don't trust ANYTHING in this place, I like to do a quick check to see if the circuit is still live. Especially if there's some sketchy-looking wiring where I'm about to stick my fingers. Idiots could have easily landed one of the hot wires to the wrong breaker; it could light me up. No thanks. It's time to reach the Bat Belt for my trusty non-contact voltage tester.
.

.

Apparently, It's pretty serious.
Ahhhhh,... sweet silence. The circuit is dead.

This is scary. The wire nut inside the tape glob is completely destroyed. Worse yet, where is the rest of it? There were no fragments or pieces of more than half of it, not in the tape, not in the junction box. To me, this means some mental giant actually knew this was busted and wrapped it in electrical tape, rather than simply installing a new wire nut. This could burn a house down to save the effort of installing a cheap wire nut. Jackassery! I think it's especially unsafe in that it's aluminum to copper wire junction.

That's an identical, complete wire nut on the right.
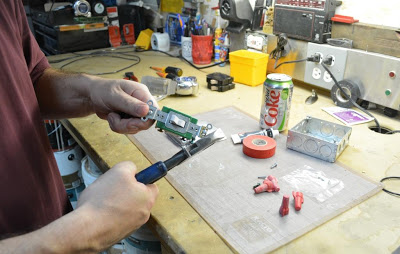
Back over to the workbench, I set up to prefabricate the switch assembly. Here's the stuff:


Diet Coke Lime The lime is important. I can't find the reference exactly, but it's in the National Electrical code somewhere,...promise.
Square Box Extension Ring. This will extend the in-wall box allowing for more room to fit the switch and wiring.
30 Amp, 2 pole switch I chose Leviton's extra heavy-duty spec-grade.
Anti-Oxidant CompoundThis gunk is required when you tie copper to aluminum wiring.
Screws: 8/32's to screw the window box, and one ground screw to ground it. (... to rule them all!)
Wire Nuts ..you know,...to nut wire.
I clipped the ears off the switch, so it would fit nicely behind the plate.
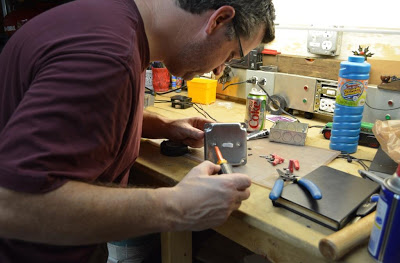
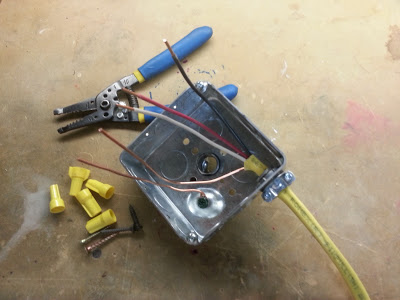
I pulled the existing 6/32 mounting screws out of the switch, since they're not needed here. Next, I stripped some new #10 copper wire and installed it behind all 4 termination screws, the line side (the "home run" to the breaker) on the black screws, load side (to the heater) on the brass.

No, the WD-40 and the big ol' bottle of blowin' bubbles are not necessary.
I like to put a wrap of electrical tape around the device, leaving a folded, courtesy tab for easy removal later.

Pop the cover on with the two short 6/32's (included with the cover) and we're ready to install.
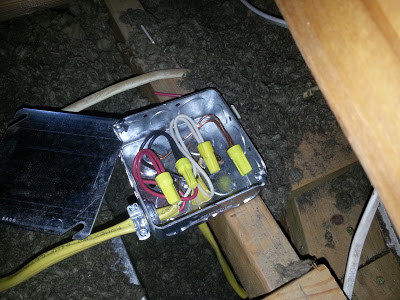
The extension ring installs on the wall, screwed to the back box in the wall.

The stripped, bare copper and aluminum wires got a good bit of the anti-oxidization goop. Man! I wish we didn't have that aluminum wiring. At least it's only on a few circuits in the house.
All wired up and sealed in place. I slipped on a 90 degree flex connector, pulled fresh new wire to the heater, terminated it, and sealed everything up.

Flip the breaker and power it up. We should be in business, just in time for the next laundry cycle. Now I can shut the whole thing off whenever I'm finally able to drain it for maintenance.

Look good?
To check the voltage, I popped off the front cover, peeled out a piece of insulation, and exposed the internal wiring terminations for the the heating element. Careful, careful,.. 120 volts from both of the hot conductors to ground and 240 between them. Done!

240,...243.7, whatever it takes.
Next time kiddies, it's on to plumbing. I have to repair or replace that corroded, seized shut-off valve. I'll have to do some research on that one.

Before servicing the water heater...
A friend of mine told me about struggles with black water coming from all the taps in her house. It appears that it may be a water softener issue, but her heater is half-full of gross sediment. In discussing the water heater as a possibility, it really woke me up to my own lack of maintenance.
I found that water heaters should be drained and flushed as much as twice a year?!!! and the sacrificial anode rod replaced as much as annually?!!! Lovely. We're on year 7 and I've never touched the thing; heck I've never even looked at the water heater, even though I pass it entering and leaving the garage. There was a receipt on top, showing that it was purchased at Home Depot 2001. I bet it's never been drained or had the anode replaced in all this time.
What a great opportunity for a blog post on water heater servicing right? Drain it and check the rod, piece of cake. Let's do it this weekend kiddies!!!
Nope. Because of this stuff I need to deal with first.

Just to spice things up a bit, I just found another little Inheritance from my DIY Predecessors. Instead of the 2 pole, 30 amp breaker, they installed two 1 pole 30 amp breakers. Not cool, IMHO. The two pair in the yellow circle should look like the three in the blue below. It's not safe to turn off or trip half a 240 volt circuit, both should turn off together.
2) Water: To drain the water heater I need to turn off the cold water coming into the tank. It's handy that there is a valve here. Of course this particular valve isn't handy at all. It's completely frozen, crusty with corrosion. AWESOME!! I'm going to look into replacing the parts so I don't have to cut into the pipe and mess with soldering ect. I'll just have see if that's a possibility. (I checked Home Depot; they don't sell the kit, but they referred me to Ace Hardware).
3) Dissimilar metal corrosion: This steel fitting tied to copper on the cold water feed is corroding. Eventually, I suspect we could suffer a breakdown here, probably timed for 5 minutes after we depart for a long vacation. There's nothing like spewing water left unchecked for a week.

I found that water heaters should be drained and flushed as much as twice a year?!!! and the sacrificial anode rod
What a great opportunity for a blog post on water heater servicing right? Drain it and check the rod, piece of cake. Let's do it this weekend kiddies!!!
Nope. Because of this stuff I need to deal with first.
1) Electrical: As I understand it, code requires an electrical disconnect:
A) within sight,... or
B) capable of being locked in the open position (power off) position.Our electrical panel is outside, as is common here in Arizona. Technically, we may be ok, since the breaker can be locked out (if I buy a lockout kit). It's fuzzy, the locking means is supposed to be there even if it's not locked. Either way, I don't like it. Electrical code is minimum. I want better in my own home, so I'm going to install a switch.
Just to spice things up a bit, I just found another little Inheritance from my DIY Predecessors. Instead of the 2 pole, 30 amp breaker, they installed two 1 pole 30 amp breakers. Not cool, IMHO. The two pair in the yellow circle should look like the three in the blue below. It's not safe to turn off or trip half a 240 volt circuit, both should turn off together.
 |
| Alas, this fine, Shakespearean penmanship is not mine to claim. |
 |
| Crust is good on apple pie, not on plumbing. - AZ DIY Guy |
I'm not quite sure what to do here yet. I'll start researching it.
I suppose I'll start with the electrical. Hopefully, I don't discover anything else shocking. Check in next time as I head towards eventually getting on a regular maintenance program.
PS - Do I at least get points for making it through the whole post without calling it a Hot water heater?
I suppose I'll start with the electrical. Hopefully, I don't discover anything else shocking. Check in next time as I head towards eventually getting on a regular maintenance program.
PS - Do I at least get points for making it through the whole post without calling it a Hot water heater?
_____________________________
Update: I crossed step number one off the list and repaired the electrical portion. Yes, I found some scary stuff in the process. Check it out! Installing a Water Heater Shut-Off Switch
Moving through another door
Despite the kids going back to school, some crazy weeks at work, the still oppressive summer heat, I managed to regain forward momentum on the interior door replacement project. It's getting to be routine now: purchase, plane to size, paint, rout hinge mortises, hang the door, drill and chisel for the door hardware and install the handle / latch assembly. Not a pro, but I'm getting better at it. (Here's where I started)
This time it was Jack's bedroom that got completed. His door had sat, half-painted for four months or so, while I tackled other pressing projects (see the index, April through July). I do get off-track.
I pulled his (young) man-cave door, complete with HAZ-MAT warning and an electrician's lockout tag-out tag out off it's hinges.

I've also started monkeying with the new DSLR camera and tripod, so "action shots" of yours truly are possible. Although, seeing my mug isn't much of an improvement, I can finally show some better photos than the ol' camera phone, and share some updates to my methods.


This time it was Jack's bedroom that got completed. His door had sat, half-painted for four months or so, while I tackled other pressing projects (see the index, April through July). I do get off-track.
I pulled his (young) man-cave door, complete with HAZ-MAT warning and an electrician's lockout tag-out tag out off it's hinges.
I've also started monkeying with the new DSLR camera and tripod, so "action shots" of yours truly are possible. Although, seeing my mug isn't much of an improvement, I can finally show some better photos than the ol' camera phone, and share some updates to my methods.
I've started using Bench Dog - Bench Cookie Work Grippers to keep from scratching a fresh door with the old one, when I'm transferring hinge measurements. mmmmm coooooookies!

 |
| Cooooooooookies!!! |
I like to transfer marks directly by using a little pocket combination square rather than a tape measure or ruler. It's fast and accurate, less chance for me to screw up when there's no tolerance for error on door hinges. A slight miscalculation from my melon-head and the door won't fit in the original location.
You'll also notice I like to wear free t-shirts. It's an important step to keep Sweetie from killing me for wrecking, yet another, nice work shirt in the garage. I just thought I'd lob that out there for Jeff over at Home Repair Tutor, who has been known to DIY in a shirt and tie.
 |
| Yes,.... that's the mighty, still not finished, organizer project under there. I'm not proud. |
I zapped the hinge mortises out. The Ryobi template is still doing awesome, several doors in.
I'm still using the Irwin door lock installation kit that I've had since door #1. I'll do a review at some point, but honestly the jury is still out. It's not blown me away like the two cool Ryobi products I've tried, but it's done the trick,... mostly. Yeah,..mostly good.
I recently shared I tried and reviewed a new tool to cut the mortise for the latch plate. Read my post about the Ryobi Door Latch Installation Kit if you want all the juicy details. It sped up the process and gave me better results than my previous method.
Then a quick bit of door latch installation action (with an insulated screw-driver for some reason).
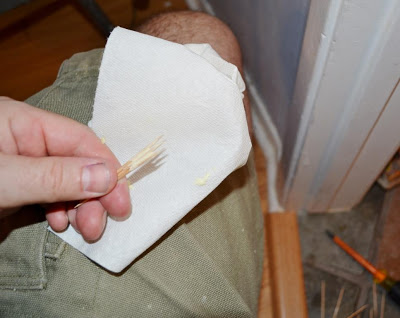
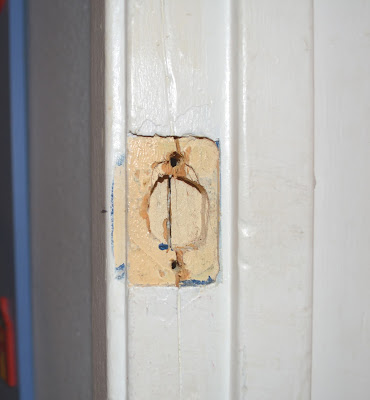
Then, a hiccup. The latch plate mortise in the doorjamb was simply too worn out to hold screws. It's obvious this particular doorway had experienced some violence, sometime in its existence, before our loving family took possession. At some point, the wood had been blown out, obviously kicked in by Genghis Khan's marauding Mongolian hordes. There had been feeble repairs.
I employed the old 1-2-3 wood glue and toothpicks approach to fill the void. Here's how it's done. Warning, it's isn't pretty, but if you want to know how the soup is made, read on.
Step 1: Slop some glue on toothpicks. Make sure to open the box in such a way that you spill them all over the floor as I have, otherwise the technique won't work. If you're wearing nice clothes to work in (ahem, Jeff), a damp paper towel is nice to have on hand.
Step 2: Jam a three or so gluey 'picks in the hole and savagely snap them off. There's no need for ceremony here. We're cleaning up after barbarians. Note: The spattered glue on my hands is a controlled exercise, just an educational illustration of one possible outcome, if you get overzealous in the glue application. It would never happen to me in real life. I'm sacrificing for you, dear reader.
Step 3: Run the screws in. Pro tip: I like to turn my screws in clockwise, otherwise known in the scientific circles as "righty-tighty". Do it your own direction, I'm just sharing what works for me. Again, I used the insulated #2 Phillips tip screwdriverbecause, well.... I don't know.
I'm going to come back and touch up all the door frames at the end of the project. I'll fix that damage. For now, we've got this end of the hall way 100% done!! Except the ugly light fixture,... those old hideous linen closet doors and hardware,.... the paint,...the baseboards,... and the chips in the drywall corner. Yep, besides that stuff, 100%!!!

Review: Ryobi Door Latch Installation Kit
Reviewing the Rayobi Door Latch Installation Kit in action.
Read MoreBefore and After: Family Room
I pulled our old, nearly-dead (mostly dead?) computer from the closet this week and managed to extract all our old files from the hard drive. I was pleased to find a few grainy photos of the family room from when we first moved in. I'd described the look of the original "built-in" shelves in the first of the Great Family Room Remodel posts, but didn't know I had the photo's show them.
 |
| Late 2005: The prior owner's stuff, as they were departing. |
These built-in bookcases were created in five sections from 2" x 10 3/4" boards (2 x 12?) and a plywood backing. They were actually fairly well constructed. They were stained dark, with no protective finish. With the thick shelves and dark color, the unit appeared too heavy for the small room. It really gave it a basement cave-like feel.
We moved into the house and just and lobbed our stuff up there.
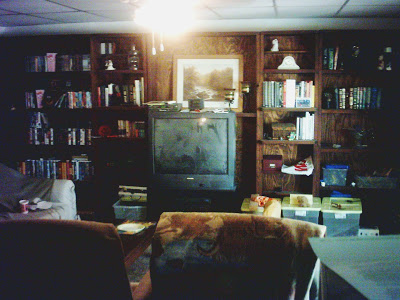 |
| Early 2006: the dusty television years. |
 |
It's hard to believe this 6 year old, Alien Bounty Hunter is now a teenager.
|
We spruced up the shelves in 2006 with molding, bead board panels, and crisp, white paint. I built a custom TV stand soon after. In about 2008, we installed french doors. There the room sat for years, with its horribly, stained, way too low (7' 5") drop ceiling and the ceiling fan finial that hung 3/8" below the peak of my melon-shaped head.
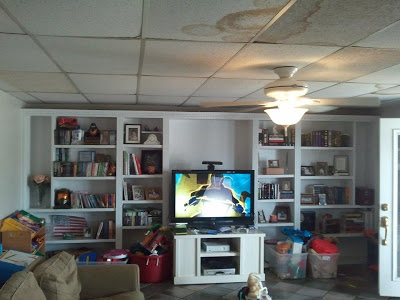
The remodel finally happened. We loaded our beat up old furniture back into the room. Recently, we replaced the old sectional couch and added some accessory tables (IKEA). Finally, a proper reveal with the new ceiling is worth while. Compare the distance from the top of the bookcase to the ceiling; we went from 7' 5" to 8' 1", an 8 inch gain! I can't even hit my head on the ceiling fan when I jump. It only took 7 years!!!
 |
| It's a bit busy, but it's our main hangout. |
 |
| The kid infestation is still in full bloom. |
 |
| I used a lightweight foam crown molding to cap off the book cases. |
 |
| The french doors got capped off with the same dentil molding. We used Jeld Wen doors with the built in shades from Home Depot. |
In case you mist it: Installing a cooling mist system
Most of the year, it's simply a paradise here in the desert southwest. However, in the apocalyptic heat of a Phoenix summer, we find ourselves dashing from air conditioned office, to air conditioned car, to air conditioned home. We do it quickly here, so we can get to our Popsicle stashes before we go into heatstroke. During these oppressive summer months in the desert, the temp rarely dips below 100°. One of the things we miss, huddled in our icy, electricity guzzling castles, is our outdoor living.
Luckily, our super-dry climate lends itself very nicely to evaporative cooling (and swimming pools!). Most restaurants with outdoor patios and amusement park lines employ a misting system to keep folks cool in the summer. Water flows through tubing and is forced through very small nozzles, vaporizing and cooling the area as much as 20 -35° F (11 - 20° C) in seconds.

We decided to install a low cost plastic tube misting system on the back patio. Perhaps if we like it, I'll upgrade to a sturdier PVC or copper tubing system in the future. Right out of the box, it was an easy install. I just uncoiled the tubing with the nozzle receivers already factory installed at regular intervals.

I screwed it to the hose and squirted the lines clean before installing the brass and steel nozzles. I installed some blank plugs in the end close to the house to keep the mist off the structure. One nozzle was an "auto drain valve" that was installed in the lowest point so that the water drains from the lines when the pressure is off.


It really worked well. On a 109° day, the temperature dropped dramatically, or at least it sure felt like it did. Even though our patio living area is out of shape, desperately needing renovation, it's an enjoyable space in the heat of the afternoon. There's nothing like burning some meat on the grill, with a frosty beverage in hand, in the comfort of your own back yard (...in the shadow of a pointy-spiked, 20 foot tall saguaro cactus (?))

Luckily, our super-dry climate lends itself very nicely to evaporative cooling (and swimming pools!). Most restaurants with outdoor patios and amusement park lines employ a misting system to keep folks cool in the summer. Water flows through tubing and is forced through very small nozzles, vaporizing and cooling the area as much as 20 -35° F (11 - 20° C) in seconds.
I attached it with the included nail-in clips. They were similar to the little white clips you normally see cable-tv wiring, only in a delightful, tube-matching tan.
 |
| Sweetness |
 |
| Yep, that's some nasty corrugated fiberglass stuff. |
I installed a handy 4 way metal hose connector w/ shut off valves at the rear faucet (one for pool filling, one for the garden hose, one for the mister system, and one for filling squirt-guns etc for pool-related combat).
I threaded the calcium filter in line with a new 6' garden hose and connected it to the system. A quick flip of the valve and sweet cooling water blasted out of the nozzles, curtaining the entire porch in a very-fine mist. It dissipated well before reaching the ground.
I know,... I know... I often take the extra, sometimes necessary step in my projects. I admit, you don't actually have to fire up a Weber Charcoal Grill when you test your own misting system. It's just how I roll folks, no shortcuts here.
 |
| I've seen fire and I've seen rain... |
Just so I can avoid the inevitable requests,... and the begging,...and the whining,... here's the money shot. I know it's the key project detail you really stayed to see.
 |
| They like their 'dogs blackened. Don't blame the grill master! |
We've been enjoying the cooling mist into the evening, several nights a week, reclaiming the night from the heat.
I don't know if this system will work where you live. I suspect that in the humidity of a Houston, Atlanta, or Orlando climate, it would not feel quite as refreshing to add more moisture to your air. I'd bet nice Popsicle will do the trick though.
What do you think? Will a misting system make summers more enjoyable at your house?
For the sake of updating,... and stuff
I'm missing a solid post today, for several reasons. For one, I'm back to working on the interior door replacement project. I can only share the same repetitive stuff with you so much before boredom causes you to bounce your head off the keyboard.
I actually do have a post on the back patio misting / cooling system, but the photo's are just plain crummy and I missed a few. I have to re-shoot.

I have fiddled around with the site a bit, adding some favorite story links in the right margin for new visitors.
I've also launched a new side project. I thought I'd chronicle my adventures in learning photography. After a long saving's program, I've finally pulled the trigger and ordered a fancy new DSLR camera. Check out my little side project, AZ DIY Guy's Photography Adventures.
Well it's off to Jury duty, a 15th wedding anniversary with my beautiful bride, and two Meet the Teacher nights this week,... plus, maybe a last coat of paint on this door? Have a great week my friends!
If you stopped by for some hardcore, rock star DIY awesomeness, and found this drivel instead, check out my last post, it's a hot beast: Installing an Oscillating Ceiling Fan (It's hot up here)
 |
| Time to make the donuts... |
I have fiddled around with the site a bit, adding some favorite story links in the right margin for new visitors.
I've also launched a new side project. I thought I'd chronicle my adventures in learning photography. After a long saving's program, I've finally pulled the trigger and ordered a fancy new DSLR camera. Check out my little side project, AZ DIY Guy's Photography Adventures.
 |
| http://azdiyguyphoto.blogspot.com/ |
I'm not only looking forward to a new camera because I'm a gadget hound with an artistic desire to capture images. It will also help improve blog photos, long hampered by exclusive camera phone use. A tripod and remote will improve my action shots and get me in the frame more often. The kids are growing fast; I'll capture more of that while I still can. Finally, Arizona is full of awesome nature, just waiting to be captured.... or maybe I'm just a gadget hound. Yep that's it.
We'll see what happens with the photography blog. I don't know how far I'll go with it and how much I'll let it cross over here or onto the Facebook page (Please stop by and give it a "like". There's a whole lot more content there that doesn't show up here). Surely, it my inner geek, stupid humor, and style will flow there as well. It's not my focus; this Project's blog is where it's at for me.
Well it's off to Jury duty, a 15th wedding anniversary with my beautiful bride, and two Meet the Teacher nights this week,... plus, maybe a last coat of paint on this door? Have a great week my friends!
______________________________________
Installing an Oscillating Ceiling Fan / Fishing Wires (It's hot up here)
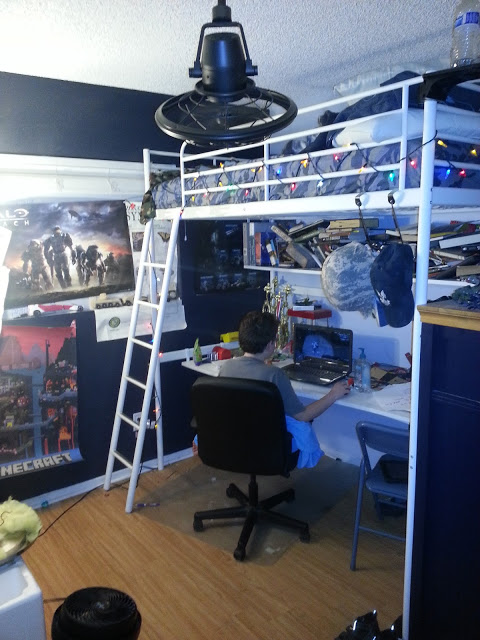
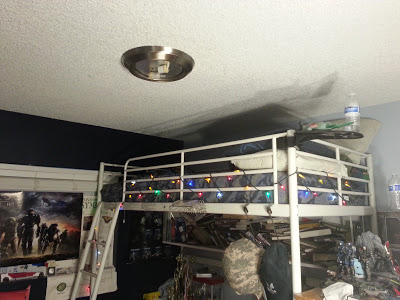
Jack's room is a den of tween, man-cave awesomeness. It's his fortress against the world, or at least against the constant onslaught of a pestering little sister. He spends a lot of time in there. To maximize space we'd gotten him a loft bed from IKEA, with a built in desk.
Problem: the blades of his ceiling fan spun right through the sleeping area. I told him to scoot over against the wall and not roll around much, but Sweetie convinced me Child Protective Services would have an issue with my solution. So, I removed the fan and installed a simple light fixture. Unfortunately, during the hottest summer nights, it's been warm for him, up by the ceiling. A floor fan just doesn't cut it.
We saw an oscillating ceiling fan on display at Home Depot and decided it would be perfect for him. We'd direct it at his bed and get him some much needed air flow. What a cool idea! I've installed plenty of ceiling fans over the years, this was an odd one, but it shouldn't take more than a few minutes,...right? (Remember Murphy's Law?)
I say "prepared", because that's as far as I got. Why? because I was an over confident putz. In my steely-eyed, experienced-fan-installer confidence, I hadn't even glanced at the instructions. I hadn't paid any attention whatsoever to the fact that this fan had two wires, one to control the fan, the other to control the oscillating. The existing house wiring only had one wire. Moooooron.

Problem: the blades of his ceiling fan spun right through the sleeping area. I told him to scoot over against the wall and not roll around much, but Sweetie convinced me Child Protective Services would have an issue with my solution. So, I removed the fan and installed a simple light fixture. Unfortunately, during the hottest summer nights, it's been warm for him, up by the ceiling. A floor fan just doesn't cut it.
 |
| The lens is missing as a result of an unfortunate incident with a N-Force Vendetta Sword |
With the power off, I took down the old fixture. I capped off the wires and installed the mounting bracket that came with the fan. I'd forgotten about the ceiling damage from the old fan that was hidden behind the larger fixture.
Again, please excuse the shabby cell phone pictures folks. I'm still working on a replacement for the camera.
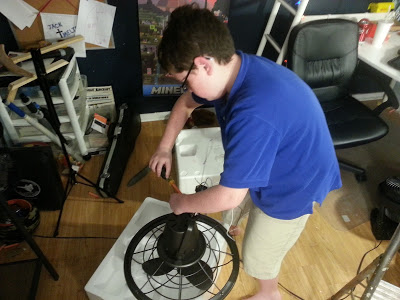
Jack got some tool time in with the assembly of the fan.
I popped the fan onto the bracket and prepared to make the electrical connections.
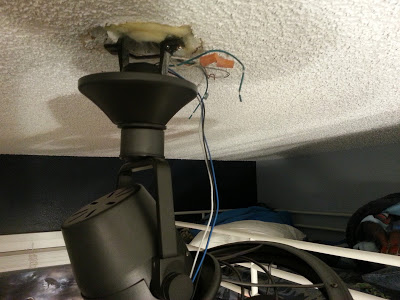 |
| See the black AND blue wires? |
I say "prepared", because that's as far as I got. Why? because I was an over confident putz. In my steely-eyed, experienced-fan-installer confidence, I hadn't even glanced at the instructions. I hadn't paid any attention whatsoever to the fact that this fan had two wires, one to control the fan, the other to control the oscillating. The existing house wiring only had one wire. Moooooron.
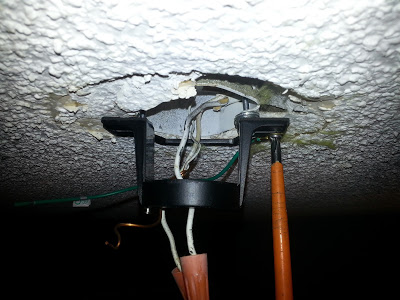
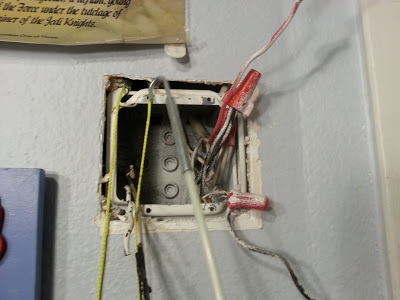
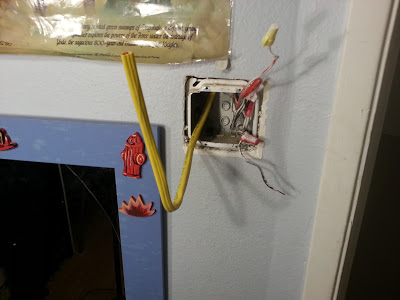
I've used awesome add-on electronic solutions in the past to solve this single-switched wire problem when using a fan / light combo, but this unit comes with its own control switch. It requires two wires. I need to install another wire from the switch box to the fan. You know what that means,... in Phoenix,... in the summertime,... in the afternoon...
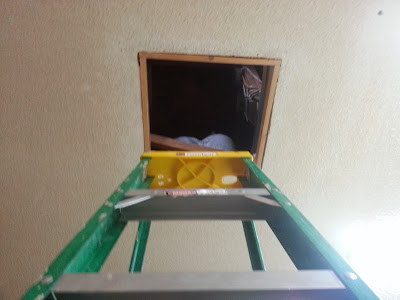 |
| Attic work. I hate attic work. |
It was easy to find the ceiling box quickly (It's hot up here.), and trace the cable to where it dropped down the wall, towards the switch (It's hot up here). I needed to replace that section of 2 conductor cable with 3 conductor cable (It's hot up here). I gave it a gentle tug (It's hot up here) and figured that it felt loose enough to pull out, no staples (It's hot up here). I scurried back down into the sweet cooling embrace of air-conditioned space.
I popped into the switch box, below the Empire poster. Anyone know where I got this poster,... a loooooong time ago?
Fishing attempt #1: (By using the word "attempt", and numbering it, savvy readers will recognize that I'm about to introduce a failure). I tied attached the new cable to the old one and wrapped it with electrical tape in a long tapered head. I had Jack gently feed it into the wall, while I pulled from above (It's hot up here).
Nothing. We made it an inch. I stopped pulling when I felt initial, heavy resistance (It's hot up here). There's no point in skinning the wire up due to a staple. Fail.
Fishing attempt #2: I broke out the ol' fish sticks. No, not this variety, but a set of Klein Glow Rods . These are great for getting through hard to reach areas. I've had tremendous luck in the past.
I poked around for a bit but could not access the proper spot from above (It's hot up here) or below. There was a duct immediately above the switch, blocking the wall cavity. The existing cable entered through a hole at an odd angle. FAIL
Fishing attempt #3: A fish tape? . Nahhhh... The last thing I want to mess with in the attic (It's hot up here) is a coiled mess of fish tape in all that god-awful insulation. Didn't even try. FAIL
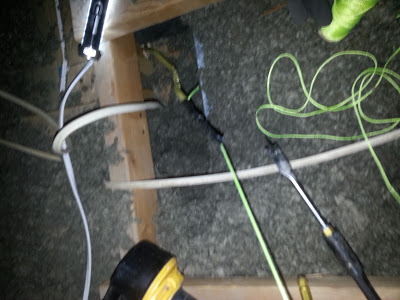
Fishing attempt #4: In walls without insulation, I've had good luck with weight on a string. I Mac Gyver'd this feat of modern engineering with a string line and some 1/4" nuts.
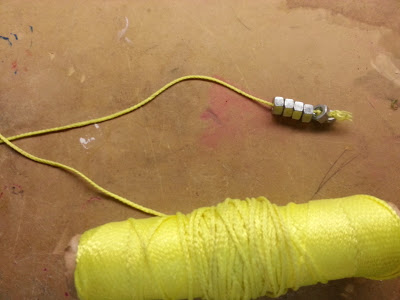 |
| W.W.M.G.D. = What would Mac Gyver do? |
Then it was a matter of drilling through the top plate. I used a large extension and a 3/4" spade bit
 , at an angle to penetrate below the duct work (It's hot up here).
 |
| Here's my rig. |
 |
| Hmmm... AZ DIY Guy, It doesn't look to miserable in the picture. |
This is one of those times where a good cordless drill is a must. Stringing an extension cord through the itchy attic mess (It's hot up here) would be another exercise in misery. I like a bigger 1/2" chuck drill too.
I dropped the weighted string down the hole (It's hot up here) and landed it directly on the top of the switch box, first try!!!. Success!!! I clambered back down (into air conditioned sweetness) and fished the string out with the hook on the fish stick.
Back up top (It's hot up here), with Jack feeding from below, I slowly pulled the string with the new cable attached. I managed to get it plenty clear of the hole, when it got hung up on something. There was no way I was going to tug on it and strip the wire in the wall. I cut my losses and stopped. I'll splice it in the attic (It's hot up here).
I did not want to spend one more second than necessary in a 140 degree attic (It's hot up here), so I prefabricated my splice box down in the workshop.
Back in the foul darkness (It's hot up here). I screwed the box down, clamped the cable, made the splices, installed a few staples and stuffed the cable into the fan box.
It's hot up here: In case I hadn't mentioned it. It was a bit toasty, especially in my long sleeve shirt and jeans. I forgot my dust mask on that last ascent into hell.
 |
| Crazy from the heat. |
Seriously folks, attics are no place for dilly-dallying in the summer, not to mention in Phoenix on a 106 degree day. I took good breaks in the cool, stayed hydrated, and kept my visits to less than 10 minutes. It still sucked, but I got it done and managed to avoid a heat stroke and fall through the ceiling. I don't recommend it.
Back on earth, I had a nice fresh piece of 12/3 w/ ground NMC ("Romex") to work with.
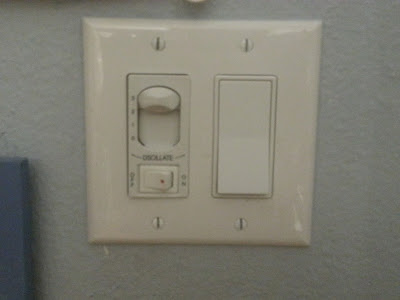
The included switch went in easy. It has a speed selector and an oscillate switch. The other toggle switch now controls a switched receptacle to control a floor lamp, for lighting. We now had no ceiling light fixture. My exciting post on installing a switched split receptacle can be enjoyed here.
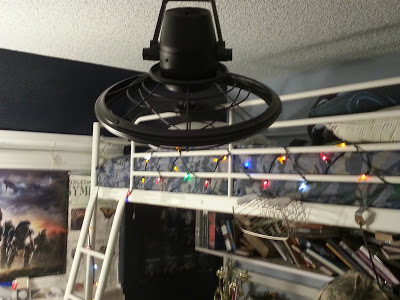
Installing the fan the rest of the way was pretty standard stuff. No problem at all.
It looks great and works well. It cools nicely at the desk below. BUT, dang-it, it won't oscillate high enough to blow into the bed. It's a total miss. I couldn't rotate it until I powered it up to learn that it wouldn't go 90 degrees to the ceiling; it goes about 45 degrees.
The other issue is that there's some wobble in the entire fixture as it oscillates. I'm going to have to brace it up tighter. I'm not comfortable with all the movement on just two 8/32 screws holding it up. I also don't like the direction to periodically tighten the screws. It seems they'd solve that in the design.
I may see if I can safely disassemble it and slip a couple gear teeth to get the thing to shoot sideways. Either way, Jack's enjoying it while he Minecrafts his summer vacation away.
Enjoy the cool breeze my friends.
Installing drip edge, or maybe not...
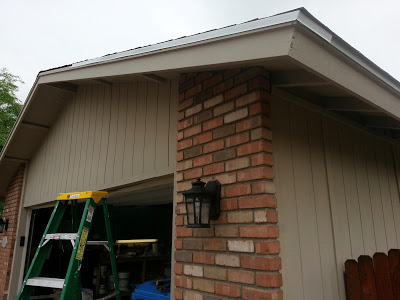
I'm really trying to wrap up the work on the front of the house. All that's left is replacing the drip edge that was removed when our predecessors built the dreaded tunnel of doom . I'd also torn off a good amount when I replaced the rotted facia boards.
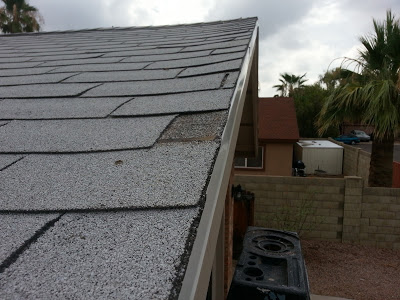
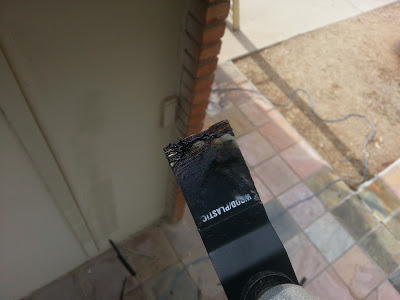
Drip edge is a sheet metal flashing strip that slides under the roofing and over the top edge of the facia. It has a slight kick at the tip that kicks water off, away from the wood to keep water from ruining it. Here's a good look at the old stuff I'd removed a few weeks back when I tore out the facia.

You may have noticed, my normal practice is to attack a project in a frenzy like a shark on the scent of blood until about 90% complete. This is normally where my eye wanders and I leave the project, moving on to the next. I don't recommend this, and I don't have any good excuse; I'm just letting you know my style.
The problem is that this time it's obvious. not only is there a bright white metal strip missing on part of our roof line, but there's the issue of the remaining shingles not being fastened very well. I'd pulled nails and staples in my demolition. Our area suffered a pretty strong storm last week that uprooted trees and ripped up roofs, even clay tile shingles. We were mostly spared, but there was a little issue with loose edge shingles.

I got up early this morning, to beat the heat but couldn't really fire up the air compressor to nail it without waking the neighborhood.

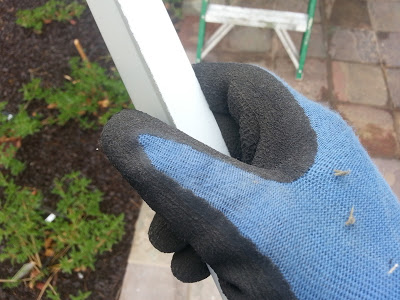
At least I could get to the quiet work of measuring, cutting, and dry fitting the edge. This stuff is hazardous. Just touching it, you can feel it really wants you to slide your bare hand along the edge, just once, so it can rip your tender flesh open. It wants to taste blood. I denied myself a trip to urgent care for stitches and slipped on some gloves.
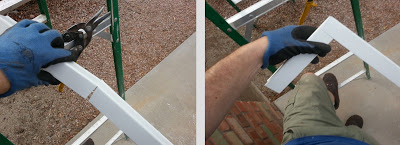
I took a quick tour around the rest of the house to see how the existing drip edge was installed around corners and peaks. It's pretty easy with a pair of tin snips. Here's an outside corner.
I slipped it into place, under the shingles, overlapping the next piece of edging. In some parts of the country, there's additional steps, such as getting it under the underlayment to prevent ice damming. Nothing we need to worry about here in Phoenix.
Heck, it almost never rains anyway.*
There were a few missing shingle parts from the storm. Luckily, I still have a scrap pile I can find some pieces to scavenge and cut here and there.
In one case, I happened to find the exact missing puzzle piece laying over by the neighbor's yard. I tucked him back in under his blanket, nice and cozy. I'll come back and fasten it later, when I nail in the edge.

I got the garage dry fitted and started wrapping around to the front, where the tunnel had been.
The trouble is, I had cut through two layers of shingles in the middle of the roof face to remove the section over the tunnel. The old roof buried below was sticking out too far. I'd have to trim it back, flush with the facia somehow. I tried a razor knife, but that was ridiculously difficult. I ended up using my oscillating multi tool, even though I only had a wood / plastic blade on hand. It did really good when cutting from below,...
for a while.
Yep. I destroyed the blade in a few short minutes.
I guess it's a trip to the hardware sto...."Boom!,... BOOOM!,... BOOOOOM! ....BOOOOOOOOOM...."
Someone to the south of us was evidently doing a reenactment of the cannonade, preceding the last charge in the battle of Gettysburg, early Sunday morning, no less.

Ahhhhhh,... crud.
Normally, I'm accustomed to seeing a bright blue beautiful sky over there. A couple more flashes and deep rolling booms re-awakened my long dormant Michigan weather sense.
"Fuuuuuuuuudgggggggge....." - Ralphie Parker
Everything was painstakingly dry fit into place. Shingles and edge would be blown to kingdom come in a storm. It looked like it was going to be a doozy. After a moment of cursing and staring stupidly to the south, I dropped what I was doing and fired up the compressor. I had originally intended to simply tack the edge into place with staples before nailing it with roofing nails and adhesive. I didn't even buy the nails yet. I grabbed the 18GA Stapler , scurried up the ladder, and started rapidly banging away. An adjustment to the depth wheel and it was sinking staples through shingles and edge easily, with the occasional spark from hitting granules.

It looked like the storm might just pass to the west. I got the garage face nearly fastened when a big boom from behind startled the absolute crap out of me. It was coming my way after all.
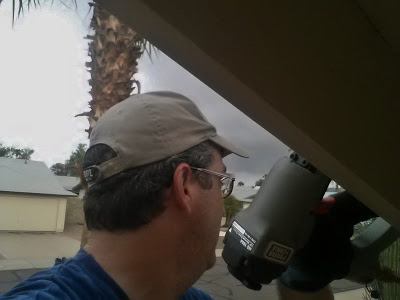
The stapler kept its cool and said, "Bang-ity, bang! bang! bang! bang!" getting me nearly to the end for the garage facia before the initial drops, preceding a cold sheet of rain hit me in the back.
* Heck, it almost never rains anyway.
Idiot.

So much for that. How are your morning plans working out?
______________________________________________

PS - A PORTER-CABLE 3-Tool Combo Kit is one of the very best tool investments I've made for renovation projects and woodworking. It's small and portable. I use mine with its included guns, as well as a big 2-Inch to 3-1/2-Inch Framing Nailer, filling tires and pool toys, and blowing stuff off with a blast of compressed air. - John
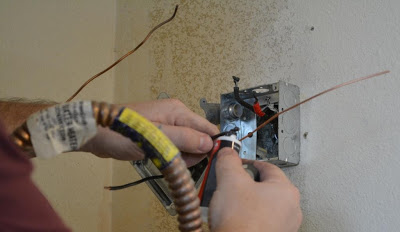
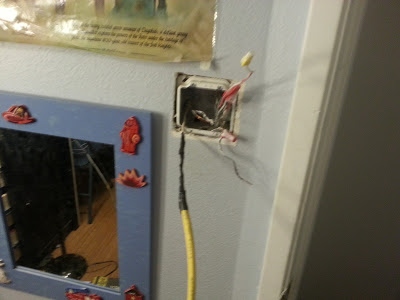
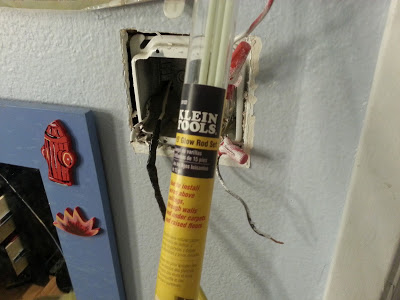
Wiring a split, switched receptacle.
As I redo a room, I like to replace the yellowed, paint-clogged outlets with fresh, crisp new ones. Personally, I like the clean look of the Decora or decorator style devices. They're smooth and don't have all the nooks and crannies to collect dirt.
In working on Jack's room I decided to make one of his plugs switchable so that he could control a lamp with his wall switch. Being the crafty man about town that I am, I decided I wanted to switch only half of the device, leaving one plug constantly hot. Why switch the whole thing when there's only one lamp? It would mean loosing an opportunity for permanent power at that location. How would today's modern lad power his army of electronic devices?
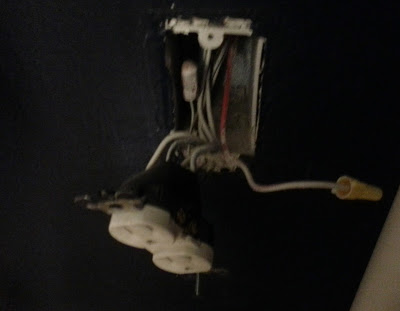
To split a receptacle, there's an easy trick. There's a little bridge between the terminal screws on the "hot" ("un-grounded conductor") side of the device. The "hot" side has brass color screw terminals and is on the side that has the smaller, vertical slot on the face.
.
This bridge is a jumper that lets the current flow from one feeding wire attached to either of the screws or rear, push-in connectors to both of the outlets on the face. Break the bridge and the current won't flow between the top and bottom outlets. It can be done with needle nose pliers and some serious wiggling, or with some diagonal cutting pliers.
I leave the bridge intact on the neutral side ("grounded conductor" or "common") with the silver screw terminals.
Ready to start? You know the drill...
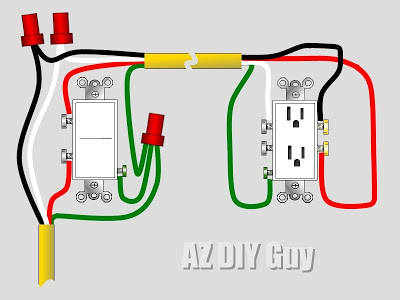
Since my predecessors were thoughtful enough (for once!!) to leave me an extra wire (conductor), I was able to wire this up the most efficient way, no wall fishing expedition.
Here's my quick sketch of how it get's wired up:
In this example, the black and red are actually tied together, to the same circuit (hot) at the first junction box. The switch breaks the red's current. The black travels unbroken The white, neutral travels with them, but simply terminates at the receptacle. The green "ground" (grounding conductor) simply hits the green screws (and metal boxes if applicable). The green shown here is usually found as a bare, un-insulated copper wire. Keep it away from the side screws when inserting the device back into the box.
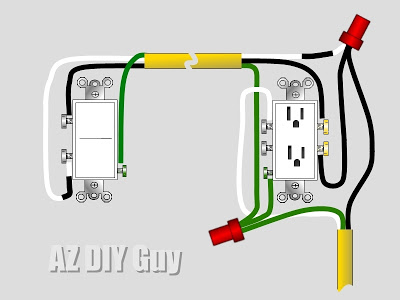
I was very lucky in that there was an extra wire from the switch to the outlet that I wanted to control. There was a second dummy switch at the door. I guess the 1979 electricians had pre-wired for it, but the original buyer didn't want to pay the up charge. But, there's another way, if there's no third wire. It requires that the feeding (line) side hits the receptacle first. It's a little harder to follow.
Confusing eh? This is a perfect example of why I don't ever trust color. There's current on one of those white wires. Cross them up and you've created a direct short. Turn on the circuit breaker, flip the switch, and the breaker will trip (hopefully).
The black feeds half the receptacle and ties directly to the white conductor headed to the switch. The switch-leg comes back on the black wire when the switch is active. Switches don't use a neutral. The re-tasked white wire should be marked with black tape to signal it's change to a "Hot" conductor. The receptacle still does get a neutral in order to work properly and a ground for safety.
It's a common practice to install the switched plug "upside-down" compared to the rest of the room, ground prong side up. It's easily recognizable.
Look like a pro tip: vertically line up your plate mounting screws. Don't leave it looking like a cross-eyed orangutan installed it.
There's so many variations of wiring methods that can be found in a house. Receptacles are often daisy-chained together, so it's hard to get a direct line between the intended plug and the switch without switching more than the one you want. Of course, it's easier to switch an entire receptacle, because there's no third wire needed. I'll share how to fish new cables down walls in a future post.
 UPDATE!! I'm honored to have this story chosen to be featured an Bob Vila's website as part of the "Bob Vila Nation" of contributors from the blogging community. Please check it out and give me a vote by the hammer image.
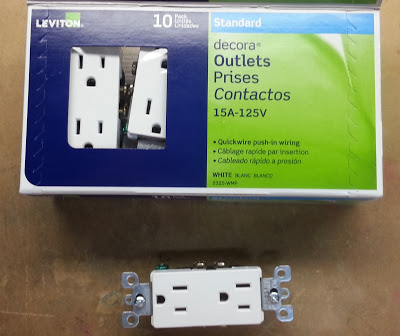 |
| I wonder if there's a prize in this box? I think that's what Prises Contactos means. |
To split a receptacle, there's an easy trick. There's a little bridge between the terminal screws on the "hot" ("un-grounded conductor") side of the device. The "hot" side has brass color screw terminals and is on the side that has the smaller, vertical slot on the face.
.
 |
| Pro tip: Don't stick a sharp pencil, such as this one, in your eye |
This bridge is a jumper that lets the current flow from one feeding wire attached to either of the screws or rear, push-in connectors to both of the outlets on the face. Break the bridge and the current won't flow between the top and bottom outlets. It can be done with needle nose pliers and some serious wiggling, or with some diagonal cutting pliers.
 |
| Snipped! |
I leave the bridge intact on the neutral side ("grounded conductor" or "common") with the silver screw terminals.
Ready to start? You know the drill...
 |
| Circuit breaker = OFF!!!! |
 |
| horrid, low-light cell phone shot. |
Please excuse the crudity of this model.
I didn't have time to build it to scale or paint it.
I didn't have time to build it to scale or paint it.
- Dr. Emmett L. "Doc" Brown
 |
| Split receptacle with 3 wire + ground cable |
I was very lucky in that there was an extra wire from the switch to the outlet that I wanted to control. There was a second dummy switch at the door. I guess the 1979 electricians had pre-wired for it, but the original buyer didn't want to pay the up charge. But, there's another way, if there's no third wire. It requires that the feeding (line) side hits the receptacle first. It's a little harder to follow.
 |
| Split receptacle with 2 wire + ground cable |
Confusing eh? This is a perfect example of why I don't ever trust color. There's current on one of those white wires. Cross them up and you've created a direct short. Turn on the circuit breaker, flip the switch, and the breaker will trip (hopefully).
The black feeds half the receptacle and ties directly to the white conductor headed to the switch. The switch-leg comes back on the black wire when the switch is active. Switches don't use a neutral. The re-tasked white wire should be marked with black tape to signal it's change to a "Hot" conductor. The receptacle still does get a neutral in order to work properly and a ground for safety.
It's a common practice to install the switched plug "upside-down" compared to the rest of the room, ground prong side up. It's easily recognizable.
Look like a pro tip: vertically line up your plate mounting screws. Don't leave it looking like a cross-eyed orangutan installed it.
 |
| Upside-down you're turning me...
- Diana Ross (apparent electrician)
|
_________________________________________
AZ DIY Guy's Standard Scary Warning - Electrical Edition: Don't mess with electrical, unless you know what you are doing. 120 volts of household current can kill you just as dead as much higher voltages, it just lets you suffer longer, and folks can recognize you in your casket. Plus, electrical issues can do a heck of a job burning your house right to the ground. When in doubt, get a professional electrician. If you do the prep work, this project is a snap for someone who's trained; it shouldn't cost too much. Even if you know what you are doing, I recommend you work it like it's live, even if it's not. Research legal requirements in your area before making changes to your electrical system. Don't take my word for this stuff, I might be an idiot.
Mounting a new address plaque
As we touched up the front of the house (tunnel demo, facia, window sill, lighting, flower bed), it has become painfully obvious that the old address plaque is in dreadful shape. Mr. Sun has toasted it. One more summer will probably do it in completely.
 |
| Wait,... What's up with the address number?* |
An address sign is the house's "Hello" to the world,... or at least to visitors, Amazon.com deliveries, and, God forbid, 911 responders. In our neighborhood, emergency responders have done really well locating targets without using address signs. They've easily located night time emergencies due to the flames engulfing the structures.

...screw it in,..


This inexpensive plaque was one of the first things I had added when we moved in. It was a basic wooden plaque I painted and screwed on metal numbers. Cheap, easy, and effective. Besides the cracking paint and degrading wood, the newly installed light fixtures had a spacial conflict and wouldn't go up until I removed it.
 |
| Ok, ... DIY Guy, ... what the heck does that say?* |
So here it's sat for weeks, knee-high to a grasshopper. It's hardly welcoming, barely visible beside vehicles and behind the huge mailbox and palm tree.
 |
| It's so sad and lonely down there. |
Finally, the new one we'd ordered online arrived! Sweetie purchased a Whitehall 16"x 9" San Diego Carved Stone wall plaque from PatioSigns.com. This is 100% acrylic; hopefully, it will weather much better than the wood one. It seems like its made out of the counter top material. It's a nice look. The decorative border line and custom numbers are routed, rather than stuck on. The mounting screw holes are countersunk and there is a nice decorative ogee edge around the plaque. After finding an online coupon, she purchased it for $90.25, delivered. It's a custom piece, you get to pick colors and numbers. I feel it was pretty good turnaround, showing up on our doorstep in three weeks.
I measured the mounting hole locations and lined it up where we wanted it. I adjusted height to make sure the holes would land on a brick. I didn't want to hit weak mortar and have it blow out on me.
 |
| Well, isn't this is an unflattering, weak-chinned angle. |
If you've drilled in brick before with a standard drill, you know what pain it is, even with a fresh masonry bit. A hammer drill makes it downright pleasurable (other than the noise). If you're going to buy a high-end cordless anyway, it's not too much more to get the hammer option. This is my DeWalt 18-Volt XRP in action. It's an older NiCad battery style from my cordless set but is still widely available. Newer, Lithium-Ion versions versions are smaller, lighter, and run longer.
Watch how much quicker a hammer drill works. I start here with normal drilling, then switch to hammer mode (both in the highest speed setting (3)).
Tap in some plastic masonry anchors,...
 |
| Official Klein Klein anchor tapping tool |
 |
| Official Klein Insulated plaque screwdriver |
... and "Hello"
Simple.
* So how do you write about an address plaque without actually sharing your address with the entire connected world? Do it the same way Spielberg creates dinosaurs, with modern technology. A little digital sleight of hand and the numbers are switched. Geeks - do you recognize the language? What's it say? (Hint: It's not Klingon)
SketchUp: Modeling my miter saw workbench
After years of being slightly aware of SketchUp, the free 3D CAD modeling software developed by Google, (now owned by Trimble), I decided it was time to give it a whirl. I was motivated by the excellent Google SketchUp Tips and Resources post on HomeFixated.com and followed the link to download the program. After watching a few of the tutorial videos, I felt reasonably confident in using the software; I dove headfirst into the deep-end of high-tech design wizardry.
It's fun to see it modeled, and clean in 3D, with the real workhorse stabled in my workshop. The story on building the real one can be found here: Building a Miter Saw Bench - Economical but Beefy!
Apparently, I like to do things completely bass-ackwards. I built this project first in the real world, many-many months before introducing it to the digital realms. I had done a quick and simple pencil and paper sketch in my Moleskine Classic Notebook , before jumping right into sawing lumber, and screwing screws with the Kreg Jig, redesigning and
  adjusting my half-baked plan as I built.
This bad-ass bench has been in real-word, front-line combat, supporting the mighty DeWalt 12-Inch Slide Compound Miter Saw in its sawdust-spraying missions for quite a while.
PARTS LIST:
Personally, I'm leaning towards starting my next project with SketchUp and finding my mistakes earlier. I'll still use the beloved Moleskine notebook though.
 |
| It's easier than it looks! |
Apparently, I like to do things completely bass-ackwards. I built this project first in the real world, many-many months before introducing it to the digital realms. I had done a quick and simple pencil and paper sketch in my Moleskine Classic Notebook ,
This bad-ass bench has been in real-word, front-line combat, supporting the mighty DeWalt 12-Inch Slide Compound Miter Saw
 |
| Right before the maiden voyage. |
You can see the general assembly in the photo above. The difference is, with the 3D model, I can do the Tony Stark design move, exploding and spinning it to show you the structure.
 |
| This is exactly how Iron Man was designed. Exactly. |
Plus, the whole thing can be disassembled in mere moments to a virtual lumberyard of precision-cut and stacked loveliness. Enjoy the parts list in its gleaming, three-dimensional-ness:
 |
| Because parts is parts |
- Vertical Structure: 10 ea. 2x4's (1.5" x 3.75" actual) x 29 1/4" long
- Bins: 4 ea. I actually built these for another project from 1/2" plywood and a 1/4" bottom. I used a dovetail jig, but it's not necessary for simple tool bins. 10.5" wide x 6.5" high x 16.25" long.
- Swivel Castors: 4 ea. I bought these 3" heavy-duty, locking swivel castors at Harbor Freight
- Bin Rack - back stop: 4 ea. - pine 0.5" x 1" x 14.25" (made from planed pallet wood)
- Bin Rack - rails: 8 ea. pine 0.5" x 1" x 21" (made from planed pallet wood)
- Top and Bottom Depth Structure: 10 ea. 2x4's (1.5" x 3.75" actual) x 21" long
- Base blocks: 4 ea. 2x4's (1.5" x 3.75" actual) x 3.75" long - for mounting the castors
- Top and Bottom cover: 2 ea. 1/2" plywood 24" x 96" (8 feet)
- Top and Bottom Width Structure: 4 ea. 2x4's (1.5" x 3.75" actual) x 96" (8 feet) long
- Work surface Center: 3/4" White thermally-fused melamine coated particle board 24" x 24"
- Work Surface Right: 3/4" White thermally-fused melamine coated particle board 24" x 23"
- Work Surface Center: 3/4" White thermally-fused melamine coated particle board 24" x 42"
- Two Drawer File Cabinet: (not shown above)
What do you think? SketchUp or actually sketch it up?
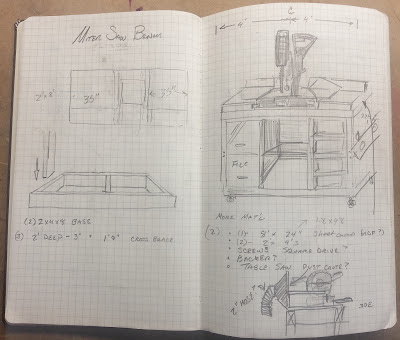 |
| No, it's not a Leonardo da Vinci original, but I see how you might think so. |
Download and enjoy my 3D model free* from Trimble's Warehouse here: Economical Miter Saw Workbench.
* All rights reserved - AZ DIY Guy's Projects: . I hereby give license to individuals to build this bench for their own use. My design, plans, images, and model and may not be used for profit without my express permission. This means you Ted's Woodworking Plans.
If you build a version of my Economical Miter Saw Workbench, please send me some pics and a description. I'd love to feature your project here.