Rubber Biscuit! - Creating a flower bed from recycled materials

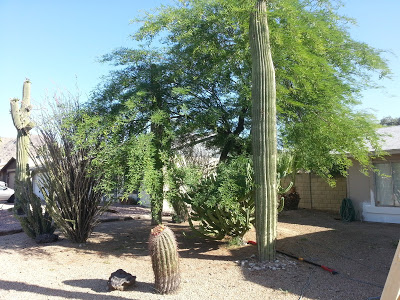
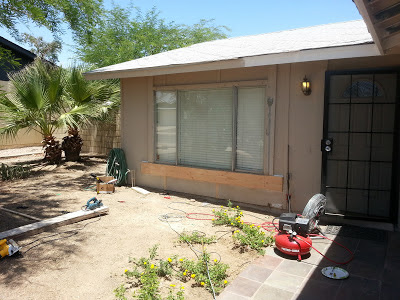
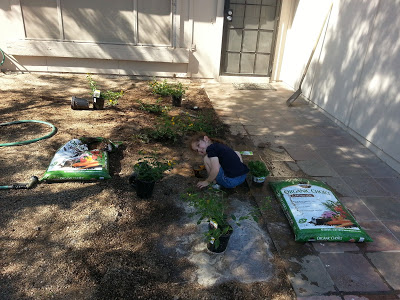
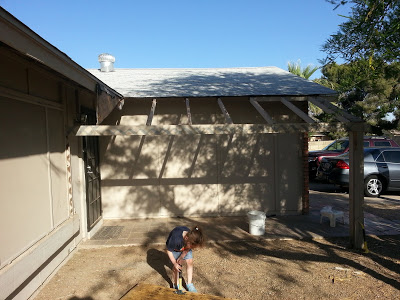
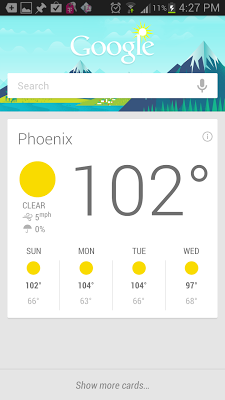
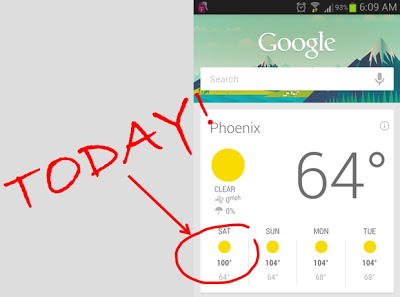
As part of my insane one-day blitz of completing as many projects I could fit, I tackled the new planting bed at our front entrance. I managed to get into it early, before the peak heat of the 4th hottest day ever in Phoenix . It was still a miserably hot experience.

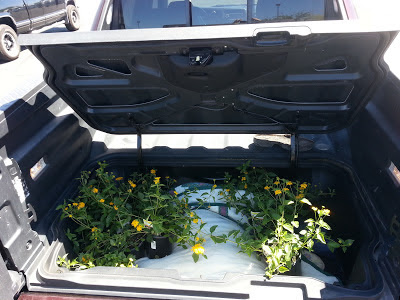
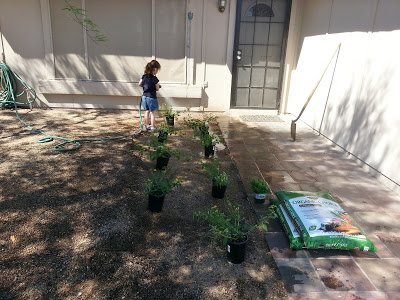
We planted the flowers a couple weeks ago , so today was a border and mulch install day. We wanted a free form, curved bed, to contrast the sharp edges of the house and walkway. I used a string line to lay out a few shapes, until I found one that Sweetie liked. I measured the string to get an accurate length to put on the shopping list.

A clever string quote goes here.

A clever string quote goes here.

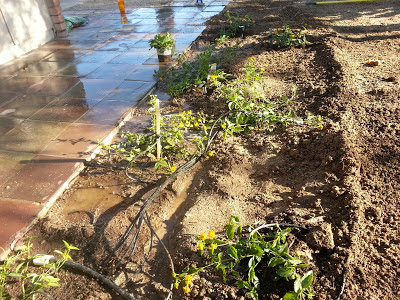
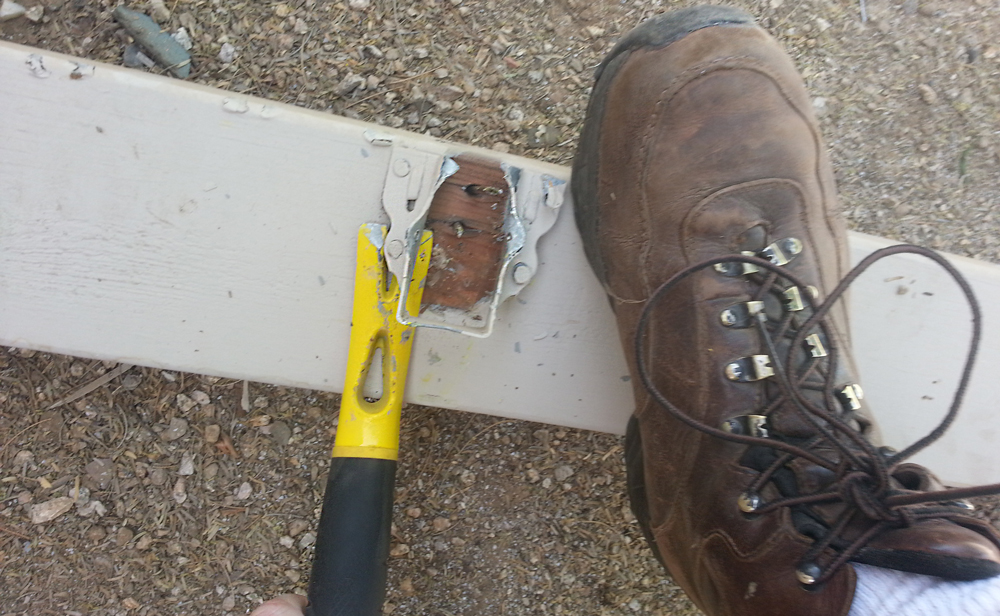
We looked at our options and decided on something a little different. EcoBorder  ("Your best landscape Edge for a greener planet") is a flexible, molded edging. It comes in 4' sections with all needed hardware and is available in a variety of colors. Home Depot had red at one store, red at another, but they carry black, gray, and green on their website. We chose dark brown.

02-eco-border.jpg

I find myself choosing "green" products more and more often when given the choice. This edging is made from crumb rubber, recycled tires. I'd certainly rather tires beautify our yard rather than spend a millennium in a landfill.

I started at the house, where I wanted the edging to butt up at an angle. It was extremely easy to cut with a hack saw. (I know, I know, a hacksaw?!!! Right, I'll break out a power tool later, I promise)

"Wear gloves" it says, vs steel-belted radial bits perhaps?

"Wear gloves" it says, vs steel-belted radial bits perhaps?

The sections coupling together with hard plastic pins. They have scalloped ridges, that should help them from backing out. The gap between sections mirrors molded groves equally spaced throughout the piece. I found it best to coupling a few pieces together before making exact, final placement. 

04-eco-border-landscape-pins.jpg

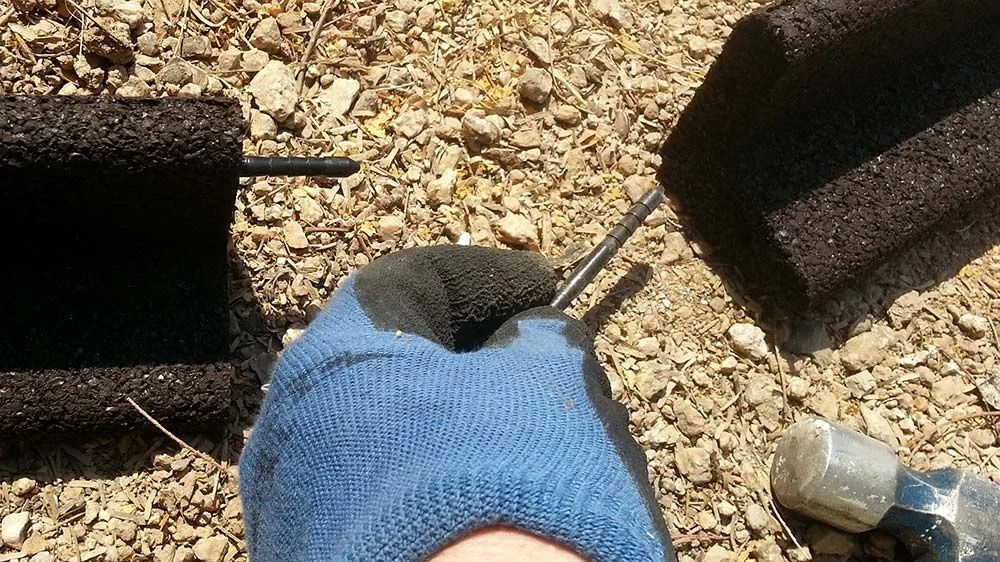
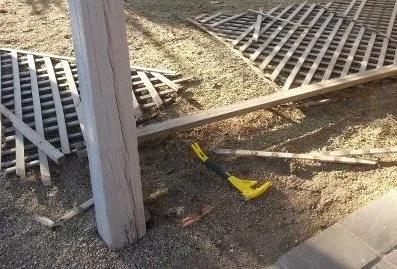
The instructions recommend driving stakes in the ends first. They also state the task requires a "household hammer". Huh? For a tool junkie, that's just gibberish!  There are a lot of hammers in my household; what am I supposed to use?,  ball-peen? sledge, framer's, electrician's, what?!!!.

Moving on, completely free-wheeling without concise, hammer guidance from the manufacturer, I selected Sweetness from my arsenal. Sweetness is my favorite beating stick, a Klein 808-20 Heavy-Duty Straight-Claw Hammer, a common favored sidearm of electricians, ohhhhhh yeahhhhh...

Once I had the sections roughly in place, I started pounding in stakes like Van Helsing. 

Isn't Sweetness  radiant in the sun?

Isn't Sweetness  radiant in the sun?


I merrily staked three sections down, moving along at a rapid pace. This is hard-packed desert soil, not easy to penetrate, even with a shovel. I was happy with my progress,..then, I ran into trouble. I started hitting rocks. The plastic stakes did pretty good, but in the rough, rocky terrain, I snapped the button head off a couple and broke two of them clean in half. One breaking made Sweetness bounce into my knuckle. I may have let an expletive fly on that last one. Sorry neighbors. 

Looking for another solution, I soaked the ground down, no help. I didn't want to drive an old drill bit into the earth, because I knew there was a 3/4" electrical conduit and who knows what else buried below. Burrowing into a subterranean  electrical line is what professional electricians refer to as, "not a good idea". Finally, I Mac Gyvered it by chucking a long bit extension into my drill  backwards (Yayyyy! Power tool!). This put a blunt tip on the end. I set the drill on hammer-mode and slowly let it loose on the hard packed soil, while letting the hose dribble over the hole. 

Drill baby drill!!!

Drill baby drill!!!

It worked. I had to move the routing a couple times when I hit rocks too big to drill past, but it was close enough, I was able to pound the final stakes. I suspect that a nice, soft grass lawn would allow these stakes to go in easily, compared to the Martian landscape of our front lawn.

One last display of the finest hacksaws-man-ship I could muster, and the border was complete!

The most important, and most used tool of the day is on the left: Gatorade

The most important, and most used tool of the day is on the left: Gatorade

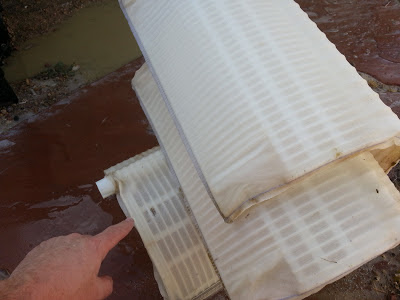
On to mulching, I found this Vigoro Rubber Mulch at Home Depot. Again, they have red and dark brown, but you can order many more colors on the their website. The dark, chocolaty brown matched the new border very well. I decided against tasting it, to review true chocolaty-ness for you. It was my loss perhaps, but the possibility of left over steel-belted-radial on my tongue, gave me pause.

08-pallet-of-rubber-mulch.jpg

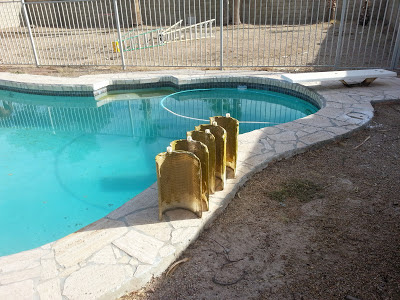
I'd like to see someone drop this pallet off a building. Would it bounce?

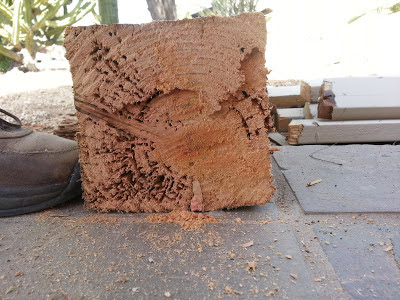
Again, this is from recycled tires. But this time, it's shredded and colored, not crumbles, formed in shape. A close examination will actually show the occasional tire tread pattern. I chose it again for the "green" / recycled aspect, but I also liked the fact that there I wouldn't be laying out a buffet of of munchable wood right where I had found subterranean wood-eating insects feasting on our front porch overhang. The manufacturer states about this rubber mulch:

  • Does not attract insects

  • Saves time and money by eliminating annual mulching

  • Prevents weeds

  • 12 year color guarantee 

Sold!!!!!!

Five bags installed, I'm on my way to Home Depot, again.

10-need-more-mulch.jpg

It was easy to work with, but odd. Dropping a handful on the sidewalk resulted in bouncing, ricocheting rubber. Weird, weird behavior for yard-work material.

What do you want for nothing? A rubber biscuit?!!

                                                            - Elwood Blues, Blues Brother

11-rubber-mulch-vigro.jpg

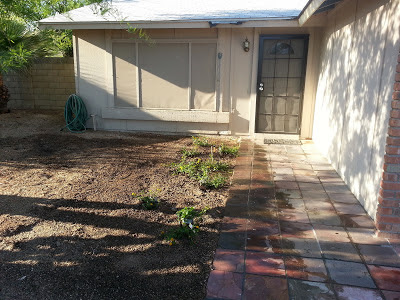
It was crazy hot by the time I finished. I think it turned out  looking pretty good though. I feel good about using the recycled material, especially since its low maintenance. 


Keeping in theme, I'm going to let Elwood take it from here, as only he can. You ever heard of a ricochet biscuit

rubber biscuit by Elwood Blues

Bow bow bow!

"You will go to the Dagobah system"

Obi-Wan Kenobi: [voice comes from out of nowhere] Luke. Luke!
Luke Skywalker: [weakly] Ben?
Kenobi: You will go to the Dagobah system.
Skywalker: The Dagobah system?
Kenobi: There you will learn from Yoda, the Jedi Master who instructed me.

- Star Wars, Episode V, The Empire Strikes Back

You know how some things sound really great, but when you take the plunge, not so much? I'm talking about convertibles, pet boa constrictors, joining the French Foreign Legion, and, of course, swimming pools. Visions of sparkling summer recreation can quickly turn into the reality of a green, swampy pit of wallet-sucking, time-stealing forced labor for survival misery. The planet Dagobah.

BUT, access to a swimming pool, in Phoenix, is pretty much compulsory. It's like having a snowmobile in Northern Michigan.  It's mid-June, and I still haven't gotten our pool operational. The weather would have allowed for swimming in April, but it's been a constant battle with the pool to get it habitable. It's an old pool, in need of a serous top to bottom retrofit, but it's cool, wet, and does the job, usually.

Swimming on Dagobah
At least someone is swimming.
It's not quite as bad as the turtle pond above, but we have had it turn nearly this color when our Baracuda Vac sucked up a rock and I didn't catch it for a couple weeks. Yoda would have been quite comfortable, spending his years of exile in our backyard.

I'd already torn the filter apart and cleaned it twice this year. This time, it was blowing D.E. (diatamatious earth) filter-aid powder back into the pool. In the morning, it was easy to see that yellow slime mold was taking root again. Basically, the filter cycling dirty muck right back into the pool.


Dirty pool
Even our house guest, Bella thinks it's horrid
Our Hayward DE3620 Pro-Grid 36-Square-Foot D.E. Pool Filter
takes 8 screens that look like fish skeletons covered with sail canvas. Locally, they cost 30 - 40 bucks (EACH!!!). I try not to replace them unless I 
absolutely have to, one at a time. Since Sweetie and the kids are bugging me and summer in the desert is in full (heat of hell-fire) blast, I bit the bullet and ordered a full set. Luckily, Amazon had a full replacement grid setwith good reviews, for $103 plus, it's eligible for Prime (free two day delivery). Scooooore!!!


Out of the box they look just as good as anything I've found locally. I let the pressure out of the filter and zapped the retaining ring off with my beloved impact driver.

Hayward DE3620 Pro-Grid 36-Square-Foot D.E. Pool Filter

You may want to have your children leave the room for this next photo. Brace yourself. I'm unleashing serious horribleness upon you, dear reader... You cannot un-see this...

Remember the way to kill a zombie?
AAAGHHHH!!!! That, my friends is slimy yellow mustard algae at it's finest. Believe it or not, I've seen worse. 

A single 37" centered bolt holds this contraption together. I managed to get it apart and remove the screens, getting just enough of this putrid green slime on me to make my stomach lurch, but I managed to keep my breakfast down with Herculean effort. Some screens were obviously damaged, with broken "bones", holes, and bits of yard debris inside, far too big to normally get that far in the system.

A month ago, the system had lost it's prime when the vac hose came undone and water was not flowing through at all for a whole day. The basket that normally catches debris, right before the filter, actually melted. When I had opened the housing, steam came out; the water was nearly boiling. The melted basket had allowed flotsam and jetsam to flow past, into the filter. I had thought the screens were ok, but if I had done this operation then, and we'd already be swimming.


After cleaning up the manifold, it was easy to pop the new screens into place. There's a slot on each that keeps them oriented in the right direction. The only thing to watch out for is placing one short narrower screen in the right spot, near the big inlet tube.


Screw the whole thing back together, and it's a single unit. It's so much easier to handle without the dry-heave inducing weight of that godawful slime-impregnated filter powder and fetid water.


Reversing steps, it's easy to put the whole thing back together. I just add the step of whacking merrily on the retaining ring with a rubber mallet as I tighten it, to ensure even seating. I fired up the system, loaded fresh DE powder through the skimmer and got the Barracuda prowling the depths again, greedily devouring it's prey. Clear water began discharging back into the pool. Hooray!!

Next, I turned my attention to the fallen, the wounded screens. 


I hosed them down, from a distance, and surveyed the damage. Three of them were completely wrecked. One, with a fingertip sized hole, was probably the biggest offender in causing the issues. Two others were significantly broken inside. I stomped them into submission, crushing them into broken carcasses of shattered bones, to fit in the trash can. It felt good.


I saved the rest. two look really good, the other three are serviceable in a pinch. I'll stick them in the shed for future emergencies. I cleaned the area up, loaded some liquid and tablet chlorine let the system run all day, and night....

Good night, sweet desert oasis
... and now, it's tomorrow! Holy sparking sunshine and blue water!!!!

Bella approves, but the Barracuda lurking below makes her nervous
I hereby proclaim: We shall swim again this day! Sorry Yoda. 

This one's for Jef, who loved it as a kid and played it endlessly:


MP-3: Yoda, by "Weird Al" Yankovic -Album:  Dare To Be Stupid

Fixing it up, again

At some point in the ongoing adventures of home ownership and remodeling projects, I think everyone finds themselves at the point where they are re-remodeling or fixing stuff they were already proud to have called finished.

Upon study, it's my hypothesis that this natural phenomenon, normally brought on my age or changing tastes, is greatly accelerated by the presence (infestation) of the pint-sized interlopers commonly referred to as "children".

One of my early (pre-azdiyguy.com) projects in this house was the remodel of our guest bathroom. Along with new cabinetry, the train-rack towel rack, vanity top, paint and pluming fixtures, we'd installed wainscoting. I'd made it from a 1/4" x 4' x 8' particle board panel with a beaded finish and trimmed it out with wide base molding and chair rail.

I think a cannon exploded right about here.
Now two years later, next to the bathtub where a deluge from countless water-gushing naval engagements had been fought by our little pirates, the panels have become damaged.

Evidently, I didn't seal them up well enough when I painted them. The decorative grooves had let splashed water into the fiberboard, and it has swelled horribly. 

Ohhhhhh,..... the horror!
Luckily, in the dryer than dry climate of the Sonoran desert, the panels were bone dry. The swollen spots were not spongy at all; they were left hard nodules of ugliness. It took just a few minutes of sanding with my sweet DeWalt random orbit sander and some 220 grit sandpaper to get all the swelling knocked down and the panel smooth again.

DEWALT D26453K 3 Amp 5-Inch Variable Speed Random Orbit Sander Kit with Cloth Dust Bag
Sand-tastick
Unfortunately, the worst area was swollen so thickly that sanding it had completely taken out the groves (beading?). That would certainly look stupid if I simply painted it. I tried to cut new grooves with a razor knife and a straight edge, chisels, and even sandpaper folded over a thin piece of plastic. Nothing worked well enough for me to really dig in with confidence.


Staring slack-jawed at my garage tool cabinet, I finally remembered my oscillating, multi-tool. It's an inexpensive Harbor Freight version, but its served me admirably well on two projects already. Sure enough, plunge cutting and giving it a slight wiggle scored the new lines in mere seconds. The grooves on the existing panels are already a little rustic, so the hand-held cut matched up just fine.


I finished it up with some fresh caulk and a coat of KILZ primer. I taped the whole panel off with my favorite painting buddy, Frog Tape, and painted it a fresh, glossy white. I think I sealed it up pretty good.


Fixed. Repaired. Re-remodeled. It looks nice against the new door I think. Hopefully, our youngest is at an age that we can keep the raging geysers of Poseidon's oceanic tempest under control.

How about you? You get tired of fixing up stuff you've already fixed?

Replacing exterior lighting fixtures

Even though I'm currently on a big home / yard maintenance and repair binge, I occasionally have to get back into the fun tools and do some upgrade / renovation work, or I'll go mad. I interrupted the yard work for a bit this weekend to replace our exterior fixtures.
I know, I know,... there's still primer on the front. I'll get back to painting,... honest!
There's two on the garage face, one by the front door, and one on the side of the garage. They were beat up,  mismatched and ugly. Sweetie and I headed over to The Home Depot to pick out some replacements. We wanted something dark, to offer a little contrast with our light beige and brick home. We picked out the
Waterton Wall-Mount Ridge Bronze Lantern by Hampton Bay. It's so dark, it looks black.

Hampton Bay Waterton Wall-Mount Ridge Bronze Lantern

The original brass fixture at the front door had been hidden behind the crazy entry way tunnel that I'd just torn down. Now, it just looked really bad next to the black screen / security door we'r repainted.

With the circuit off, I loosened a couple hand-tight nuts and removed the fixture from the wall. There were only two wires to remove from the wire nuts. Not good. The ground wire was unused, which could lead to an electrified metal fixture, in the event of a short. Typical crap left by our DIY predecessors.


There were two black wires (hot) and two whites (neutral) in the junction box, each tied together. This means that the "hot" current carrying conductor goes somewhere else, in addition to the switch that controls it. In this case, it feeds an exterior GFCI convenience receptacle below. Therefore, the receptacle, is controlled by the same switch that controls the light (really convenient for Christmas / Halloween light decorations).

I tied the new fixture wires into the existing wire joints. 

Scary warning: Don't mess with electrical, unless you know what you are doing. 120 volts of household current can kill you just as dead as much higher voltages, it just lets you suffer longer, and folks can recognize you in your casket. Plus, electrical issues can do a heck of a job burning your house right to the ground. Get a professional electrician. If you do the prep work, this project is a snap for someone who's trained; it shouldn't cost too much. Even if you know what you are doing, I recommend you work it like it's live, even if it's not. 

Tip#1: When I am wiring a smaller wire to a larger one, I stick the smaller one slightly beyond the larger wire and hold it tight when twisting on the wire nut. Note how I'm only touching the insulation, not the copper. Also, see how I have my knuckle on the metal (grounded) box. In the unlikely event that somehow the circuit is (or becomes) live, despite my precautions, current would go through my fingers only, not through my chest / heart.


Tip#2: Make the connections in this order GROUND (normally bare copper or green), NEUTRAL / "COMMON" (normally white), HOT (normally black or red). Don't trust the colors, because there are situations where the white and black can be reversed, in switching, and there are regional differences in wiring practices. Electricity is color-blind.

I always give a quick tug on the wires to make sure they're locked in tight.


Next, I install the mounting bracket. This one is pretty neat. It's fully adjustable from a vertical to horizontal screw holes. I laid a torpedo level on it to make sure the counting screws were level, and tightened it down. It's a little awkward working with the fixture tucked under one arm to keep it from hanging from the wires, but it's light and can be done. 

Tip# 3: Whenever I'm wiring to a screw, like this ground screw, I always wrap the wire clockwise around the screw. This way, as the screw is tightened, it pulls the wire tight against it, rather than pushing it away. I also give it a little tug to make sure it's on there good and tight. 


I slipped the new fixture up on the mounting screws and added the mounting nuts. What I found to be typical  of all four fixtures was that the mounting screws were 1/4" too long. The nuts wouldn't tighten the fixture to the wall.
Hampton Bay Waterton Wall-Mount Ridge Bronze Lantern

I had to pull it down and remove the mounting gadget. Luckily, my wire strippers have a built in screw cutter. I threaded the 8/32 screw into the hole, and gave them a quick squeeze, "SNAP!" = shorter. Unscrew it from the strippers and put the whole thing back together. Back in business!


Moving to the garage face, I pulled down another fixture. Lovely. No junction box, nothing sealing the fixture to the wall to keep water out, no attached ground wire (stuffed back in the wall), and only black electrical tape wrapped around the wire nuts. Dang these hack-job / drunken meat heads that preceded me!


I mounted the bracket, attached the ground wires, and used silicone filled wire nuts, facing tip upwards. I put a bead of silicone caulk on the top of the fixture and filled the mortar-joint groove with silicone so water would not get in from above. It's much better than what was there. 


Gracie was fascinated by the hundreds of insect carcasses left behind following their unsuccessful attempts to eat flaming hot light bulbs over the last many years. I piled the beat up fixtures on the bulk-waste pile out by the curb. someone actually snagged them within a few minutes. I'm glad they won't end up in a land fill.

Bugzzzzzzz
I replaced the incandescent lamps and a couple compact florescent with new Cree 9-Watt (60W) Daylight LED Light Bulbs  from Home Depot. These should last a looooooong while, save money, and don't' have the hazardous disposal issues that CFL's have. 


Done! They all work perfectly and look much better.

Hampton Bay Waterton Wall-Mount Ridge Bronze Lantern
I don't think I can avoid painting for much longer.
We have the garage lights on a Programmable Timer Switch with Astronomical Clock that keeps them on at night and off during the day. We've kept them on all night ever since someone tried to help themselves to my last truck hammering a massive screwdriver into my passenger door lock. Bastards.

Hampton Bay Waterton Wall-Mount Ridge Bronze Lantern

We think it looks much better. Not bad for a couple hours easy work eh? I had to take the address plaque off to fit this new light. It's time for a new one anyway. The DIY wooden one was looking rough.


I can't get the camera phone to take a decent shot of a nighttime view, but you can see these lamps really throw down some light. I hope they don't divert air traffic to land in the drive way.

What do you think?


Bulk time again! Still outside in the heat.

Plans are destined to be broken. I'm still far from completing the interior door replacement project started back in February and intended to finish in March. One thing after another just keeps getting in the way.

Now, it's time for quarterly bulk waste pick-up. I can't leave the yard work another three months or the HOA will nail us with a nasty-gram. This happened once when we first moved in, with no bulk pickup anytime near. The trees went a little wild, so we hired a landscape crew with a giant truck and a chipper to haul it all away. 800 bucks my friends; I've been DIY'ing it ever since.


So it's outside again, in the hottest temperatures so far this year. We have mesquite trees that grow like weeds on steroids, dragging on the roof in no time. I started trimming from the peak of the roof like King Kong with a pole saw, just after 7:00 am, when it was "cool" in the high 80's.

"Not dead yet"
I'd given this particular tree up for dead last year. I cut it back to the largest branches that I could get through with my saw. There wasn't a trace of green left. Then,...it burst back to life, overnight it seemed.

Following the cut, a massive clean-up begins. I have to drag this jungle of green out to the curb...

Welcome to the jungle, no fun and games
... and line it up for processing like a slaughterhouse. 


It took big-ass clippers, an aggressive-bladed reciprocating saw, and gallons of frosty, refreshing beverages to work through four loads of this.

Next, it was onto the palms. These bee-infested Q-tips of doom had to be cut back before they got out of control.


At least I can still catch them from a ten foot ladder with a pole saw. Some of the neighborhood trees are 40-50 feet, and require a professional to scale up and trim them. They're neat looking, but useless trees. At best they throw a 5 foot blotch of shade in the neighbor's yard, two doors down.


You have to cut these saw-toothed death-fronds when they're still green and cut easily. I have refined a talent at getting them to drop just right where they manage to fly directly at me, leaving nice, bright red scratches on my arms, legs, and neck so that I have to go back to work looking like I have spent time in a burlap sack fighting a pissed off alley cat. Of course, this is not a good comparison, because cat scratches probably wouldn't welt up quite so badly from an allergic reaction.


Finally, I ended up with a massive beaver-dam of waste, waiting to be picked up by our heroic cadre of the Phoenix waste collection services. 

Cropped high and tight
At least this particular project is done for a few months. Now I can get back on track with the door project,... well, after I finish painting the facia and the front of the house,... and installing drip edge, and fixing the pool filter. Evidently, I'm supposed to spend June in Phoenix outside, lovely. 

Oh yeah, I nearly forgot: Meet the new twins!


I finally got to break in a new pair of Red Wings. I bought the same style I'd had to retire recently. I really like the 8683 Men's Hiker Boot. These are much better on the old aching dogs than shoes for this sort of work. Fare thee well old pair, gone but not forgotten.

Beloved  Red Wing work boots
(original pair)
2003 - 2013

Completely Sidetracked

I got out early to beat the heat. The task was to finish priming the new facia boards and to sand and prime the house where I'd removed the entry lattice / tunnel. Settle in for a long one folks, because when I came to a fork in the road, I did not stay on the direct path.


Initially, I made good time on the facia boards using a 4" roller, planning to fall back and cut in the edges with a brush after I got the affected front of the house sanded and primed. It was just a small strip that needed painting, only 2 to 4 inches wide, but...The lattice wall had attached to the house front atop a big slab of a sill under the front window. This sill /slab / trim could use a good sanding. Just a bit off task, maybe, but it would only take a few minutes. 

To say there was a bit of dried-up, caulk would be an understatement. I started removing clumps of it with a chisel and a utility knife. I think half the wall was constructed from caulk. I now recognize I had really started veering off track at this point.


It was particularly lovely to discover there were three chunks of wood, apparently glued in with caulk, to fill the voids where the sill (bottom) didn't reach the jamb (side). The sill wood was split and rotted. Maybe some more appropriate filler was needed. Still just a little sidetracked.


 The trim slab wasn't even against the house. I gave it a test wiggle. Uh ohhh.


Ohhhh,...it's coming right the heck off. Mayday! Mayday! The original plan is in a nose dive!


Some interesting archaeological revelations (while I'm completely ignoring today's plan):
  • This big piece of wood was held on with nails from inside the house, through the exterior T-111 siding material, I guess before drywall went in. Most the nails were very loose. I'm no expert, but this seems stupid.
  • Apparently the house was originally a light, 1979 aqua blue.
  • The house must have been vacant for a significant time in its history. That weedy looking stuff is some sort of grass that must have grown up, behind the trim piece. It appeared to have grown completely behind and around it and stuck out the top. There were traces of the weed sticking through the massive caulk plug under the window. It had been cut flush with the bottom and with the face of the window trim.
  • The original front faucet was roughed in where this trim piece went. I found a hole that I could stick my finger through and feel the plumbing, with couplings and elbows leading to the current location.
  • Some late 70's carpenter had scrawled "3 x 10" here in pencil. The board was 10 feet long, 10" high, and a full 3" thick. Not something you could probably find at your local home center these days.

I know should have been working on the facia, but... I loaded the random orbital random orbit sander with some toothy 60 grit and started sanding. I clipped most of the nails with my lineman pliers and pushed them back in the wall. A few were clipped through the edge of a stud and were at odd angles. I didn't' want to pound them back into the house and cause mystery damage inside the wall, so I broke out the Dremel, loaded a cut-off wheel, and let some sparks fly.


We decided to replace the big slab sill with a 2x10. A quick trip to Home Depot was in order. Gracie accompanied me on my quick trip,... on the first Saturday of the month,... to Home Depot. Are you aware of what happens at Home Depot on the first Saturday of the Month, in the lumber section?

Pandemonium. Pint-sized side-tracking on a colossal scale. That's what. No way I could keep my little girl away from this:

Building a lawn mower pencil holder

Today only savings! See today's instant, online on

Finally, back to the fort, I engaged the big ol' clamp in spreading mode to use it as a jack. This is getting pretty interesting. Wasn't there something else I should be doing?


Forgoing the whole "cram scraps in the hole and caulk it in" approach, I wanted to cut the board to fit. I used a rafter square to transfer the end location of the cut. The critical step here was to utilize a neon pink pencil. Otherwise, obviously, the whole project would have failed. Take it from me, all serious craftsman have a neon pink pencil readily at hand.


A quick scribing of the measurement with a compass by setting it to the gap on the side and transferring it to the mid section.


Then I ripped the length of the mid section with a cordless circular saw and cut the ends with a reciprocating saw. Paintbrush? What paintbrush? DEWALT power tools will always win that battle.


It took a little adjustment with the planer to fit snug. I jacked it up, and shot it in place with the framing nailer, into the studs. I created some vertical trim boards to replace the missing ones below the sill out of recycled pallet wood I had stored in the garage.


At this point, I really committed to my sidetracked approach. I heroically continued to not sand and prime as planned. The heat had worn me down enough. I cleaned up, went inside, and planned my next step. By "planned", I mean I ate a slice of cold pizza and fell asleep on the couch.

Now cooled down, I returned to the battle to meet the morning's first objectives,... in the afternoon. Darn that evil, side-tracking front window project. Only pride kept me out there in the blast furnace of the peak heat of a Phoenix afternoon at the record heat of 111 degrees. I'm so glad I waited.


Finally, back on track, and suffering in the horrors of the afternoon sun, I got it all primed.


Including that dreadful, side-tracking project that tacked hours onto the day.
  

You ever let a side-tracking project take you down the rabbit hole?

Get a damn truck first!

I listed a couch on Craigslist this weekend. It was a well used couch, offered at a cheap price, just to get rid of it.

Seems like a decent deal. 

Seems like a decent deal. 

Public service announcement:

Dearest  potential buyers, when you would like to purchase large items from people on Craigslist... get a truck before you call, please.

This is a big IKEA L-shaped EKTORP sectional couch rigged up with the pop-out bed, ottoman, and a storage drawer. We'd finally replaced it, since it was out of scale with the remodeled living room, with its higher ceiling and we wanted more layout flexibility. The removable cover was fairly worn and soiled from countless disasters involving the raising of a 5 year old and representative specimens of the milk, orange juice, Cheese-it and Fruit Loop food groups. The night before listing it, I took it apart and assembled the new couches.

Size-wise, this is what I consider "big"

Size-wise, this is what I consider "big"

This is a used but decent couch. The bones were in great shape, but the cover was shot. IKEA still sells covers of all colors and fabrics, but we thought it was time to replace the whole thing, rather than just a cover. I listed it on Craigslist at 9:30 am for $50.  New, this beast goes for over $1,000 as equipped, but I wanted it out quick.

couch-in-the-garage.jpg

By 9:34 am,  I'd already received my third inquiry. Everyone wanted it. I had to start a waiting list, just in case, while the first caller was "on their way". I lugged the massive slabs of couch scattered around the house out to the garage and put it together.  Easy sale!

What followed was a full day of delay tactics, schenanigans, and no-shows. My phone rang and received texts constantly. Someone actually showed up,... in a bright red Honda Fit.  

What?!!! The thing was the size of a pregnant roller-skate. They couldn't even fit half the cushions.

All day, it was a lack of hauling vehicle that kept people from showing up. The stories though...

"My dad will be home on Friday"

"I called my cousin, but he isn't calling me back"

"I'm trying to find a truck"

"My mom is coming over with her van"

"I'm on my way,... when I borrow a truck"

"Nooooooooooooo.... truuuuuuuuuk....".

I felt the day slipping away. Surely one of these peanut-heads would soon to get their hands on something with four wheels and a cargo bay or bed at some point, right?.. right? 

Could someone even come up with a mid-sized vehicle that they could stuff into and lash on top? A Honda Element perhaps? A station wagon with a roof rack even? I offered local delivery for $30 (two trips in my truck), but apparently that was too steep. Heck, Home Depot will rent you a truck for $19.00.

IKEA-couch-in-the-garage.jpg

Dear readers, if you were seeking and answering ads for a couch, wouldn't you be ready with a couch-capable vehicle? Of course you would, because you are bright, well-read people.

IKEA-couch-for-sale.jpg

Finally, at 3:30 pm, working my way down the list to a dude who'd been waiting patiently for a few hours (while I dealt with a rabble of truck-less (friendless?) nincompoops). He showed up promptly, slapped fifty bucks in my hand, and loaded up a mini-van and a mini-pickup, before departing happily with his soft cushioned prize. That's how it's done folks, the man was clearly a genius.

If people want to buy my original Kindle, or a Palm Pilot, they can show up on a unicycle for all I care, but if they're shopping for a deal on a COUCHget a damn truck first!

AZ DIY Girl, Episode II

Following up on the last episode of AZ DIY Girl, I've found more evidence of covert, munchkin DIY crafting actions. This time Gracie took it outdoors, and to a whole new level.


At our house, "Daddy, can I water the flowers?" means something that has absolutely nothing to do with flowers, but a lot to do with water. We do need to water our flowers off the back porch, because I have yet to run irrigation over to them. However, when our little princess returns from "watering the flowers", the flowers are still somewhat dry, she is a filthy-soaked mess, there is mud all over the patio, and our backyard is a Martian landscape of empty water canals.

Our pristine desert backyard goes from this...


...to this:


So what? Left alone to her own devices, a kid just blasted holes in the dirt with the hose. How cute, right? 

Wrong!,... She was mining. 

That's right, the 5 year old DIY'er engaged in hydraulic, high-pressure excavation techniques to acquire the necessary material for her project. I really don't know how she refined it or even how she did the actual crafting, but I did find the results sitting on a plate later.


Arizona snowmen. Mud? Clay? It's dried hard as a rock, dry fired in the 100 degree sun.  This must be the stuff the Native Americans used to make adobe homes in the past. This whole thing happened with no more adult awareness than turning the hose on. 

The ladies of the craft blogging world really have some competition coming and it's this little delicate flower:

PS - Pay no attention to the god-awful patio stone. The replacement of it's hideousness is on the long term plan.

Flagging it for the weekend

This morning, with Sweetie feeling under the weather, I took the kids to join a group going to place flags at at the National Memorial Cemetery of Arizona.


We figured that approximately 100 volunteers would complete the 40,000+ grave markers in 3-4 hours. then, everyone showed up: Cub Scouts, Boy Scouts, Girl Scouts, Junior-Marines, biker gangs, families, veterans, active duty soldiers,... everyone. Five hundred people?,... A thousand?!!! A sea of humanity had descended on the cemetery this morning. At one point it was shoulder-to-shoulder, like Disneyland.

Our group loaded up bundles of flags, headed out to a fairly uncrowded section, and set to work.


The desert floor proved to be very tough to stick flags into. Of course, the Boy Scouts were well prepared with custom-made, welded-steel, hole-punching contraptions of precise efficiency. They positively started ripping along, peppering their trail with fluttering flags. Never without at least one of my tools, I employed my beloved Victorinox Swiss Army SwissTool's saw blade to poke holes in the tough soil for some of our group.

Victorinox Swiss Army SwissTool
Don't leave home without it.
Gracie liked to stab the flags into the ground with the unbridled gusto of an explorer of old, claiming new found shores for King and country. 


It was humbling to read the names and dates of the heroes interned there. Our section was from those who had passed around 2003, but had served in World War II, Korea, Vietnam, and the Gulf War. Sometimes, they had served in three conflicts.

With the volume of volunteers on site, we finished in an hour or so. Considering the solemn nature of the location, I don't consider the experience "fun", but it was certainly rewarding. I enjoyed hanging out with the 30 for 30 team again. It was a good experience for the kids as well.


Have a great Memorial Weekend all! Do some projects, put some flame to meat, and enjoy the time off.

Oh yeah, can we get some more stars and stripes back in our neighborhoods too? I don't get it, why am I the only one flying a flag on my street each patriotic holiday?


Remember our heroes, past and present.

Measure not, cut once (maybe)

I got too smart for my own good, and this time it bit me.

Anyone worth their salt in the world of building stuff has heard the old English proverb, "Measure twice, cut once". Wiktionary states it plainly:
One should double-check one's measurements for accuracy before cutting a piece of wood; otherwise it may  be necessary to cut again, wasting time and material.
Of course it makes sense, but whenever I get a chance to not use a tape measure, I take it. I scribe lines,  use story sticks, and pieces of scrap wood to transfer cut lines. Don't get me wrong, I can read a tape; I know my fractions,...honest. I even use a handy construction calculator to solve complex equations accurately. These alternate methods are just very accurate and very fast. Tom Silva of This Old House does it all the time; he knows a thing or two about building stuff.


In working on the front facia replacement project, I found that copying the exact miters and angles from the original boards was inaccurate. The original boards were warped, dry-rotted, and had shrunk. With one side of the garage face complete and installed, I took a piece of scrap up to the peak and scribed the cut line with a compass. By holding the compass at a steady angle and sliding the point along the existing edge, it draws (scribes) an accurate line, no measuring, no angle gauge, no protractor.

Scribing a cut line with a compass
The Compass: It ain't just for drawin' circles anymore
It is easier to use a small piece of scrap to do this, rather than fight a 16 foot 2x6 hunk of lumber up and down the ladder. I put the marked scrap on the miter saw, swung the saw to the correct angle and sliced it. The scrap became a template for the real cut. I make it a practice of scooting back up the ladder with the scrap to check the fit and cut direction before I cut a big expensive board. The boards I was using had a rougher side; I did not want that side facing outwards. Perfect fit!

DeWalt Miter-Saw LED Work Light System

I have a cool cheat at the saw station; I'd added the DeWalt Miter-Saw LED Work Light System. This neat widget projects light on the work-piece and lays the crisp shadow line of the blade itself on the work piece. There's no single-sided laser to keep adjusted and no batteries, since it's powered by the saw. It's economical and installs easy.

If you squint, you can see the miter saw. It's in another zip code, but mail still gets there in a few days.

I had not set up my saw station to cut 16 foot boards. To fit, I had to open the door to the house and let precious, sweet, air-conditioned coolness, leak unchecked into the neighborhood. Sweetie gave me the skunk eye and waived the checkbook at me. Naturally, I said "Baahhhh!" and waived her off, I had sawdust to spray! I lopped the end off.

Next, I clamped the big board in place on the house, letting it run long, past the 45 degree miter at the end. I used another piece of scrap, with a pre-cut 45 degree miter, to precisely line up the joint and traced a line on the big board at the end of the scrap piece. It was easy to use the scrap as a template and precisely trace the miter cut line back on Terra firma, in the driveway. After another trip into the miter station, I triumphantly, slung the fresh trimmed board on my shoulder, scurried up the ladder and fit it into place. What the...

A slap in the facia
A slap in the facia
...two feet short! Two feet?!!!  In a monumental feat of dumb-assery, I had engaged an expensive, 12-inch carbide-tipped tool of  high-tech, precision-guided cutting technology,... on the wrong damn pencil line! It was the original line drawn against the butt end of the scrap. Laying discarded on the out-feed side of the blade was a shiny new piece of scrap with the actual cut line still intact. I had forgotten my normal practice of putting an X on the "no-cut" line. Since there were neighborhood children playing in the vicinity, I managed to choke back an especially colorful expression of my frustration before it left my lips. The ears of the cosmos were spared this day.

Unfortunately, my tool collection does not include a board stretcher. A seam on the front of the house  would look bad and not age well, so it's back to the store for a new $20 board.

Please don't tell Tom Silva.

Planting and drip irrigation

We took some time out from the structural work on our front entry and decided to beautify it a bit, since it looked so plain after tearing out the overhang. Sweetie suggested we get some lantana to spruce it up for a while we decide what sort of permanent porch / landscape we'll want in the future.


Shhhh...don't tell anyone my pickup truck has a hidden trunk in the bed.
While much of the rest of the country shivered under Cold Miser's last gasp of frigid torture, we were visited by his argumentative brother Heat Miser who treated us to our project conditions of 102 degrees.

Lantana seems to do pretty well here in the direct sun and heat, especially the yellow ones. Of course, everyone knows this and purchased all the nice big ones. Instead of 4 large ones as planned, I brought home 8 small pots.

We soaked the whole area down to loosen the soil.


With the oddities of our home, I don't simply sink a shovel anywhere in our yard. This project was no different. I found a mystery electrical conduit and a main irrigation line inches below the surface. The hard packed soil is just easiest / safest to dig with a high pressure garden hose nozzle and my hands (or a plastic kid shovel)

No work boots here.
We started loosening the roots, adding potting soil, and plugging them in the holes. My assistant made sure I was working in the swampiest conditions possible.


Once they were planted, I punched a hole in the main sprinkler tube (conveniently dead ended right at the first plant) and turned on the system. No water. After fifteen minutes of screwing around, I cut the line open and discovered a wad of roots and nastiness had plugged the line just past the point I had made a repair this winter. Luckily, I had another coupling and the tubing needed to fix it. I ran lengths of the 1/4 inch tubing from the main line to each plant, staked it, and added a flag dripper head. The nice thing about these systems is that you simply punch a hole, add a barbed coupling to the tubing and stab it into the main line by hand. Easy.

 
I need to get some decent stakes designed for this instead of junk I had laying around the garage. With the system on, each of the lantana received it's quenching drips of liquid gold needed to survive in the desert. The irrigation timer will take care of them from now on.
 
 
We just need to get some mulch down and some kind of border. This type of plant expands pretty good here and only dies down in the winter. In our experience, it comes back stronger each year. It should fill this whole area in a fairly short time.


It was nice to change gears and do something different. I had plenty of excitement with the occasional, "accidental" dousing of a hose or spattering of mud following a good Gracie puddle jump. She had to strip down in the garage, for an immediate trip to the bathtub.

Liquid madness.
How could I not close with the pure, unadulterated joy of a child playing with a hose at the peak heat of the day?


A walk in the park

We took some time off from home projects to go for a family hike in the largest city park in the country. Nope, we didn't fly to New York, we practically stayed in our back yard, South Mountain Park in Phoenix.

For those of you outside the desert southwest, a half mile from the urban metropolis, it can be like an alien landscape. It's somewhere you wouldn't be surprised to see armed guerillas from Planet of the Apes ride up on horseback. I thought I'd show some photos, to help share the Arizona in AZ DIY Guy.


The trail started out easy. It was well maintained.

It was a nice day, but it got pretty hot during our excursion. We probably should have left a little earlier, but a hefty coat of sunblock and a bunch of water made it bearable as we set off down the trail.

Frodo and Sam?
Behind us we could see the high rises in Downtown Phoenix in the distance.


The landscape was covered with giant Saguaro Cactus. We do have a few in our yard, but it was cool to see so many in the wild. Many were easily 20 feet tall with several arms.

This one's in rough shape.


Saguaro down.

We passed a couple dams, built in the 30's, from what we understand. There's not a drop of water up there now.
Dam!
Dam again!

We managed to find a couple of the ancient Hohokam petroglyphs. We missed plenty in the rest of the park, but that's for other days

An original AZ DIY project from long, long ago

Can you spot this one?
A spiral, just left of center frame.
On the way back, going got rough. Gracie took a spill and scratched up her hands. Luckily, Jack packed some Band-Aids. Big brother washed her up and took care of the damage.


She was dog tired and scared of tripping again. Daddy had to carry her...


... and it really started getting hot, 92º at this point.


Then, tragedy of tragedies, one of my oldest friends succumbed to the harsh, rocky environment. If you are squeamish about horrendously graphic and fatal damage to finely crafted, rugged footwear, you may not want to look at the photo below: 


One of my trusty Red Wing work boots lost its sole. These tough-as-nails soldiers have served me on the front lines for over 10 years. You've probably even seen them in several of my posts. They'd been glued up once before, but there just wasn't much rubber left in the old boys. They got me within a quarter mile of the truck, past the worst part of the trail, before finally gasping their last. Luckily, I had a Red Wing, heavy-duty insole with just enough liner holding it in, to limp back on.

Beloved Red Wing work boots
2003 - 2013
Rest in peace

I guess I'm down to athletic shoes for the next project.

Installing new facia boards,... solo style

After tearing off the front overhang on our house, we need a new facia board. While I'm at it, it's time to fix the sun-beat, peeling, rotten soffit that's along the whole front of the garage. Surely, the HOA will soon ding us on that as well.

I started the day at Home Depot, then Lowes. Both were down to fuuuugly 2x6x16 boards this morning. There were twisted, knotty, and split misfits.  'Depot was nearly picked clean. Hopefully, this is a good sign for our economic recovery; people (besides me) are working on their homes again. I managed to dig through the entire stack and find three serviceable boards at Lowes.

Loading the big 16 footers into a pickup with a 5 foot bed was a challenge. Even shoving them through the sliding rear window left too much hanging out the back, so I opted to go upstairs with it:

Not a surfboard, dudes.
Lugging those big boys onto the truck, I started thinking the idea of a solo soffit install might just be beyond me. Working with a heavy, 16 foot board atop a ladder and trying to nail it in place now seemed more difficult than it had earlier.

I thought I'd make some sort of custom contraption with 2x4 T-braces, but I realized I had cut up my stock of 2x4's building the miter saw bench. After some stubble scratching thought, I came up with a workable method. I put the ladder in the middle of the run and balance the board on it. I lifted the board, held it, and used a one-handed woodworking clamp to secure it in place. Bingo!

Clampeyness
The door-end of the board required a compound miter cut due to the angles of the two soffits combining on two planes. I used a piece of scrap to scribe a pencil line, front and back, and then connected the two lines across the bottom of the board.

Scribing the outside angle.
I took the board back down and set up to cut both angles, on B.A.M.S. (big ass miter saw - as coined by Kit over at DIY Diva). This was the first time I'd actually used the saw to cut a compound miter. It paid for itself today, slicing and dicing 2x6's with precision and ease. My homemade, beefy saw bench was priceless when man-handling those massive boards. At one point, it stuck out so far, I had to open the door into the house and stick it inside.

B.A.M.S having lunch.
After clamping the board up again, B.A.N.G. came out to play (big ass nail gun - I claim that one). I shot the board into the rafters and then again through the decking, resetting the clamps as I worked across to keep it tight. I actually hit the framing rafters behind,... most of the time.

Bang - Bang - Bang
Rounding the corner, to move up along the garage, the old facia looked even worse up close.  I don't think the wood was ever primed.

Mr. Hook, it's been lovely, but you'll not hold Christmas lights again.
I had to work my way up slowly, gently prying the shingles up and pulling out the staples that held the metal drip edge. This was precision work, best suited for a small prybar / nail puller.


It also was tedious work. There were a million of those pesky staples to pry out. The sun started getting to me so I broke for lunch, a healthy dose of sunblock, and my sexy hat. Oh yeah, I know the ladies will be drawn to the floppy lid, but too bad, I'm taken. And no, I'm not going to share a source link for this sweet slice of melon shading headgear.

It's a Stubble Sunday, but  you just can't take your eyes
off the ol' chapeau can you? Don't be jealous.
After the 1x2 behind the drip edge popped off easily with a Wonderbar Pry Bar , I tried to pry off the old facia. It wouldn't come off without damaging the decking and framing, because it was nailed both through the top and the face. I pried the decking up a bit and cut nails with some diagonal cutters for a while. Finding that a pain, that still left some nail-nubs behind, I changed tactics. In came the reciprocating saw with a bimetal blade which sliced the nails off flush as I ran it down the seam, a much better approach.

Ye old nail slicer.
A couple hearty whacks with the FUBAR sent it tumbling to the ground with a clatter. I'm really glad I'd moved the cars out of the way. I used it to trace the angles to the new board before taking it in for a visit with B.A.M.S for a quick bit of slice and dice. No compound cuts this time, just nice simple angles.

The clamp trick worked perfectly again. I skadooshed it into place with B.A.N.G and called it good for the day.


A heaping helping of cleanup was in order, again. I'd managed to blast debris in a wide radius around the work site, which is where (inconveniently) we park our vehicles. I hired out some skilled labor to police up all the nails and staples. She drove a hard bargain, but it was cheaper than buying a new tire.

There's still lots of work to do on this project. I still have half the garage face to demo and replace. I need some 1 x 2's, drip edge, primer, and paint.

Tearing it all down! Bones and all.

A new weekend dawns, so does the need for more destruction. Since the

HOA told us to tear down our front overhang, we started immediately . It sat in skeletal, semi-demolished form since last weekend, when I had taken the roof off. Rather than wait for the afternoon heat, I got going in the morning, right after breakfast, while it was cool.

The old bones, and a munchkin.

Out of a concern for breaking the framing parts of the overhang that need to stay, I decided to isolate them by cutting them off close, leaving the lumber weight on the outboard frame. The first thought was to use a circular saw, but the framing was so full of nails, staples, and junk, I figured it would ruin the blade. Instead, I loaded a new Diablo "Demo-Demon" Carbide-Tipped Blade in the Reciprocating Saw.

Locked and loaded

I've used bimetal blades that would cut metal before, but not carbide tipped like this red devil. This bad boy blade chewed through the 2 x 4's  like butter. It ripped through everything so smoothly, I could use the saw one handed while holding the board with the other. The blade tore through lumber with just the weight of the saw. They were all cut in about 5 minutes. The urchins stayed inside, watching cartoons, during this part. I needed to watch my own head and not worry about beaning a kid with a nail encrusted board.

Sliced like butta'

I thought about cutting them again, close to the outer frame, but it only took a quick lift and jerk; they tore out of the clips holding them in a shower of flying splinters and nails. A quick couple cuts to the outer frame took it down as well.

chopped

The saw blade was not big enough to cut the support that was still standing. I considered using a chain and the truck or maybe... <gasp> a non-powered, hand saw... to take it down. In a fit of goofiness, I kicked the thing.

I haven't thrown a martial-arts move, of any sort, in over 13 years. But, true to form, when I actually executed a near perfect shuffle sidekick, there was no one around with a camera. When my size 12 Red Wing work boot connected with that beam it sheared off and flew, landing in a cloud of dust. First kick too! BAD-ASS STILL HAS THE MOVES!!!

Of course, the whole street was empty. No witnesses to the unarmed, Chuck Norris style carnage I had visited upon the mighty slab of lumber.

I strutted over to inspect my fallen victim. Ahhh,.... Crap.

rotten_post.jpg

The dang thing was simply eviscerated with termite damage. I was even able to reach in a pull a chunk from the hole and crush it to powder, bare-handed. A five year old could have kicked that thing down,... barefoot. Heck, I could have sneezed that thing over. An especially charming realization is that it was the primary support for the entire structure, and I'd been tromping around up there last weekend, like an idiot. I'm lucky I didn't kill myself in a tumbling roof collapse. At least there was no evidence of live termites.

Demo is always so fast. 10 minutes and I was done with the major structure.

Who turned on the lights?

Now onto the detail stuff, I had to be careful not to harm the structure needed to attach the new facia boards. I tried the big demolition jaw on the Stanley Fubar , but it was too much. It gripped  the board well, but when I twisted the tool to pull the board off, I could see and hear that the framing I was trying to save was going to be damaged. Switching to the demo hammer on the Fubar and banging away, while prying left-handed with a Wonderbar Pry Bar  did the trick. Patience paid off. Soon, boards were flying to the ground again.

Stop! Hammer time!

Gracie came out to lay down some carnage as well. She kept her head out of the way this time.

Klein! Hammer time!

Another problem, what to do with a concrete, with a square hole, right where Sweetie wants to plant some flowers? 

...but can you put a round peg in a square hole?

Of course, it was time to bring out SLUF, (Short, fat, ugly "feller").

It’s a full sized sledge, customized with its handle cut off at 17″. It was given to me by a foul-mouthed middle-eastern gentleman with muscled forearms the size of gallon paint cans. He drove electrical grounding rods with it, like they were thumbtacks. Sorry folks, I can't give you a source link for this, you gotta make your own (or find your own foul-mouthed, middle eastern gentleman to make one for you).

S.L.U.F., the not-so-gentle persuader

I pounded the stuffing out of that concrete. Of course, contrary to all the other half-assed construction our predecessors did, they built the heck out of this particular detail. It wasn't just run of the mill Sackrete in the post hole, they'd loaded it with a heavy aggregate mix, full of crushed gravel, and very resistant to a quickly tired knucklehead pounding away on his hands and knees in the sun with a heavy one-handed hammer.

I wore myself out with that stupid, stumpy sledge-hammer.

Sitting there in the hole, resting after all that hammering with concrete shards pinging of my face, I noticed something, that wiped that stupid smirk off my face...

Temitus-Bastardus-Home-Chewerus

The hole was crawling with what I'm fairly sure are termites. We'll have to have the place treated. Dang it; that's probably not cheap.  No termite tubes, the little beasts were using the support beam as an elevator.

The secret passage.

Food for five years, a thousand gallons of gas, air filtration, water filtration, Geiger counter. Bomb shelter! Underground... God damn monsters.

Burt Gummer, Hard Core Survivalist (Tremors)

The whole area got a good soaking with the hose and a healthy dose of Demon WP  through the pump sprayer

The entire exterior of the house got sprayed as well. I had learned about Demon when we were in Texas. It's a murderer. Hopefully, it will keep their migration down, now that I've taken their source of crunch and munchies away, with a spectacular, un-witnessed side-kick.

It's hot and the demo is done. Next, new facia and drip edge has to be installed to finish this project up.

What do you think? The house look too plain now?


UPDATE!!

I'm honored to have this story chosen to be featured an Bob Vila's website as part of the "Bob Vila Nation" " of contributors from the blogging community. 

Please check it out and give me a vote by the hammer image.

(UPDATE II: looks like Mr. Vila & Co. canceled this program and deleted all the Blogger created stuff)

And so it begins - demolition day

Since we hate our front door overhang / porch / hobbit tunnel, and the HOA conveniently demanded that we remove it, I decided to jump right into the demolition this weekend. As a certified dimwit, I thought the hottest weekend of the year (to date) would be a great time to climb up on the roof. With other commitments, I was only able to find bits of time here and there, to tackle the project.

Two minutes wielding the mighty Stanley FUBAR (Functional Utility Bar) resulted in lattice and splinters blasted across the front yard like a cruise-missile strike. This beast of a tool is like having the very essence of destruction itself, leashed in your hand.
Don't you just want to skip barefoot across our lush front yard?
Since bulk waste pickup isn't for another month and a half, I spent the next couple hours breaking the lattice down, bundling it into three rolls of slats for storage, and cleaning the front yard of stray wood bits, nails, and staples. That was all the time we had on Saturday.

Late Sunday morning, I found a very efficient way to quickly dull razor blades. Carving through the face of four layers of granulated shingles makes quick work of blunting your knife. A blade lasted only about one linear foot before it had to be replaced. I made good use of a Stanley Quick-Change Utility Knife, making it easy to constantly flip and swap blades. I used a Edge Cutting Guide , normally for a router or circular saw, to keep my line.


This was some tedious, hot work. I took my time, really wanting that shingle edge to look straight and clean. At least the yard didn't  get too messy. Each time I gave the all clear, Gracie would scurry up and pile the bits of shingles and tar paper that rained down below. It took a bit longer because I had to be extra careful about nails and keeping the drop zone clear of my happy little helper.


It took about a 45 minutes to finish the cut line. It turned out pretty good, but it's thick as heck with 4 ply of shingles at that point.


I sat down for a cold drink and called my young squire for my weapon. I recall that I'd seen on one of the multitude of DIY shows on cable, that a flat blade shovel is the tool of choice for stripping shingles. Time to put it to the test. My blade, young Padawan...


The shovel stripped the roof like a champ. Two minutes and the deck was clear. I ran into some old termite damage out at the far edge, not a good sign.

"...I smote it's ruin upon the mountainside"

Once again, a diabolical lack-of-fun reared its ugly head, cleanup.  Jack donned a pair of gloves and came out to lend a hand. We drug the pile over to the "alley" beside the garage and piled it on a tarp for disposal later. It's nice to have a larger kid who can really pitch in and help. It made much shorter work of the mess.

Yeah, that's a laundry hamper from the garage. Shhhhhhhh.....

We finished tidying up and left it alone for a few hours while we ran some errands. After all, it was only 87 degrees, and not quite miserable yet.


I returned to the task late afternoon, as the day's heat reached it's peak. The FUBAR and mighty sawed-off, sledge hammer rained their fury upon the decking, as if wielded by the Norse God of Thunder himself. Timbers splintered like toothpicks; a cloud of dust rose from the site.


Since we have to find a way to get rid of all the waste later and have to store it. We spent the extra time pulling all the nails. I brought in a pro. Gracie was a marvel of nail-yanking prowess. She threw herself into it with such a gusto that she soon bounced the hammer handle off her forehead. Don't worry, the hammer's fine, it's a Klein Heavy-Duty .

It was nothing that couldn't be fixed with a hug, a bag of ice and a stiff drink.
After the weekend's third cleanup. We called it quits. The carcass is picked clean, down to the sun-bleached bones in the desert.

Break time is over young lady.

Did I mention the temperature? It's April 28th, and we've officially hit triple digits

Summer in Phoenix. It has begun.


Enjoy your spring folks.
 
________________
<UPDATE> I tear the rest of this beast up the next weekend in the exiting conclusion to demo phase in: Tearing it all down! Bones and all


A Challenge from the H.O.A.

We received a letter from our homeowners association, a "Friendly Reminder". They just don't like our front entrance.


We've received HOA letters before; we call them "nasty-grams". They've told us we need to trim the palm trees, nip some weeds, fix a board on the gate, and even hit the place with a fresh coat of paint. Each time, we've sheepishly complied. After all, we're supposed to keep up with this stuff. It's just our Strategic Doctrine of "Inside Out", that sometimes gets us in trouble.

The letter we received this week was a mule kick to the head. Uh ohhhhh...


"We noted the overhang on the entrance way to your house was not submitted for ABM approval and is in disrepair. Please remove the overhang in a workmanlike manner. 

ABM will perform a follow-up inspection of the property...   ..in compliance by 06/22/2013 "
A few notes my dear reader:

  • This "overhang" is a beast, a huge, crap-tastic beast of drunken, weekend-warrior awfulness. We want it to go, eventually, but it's not foremost on the schedule, neither time wise or financially.
Notice anything stoooooooopid?
  • "State of disrepair"???!!! Nope. It's in a state of jackleg construction. The dang thing was built to look like someone pounded dog excrement with a sledge hammer.

  • I didn't know it was not submitted for approval, because, I didn't build it. We've been here 7 years. I think this "overhang" has been here for 15-20.
     
  • A goal of 06/22/2013 is pretty much a do-it-now situation. June is not the time to be dilly-dallying around, working on a major, outdoor construction project around here. Why? Because of this:

It's only April 27 and we're going to hit the century mark. June will be worse.

We live in one of the oldest, largest homeowners associations the country. We are in Phoenix, but our area is an urban village, almost completely cut off from the rest of the city. This village, Ahwatukee, is covered by a colossal HOA. Honestly, they do a pretty good job of keeping the place up, but I think this particular requirement is ridiculous.

A quick web search will reveal absolute horror stories from HOA's nationwide and their abuse of power, crushing individual families over unpaid fees, misplaced garbage cans, or an unapproved shed that was 2.75" too tall.

I'm not messing around. It's time to let these two, savage dogs-of-war out of their cage.

Spears shall be shaken, shields shall be splintered! A sword day... a red day... ere the sun rises!
- King Théoden
__________________________
 
 
<UPDATE> Oh yes,..  splintering does begin. Check out the carnage in the exciting saga: ... and so it begins, demolition day.


Replacing our bathroom exhaust fan

Both of our bathroom exhaust fans are shot. The one in our guest bath was a beast at one time; it sounded like an F-16 afterburner on takeoff and moved air like a pissed-off hurricane. I'm surprised it didn't pull the door off its hinges. Certainly, it blew too much of our costly air conditioning up into the attic. Now it's fried.

A trip to the home center for a replacement found me staring slack-jawed at a huge display of ceiling-suck-age options, ranging from $30 to $200.


Uhhhhh,... I came prepared complete with the info of: about 12" x 12" square. I was certainly not prepared with CFM measurments, Sone ratings or, most importantly, funds up to $199.99. Since the slack-jawed, staring approach didn't seem to resolve much after a few minutes, I did some split-second Matrix style education,... I looked it up on the smartphone.  I find that the deal on CFM ratings is that it's the speed / amount of air the fan moves, in cubic feet per minute. I found a formula and plugged in our measurements:

Cubic Feet = Length: 9 ft. x Width: 5 ft. x Height: 8 ft. = 360

360 cu. ft. ÷ 60 minutes per hour = 6

6 x 8 air changes per hour = min 48 CFM fan needed
I bought a Hampton Bay (#986 755), 50 CFM, 0.5 Sone (Ultra Quiet) for $ 48.97. It turns out the old one was rated for 180 CFM and screamed its furious banshee wail at 5.0 Sones. Folks with bigger bathrooms will need bigger fans, and deeper wallets.
Back at home, I tried to pull the cover and found that this one was held in by rusted screws, not the handy springs I'd seen more recently on our other fan. Up close, this cover is a yellowed, paint spattered mess. I cut the paint and caulk from the edge with a utility knife before I pulled it down.

Next, I geared up for the dreaded attic crawl. Our attic is a filthy, itchy mess of ancient, blown-in insulation horror. It's never fun. I loaded a tool bag with all the tools and material I might need. When I returned from changing into long pants, a long sleeve shirt, and a spare t-shirt wrapped around my head and tucked into the back at my neck, I found my tool bag had been substantially supplemented.


Gracie was worried about me going into the attic, without her. She'd helpfully loaded up my tool bag with:
  • (1 ) box of Band-Aids (Angry Birds)
  • (3) tape measures
  • (1) Diet Coke
  • (1) Photo of Kirby (our dog who passed in 2010)
  • (1) Doggy Valentine's card
  • (1) Hand drawn "note" with hearts and "Daddy"
  • (4 ) Pretty rocks
  • (1) Small bag of 1/2" nuts and bolts
  • (7) 3" finishing nails
  • (1) Extra dust mask
Of course, I had to lug the extra stuff up there, just in case.

I traversed the attic, which ended in a miserable, belly-crawl across the rafters. It was 86º degrees outside in Phoenix; in the attic, it was damn hot. In the light of my headlamp, the fan appeared, it was unfastened and completely without a duct. From what I know, venting your moist shower air directly into your attic is commonly referred to as extremely stupid. It's not going to freeze in Phoenix, but it could cause mold issues and who knows what else. I didn't see any evidence of problems, but it was a dark, hot mess, and I wasn't going to loiter.

I could see the target in my high-beams.
I lifted the old fan out of the way. Luckily, there was enough slack in the electrical line to push the unit back to where I could at least crouch to work on it. With the hole open, there was a sudden burst of excited chatter from the bathroom below. I couldn't get close enough to the hole to look down. I held my camera phone over the edge to take a blurry recon shot:

Daddy's helper. Thanks for the Coke sweetie!
With the power off, I opened the wiring compartment and took the wires out of the wire nuts. I slid the existing, three wire cable into the compartment of the new fan and clamped it down, using the connector (NM 3/8-Inch Clamp Type Connector) I had installed earlier, in the comfort of the garage. This particular unit used the push-in style quick connectors for the wiring. Normally, I cut them off and make a tight, twisted joint with my Linesman Pliers and wire nuts, but in the dark, hot attic, I was pleased to go with the plug-and-play approach.

Clamp, plug & play!
I had bought a wall vent ducting kit as well. The 4" flex duct attached to the fan exhaust port with an included zip-tie. I added a quick wrap of the metallic foil tape that I had left over from the ceiling project. I shoved the new fan back over the hole and screwed the supports to the nearby studs.

Duct,..duct,... duct,... GOOSE!
QUICK TIP: Ready to run the duct to the outside, and having pulled the bone-headed move of drilling exterior holes into framing members in the past, I took the time to drive a screw through the wall from the inside, so I could find the location easily from the outside, no measuring!

Finding the screw was easy. I shifted to the right to avoid the groove in our "lovely" T-111 siding and traced the 4" hole using the template supplied with the duct kit. Drilling a larger hole near the side of the line with a Spade Bit allowed for saw blade access.


Grumbling about the lack of a cordless jigsaw in my collection of power tools, I was forced to the disagreeable task of stringing out an extension cord, like a chump. This Black & Decker Jigsaw is actually the first power tool I ever purchased as a homeowner. It was bought for slicing a countertop to fit a new refrigerator in our first house, probably in 1999. I don't use it a ton, but it's held up very well for a lightweight, economical-grade power tool. Here's their current version, the Black & Decker 4.5 Amp Variable Speed Jigsaw


The duct kit came with a exterior vent with a flap door. An included sheet metal, rigid duct tube snaps into the back and is fed through the wall into the attic. I put a my small torpedo level on a straight line to square it up. Four wood screws zapped in quickly with the impact driver.


Back in the attic, I attached the flex duct to the rigid duct tube, again with a zip tie and some foil faced, adhesive tape to seal it up. Per instructions, I kept the flex duct in a gentle curve, without making any tight corners. The attic rat mission is an operational success. This highly classified image shows the target has been taken care of:

Classified: Just between us right?
Returning filthy-clothed to the sweet, air conditioned goodness of inside, I popped the beautiful, new fan cover in place, this time with the easy, snap-in retention springs.

Note a very important detail in this step: no bald spot.
Now that it's all done, I guess I should have tested the fan to make sure this one wasn't a dud. Luckily, it worked just fine. I actually had to strain to hear it. I almost miss the clattering din of the old one.

The exterior vent flap works well. It swings open and closed as needed.

Thar she blows!

This was a medium difficulty project. Anytime attic work is required, it's a bit difficult and unpleasant, but you can do it. Keep your feet on solid framing and watch out for nails and open electrical connections.

It's not an exciting project to have done; we had a fan and we have a fan again. Just an unforeseen, necessary repair, not a desired improvement project. At least it's quiet and looks much better than the dated, ugly one. Plus, we now have exterior venting.


Thoughts? Comments? I'd love to hear from you.
 ____________________________________________________
UPDATE!! I'm honored to have this story chosen to be featured an Bob Vila's website as part of the "Bob Vila Nation" of contributors from the blogging community. Please check it out and give me a vote by the hammer image, if you like the story.

Quick Tip: disposable gloves

For "First Aid - Heath Care - Baby Care - Serious DIY"
I've recently started using disposable gloves for messy work. As a family dude, it seems like every time I open a can of paint, I get called back into the house for something. There's always a huge tragedy, like a 5 year old that absolutely must have some cucumbers or a fresh glass of milk, NOW!!!. Other times, it's been a lady trapped in the bathroom when the pocket door falls off the track, a broken glass, or a bunny in the backyard that must be looked at. Perhaps, it's just lunchtime.

I just keep a box in one of my tool cabinets and grab a couple before starting.


Regardless of the reason for my hasty retreat from a project, I normally have wet paint on my hands when I need to pop back in for a minute. It's nice to simply slip off the gloves and pitch them in the trash before leaving the room.

 
I also use them for other messy work, like working on the car. They're good when you don't want dirt, glue, oil, or paint under your fingernails or all over your hands when you have to go meet with someone or make an emergency run out to the grocery for a can of evaporated milk. It saves huge time, otherwise spent doing the surgeon's scrub down at the laundry sink.
 
You can find them cheap, at the drugstore or on Amazon here: Ansell Vinyl - Touch Powder Free, Latex Free Disposable Gloves 50 ea

The best laid plans...

Why is it that when you need consecutive weekends dedicated to a big project (like replacing all the doors in your house) that the rest of your house goes haywire? We've been buried with scheduled obligations lately, so the time allotted for serious weekend-warriormanship was already limited. The door project was going really well; I could see then end in sight. I was knocking one door out each weekend, no problem-o.

Then BAM! The washing-machine self destructs. Gotta drop everything and fix it. Tear down and rebuild.

Frickin' frackin' rubble bumbin' mumble mud...
...then, BAM! Just like the front yard, the irrigation system bursts in the back.  Gotta be fixed.


... then, BAM! The Pool Filter gets clogged up, right as the temperature rises. The pool turns into a swampy-green, scale model of the planet Dagobah, without the diminutive Jedi Master.  A total tear-down and rebuild is in order, with a diminutive mud-pie master.


...then, BAM! The awesome Baracuda Zodiac G3 robot pool cleaner-dude finally wears out it's rubber parts. A total tear down and,....you know the rest. At least I found better pricing on Amazon and saved about $150 vs. our local pool shop. Still, it's not the fun kind of tool I want to be buying parts for.

Baracuda Zodiac G3

... then, BAM! The guest bath exhaust fan gives it's death rattle. Inside, it's an unholy fossilized mess of rusted metal. Carbon-dating analysis puts it's installation in the long bygone era of 1979. I think the only thing holding it together is the rust.

This weekend's recreational activity.
I even managed to fit time in to break my shop's dust-collector while changing the bag. Enough with "BAM!" already. It's killing progress, and tearing an unwelcome, good-sized hole in our checkbook. 
 
What's next?