AZ DIY Girl, Episode II

Following up on the last episode of AZ DIY Girl, I've found more evidence of covert, munchkin DIY crafting actions. This time Gracie took it outdoors, and to a whole new level.


At our house, "Daddy, can I water the flowers?" means something that has absolutely nothing to do with flowers, but a lot to do with water. We do need to water our flowers off the back porch, because I have yet to run irrigation over to them. However, when our little princess returns from "watering the flowers", the flowers are still somewhat dry, she is a filthy-soaked mess, there is mud all over the patio, and our backyard is a Martian landscape of empty water canals.

Our pristine desert backyard goes from this...


...to this:


So what? Left alone to her own devices, a kid just blasted holes in the dirt with the hose. How cute, right? 

Wrong!,... She was mining. 

That's right, the 5 year old DIY'er engaged in hydraulic, high-pressure excavation techniques to acquire the necessary material for her project. I really don't know how she refined it or even how she did the actual crafting, but I did find the results sitting on a plate later.


Arizona snowmen. Mud? Clay? It's dried hard as a rock, dry fired in the 100 degree sun.  This must be the stuff the Native Americans used to make adobe homes in the past. This whole thing happened with no more adult awareness than turning the hose on. 

The ladies of the craft blogging world really have some competition coming and it's this little delicate flower:

PS - Pay no attention to the god-awful patio stone. The replacement of it's hideousness is on the long term plan.

Flagging it for the weekend

This morning, with Sweetie feeling under the weather, I took the kids to join a group going to place flags at at the National Memorial Cemetery of Arizona.


We figured that approximately 100 volunteers would complete the 40,000+ grave markers in 3-4 hours. then, everyone showed up: Cub Scouts, Boy Scouts, Girl Scouts, Junior-Marines, biker gangs, families, veterans, active duty soldiers,... everyone. Five hundred people?,... A thousand?!!! A sea of humanity had descended on the cemetery this morning. At one point it was shoulder-to-shoulder, like Disneyland.

Our group loaded up bundles of flags, headed out to a fairly uncrowded section, and set to work.


The desert floor proved to be very tough to stick flags into. Of course, the Boy Scouts were well prepared with custom-made, welded-steel, hole-punching contraptions of precise efficiency. They positively started ripping along, peppering their trail with fluttering flags. Never without at least one of my tools, I employed my beloved Victorinox Swiss Army SwissTool's saw blade to poke holes in the tough soil for some of our group.

Victorinox Swiss Army SwissTool
Don't leave home without it.
Gracie liked to stab the flags into the ground with the unbridled gusto of an explorer of old, claiming new found shores for King and country. 


It was humbling to read the names and dates of the heroes interned there. Our section was from those who had passed around 2003, but had served in World War II, Korea, Vietnam, and the Gulf War. Sometimes, they had served in three conflicts.

With the volume of volunteers on site, we finished in an hour or so. Considering the solemn nature of the location, I don't consider the experience "fun", but it was certainly rewarding. I enjoyed hanging out with the 30 for 30 team again. It was a good experience for the kids as well.


Have a great Memorial Weekend all! Do some projects, put some flame to meat, and enjoy the time off.

Oh yeah, can we get some more stars and stripes back in our neighborhoods too? I don't get it, why am I the only one flying a flag on my street each patriotic holiday?


Remember our heroes, past and present.

Measure not, cut once (maybe)

I got too smart for my own good, and this time it bit me.

Anyone worth their salt in the world of building stuff has heard the old English proverb, "Measure twice, cut once". Wiktionary states it plainly:
One should double-check one's measurements for accuracy before cutting a piece of wood; otherwise it may  be necessary to cut again, wasting time and material.
Of course it makes sense, but whenever I get a chance to not use a tape measure, I take it. I scribe lines,  use story sticks, and pieces of scrap wood to transfer cut lines. Don't get me wrong, I can read a tape; I know my fractions,...honest. I even use a handy construction calculator to solve complex equations accurately. These alternate methods are just very accurate and very fast. Tom Silva of This Old House does it all the time; he knows a thing or two about building stuff.


In working on the front facia replacement project, I found that copying the exact miters and angles from the original boards was inaccurate. The original boards were warped, dry-rotted, and had shrunk. With one side of the garage face complete and installed, I took a piece of scrap up to the peak and scribed the cut line with a compass. By holding the compass at a steady angle and sliding the point along the existing edge, it draws (scribes) an accurate line, no measuring, no angle gauge, no protractor.

Scribing a cut line with a compass
The Compass: It ain't just for drawin' circles anymore
It is easier to use a small piece of scrap to do this, rather than fight a 16 foot 2x6 hunk of lumber up and down the ladder. I put the marked scrap on the miter saw, swung the saw to the correct angle and sliced it. The scrap became a template for the real cut. I make it a practice of scooting back up the ladder with the scrap to check the fit and cut direction before I cut a big expensive board. The boards I was using had a rougher side; I did not want that side facing outwards. Perfect fit!

DeWalt Miter-Saw LED Work Light System

I have a cool cheat at the saw station; I'd added the DeWalt Miter-Saw LED Work Light System. This neat widget projects light on the work-piece and lays the crisp shadow line of the blade itself on the work piece. There's no single-sided laser to keep adjusted and no batteries, since it's powered by the saw. It's economical and installs easy.

If you squint, you can see the miter saw. It's in another zip code, but mail still gets there in a few days.

I had not set up my saw station to cut 16 foot boards. To fit, I had to open the door to the house and let precious, sweet, air-conditioned coolness, leak unchecked into the neighborhood. Sweetie gave me the skunk eye and waived the checkbook at me. Naturally, I said "Baahhhh!" and waived her off, I had sawdust to spray! I lopped the end off.

Next, I clamped the big board in place on the house, letting it run long, past the 45 degree miter at the end. I used another piece of scrap, with a pre-cut 45 degree miter, to precisely line up the joint and traced a line on the big board at the end of the scrap piece. It was easy to use the scrap as a template and precisely trace the miter cut line back on Terra firma, in the driveway. After another trip into the miter station, I triumphantly, slung the fresh trimmed board on my shoulder, scurried up the ladder and fit it into place. What the...

A slap in the facia
A slap in the facia
...two feet short! Two feet?!!!  In a monumental feat of dumb-assery, I had engaged an expensive, 12-inch carbide-tipped tool of  high-tech, precision-guided cutting technology,... on the wrong damn pencil line! It was the original line drawn against the butt end of the scrap. Laying discarded on the out-feed side of the blade was a shiny new piece of scrap with the actual cut line still intact. I had forgotten my normal practice of putting an X on the "no-cut" line. Since there were neighborhood children playing in the vicinity, I managed to choke back an especially colorful expression of my frustration before it left my lips. The ears of the cosmos were spared this day.

Unfortunately, my tool collection does not include a board stretcher. A seam on the front of the house  would look bad and not age well, so it's back to the store for a new $20 board.

Please don't tell Tom Silva.

Planting and drip irrigation

We took some time out from the structural work on our front entry and decided to beautify it a bit, since it looked so plain after tearing out the overhang. Sweetie suggested we get some lantana to spruce it up for a while we decide what sort of permanent porch / landscape we'll want in the future.


Shhhh...don't tell anyone my pickup truck has a hidden trunk in the bed.
While much of the rest of the country shivered under Cold Miser's last gasp of frigid torture, we were visited by his argumentative brother Heat Miser who treated us to our project conditions of 102 degrees.

Lantana seems to do pretty well here in the direct sun and heat, especially the yellow ones. Of course, everyone knows this and purchased all the nice big ones. Instead of 4 large ones as planned, I brought home 8 small pots.

We soaked the whole area down to loosen the soil.


With the oddities of our home, I don't simply sink a shovel anywhere in our yard. This project was no different. I found a mystery electrical conduit and a main irrigation line inches below the surface. The hard packed soil is just easiest / safest to dig with a high pressure garden hose nozzle and my hands (or a plastic kid shovel)

No work boots here.
We started loosening the roots, adding potting soil, and plugging them in the holes. My assistant made sure I was working in the swampiest conditions possible.


Once they were planted, I punched a hole in the main sprinkler tube (conveniently dead ended right at the first plant) and turned on the system. No water. After fifteen minutes of screwing around, I cut the line open and discovered a wad of roots and nastiness had plugged the line just past the point I had made a repair this winter. Luckily, I had another coupling and the tubing needed to fix it. I ran lengths of the 1/4 inch tubing from the main line to each plant, staked it, and added a flag dripper head. The nice thing about these systems is that you simply punch a hole, add a barbed coupling to the tubing and stab it into the main line by hand. Easy.

 
I need to get some decent stakes designed for this instead of junk I had laying around the garage. With the system on, each of the lantana received it's quenching drips of liquid gold needed to survive in the desert. The irrigation timer will take care of them from now on.
 
 
We just need to get some mulch down and some kind of border. This type of plant expands pretty good here and only dies down in the winter. In our experience, it comes back stronger each year. It should fill this whole area in a fairly short time.


It was nice to change gears and do something different. I had plenty of excitement with the occasional, "accidental" dousing of a hose or spattering of mud following a good Gracie puddle jump. She had to strip down in the garage, for an immediate trip to the bathtub.

Liquid madness.
How could I not close with the pure, unadulterated joy of a child playing with a hose at the peak heat of the day?


A walk in the park

We took some time off from home projects to go for a family hike in the largest city park in the country. Nope, we didn't fly to New York, we practically stayed in our back yard, South Mountain Park in Phoenix.

For those of you outside the desert southwest, a half mile from the urban metropolis, it can be like an alien landscape. It's somewhere you wouldn't be surprised to see armed guerillas from Planet of the Apes ride up on horseback. I thought I'd show some photos, to help share the Arizona in AZ DIY Guy.


The trail started out easy. It was well maintained.

It was a nice day, but it got pretty hot during our excursion. We probably should have left a little earlier, but a hefty coat of sunblock and a bunch of water made it bearable as we set off down the trail.

Frodo and Sam?
Behind us we could see the high rises in Downtown Phoenix in the distance.


The landscape was covered with giant Saguaro Cactus. We do have a few in our yard, but it was cool to see so many in the wild. Many were easily 20 feet tall with several arms.

This one's in rough shape.


Saguaro down.

We passed a couple dams, built in the 30's, from what we understand. There's not a drop of water up there now.
Dam!
Dam again!

We managed to find a couple of the ancient Hohokam petroglyphs. We missed plenty in the rest of the park, but that's for other days

An original AZ DIY project from long, long ago

Can you spot this one?
A spiral, just left of center frame.
On the way back, going got rough. Gracie took a spill and scratched up her hands. Luckily, Jack packed some Band-Aids. Big brother washed her up and took care of the damage.


She was dog tired and scared of tripping again. Daddy had to carry her...


... and it really started getting hot, 92º at this point.


Then, tragedy of tragedies, one of my oldest friends succumbed to the harsh, rocky environment. If you are squeamish about horrendously graphic and fatal damage to finely crafted, rugged footwear, you may not want to look at the photo below: 


One of my trusty Red Wing work boots lost its sole. These tough-as-nails soldiers have served me on the front lines for over 10 years. You've probably even seen them in several of my posts. They'd been glued up once before, but there just wasn't much rubber left in the old boys. They got me within a quarter mile of the truck, past the worst part of the trail, before finally gasping their last. Luckily, I had a Red Wing, heavy-duty insole with just enough liner holding it in, to limp back on.

Beloved Red Wing work boots
2003 - 2013
Rest in peace

I guess I'm down to athletic shoes for the next project.

Installing new facia boards,... solo style

After tearing off the front overhang on our house, we need a new facia board. While I'm at it, it's time to fix the sun-beat, peeling, rotten soffit that's along the whole front of the garage. Surely, the HOA will soon ding us on that as well.

I started the day at Home Depot, then Lowes. Both were down to fuuuugly 2x6x16 boards this morning. There were twisted, knotty, and split misfits.  'Depot was nearly picked clean. Hopefully, this is a good sign for our economic recovery; people (besides me) are working on their homes again. I managed to dig through the entire stack and find three serviceable boards at Lowes.

Loading the big 16 footers into a pickup with a 5 foot bed was a challenge. Even shoving them through the sliding rear window left too much hanging out the back, so I opted to go upstairs with it:

Not a surfboard, dudes.
Lugging those big boys onto the truck, I started thinking the idea of a solo soffit install might just be beyond me. Working with a heavy, 16 foot board atop a ladder and trying to nail it in place now seemed more difficult than it had earlier.

I thought I'd make some sort of custom contraption with 2x4 T-braces, but I realized I had cut up my stock of 2x4's building the miter saw bench. After some stubble scratching thought, I came up with a workable method. I put the ladder in the middle of the run and balance the board on it. I lifted the board, held it, and used a one-handed woodworking clamp to secure it in place. Bingo!

Clampeyness
The door-end of the board required a compound miter cut due to the angles of the two soffits combining on two planes. I used a piece of scrap to scribe a pencil line, front and back, and then connected the two lines across the bottom of the board.

Scribing the outside angle.
I took the board back down and set up to cut both angles, on B.A.M.S. (big ass miter saw - as coined by Kit over at DIY Diva). This was the first time I'd actually used the saw to cut a compound miter. It paid for itself today, slicing and dicing 2x6's with precision and ease. My homemade, beefy saw bench was priceless when man-handling those massive boards. At one point, it stuck out so far, I had to open the door into the house and stick it inside.

B.A.M.S having lunch.
After clamping the board up again, B.A.N.G. came out to play (big ass nail gun - I claim that one). I shot the board into the rafters and then again through the decking, resetting the clamps as I worked across to keep it tight. I actually hit the framing rafters behind,... most of the time.

Bang - Bang - Bang
Rounding the corner, to move up along the garage, the old facia looked even worse up close.  I don't think the wood was ever primed.

Mr. Hook, it's been lovely, but you'll not hold Christmas lights again.
I had to work my way up slowly, gently prying the shingles up and pulling out the staples that held the metal drip edge. This was precision work, best suited for a small prybar / nail puller.


It also was tedious work. There were a million of those pesky staples to pry out. The sun started getting to me so I broke for lunch, a healthy dose of sunblock, and my sexy hat. Oh yeah, I know the ladies will be drawn to the floppy lid, but too bad, I'm taken. And no, I'm not going to share a source link for this sweet slice of melon shading headgear.

It's a Stubble Sunday, but  you just can't take your eyes
off the ol' chapeau can you? Don't be jealous.
After the 1x2 behind the drip edge popped off easily with a Wonderbar Pry Bar , I tried to pry off the old facia. It wouldn't come off without damaging the decking and framing, because it was nailed both through the top and the face. I pried the decking up a bit and cut nails with some diagonal cutters for a while. Finding that a pain, that still left some nail-nubs behind, I changed tactics. In came the reciprocating saw with a bimetal blade which sliced the nails off flush as I ran it down the seam, a much better approach.

Ye old nail slicer.
A couple hearty whacks with the FUBAR sent it tumbling to the ground with a clatter. I'm really glad I'd moved the cars out of the way. I used it to trace the angles to the new board before taking it in for a visit with B.A.M.S for a quick bit of slice and dice. No compound cuts this time, just nice simple angles.

The clamp trick worked perfectly again. I skadooshed it into place with B.A.N.G and called it good for the day.


A heaping helping of cleanup was in order, again. I'd managed to blast debris in a wide radius around the work site, which is where (inconveniently) we park our vehicles. I hired out some skilled labor to police up all the nails and staples. She drove a hard bargain, but it was cheaper than buying a new tire.

There's still lots of work to do on this project. I still have half the garage face to demo and replace. I need some 1 x 2's, drip edge, primer, and paint.

Tearing it all down! Bones and all.

A new weekend dawns, so does the need for more destruction. Since the

HOA told us to tear down our front overhang, we started immediately . It sat in skeletal, semi-demolished form since last weekend, when I had taken the roof off. Rather than wait for the afternoon heat, I got going in the morning, right after breakfast, while it was cool.

The old bones, and a munchkin.

Out of a concern for breaking the framing parts of the overhang that need to stay, I decided to isolate them by cutting them off close, leaving the lumber weight on the outboard frame. The first thought was to use a circular saw, but the framing was so full of nails, staples, and junk, I figured it would ruin the blade. Instead, I loaded a new Diablo "Demo-Demon" Carbide-Tipped Blade in the Reciprocating Saw.

Locked and loaded

I've used bimetal blades that would cut metal before, but not carbide tipped like this red devil. This bad boy blade chewed through the 2 x 4's  like butter. It ripped through everything so smoothly, I could use the saw one handed while holding the board with the other. The blade tore through lumber with just the weight of the saw. They were all cut in about 5 minutes. The urchins stayed inside, watching cartoons, during this part. I needed to watch my own head and not worry about beaning a kid with a nail encrusted board.

Sliced like butta'

I thought about cutting them again, close to the outer frame, but it only took a quick lift and jerk; they tore out of the clips holding them in a shower of flying splinters and nails. A quick couple cuts to the outer frame took it down as well.

chopped

The saw blade was not big enough to cut the support that was still standing. I considered using a chain and the truck or maybe... <gasp> a non-powered, hand saw... to take it down. In a fit of goofiness, I kicked the thing.

I haven't thrown a martial-arts move, of any sort, in over 13 years. But, true to form, when I actually executed a near perfect shuffle sidekick, there was no one around with a camera. When my size 12 Red Wing work boot connected with that beam it sheared off and flew, landing in a cloud of dust. First kick too! BAD-ASS STILL HAS THE MOVES!!!

Of course, the whole street was empty. No witnesses to the unarmed, Chuck Norris style carnage I had visited upon the mighty slab of lumber.

I strutted over to inspect my fallen victim. Ahhh,.... Crap.

rotten_post.jpg

The dang thing was simply eviscerated with termite damage. I was even able to reach in a pull a chunk from the hole and crush it to powder, bare-handed. A five year old could have kicked that thing down,... barefoot. Heck, I could have sneezed that thing over. An especially charming realization is that it was the primary support for the entire structure, and I'd been tromping around up there last weekend, like an idiot. I'm lucky I didn't kill myself in a tumbling roof collapse. At least there was no evidence of live termites.

Demo is always so fast. 10 minutes and I was done with the major structure.

Who turned on the lights?

Now onto the detail stuff, I had to be careful not to harm the structure needed to attach the new facia boards. I tried the big demolition jaw on the Stanley Fubar , but it was too much. It gripped  the board well, but when I twisted the tool to pull the board off, I could see and hear that the framing I was trying to save was going to be damaged. Switching to the demo hammer on the Fubar and banging away, while prying left-handed with a Wonderbar Pry Bar  did the trick. Patience paid off. Soon, boards were flying to the ground again.

Stop! Hammer time!

Gracie came out to lay down some carnage as well. She kept her head out of the way this time.

Klein! Hammer time!

Another problem, what to do with a concrete, with a square hole, right where Sweetie wants to plant some flowers? 

...but can you put a round peg in a square hole?

Of course, it was time to bring out SLUF, (Short, fat, ugly "feller").

It’s a full sized sledge, customized with its handle cut off at 17″. It was given to me by a foul-mouthed middle-eastern gentleman with muscled forearms the size of gallon paint cans. He drove electrical grounding rods with it, like they were thumbtacks. Sorry folks, I can't give you a source link for this, you gotta make your own (or find your own foul-mouthed, middle eastern gentleman to make one for you).

S.L.U.F., the not-so-gentle persuader

I pounded the stuffing out of that concrete. Of course, contrary to all the other half-assed construction our predecessors did, they built the heck out of this particular detail. It wasn't just run of the mill Sackrete in the post hole, they'd loaded it with a heavy aggregate mix, full of crushed gravel, and very resistant to a quickly tired knucklehead pounding away on his hands and knees in the sun with a heavy one-handed hammer.

I wore myself out with that stupid, stumpy sledge-hammer.

Sitting there in the hole, resting after all that hammering with concrete shards pinging of my face, I noticed something, that wiped that stupid smirk off my face...

Temitus-Bastardus-Home-Chewerus

The hole was crawling with what I'm fairly sure are termites. We'll have to have the place treated. Dang it; that's probably not cheap.  No termite tubes, the little beasts were using the support beam as an elevator.

The secret passage.

Food for five years, a thousand gallons of gas, air filtration, water filtration, Geiger counter. Bomb shelter! Underground... God damn monsters.

Burt Gummer, Hard Core Survivalist (Tremors)

The whole area got a good soaking with the hose and a healthy dose of Demon WP  through the pump sprayer

The entire exterior of the house got sprayed as well. I had learned about Demon when we were in Texas. It's a murderer. Hopefully, it will keep their migration down, now that I've taken their source of crunch and munchies away, with a spectacular, un-witnessed side-kick.

It's hot and the demo is done. Next, new facia and drip edge has to be installed to finish this project up.

What do you think? The house look too plain now?


UPDATE!!

I'm honored to have this story chosen to be featured an Bob Vila's website as part of the "Bob Vila Nation" " of contributors from the blogging community. 

Please check it out and give me a vote by the hammer image.

(UPDATE II: looks like Mr. Vila & Co. canceled this program and deleted all the Blogger created stuff)

And so it begins - demolition day

Since we hate our front door overhang / porch / hobbit tunnel, and the HOA conveniently demanded that we remove it, I decided to jump right into the demolition this weekend. As a certified dimwit, I thought the hottest weekend of the year (to date) would be a great time to climb up on the roof. With other commitments, I was only able to find bits of time here and there, to tackle the project.

Two minutes wielding the mighty Stanley FUBAR (Functional Utility Bar) resulted in lattice and splinters blasted across the front yard like a cruise-missile strike. This beast of a tool is like having the very essence of destruction itself, leashed in your hand.
Don't you just want to skip barefoot across our lush front yard?
Since bulk waste pickup isn't for another month and a half, I spent the next couple hours breaking the lattice down, bundling it into three rolls of slats for storage, and cleaning the front yard of stray wood bits, nails, and staples. That was all the time we had on Saturday.

Late Sunday morning, I found a very efficient way to quickly dull razor blades. Carving through the face of four layers of granulated shingles makes quick work of blunting your knife. A blade lasted only about one linear foot before it had to be replaced. I made good use of a Stanley Quick-Change Utility Knife, making it easy to constantly flip and swap blades. I used a Edge Cutting Guide , normally for a router or circular saw, to keep my line.


This was some tedious, hot work. I took my time, really wanting that shingle edge to look straight and clean. At least the yard didn't  get too messy. Each time I gave the all clear, Gracie would scurry up and pile the bits of shingles and tar paper that rained down below. It took a bit longer because I had to be extra careful about nails and keeping the drop zone clear of my happy little helper.


It took about a 45 minutes to finish the cut line. It turned out pretty good, but it's thick as heck with 4 ply of shingles at that point.


I sat down for a cold drink and called my young squire for my weapon. I recall that I'd seen on one of the multitude of DIY shows on cable, that a flat blade shovel is the tool of choice for stripping shingles. Time to put it to the test. My blade, young Padawan...


The shovel stripped the roof like a champ. Two minutes and the deck was clear. I ran into some old termite damage out at the far edge, not a good sign.

"...I smote it's ruin upon the mountainside"

Once again, a diabolical lack-of-fun reared its ugly head, cleanup.  Jack donned a pair of gloves and came out to lend a hand. We drug the pile over to the "alley" beside the garage and piled it on a tarp for disposal later. It's nice to have a larger kid who can really pitch in and help. It made much shorter work of the mess.

Yeah, that's a laundry hamper from the garage. Shhhhhhhh.....

We finished tidying up and left it alone for a few hours while we ran some errands. After all, it was only 87 degrees, and not quite miserable yet.


I returned to the task late afternoon, as the day's heat reached it's peak. The FUBAR and mighty sawed-off, sledge hammer rained their fury upon the decking, as if wielded by the Norse God of Thunder himself. Timbers splintered like toothpicks; a cloud of dust rose from the site.


Since we have to find a way to get rid of all the waste later and have to store it. We spent the extra time pulling all the nails. I brought in a pro. Gracie was a marvel of nail-yanking prowess. She threw herself into it with such a gusto that she soon bounced the hammer handle off her forehead. Don't worry, the hammer's fine, it's a Klein Heavy-Duty .

It was nothing that couldn't be fixed with a hug, a bag of ice and a stiff drink.
After the weekend's third cleanup. We called it quits. The carcass is picked clean, down to the sun-bleached bones in the desert.

Break time is over young lady.

Did I mention the temperature? It's April 28th, and we've officially hit triple digits

Summer in Phoenix. It has begun.


Enjoy your spring folks.
 
________________
<UPDATE> I tear the rest of this beast up the next weekend in the exiting conclusion to demo phase in: Tearing it all down! Bones and all


A Challenge from the H.O.A.

We received a letter from our homeowners association, a "Friendly Reminder". They just don't like our front entrance.


We've received HOA letters before; we call them "nasty-grams". They've told us we need to trim the palm trees, nip some weeds, fix a board on the gate, and even hit the place with a fresh coat of paint. Each time, we've sheepishly complied. After all, we're supposed to keep up with this stuff. It's just our Strategic Doctrine of "Inside Out", that sometimes gets us in trouble.

The letter we received this week was a mule kick to the head. Uh ohhhhh...


"We noted the overhang on the entrance way to your house was not submitted for ABM approval and is in disrepair. Please remove the overhang in a workmanlike manner. 

ABM will perform a follow-up inspection of the property...   ..in compliance by 06/22/2013 "
A few notes my dear reader:

  • This "overhang" is a beast, a huge, crap-tastic beast of drunken, weekend-warrior awfulness. We want it to go, eventually, but it's not foremost on the schedule, neither time wise or financially.
Notice anything stoooooooopid?
  • "State of disrepair"???!!! Nope. It's in a state of jackleg construction. The dang thing was built to look like someone pounded dog excrement with a sledge hammer.

  • I didn't know it was not submitted for approval, because, I didn't build it. We've been here 7 years. I think this "overhang" has been here for 15-20.
     
  • A goal of 06/22/2013 is pretty much a do-it-now situation. June is not the time to be dilly-dallying around, working on a major, outdoor construction project around here. Why? Because of this:

It's only April 27 and we're going to hit the century mark. June will be worse.

We live in one of the oldest, largest homeowners associations the country. We are in Phoenix, but our area is an urban village, almost completely cut off from the rest of the city. This village, Ahwatukee, is covered by a colossal HOA. Honestly, they do a pretty good job of keeping the place up, but I think this particular requirement is ridiculous.

A quick web search will reveal absolute horror stories from HOA's nationwide and their abuse of power, crushing individual families over unpaid fees, misplaced garbage cans, or an unapproved shed that was 2.75" too tall.

I'm not messing around. It's time to let these two, savage dogs-of-war out of their cage.

Spears shall be shaken, shields shall be splintered! A sword day... a red day... ere the sun rises!
- King Théoden
__________________________
 
 
<UPDATE> Oh yes,..  splintering does begin. Check out the carnage in the exciting saga: ... and so it begins, demolition day.


Replacing our bathroom exhaust fan

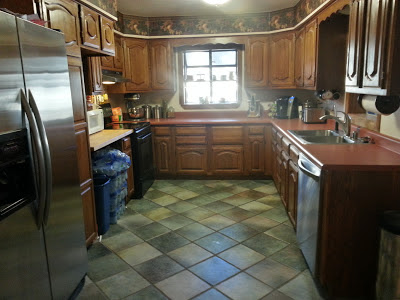
Both of our bathroom exhaust fans are shot. The one in our guest bath was a beast at one time; it sounded like an F-16 afterburner on takeoff and moved air like a pissed-off hurricane. I'm surprised it didn't pull the door off its hinges. Certainly, it blew too much of our costly air conditioning up into the attic. Now it's fried.

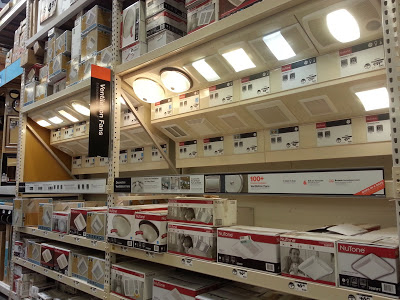
A trip to the home center for a replacement found me staring slack-jawed at a huge display of ceiling-suck-age options, ranging from $30 to $200.


Uhhhhh,... I came prepared complete with the info of: about 12" x 12" square. I was certainly not prepared with CFM measurments, Sone ratings or, most importantly, funds up to $199.99. Since the slack-jawed, staring approach didn't seem to resolve much after a few minutes, I did some split-second Matrix style education,... I looked it up on the smartphone.  I find that the deal on CFM ratings is that it's the speed / amount of air the fan moves, in cubic feet per minute. I found a formula and plugged in our measurements:

Cubic Feet = Length: 9 ft. x Width: 5 ft. x Height: 8 ft. = 360

360 cu. ft. ÷ 60 minutes per hour = 6

6 x 8 air changes per hour = min 48 CFM fan needed
I bought a Hampton Bay (#986 755), 50 CFM, 0.5 Sone (Ultra Quiet) for $ 48.97. It turns out the old one was rated for 180 CFM and screamed its furious banshee wail at 5.0 Sones. Folks with bigger bathrooms will need bigger fans, and deeper wallets.
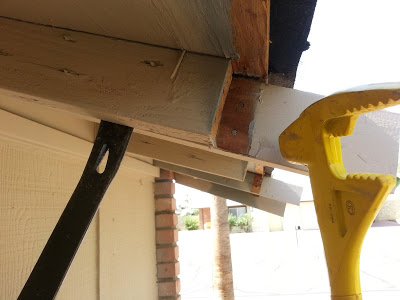
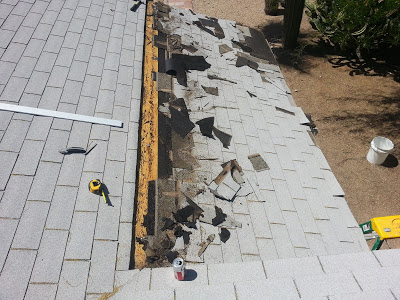
Back at home, I tried to pull the cover and found that this one was held in by rusted screws, not the handy springs I'd seen more recently on our other fan. Up close, this cover is a yellowed, paint spattered mess. I cut the paint and caulk from the edge with a utility knife before I pulled it down.

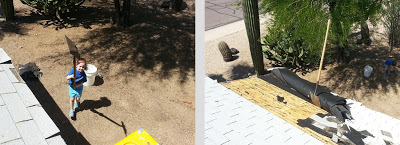
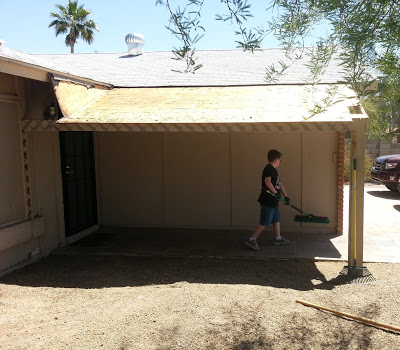
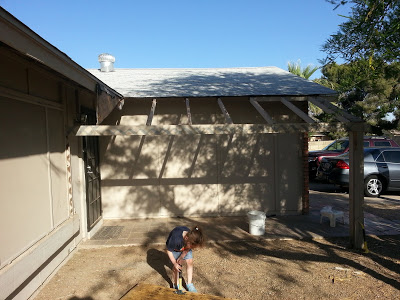
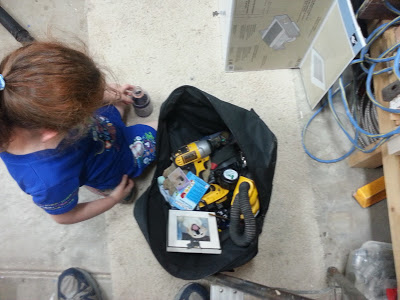
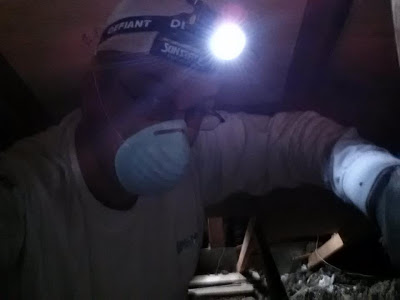
Next, I geared up for the dreaded attic crawl. Our attic is a filthy, itchy mess of ancient, blown-in insulation horror. It's never fun. I loaded a tool bag with all the tools and material I might need. When I returned from changing into long pants, a long sleeve shirt, and a spare t-shirt wrapped around my head and tucked into the back at my neck, I found my tool bag had been substantially supplemented.


Gracie was worried about me going into the attic, without her. She'd helpfully loaded up my tool bag with:
  • (1 ) box of Band-Aids (Angry Birds)
  • (3) tape measures
  • (1) Diet Coke
  • (1) Photo of Kirby (our dog who passed in 2010)
  • (1) Doggy Valentine's card
  • (1) Hand drawn "note" with hearts and "Daddy"
  • (4 ) Pretty rocks
  • (1) Small bag of 1/2" nuts and bolts
  • (7) 3" finishing nails
  • (1) Extra dust mask
Of course, I had to lug the extra stuff up there, just in case.

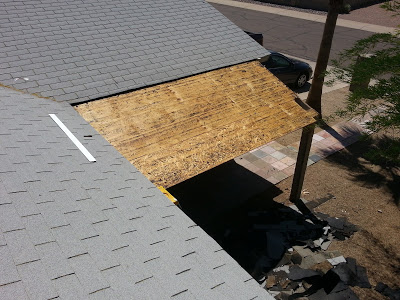
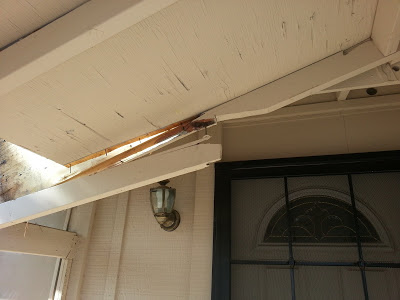
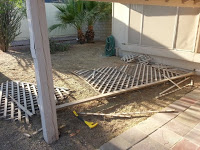
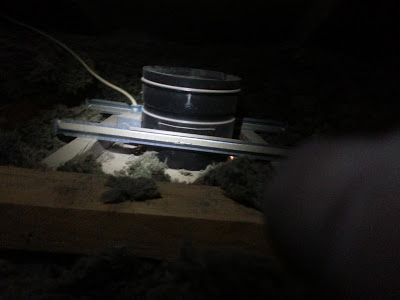
I traversed the attic, which ended in a miserable, belly-crawl across the rafters. It was 86º degrees outside in Phoenix; in the attic, it was damn hot. In the light of my headlamp, the fan appeared, it was unfastened and completely without a duct. From what I know, venting your moist shower air directly into your attic is commonly referred to as extremely stupid. It's not going to freeze in Phoenix, but it could cause mold issues and who knows what else. I didn't see any evidence of problems, but it was a dark, hot mess, and I wasn't going to loiter.

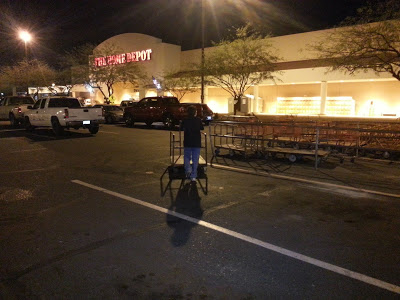
I could see the target in my high-beams.
I lifted the old fan out of the way. Luckily, there was enough slack in the electrical line to push the unit back to where I could at least crouch to work on it. With the hole open, there was a sudden burst of excited chatter from the bathroom below. I couldn't get close enough to the hole to look down. I held my camera phone over the edge to take a blurry recon shot:

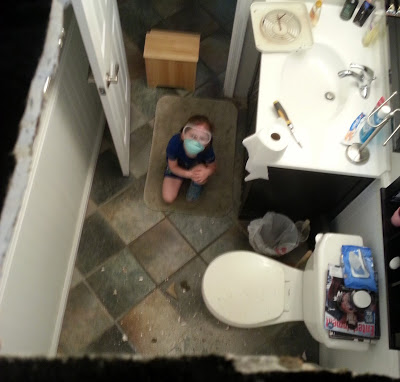
Daddy's helper. Thanks for the Coke sweetie!
With the power off, I opened the wiring compartment and took the wires out of the wire nuts. I slid the existing, three wire cable into the compartment of the new fan and clamped it down, using the connector (NM 3/8-Inch Clamp Type Connector) I had installed earlier, in the comfort of the garage. This particular unit used the push-in style quick connectors for the wiring. Normally, I cut them off and make a tight, twisted joint with my Linesman Pliers and wire nuts, but in the dark, hot attic, I was pleased to go with the plug-and-play approach.
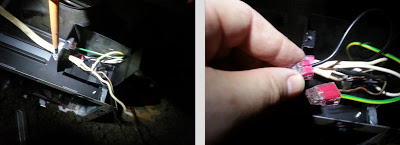
Clamp, plug & play!
I had bought a wall vent ducting kit as well. The 4" flex duct attached to the fan exhaust port with an included zip-tie. I added a quick wrap of the metallic foil tape that I had left over from the ceiling project. I shoved the new fan back over the hole and screwed the supports to the nearby studs.

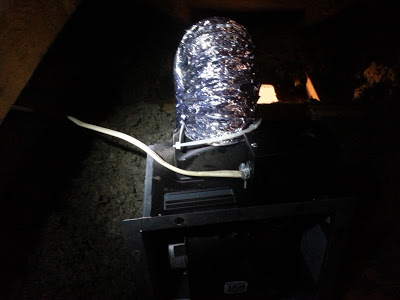
Duct,..duct,... duct,... GOOSE!
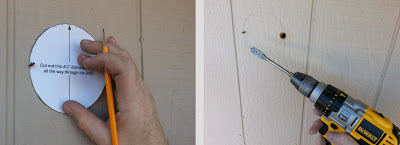
QUICK TIP: Ready to run the duct to the outside, and having pulled the bone-headed move of drilling exterior holes into framing members in the past, I took the time to drive a screw through the wall from the inside, so I could find the location easily from the outside, no measuring!

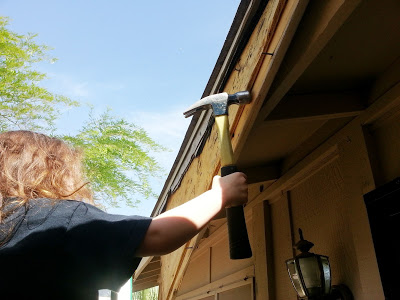
Finding the screw was easy. I shifted to the right to avoid the groove in our "lovely" T-111 siding and traced the 4" hole using the template supplied with the duct kit. Drilling a larger hole near the side of the line with a Spade Bit allowed for saw blade access.


Grumbling about the lack of a cordless jigsaw in my collection of power tools, I was forced to the disagreeable task of stringing out an extension cord, like a chump. This Black & Decker Jigsaw is actually the first power tool I ever purchased as a homeowner. It was bought for slicing a countertop to fit a new refrigerator in our first house, probably in 1999. I don't use it a ton, but it's held up very well for a lightweight, economical-grade power tool. Here's their current version, the Black & Decker 4.5 Amp Variable Speed Jigsaw


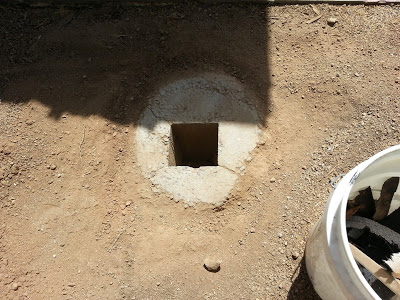
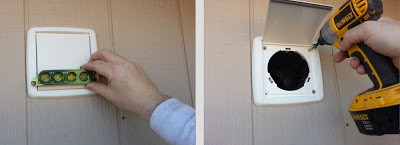
The duct kit came with a exterior vent with a flap door. An included sheet metal, rigid duct tube snaps into the back and is fed through the wall into the attic. I put a my small torpedo level on a straight line to square it up. Four wood screws zapped in quickly with the impact driver.


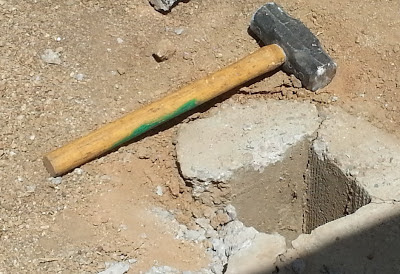
Back in the attic, I attached the flex duct to the rigid duct tube, again with a zip tie and some foil faced, adhesive tape to seal it up. Per instructions, I kept the flex duct in a gentle curve, without making any tight corners. The attic rat mission is an operational success. This highly classified image shows the target has been taken care of:

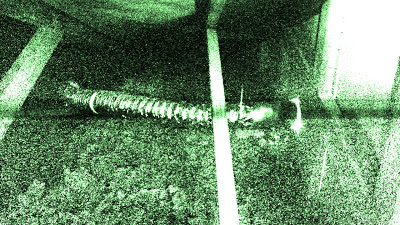
Classified: Just between us right?
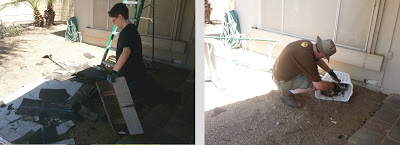
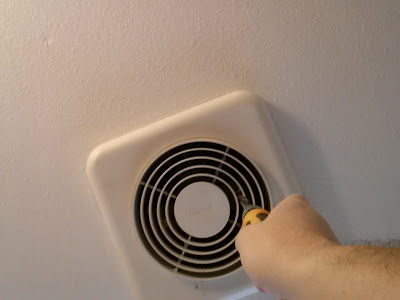
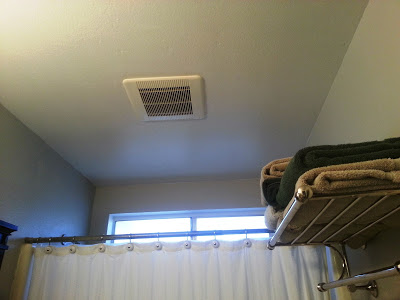
Returning filthy-clothed to the sweet, air conditioned goodness of inside, I popped the beautiful, new fan cover in place, this time with the easy, snap-in retention springs.

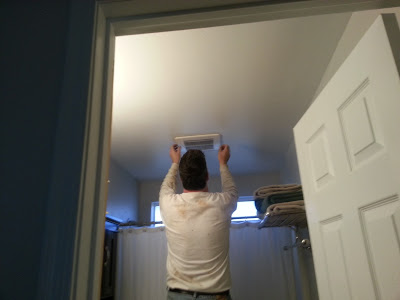
Note a very important detail in this step: no bald spot.
Now that it's all done, I guess I should have tested the fan to make sure this one wasn't a dud. Luckily, it worked just fine. I actually had to strain to hear it. I almost miss the clattering din of the old one.

The exterior vent flap works well. It swings open and closed as needed.
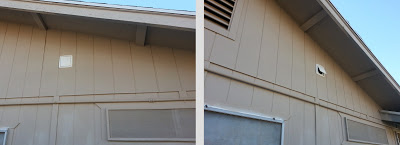
Thar she blows!

This was a medium difficulty project. Anytime attic work is required, it's a bit difficult and unpleasant, but you can do it. Keep your feet on solid framing and watch out for nails and open electrical connections.

It's not an exciting project to have done; we had a fan and we have a fan again. Just an unforeseen, necessary repair, not a desired improvement project. At least it's quiet and looks much better than the dated, ugly one. Plus, we now have exterior venting.


Thoughts? Comments? I'd love to hear from you.
 ____________________________________________________
UPDATE!! I'm honored to have this story chosen to be featured an Bob Vila's website as part of the "Bob Vila Nation" of contributors from the blogging community. Please check it out and give me a vote by the hammer image, if you like the story.

Quick Tip: disposable gloves

For "First Aid - Heath Care - Baby Care - Serious DIY"
I've recently started using disposable gloves for messy work. As a family dude, it seems like every time I open a can of paint, I get called back into the house for something. There's always a huge tragedy, like a 5 year old that absolutely must have some cucumbers or a fresh glass of milk, NOW!!!. Other times, it's been a lady trapped in the bathroom when the pocket door falls off the track, a broken glass, or a bunny in the backyard that must be looked at. Perhaps, it's just lunchtime.

I just keep a box in one of my tool cabinets and grab a couple before starting.


Regardless of the reason for my hasty retreat from a project, I normally have wet paint on my hands when I need to pop back in for a minute. It's nice to simply slip off the gloves and pitch them in the trash before leaving the room.

 
I also use them for other messy work, like working on the car. They're good when you don't want dirt, glue, oil, or paint under your fingernails or all over your hands when you have to go meet with someone or make an emergency run out to the grocery for a can of evaporated milk. It saves huge time, otherwise spent doing the surgeon's scrub down at the laundry sink.
 
You can find them cheap, at the drugstore or on Amazon here: Ansell Vinyl - Touch Powder Free, Latex Free Disposable Gloves 50 ea

The best laid plans...

Why is it that when you need consecutive weekends dedicated to a big project (like replacing all the doors in your house) that the rest of your house goes haywire? We've been buried with scheduled obligations lately, so the time allotted for serious weekend-warriormanship was already limited. The door project was going really well; I could see then end in sight. I was knocking one door out each weekend, no problem-o.

Then BAM! The washing-machine self destructs. Gotta drop everything and fix it. Tear down and rebuild.

Frickin' frackin' rubble bumbin' mumble mud...
...then, BAM! Just like the front yard, the irrigation system bursts in the back.  Gotta be fixed.


... then, BAM! The Pool Filter gets clogged up, right as the temperature rises. The pool turns into a swampy-green, scale model of the planet Dagobah, without the diminutive Jedi Master.  A total tear-down and rebuild is in order, with a diminutive mud-pie master.


...then, BAM! The awesome Baracuda Zodiac G3 robot pool cleaner-dude finally wears out it's rubber parts. A total tear down and,....you know the rest. At least I found better pricing on Amazon and saved about $150 vs. our local pool shop. Still, it's not the fun kind of tool I want to be buying parts for.

Baracuda Zodiac G3

... then, BAM! The guest bath exhaust fan gives it's death rattle. Inside, it's an unholy fossilized mess of rusted metal. Carbon-dating analysis puts it's installation in the long bygone era of 1979. I think the only thing holding it together is the rust.

This weekend's recreational activity.
I even managed to fit time in to break my shop's dust-collector while changing the bag. Enough with "BAM!" already. It's killing progress, and tearing an unwelcome, good-sized hole in our checkbook. 
 
What's next? 

Considering a counter depth refrigerator

Refrigeration Madness
I've just become aware of counter depth refrigerators.  This just might be an excellent design solution for our cave-like, U-shaped kitchen. We've been considering recessing the 'fridge through the wall, to set it flush with the cabinet faces, but that is one big invasive, load-bearing wall mess I'd prefer to stay well clear of if I can help it.

I understand those massive Sub-Zero beasts with cabinet panels are counter depth, but much wider than normal. They're also scientifically classified as "spendy" and thus beyond our humble means.

A casual visit to Lowes turned up four models, a couple side-by-sides and a couple of the awesome French door style, with the freezer drawer below. It seems that they all are about a 23.5-ish sq. ft. size, smaller than our current side-by side. The French door style seems to make more efficient use of space, so maybe it would be a good trade off. Samsung's current line looks pretty good. We'd probably try to buy all the appliances at once, to ensure a matched style, and hopefully get a volume discount.

We're going to flip the 'fridge location to the other side of the room. Either way, a full depth fridge cuts into the entry of the kitchen, physically and visually. It's even worse when I have the door open and am staring slack-jawed into the treasure trove of temptations.


The Cavern of Doom
Anyone have any thoughts or experiences with this class of refrigerator?


Review: ProjectCalc Calculator

In my Support Tools post, I mentioned I am enamored with my ProjectCalc. It does a bunch of stuff beyond a normal calculator, but for me, the winning feature boils down to one key ability, quickly doing calculations with fractions.

Sure, I took basic 5th grade math (a million years ago), and still remember some that cross-multiply and divide crap, but why do it when I can rely on economical technology to do it for me?


I like to save time, instead of scribbling my error filled, unintelligible calculations on scrap cardboard or 2x4s. Plus, it's more accurate than taking off my shoes to count past ten.

"Math is haaard".
-Kevin Malone, Accountant
Dunder Mifflen Paper Company

I keep it stowed in a drawer of measuring, layout, and marking implements, but like to tuck it in my Nail Apron when I'm suiting up for project combat operations. Its hinged cover protects it in a pocket, tool bag, or drawer full of tools. Maybe there are some smartphone apps that can do this stuff, but do you want yours to slip out of your hand from atop a ladder? I have a version older (#8515) than the one they are currently selling; it's probably about 3 years old and going strong on it's original batteries. The rugged construction of this little bulldog has allowed it to survive many projects.

The fraction feature is easy to learn, but takes a few extra keystrokes to accomplish. For example, to divide 7 feet, 3 and 3/8 inches into three equal parts, you tap a few unique buttons (shown here as <BUTTON>):

7 <FEET> 3 <INCH> 3 < / > 8 < ÷ > 3 < = >

Therefore: 7ft.  3 3/8 in. ÷ 3 = 2ft. 5 1/8 in. Wham Bam! Done!


Just don't forget to add the width of your saw blade, like yours truly did.

In addition  to standard calculator functions, it easily converts between decimal and fractional numbers in standard or metric measurements (linear, square, or cubic).   It also calculates for paint, concrete, tile, wallpaper and carpet.
 
The new version takes advantage of a quantum leap forward in project mathematical calculating technologies. Calculated Industries has finally able to harness the power of White and Blue. Gone is the ancient, yellow styling of yesteryear.  Of course this upgraded modern technical marvel has been renamed as the Home ProjectCalc Do It Yourself Calculator  (#8510). I didn't see any other differences other than additional buttons replacing the dual button function I have to use in order to figure materials.
 
Calculated Industries has a full line of project / construction calculators with even more features, (like memory storage) but for what I normally do, I'm really happy with the DIY / Homeowner grade calculator. At some point, maybe I'll try out one of the more advanced models, but for about $20 - $30, you can't go wrong with this one.
 
I've personally used mine for renovation projects, woodworking, and electrical conduit bending calculations. I'm happy to recommend it. It's a tool worth having in your collection.

10,000 Visit Milestone - One small step for AZ DIY Guy...


Following an initial launch on Facebook, in August 2012, I launched this blog in December 2012. I've just passed 10,000 views. For my little corner of the interwebs*, it's a milestone. For other elite members of the blogosphere*, it's a good week's worth of visits and in some cases, maybe just an average Tuesday.

I'm just starting to get comfortably broken-in feeling.

Ready for 10,000 more!
I enjoy prattling on about the stuff I enjoy. I'm pleased to have heard from those that enjoy my projects and tolerate my particular brand of humor. The comments and connections made have been great.

It's funny, I can never tell what post may take off in popularity. Review: Kreg Jig Jr. was lightning in a bottle, it's still almost always my daily top visited page, almost half my total visits. I really enjoyed writing the Stubble: The Ultimate Power Tool post; it's popular too. Other top posts are: The "Ted's Woodworking" Scam, Building a Miter Saw Bench - Economical but Beefy! and even the negative Review: General Tools EZ Pocket Hole Jig. I can never figure what's folks will like.

The goofy  How gun control will affect remodeling post? Not as much. The The DIY Guy vs. Dealership Challenge 2013! was one of the most fun ever, to do and to write,... not a lick of interest. Undesired Inheritance from our DIY Predecessors , ehhhhh.....

So early in my "career", I'm humbled to be noticed. One of our projects was the subject of an interview and article on Bankrate.com (and picked up by Yahoo and Fox Business). One of my reviews was featured in a Kreg newsletter. Parts source, Repair Clinic liked a post and wanted to put affiliate ads on the site. I'm even affected by scrapers stealing my articles and posting them on their sites as their own. What's next?

I'm looking forward to the one year mark. I wonder,... in December 2013...
  • Will I still be here, beating the massive 1st year blog failure rate?
  • Will I still be posting fuzzy, one-handed photos taken with a Samsung Galaxy S III Smartphone?
  • What will my shop look like? An added Shopsmith band saw perhaps?
  • Will the kitchen remodel actually be underway?
  • Will I still have all my fingers? (please?)
  • Forget completion, will I get any further on the hallway organizer project?
  • Will there be a second season of Elementary? (PLEASE!)
  • Will I bump into another amateur  DIY / Renovation blogger out there, who's a dude?
  • Will I ever get to 100 Facebook fans before their greed policy pushes us all to Google + or whatever copycat social network a new Apple/Microsoft/NBC/ABC/CBS conglomerate comes up with? Allow me to be the first: Please "approve" me on Yeeeesh!
Come on back, I'll keep the light on for you!
Thank you for visiting my friends!

- John
 
* Achievement complete: Use the words: Interwebs and Blogosphere in a post. Consider me a pro.**
**Achievement complete: Commenting on the fact that I used the terms Interebs and Blogosphere in a post. Rockstar!

Review: JELD WEN Interior Doors (hollow core)

I'm well underway with replacing all the interior doors in our home. We started with flat slab, hollow-core doors that were probably original to the 1979 home. These originals are very plain, beat up, and so thickly coated with poor paintsmanship that there's no saving them. We've started replacing them one-by-one.

Some before and after action!

Some before and after action!

I've been picking up a hollow core, six panel doors from Home Depot by Jeld Wen. I believe Lowes sells the same brand, but I have my reasons to go to HD.

Jeld Wen - hollow core interior doors

Concern?:

This sticker did not slow down the planer at all! It got chewed to bits.

I'm using the hollow core doors, because:

  1. The originals were just fine, still structurally stable after 30+ years. It's a family home, not a great wall, fortified to withstand an onslaught of marauding Mongol hordes.

  2. They cost $30.00 each. This is a serious improvement for a great price. I'm spending more on hardware than on the door.

  3. Seriously, they're $30! (Compare to this investment, for more than $30)

  4. I can man-handle these myself. They're light enough to prepare and hang solo, without having to lure a neighbor over with a craft-brew to get help wrestling a solid-oak, back-breaking beast onto the hinges.

They come off-white primed on six sides and have an embossed wood grain pattern. Painted a nice glossy white, even by hand, (...even with a 5 year olds assistance) they really finish up nice.

Of course, I had to plane mine down to size. I got a look at the construction, beneath the primer. The sides are a finger jointed, natural wood. It looks like pine. It's clean and free of knots and imperfections. The top and bottom are particle board. I'd prefer better, but it seems to work. Our old doors were the same. I just make sure I seal them up with primer and a couple coats of paint.

Jeld Wen - hollow core interior doors

Clamping a sacrificial edge to prevent snipe and blow-out with the planer.

Because the standard sizes were too big for my framing, I bought them as slabs, no hinge mortises or holes for latches and knobs. They did have pre-bored in stock for a few bucks more, for those with houses not built by guys with short tape measures. I cut into mine for two different latch applications, there was plenty of meat left.

Surgery, to&nbsp;install a pocket door latch

Surgery, to install a pocket door latch

The instructions limit how much you can plane down, 1/8" max per side. That was just fine for my application. I did it with a handheld power planer (Bosch).

Overall the quality was really good (see #'s 2&3 above!!!). So far, I only had one with a front that was coming off. It may have caught and popped up when they loaded it onto the shelf at the store. I glued and clamped it overnight before planing it down to size. Fixed!

Jeld Wen - hollow core interior doors

I'm happy with this good-looking, easy-to-install Jeld Wen product. I have no problem recommending it to mid-skilled DIY'ers, with the proper tools, providing they don't require interior doors capable of stopping bullets.

If you'd like to follow my bumbling, door replacement adventures from the start:

  1. Planning and decisions - Looking at doors, tools, and hardware (while sick as a dog)

  2. Prepping a replacement pocket door - The inaugural first door

  3. Installing a replacement pocket door - Saved the hardest for first

  4. Prepping a replacement hinged door - Improving prep and shopping for hardware.

  5. Installing a replacement hinged door - Here's my first hinged door install, including the first attempt at hinge mortising.

  6. Review: Ryobi Door Hinge Template - Now I have it figured out!

  7. Father & son DIY skills training - including the pitfalls of door shopping with your guard down.


I’m keeping this old, small version of the top pic on my site for a while. There is a carpentry business that stole my image and is passing it off as their own on their corporate website. Weird, right? - John

Considering Home Depot vs. Lowes

Since I mentioned it in my disclaimer for the Ryobi Door Hinge Template review, I need to address a serious subject related to the Home Depot vs. Lowes debate. I pretty much bounce between the two home centers when I'm getting project material and have dropped a significant amount of coin at the both of them over the years. My local stores are almost across the street from each other, so it's not entirely inconvenient. Plus, they both have some exclusive product lines. Some trips simply require a stop at both.

For some reason, especially when I'm shopping alone, I find myself at Home Depot more often. I guess it's because I'm particularly interested in some of the fine material being sold out front, that can't be found at my local Lowes...

Bad Dogs, Bad Dogs, what 'cha gonna do?
I don't know if this is a nationwide phenomenon that or if it's just my local stores. Personally, I hit Bad Dogs nearly every time and grab me a tube-steak. From hot dogs, to jumbo hot dogs, Italian sausages, Polish sausages, chips, and sodas, they have a wide selection of quality DIY / renovation project fuel. (Don't forget the fixin's.)

Lowes: May I recommend a Philly Cheesesteak vendor perhaps? Nachos maybe? Get in the game!

The kids are still sleeping this morning. Maybe I should head over for some "supplies". Certainly it's too early for Ace Hardware to have the popcorn wagon going.  


DISCLAIMER: Lowes Home Improvement Warehouse could not be reached to comment on this post. I can only suspect it was because I did not even attempt contact them to discuss the subject of hot dog vendors.


Father to Son DIY skills training

Since Jack's rapidly approaching teenagerdom, it's time the lad starts picking up some mad handyman skills. My dad started letting me help with projects when I was about his age and I still remember those times fondly.

The two of us left the ladies behind and took a Friday night, before-bed trip down to grab door #4 for our interior door replacement project, this one for Jack's own room. He examined a couple from the top of the stack for dents and scratches before choosing a nice specimen from the middle of the stack.

Get those doggies rollin'
Get that doggie rollin'
He took charge of the six-wheeled beast-cart and headed out with the unmistakable din of rattling sheet metal and chattering caster wheels. He paused to treat me to some humor about what great stuff, Great Stuff is when we passed the display. Where does he get his goofball sense of humor anyway? We were having fun. Too much fun...

Folks, I'm just going to admit it; I let my guard down and paused like a slack-jawed yokel at the clearance rack. I should have known better to stop in such dangerous proximity to the kitchen section. Of course, I was immediately waylaid, out-of-the-blue by Mr.Smiling Clipboard Dude,
 
     "Has anyone told you about what we're doing for customers tonight?"
 
CRAP! Amateur move, Mr. Smarty Pants DIY Guy. NO! No one had told me what they were doing for us customers tonight. I was snared like a gazelle drinking from the crocodile pond. Somehow, he sensed I'm a nice guy (chump) and I'd pleasantly engage in his conversation. I dutifully answered the questions about our kitchen and, ever so nicely, gave point-by-point details on our state of unhappiness with our cabinets and layout. I shared the plan for a total kitchen gut and re-model next year,... yes, including plumbing,... and electrical, ... aaaand new cabinets with taller uppers,...

You're going to have to sit this one out boy. Watch the master at work.
We all know where this leads don't we? The pitch. It doesn't matter that I clearly, obviously have no reason to entertain his product; I just have to let him toss it out. But I know can still kick away from the crocodile. He's worked so hard, and I can't be rude in front of my son (or all those shiny new tools) can I? A slight pause, a friendly smile, and he lobs it:
 
"... consider cabinet re-facing"  Yaaaaaaaay! We're almost done...
 
"Free in home estimate" Woooo-hooo! Now there's only my initial polite decline <kick> and his second, face-saving counter attack ...
 
"...just in case you want to consider it, as an option, anyway", offered with a kindly smile and an attempt to immediately schedule the estimator. I give my trusty standby, a pleasant second decline <kick> followed without pause by a quick, simultaneous thank-you / smile /cart acceleration, and finally the inevitable third decline mumbled over my shoulder as I depart <kick-kick-kick>. Checkmate. We're gone <run>. That's how it's done folks, it's a skill acquired by years of home center visits. I'm just glad my son was there to see it. (You may want to start easy, like a quick run of the dueling Cable TV vs. Satellite TV polo-shirted gauntlet in the back of Wal-Mart. This will sharpen your skills for the pro leagues)
 
We did a quick checkout, strapped down...

 
..and slipped away, like ninjas into the night.
 
 
Sure, I could have hired a pro to extricate me from the salesman, but I did it myself and saved. You can do it too! Teach your children well.