

Our daughter's walk-in closet is a bit of an odd shaped room. With the entryway offset, shelving and hangers will be to one side, leaving a large, blank wall on the other. For a walk-in closet, it's still going to be tight, especially since I've added a new window , stealing the originally blank, back wall. A little more kid-stuff storage would be nice.
I was originally planning on mounting a large, framed cork-board in the center of the blank side wall. There would probably be room for a couple posters to flank it, likely Minecraft and Shopkins would be the subject matter of the day, if I had to guess.
As my closet remodel project was underway, I read a great blog post by Cristina from Remodelando la Casa.
Her post, "DIY Between the Studs Shelf - Closet Makeover Part-2" detailed how she created this beautiful, in-wall shelving unit in her son's closet, complete with dressed-up, plastic storage bins. It was nothing less than a clever feat of space-saving wizardry. It was carved from the free space stolen from a hidden, alien dimension located somewhere between rooms of her home.
image courtesy of: Remodelando la Casa
It inspired me to make my own version for our daughter to store her ever expanding collections of weird little toys that I don't understand. I even had plenty of scrap bead board tucked away for the backing. I figured I could take Cristina's idea and expand on it for my own version. It seemed best to do the project at this point in the closet remodel, because I still hadn't primed the window trim or painted the walls.
Cristiana installed a somewhat narrow unit. It is about a foot wide by what appears to be about 7 1/2 feet tall, to fit in the side-wall space of a traditional, front-facing style closet.
In my case, I had a whole lot of real estate to play with, an entire six-foot-long blank-slate. I laid out a 2 1/2 foot high by 3 1/2 foot wide rectangle, centered in the space.
I'm going to level with you...
Luckily, this was not a load bearing wall. It was simply a partition wall between the back of the master closet and the side of our daughter's closet. Wall studs would have to be cut out, but I wouldn't need to install a header to hold the roof up when I carved such a massive hole.
I knew generally where the studs were located in the wall, by doing the ole' knuckle-knock and listen trick. It didn't really matter much though; I just wanted to be sure there weren't any surprises that would goof up my spacing.
I used my new DeWalt Oscillating Multi-Tool to cut through the drywall. (I think I'll do a full tool review in the near future) I don't know how I lived without this sweet thing for all these years.

After cutting the rectangle, I sliced the cut-out area right down the center and popped it out in two pieces. It took a little wiggling to pull the nail heads through without breaking the pieces, creating an even bigger mess.
Two, widely-spaced studs appeared, sinisterly blocking my plans. One of them had suffered a deep cut, evidently dating from the original construction of the house. It had another 2x4 sistered alongside for strength, nailed in tight. No problem, this beefy monster-stud would still get sliced.
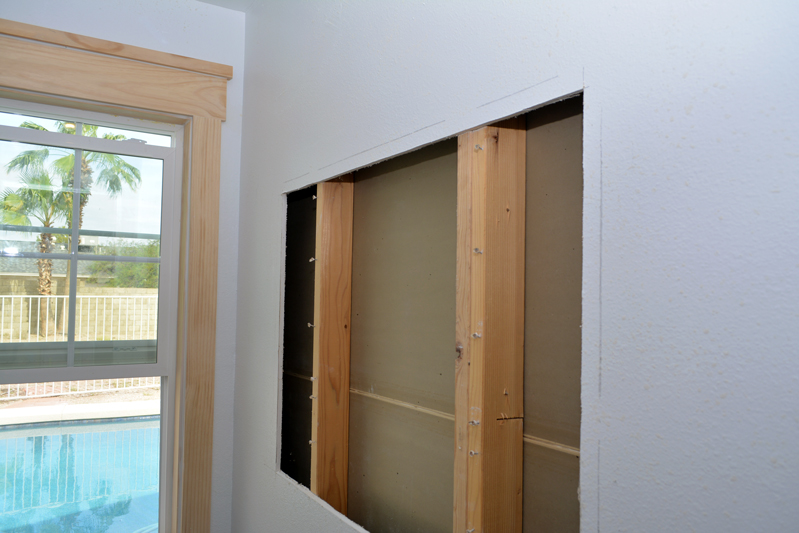
I wanted to replace some framing in the wall. Even though it was not load bearing, I'd be leaving a massive gap between studs when I removed the two offenders, at least 5 feet wide.
My personal opinion is that a wall should be constructed with structure than just drywall. Call me crazy.
I marked a 2 x 4's thickness, below the remaining lip of the drywall so I could trim the studs down, leaving exactly enough room for a horizontal board to lay flush with the edge.
Why yes, that is a Ticonderoga #2 Pencil. Good eye.
I wanted to keep the other side of the wall as untouched as possible because it is the back wall of our master closet. My sweet wife would probably kill me if I inadvertently sent a reciprocating saw blade through to the other side and carved into her clothing. So once again, I used an Oscillating Multi-Tool to cut through the studs, plunge style to leave the drywall untouched.
Plunging...
Plunged.
With the cuts complete, it was a little tricky to get the boards out without tearing up the drywall, but I found that wiggling it gently while wearing my hearing protection propped up on my head like a dork, while covered in drywall dust made it possible.
You simply won't see this pro-tip, bad-ass, safety-head wear style on HGTV my friends. You just gotta visit AZ DIY Guy for this Haute Couture.
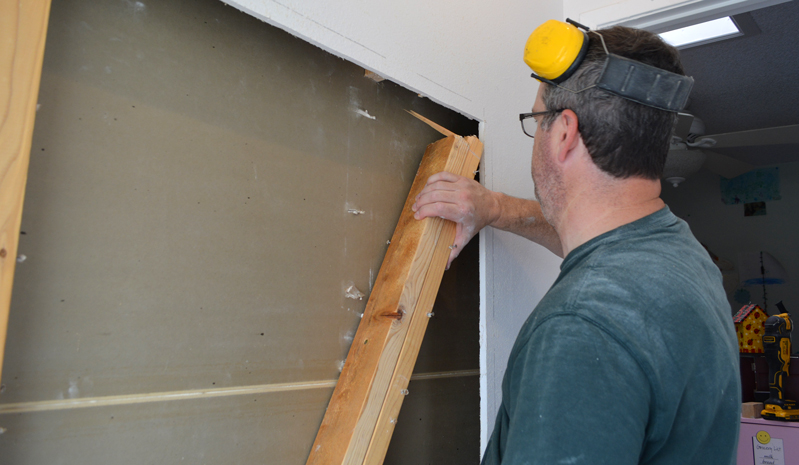
Bad-Ass Head Fashion
I laid horizontal 2x4's on the cut off nubs inside the wall and screwed them in with an impact driver.
I attached vertical framing on both sides with screws through pocket holes I'd prepped with a impact driver.
Pocket Hole Screwin'
With the rough framing done, we started building the shelving box in the garage, a nice little rainy-day project. We used clean, pine 1 x 4s (3/4" x 3 1/2") purchased right off the rack at the local home center. The first step was pre-drilling pocket holes with a Kreg Jig. . Gracie insisted on personally wielding the tools; this was for her room, after all.
AZ DIY Girl in action
We placed the pocket holes on the outside to hide them from view and screwed the thing together, nice and square.

This lightweight BLACK+DECKER was a much better fit for small hands.
Luckily, the old scrap piece of beadboard I had tucked away was large enough to use. I'd used this inexpensive, primed hardboard stuff before to make the wainscoting in our guest bath and to face the back of the shelving in the family room . It's become a bit of a decorative touch that runs throughout the house.
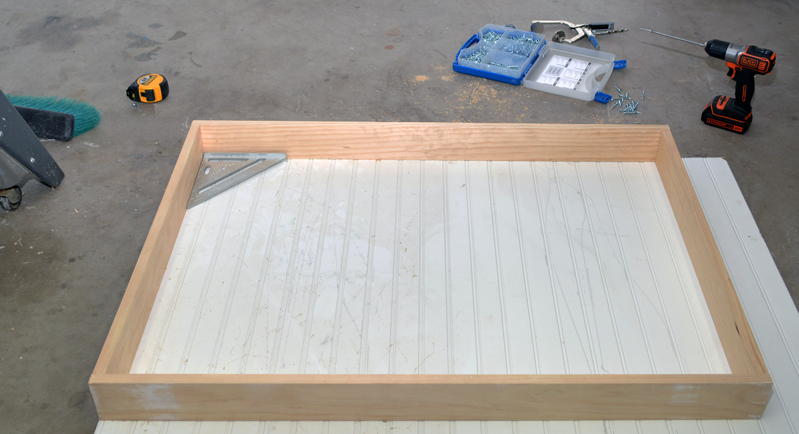
We trimmed it to size and tacked it to the back of the box, making sure to keep everything stayed perfectly square.
Hammering tacks
I had planned on sliding it in with room to spare and shimming it into place. Unfortunately, I'd made a error in my calculations and it was way too snug. Rather than disassembling, trimming and rebuilding, I brought out Ye Ole Gentle Persuader to apply its patented, heavy dose of convincing and pounded the sucker into place.
Applying a “heavy dose of convincing"
I installed a couple horizontal shelves, with pocket holes and screws. I'd calculated the vertical space into thirds for equal shelf spacing. Construction calculators are great since they'll easily help with fractions of inches.
A face frame would give the piece a substantial, finished furniture-like feel. It would also strengthen the shelving and give it an additional 3/4" depth. Completed separately from the shelving box, it would cover the sins and imperfections of my framing job, the slight warping in the wood, and the rough-cut edges of the drywall excavation site.


It snapped in place with a few shots from the finish nailer . I wrapped up the install with some wood putty in the nail holes, a light sanding, and caulk around the edges. While I was at it, I also prepped the new Craftsman Style Window Trim the same way.
By the end of the day, I'd given it a couple good coats of primer.
Even in its mostly-done state, it already looks great. In the end, it's going to get a glossy white finish against a colored wall.
We are going to let Gracie pick out the wall paint color for her closet. She's already talking about light blue as the leading contender, so I took did a quick digital stab at it, to see how it will look.
This is a fairly easy project, as long as it's not a load bearing wall situation. I took the simple road and used nice, finish-quality pine boards that I didn't have to rip for width. The joints are 100% straight, 90 degree cuts, with no miters. The beaded backer board can be cut easily by a multitude of different saw types. In fact, the whole job could technically be done with hand tools. (Of course, I used power tools nearly exclusively, because that's just how things go down around here.)
Honestly, the hardest part was to photograph the project in such a narrow room. I can't fit the whole thing in a straight shot, even with my widest angle lens (18mm).
What do you think? Could your house use some shelving carved from the hidden space inside the walls?
UPDATE!
Painted gloss white and painted walls! Check out the final reveal of the whole closet remodel.

