

Don't you love how aging copper changes colors over time? It goes from gleaming to rich brown, to hues of green and blue as the metal oxidises. I wanted to celebrate that look and create a decorative, artistic piece of rustic, aged copper. Here's how I built it and accelerated years of aging overnight with just a couple of simple, household products.
This is a sponsored post. I am a Bernzomatic Torch Bearer, though all opinions expressed are my own.
Not only is this a cool project, it's a double link to our adoptive state of Arizona. Arizona isn't just called The Grand Canyon State; its other nickname is The Copper State. The mighty Saguaro cactus is a unique piece of the American Southwest and really common around here. In fact, we have four three of these giants in our yard.
Building a Copper Cactus
I picked up some copper tubing and fittings at the hardware store and started by cutting the pieces to length using a mini tubing cutter. Spin, tighten, spin, tighten and keep repeating. The round blade snaps through in a minute.
Each of the mating surfaces got cleaned up with a special four-way wire brush, designed just for this purpose.
With all the pieces cut and cleaned, the mating surfaces got a thin coat of flux. I tried out Bernozomatic water soluble plumbing flux for the first time. It's more of a creamy consistency than the greasy, waxy stuff I've used in the past. I also liked that cleanup was a lot easier after I inevitably got it on my hands.
My go-to torch of choice for soldering is the Bernzomatic TS8000 with MAP-Pro fuel. It's a trigger start, hot-burning beast, an absolute pleasure to use.
I focus the heat on the pluming fitting, gently swirling it around until the flux starts to sizzle. Then I remove the heat and gently wipe the joint with an extended piece of Bernzomatic Plumbing solder; the silver metal liquefies and gets sucked into the tiny void between the pieces.
I soldered all the joints of the smaller cactus in one flaming session. It was a simple combination of 1/2 inch T-fittings, elbows, and end cap pieces. After such an extended time under heat, the piece was blazing hot. I quenched it with a damp rag and wiped it down.
The bigger, 3/4" Saguaro got the same treatment, but it was a little heavier. With the slippery flux, the pieces kept moving. I had to solder it in several steps to make sure everything would stay straight. We don't need any crooked cactus arms for this project.
Flame on! The arm was the last piece to get the treatment.
Yes, I cooked the UPC price tag. Didn't see it from my angle.
The final bit of soldering was done, but I'd be reaching for the torch again in a few minutes.
That's it. Two copper Saguaro. Next step, the speedy patina trick.
Better Living Through Chemistry
This copper wasn't going to patina itself... not anytime soon anyway. The only way to accelerate time is to dabble in some alchemy of one sort or another. There are chemical products, but I'm going with some non-hazardous, easy ingredients this time. These ingredients can't just be found anywhere though, you have to go on a long quest to the furthest reaches of... the kitchen.
I victoriously returned from the kitchen expedition with a jug of vinegar, the very stuff we use to descale the Keurig coffee maker. I poured an exact amount in my ancient cauldron. Well,... I don't know the exact amount, but it was way more than a splash and less than a whole bunch. Precision, my friends.
I carefully measured ingredient number two as well. I dumped enough salt in to make the elixir about 50% salt.
When it rains, it pours.
The garage smelled like my favorite flavor of potato chips (clue: it wasn't sour cream and onion). I lined an old baking pan with paper towels and poured the concoction over both pieces. I soaked a couple more layers of paper towels and added them to the top, tucking the copper cacti in for a nap. They got to take that nap outside the garage, in the sunny driveway. I love salt and vinegar chips, but whew!!! I had enough.
After about 45 minutes, I pulled them out of the bath and laid them in the sun. I sprinkled more salt on top, and laid the wet towels back on top. After a few hours there was a little patina starting to show, but nothing much. I was disappointed that there wasn't more movement.
I think the wet vinegar in the towels kept dissolving the patina, so I changed gears. The pieces were still damp, so I brought out the kitchen salt shaker and gave them a good seasoning, front and back before leaving them on a fresh, dry set of towels to be undisturbed overnight. Checking them after a few hours, I could tell that was the right approach.
I started work on the display base.
Building a desert base
A handy piece of IKEA butcher block countertop happened to catch my eye in the scrap bin. It quickly met the hungry teeth of the miter saw to get trimmed to fit. I suppose a 2x4 would have done the trick too, but I liked a harder wood and tighter grain for my finish.
I gave the chunk a rounded top edge with a router and a piloted 1/4 inch roundover bit. I keep a patch of old carpet padding around the shop for just such an occasion. It keeps smaller stuff from sliding around when working it without clamping it down.
To finish the block, I switched out the MAP-Pro cylinder on the TS8000 for propane, for slightly less heat. I took my time, slowly toasting the wood, darkening it and bringing out the grain. I took it past darkening the grain, to almost black.
The block got a couple coats of spray urethane. After it dried, I drilled a couple cactus planting holes with spade bits. Of course, for my idiot moment of the project, I accidentally oversized the hole for the 3/4" cactus based on the size of a fitting, rather than the tubing. The hole was a bit too big.
Yep. Idiot.
If you've not been to Arizona, you may not realize that the desert isn't made of flame-toasted IKEA butcher block scrap. I'd remedy that, first with a thick coat of wood glue, masked off from dripping down the edges and into the holes.
I scoured the countryside for some choice grade desert floor. It wasn't easy, but after taking three steps out the garage door, I found some by tipping my head downward and looking down at my feet, beside the driveway. I could have grabbed the dirt after two steps, but I did it in three. I always take that extra step for you, dear readers. Dedication.
I poured my desert into the wet glue, patted it down and left it to dry. Done for the day.
Behold, The Magic
The next morning.
Whaaa....?
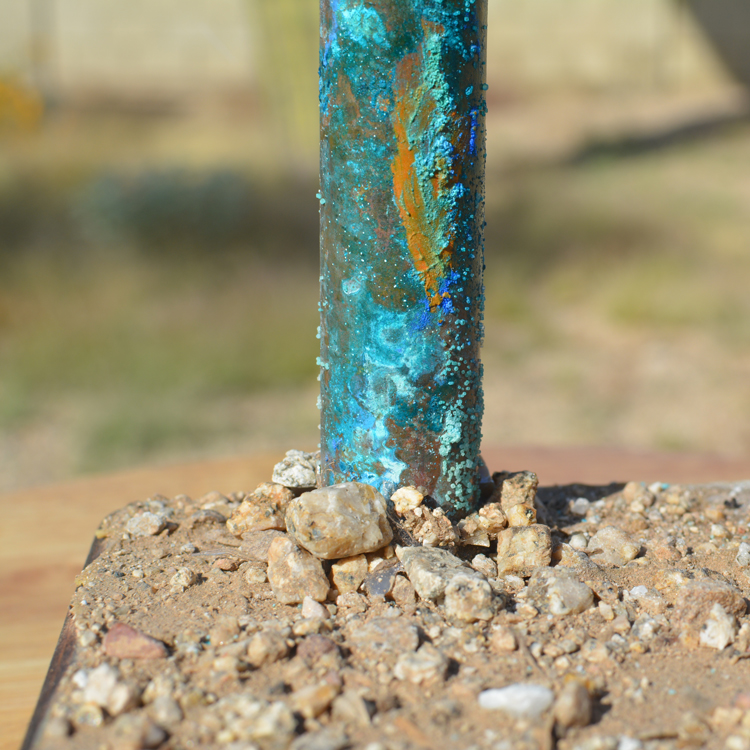
These beauties look like something pulled from a long abandoned factory.
HOW TO PLANT A CACTUS
A little dose of hot glue, a dash more dirt, and two mighty Saguaro rose from the desert floor. I gave them a brief wipe with a soft brush to knock off loose salt crystals and a quick toot of spray urethane. The spray darkened them a bit, and probably stopping the patina process. It also stopped the salty residue from flaking off and encapsulated the scent of vinegar soaked pennies. Done!
This piece makes a nice table topper, centerpiece, conversation piece or shelf dwelling knick-knack. The colors range from browns to blues to turquoise to greens. I'm certain differing amounts and varieties of the ingredients along with changes in temperature, humidity, and time will generate differences in the final finish.


Another fun project with copper and flame. Excuse me while I go grab a bag of my favorite chips.


The Torch Bearers are a group of tradespeople, DIYers, culinarians, adventurers and artists brought together to create projects using Bernzomatic torches and share their knowledge and ideas with you. Check them out here and get inspired to create with fire.
Visit the other awesome Torchbearers and see what they are up to on the Bernzomatic Torch Bearer Site.