

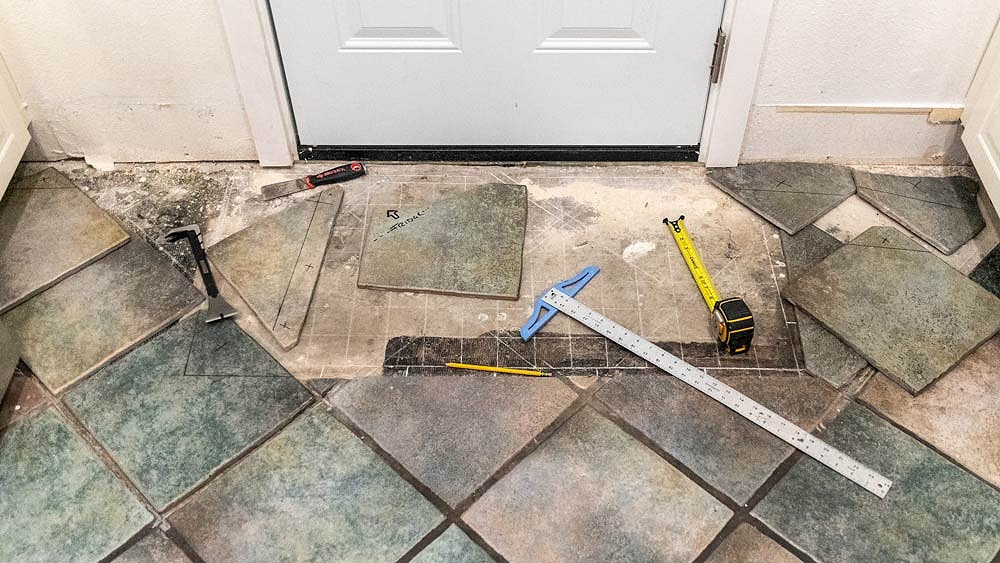
When last we visited the issue of filing in a big gap in the floor tile by removing cabinets, I’d pulled up and cleaned tile from unobtrusive areas of the house. I’d scavenged enough to fill in around the sides of what we’d planned to be a smaller, complementary tile “Welcome Mat” in front of a new exterior door. I’d marked the cut lines with a fine-tipped Sharpie and called it a week.
Revisit: THAT GAP BY THE DOOR - THE MISSING TILE CHALLENGE: PART 1
It’s finally happening!
Can you believe it?!! This is Kitchen Remodel Episode 37! and it’s a big one.
Cutting the Floor Tile
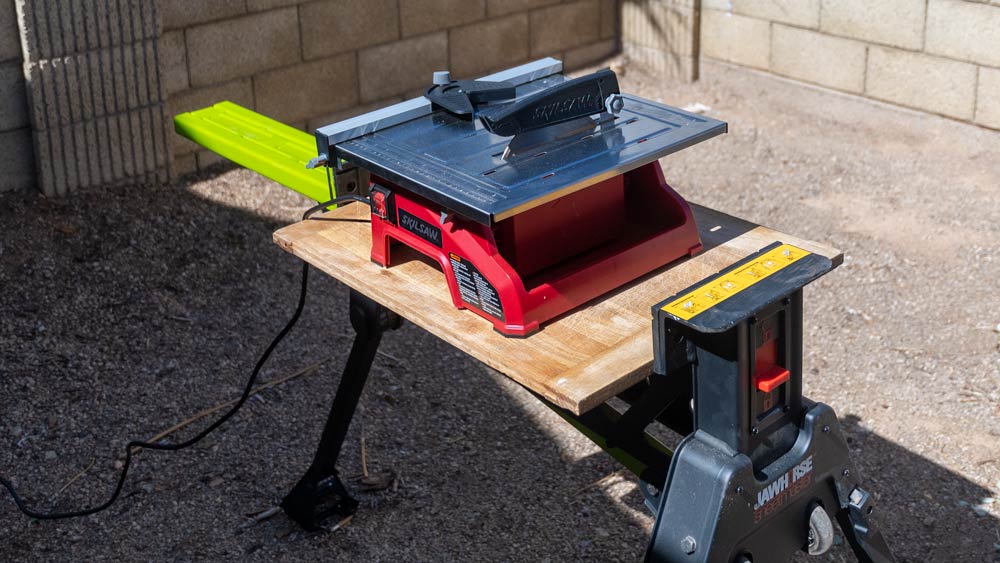
This is such a small area, compared to tiling an entire room. I initially figured I’d hand cut with a diamond blade in my grinder, but after research changed my mind; it wouldn’t be neat enough on the big, straight cuts.
I also considered renting a tile saw. The dude who had installed our kitchen back-splash, had set up a big, gorgeous tile saw in our front yard and made short, clean work of the job.


For $30-ish and only a few hours, I felt I would have been controlled by the rental. Although small, this was going to be a fussy job, probably with tweaks, adjustments, and inevitable mistakes along the way. As I am ever plagued with the Tool Collectus Neverendingus disease, I bought an SKIL 3540-02 7-Inch Wet Tile Saw for less than a hundred bucks.
It’s plastic and thin metal, so I figured I’d make a couple test cuts and return it if it didn’t do a neat job. I clamped an old cutting board on my Rockwell Jawhorse and set up a tile-cutting station right outside the new kitchen door, on our future coffee patio.
This is too neat and clean. Let’s see what we can do about that, shall we?
I filled the reservoir with water an fired it up, promptly soaking the front of my shirt. It’s a really quiet saw, but when the tile hits it there’s quite a shriek. I slowly pushed one of the scrap pieces through to see how the cut would go.

Oh, you’re gonna get wet. Trust me.
This little thing cut a laser straight line through the tile. It was an incredibly crisp and sharp cut line. Perfect. Game on.

Impressive cut.
It only took that one pass to get the hang of the saw. In a way, it was easier than a table saw, in that I didn’t feel it had much in the way of a kickback threat and I didn’t have a toothy blade hungrily scheming to bite my fingers off. I rapidly worked my way through all my tile cuts.

So much for keeping my tools clean
My last cuts were to cut a big 90 degree section out of a whole tile. I had only two full-size, unspoiled tiles to make the attempt. Inexplicably, I managed success in my first attempt.


After each cut I went inside and laid the piece dry in place. In minutes, I was done.
I’d still need to clean the residue off the tile and prepare the floor to get them to stick, but things were looking good at this point. I was actually starting to believe in my plan.

It ain’t pretty,… yet.
Installing the Floor Tile
The Easy Side…
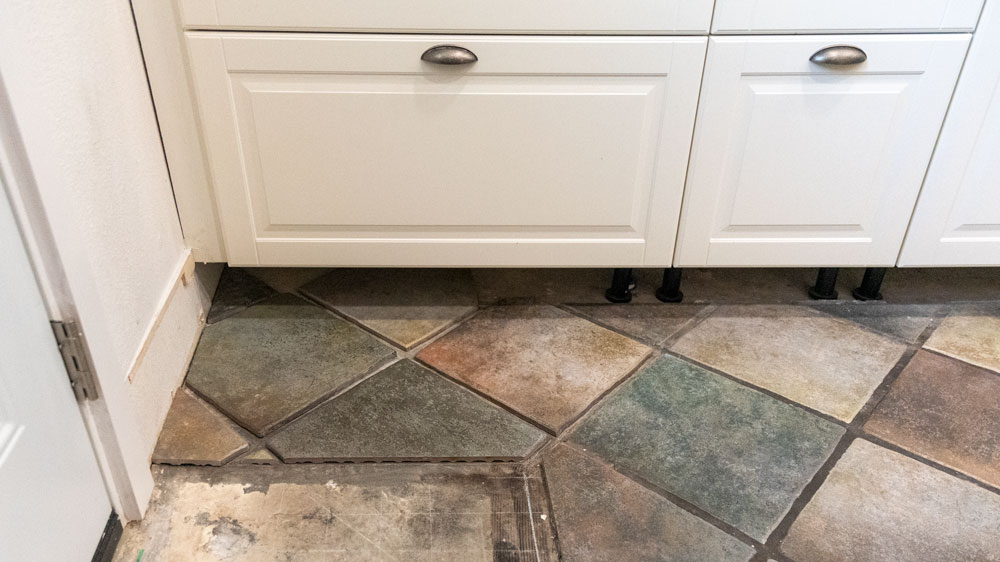
The right side floor was just a little messy. There was 40 year old dry all spatter and ancient bits of concrete dribble that needed to be cleaned up. I cleaned up the easy stuff with a hammer and an old chisel before lighting up my angle grinder with a flap disk.

I got it flattened out, vacuumed the dust, and wiped the floor down with a damp sponge. I laid the tiles out a little more carefully, lining them up on their final locations.
The hard side…
The left side was a bit more miserable. There was a bunch of black, oily adhesive gunk residue left over from some long-gone, stick-down tile. I tried the flap disk, but it quickly got gummed up.
A good soak in mineral spirits followed by a robust attack by the scraping edge of my painter’s tool got most of it up.

I kept up the scraping as the mineral spirits dried up and followed up with a quick sanding with my oscillating multi-tool. I’d ruined the flap disk with that adhesive residue, but the coarse sandpaper int the multi-tool did the trick nicely.

So clean you can eat off of it! (if you’re an idiot)
I pulled up the central tile, moistened the concrete below it and doled out some pre-mixed tile mastic. With such a small area, I really didn’t want to mix up a batch of powdered thinset mortar when I could simply open a lid and get at it. This stuff behaved nicely as I spread it out and raked with a notched trowel.


I laid all the tiles into the mastic with a slight wiggle and pressing motion.

Laying down on the job
Intrepid, highly-professional blogger that I am, I somehow managed to loose a bunch of photos of those tiles going down. You’re just going to have to close your eyes and imagine it. Trust me; it was epic. You’ve missed tile-laying on a heroic scale, with skill and finesses rarely matched in the history of the art.
The mastic needed a good bit of curing time, which was fine with my weekend DIY window over. With the recovered tile framing a much smaller, more manageable section of bare concrete slab, we began the hunt for tile to create our mosaic evenings after work.
Creating a Mosaic Entry Mat
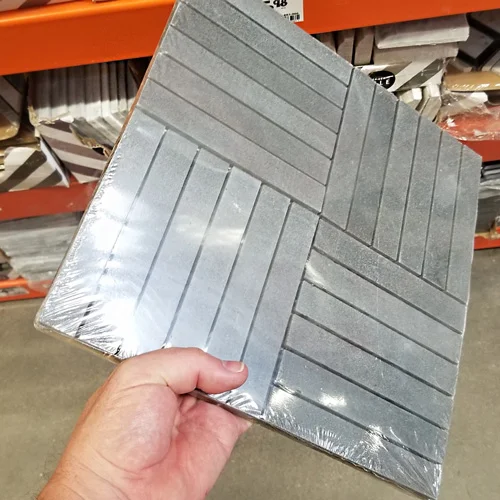
We wanted some kind of framing element, or border to break up the transition between the big floor tile and the mosaic fill. We didn’t find any thing we liked in the local flooring shops. Most of that kind of stuff was just too fancy.
In the end, we tripped across this parquet patterned tile, tucked in a corner at Home Depot, almost missing it. The big square was made up of narrow planks, mounted onto a mesh backing so the interior could be filled in with grout. I figured I could cut the backing up and use those muted planks to create the border frame.

We were initially looking to fill in with a smaller, square tile in the same color range as our existing floor to fill in the center of the mosaic. Cutting through an isle at the tile store, my wife spotted a display of a sliced river stone tile. I’m sure it’s normally used for shower floors. The color palette was so close to our’s. We wandered around the store a bit more before coming back and seriously considering it. She’s a visionary; I never would have thought of it.
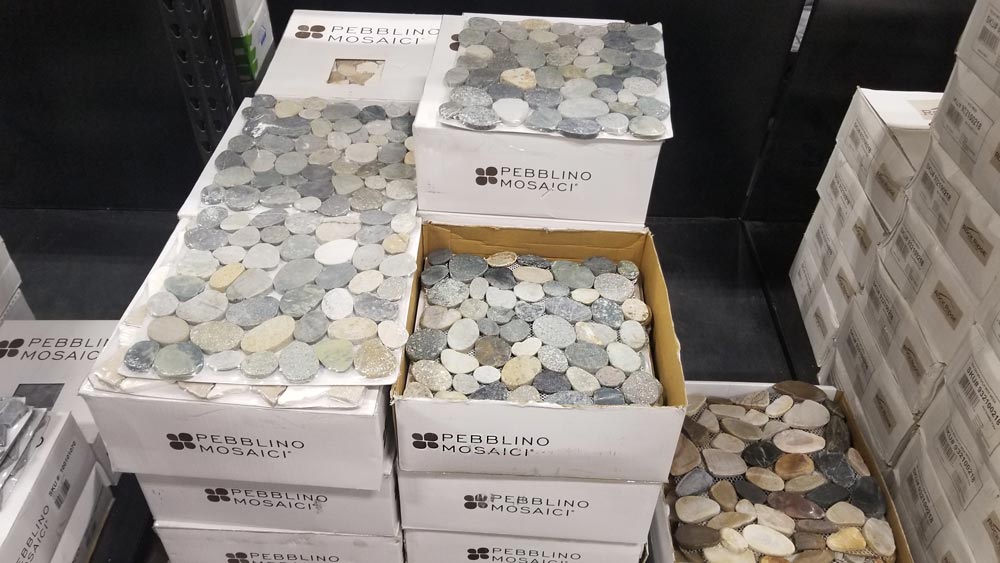
Just a pile of rocks
So we did it. It’s a small area. The colors are perfect, so it won’t jump out too much. The river stone is going to be a little whimsical and fun, but not crazy.


An Unplanned Challenge
I discovered that both the border tile and the stone were about 1/8” thinner than the existing flooring. That would leave a lip difficult to see, but enough to trip over. I set off on a hunt for some kind of solution to build up the thickness.
I didn’t find a board type product like I had hoped, but I was stopped in my tracks by a telltale, bright orange display. I’d been reading of the wonders of Schluter DITRA for years on my buddy Jeff’s Home Repair Tutor site but never had an occasion to need it.

Orange. Like stumbling into a pumpkin patch.
Luckily, the flooring store had a bulk roll set up where I could buy it by the foot. I didn’t need much.
Schluter DITRA is an isolation / waterproofing membrane that can keep tiles from cracking. In this location with small tile / stone, I think I’d really need those strengths, but the 1/8” thickness was exactly what I needed. It’s a heavy plastic product, but it cuts easy with scissors.

Waffles anyone?
Probably using the wrong notched trowel profile and the wrong adhesive product for an approved DITRA, grade A waterproof installation, I laid down a nice bed of the mastic.

I laid the DITRA in place and evenly pressed / rubbed it in with an obliging wooden block. After cleaning it up with a damp sponge, I left it to cure. There’s a good bit of “leaving it to cure” in this project, thus the many changes of outfits as I repeatedly revisited it days after the previous step.

Ready for Halloween!
I decided to trim the stones to a straight edge long the borders rather than leaving natural gaps. I wasn’t sure the tile saw could cut actual stone, but it did a fantastic job.

Not pictured: Colossal stone dust mud mess on the driveway
The mesh backed sheets of tile were really well matched together. I’d swap them from position to position and spin them around to find the best fit. Once I got the layout pretty well dialed in, I marked the rest of the cut lines with a Sharpie and a T-square.

Like a jigsaw puzzle
The stone was a slower cut than the tile had been, louder too.
The tricky part was the fact that I was actually making tons of little cuts, each small stone went through individually instead of a single slice on a big tile. The floppy backing and close proximity of my fingers to the blade was tricky.

Getting my shirt soaked was actually pleasant in the heat of summer in Phoenix

I used the same mastic to stick down the stone. It was easy to work with, allowing me to wiggle and adjust all the pieces as I went.


The project was looking pretty good, even with the brilliant, white mastic peeking out from below. I screwed up in one place, by using too wet of a sponge during my cleanup. A couple days later, it still wasn’t curing.
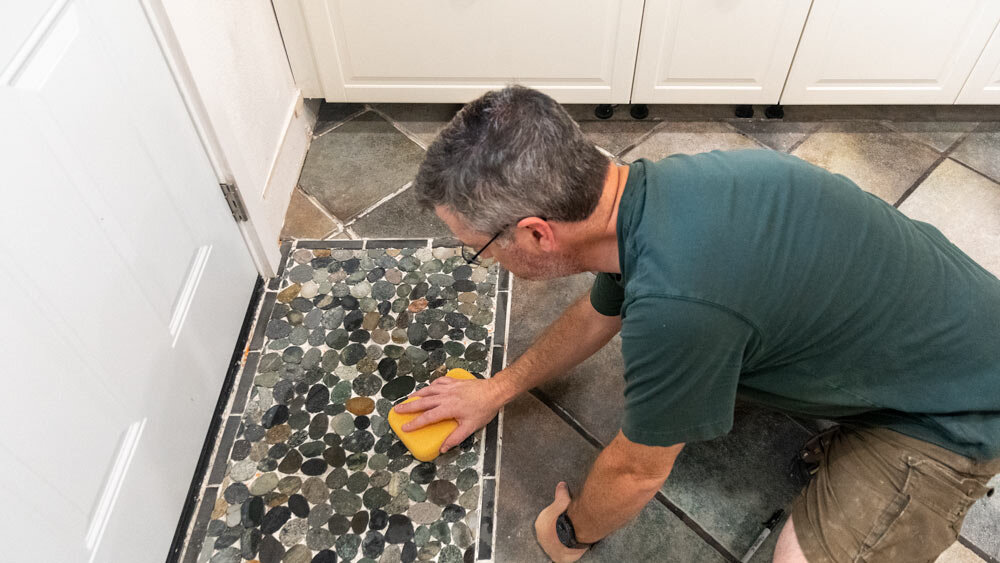
Sponge-worthy
My overzealous sponge work was actually a blessing. The seam between the sheets on the right side was a bit too noticeable when I looked back at it. It was tough to see it when I was working right on top of it. I popped a few stones out of the uncured area and replaced them with different shapes and sizes to camouflage the gap.
I used a pre-mixed grout as well, slathering it over the whole area with a rubber float. I mushed it all around, pressing it into the cracks. I cleaned it up with a damp sponge. Wiping and rinsing, wiping and rinsing until all the excess was gone. I worked the grout lines with the sponge, shaping them, slightly convex below the surface of the tile.
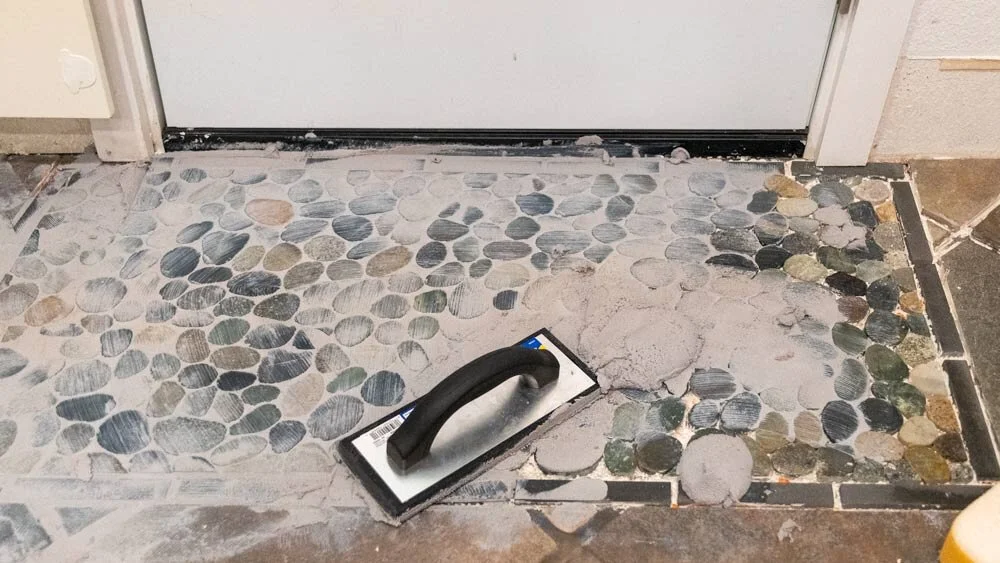
When it dried to a haze, I buffed it off with a microfiber cloth and left it to sit for a week before returning. I scraped some errant flecks off the door trim and chiseled a bit here and there before tacking the beefy base trim back in place.

Man I love this tool.
Done. It looks great. It’s not perfect, but it fits perfectly. I can’t believe there used to be a crummy little garden window, cabinets, and burnt orange counter tops over here.

I still have to fill, caulk and paint the trim. The walls need to be painted with their final color and the room will really pop. The kitchen is almost complete now that this particular project is finished. It was something I’ve been worrying about since before I started.

A permanent “Welcome Mat” project like this can be done so many ways with an unlimited selection of flooring products. I’m really glad circumstances forced me to get creative. Continuing the original tile to fill in that end of the room seems so boring now.

Walk on it, if you’ve got the stones.
