

As I redo a room, I like to replace the yellowed, paint-clogged outlets with fresh, crisp new ones. Personally, I like the clean look of the Decora or decorator style devices. They're smooth and don't have all the nooks and crannies to collect dirt.
In working on Jack's room I decided to make one of his plugs switchable so that he could control a lamp with his wall switch. Being the crafty man about town that I am, I decided I wanted to switch only half of the device, leaving one plug constantly hot. Why switch the whole thing when there's only one lamp? It would mean loosing an opportunity for permanent power at that location. How would today's modern lad power his army of electronic devices?
To split a receptacle, there's an easy trick. There's a little bridge between the terminal screws on the "hot" ("un-grounded conductor") side of the device. The "hot" side has brass color screw terminals and is on the side that has the smaller, vertical slot on the face.
.
This bridge is a jumper that lets the current flow from one feeding wire attached to either of the screws or rear, push-in connectors to both of the outlets on the face. Break the bridge and the current won't flow between the top and bottom outlets. It can be done with needle nose pliers and some serious wiggling, or with some diagonal cutting pliers.
I leave the bridge intact on the neutral side ("grounded conductor" or "common") with the silver screw terminals.
Ready to start? You know the drill...
Since my predecessors were thoughtful enough (for once!!) to leave me an extra wire (conductor), I was able to wire this up the most efficient way, no wall fishing expedition.
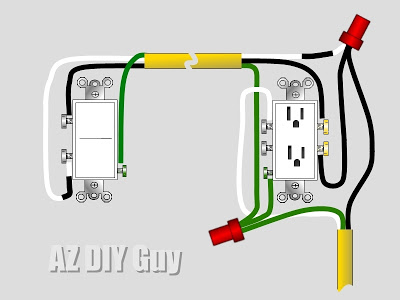
Here's my quick sketch of how it get's wired up:
In this example, the black and red are actually tied together, to the same circuit (hot) at the first junction box. The switch breaks the red's current. The black travels unbroken The white, neutral travels with them, but simply terminates at the receptacle. The green "ground" (grounding conductor) simply hits the green screws (and metal boxes if applicable). The green shown here is usually found as a bare, un-insulated copper wire. Keep it away from the side screws when inserting the device back into the box.
I was very lucky in that there was an extra wire from the switch to the outlet that I wanted to control. There was a second dummy switch at the door. I guess the 1979 electricians had pre-wired for it, but the original buyer didn't want to pay the up charge. But, there's another way, if there's no third wire. It requires that the feeding (line) side hits the receptacle first. It's a little harder to follow.
Confusing eh? This is a perfect example of why I don't ever trust color. There's current on one of those white wires. Cross them up and you've created a direct short. Turn on the circuit breaker, flip the switch, and the breaker will trip (hopefully).
The black feeds half the receptacle and ties directly to the white conductor headed to the switch. The switch-leg comes back on the black wire when the switch is active. Switches don't use a neutral. The re-tasked white wire should be marked with black tape to signal it's change to a "Hot" conductor. The receptacle still does get a neutral in order to work properly and a ground for safety.
It's a common practice to install the switched plug "upside-down" compared to the rest of the room, ground prong side up. It's easily recognizable.
Look like a pro tip: vertically line up your plate mounting screws. Don't leave it looking like a cross-eyed orangutan installed it.
There's so many variations of wiring methods that can be found in a house. Receptacles are often daisy-chained together, so it's hard to get a direct line between the intended plug and the switch without switching more than the one you want. Of course, it's easier to switch an entire receptacle, because there's no third wire needed. I'll share how to fish new cables down walls in a future post.
 UPDATE!! I'm honored to have this story chosen to be featured an Bob Vila's website as part of the "Bob Vila Nation" of contributors from the blogging community. Please check it out and give me a vote by the hammer image.
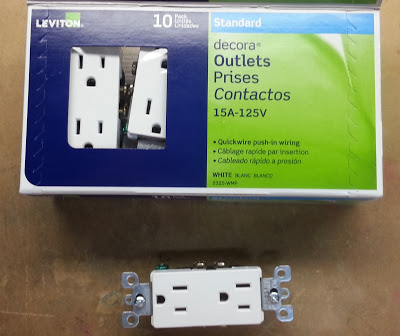 |
| I wonder if there's a prize in this box? I think that's what Prises Contactos means. |
To split a receptacle, there's an easy trick. There's a little bridge between the terminal screws on the "hot" ("un-grounded conductor") side of the device. The "hot" side has brass color screw terminals and is on the side that has the smaller, vertical slot on the face.
.
 |
| Pro tip: Don't stick a sharp pencil, such as this one, in your eye |
This bridge is a jumper that lets the current flow from one feeding wire attached to either of the screws or rear, push-in connectors to both of the outlets on the face. Break the bridge and the current won't flow between the top and bottom outlets. It can be done with needle nose pliers and some serious wiggling, or with some diagonal cutting pliers.
 |
| Snipped! |
I leave the bridge intact on the neutral side ("grounded conductor" or "common") with the silver screw terminals.
Ready to start? You know the drill...
 |
| Circuit breaker = OFF!!!! |
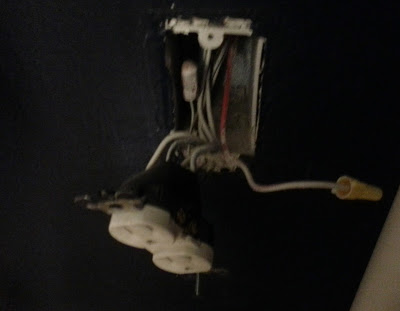 |
| horrid, low-light cell phone shot. |
Please excuse the crudity of this model.
I didn't have time to build it to scale or paint it.
I didn't have time to build it to scale or paint it.
- Dr. Emmett L. "Doc" Brown
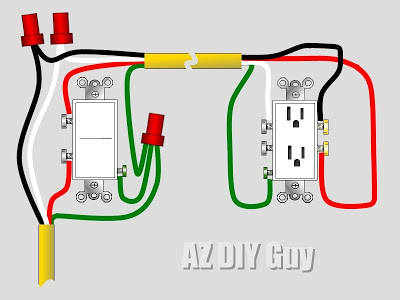 |
| Split receptacle with 3 wire + ground cable |
I was very lucky in that there was an extra wire from the switch to the outlet that I wanted to control. There was a second dummy switch at the door. I guess the 1979 electricians had pre-wired for it, but the original buyer didn't want to pay the up charge. But, there's another way, if there's no third wire. It requires that the feeding (line) side hits the receptacle first. It's a little harder to follow.
 |
| Split receptacle with 2 wire + ground cable |
Confusing eh? This is a perfect example of why I don't ever trust color. There's current on one of those white wires. Cross them up and you've created a direct short. Turn on the circuit breaker, flip the switch, and the breaker will trip (hopefully).
The black feeds half the receptacle and ties directly to the white conductor headed to the switch. The switch-leg comes back on the black wire when the switch is active. Switches don't use a neutral. The re-tasked white wire should be marked with black tape to signal it's change to a "Hot" conductor. The receptacle still does get a neutral in order to work properly and a ground for safety.
It's a common practice to install the switched plug "upside-down" compared to the rest of the room, ground prong side up. It's easily recognizable.
Look like a pro tip: vertically line up your plate mounting screws. Don't leave it looking like a cross-eyed orangutan installed it.
 |
| Upside-down you're turning me...
- Diana Ross (apparent electrician)
|
_________________________________________
AZ DIY Guy's Standard Scary Warning - Electrical Edition: Don't mess with electrical, unless you know what you are doing. 120 volts of household current can kill you just as dead as much higher voltages, it just lets you suffer longer, and folks can recognize you in your casket. Plus, electrical issues can do a heck of a job burning your house right to the ground. When in doubt, get a professional electrician. If you do the prep work, this project is a snap for someone who's trained; it shouldn't cost too much. Even if you know what you are doing, I recommend you work it like it's live, even if it's not. Research legal requirements in your area before making changes to your electrical system. Don't take my word for this stuff, I might be an idiot.